


 Try for Free
 Try for Free

“connect gopro to mac via usb - I want to just connect my new gopro session to my mac using USB, which should be quick and easy, plug and play etc. However, when I connect them via USB, the go pro chages but the mac cannot see it, so I cannot import files into Gopro studio. Am I being dim?”
As one of the top extreme moment recorders, GoPro camera has been widely used for many high-level sport moments like skiing, diving, driving, etc. However, many GoPro owners have reported issues on connectingn their GoPro cameras to computer, especially those people who recently switched from Windows PC to Mac computer. Unlike Windows that allows you to access images, videos, and audio files merely by browsing through its windows, macOS has particular programs to handle different file types. This makes the operating system secure by enforcing all the malicious elements to become inactive and sit idle even if they are copied to your Mac erroneously.
If you have difficulties in connecting GoPro to PC/Mac, this guide would be helpful. Since it is extremely easy to transfer GoPro videos and photos to Windows computer, here we will show you detailed steps on how to connect GoPro to Mac before you could view and edit GoPro camera recorded videos on Mac computers.
Part 1. Connect GoPro to PC/Mac with USB Cable
You could connect GoPro camera to your Windows computer via a USB cable to freely and easily transfer GoPro videos and photos to Windows computer for viewing and editing, as you usually do with other devices. It’s quite simple. How about connecting GoPro camera to Mac and transferring GoPro videos and photos to Mac? Can you also use a USB cable to connect and transfer GoPro videos and photos to Mac computer? Of course yes.
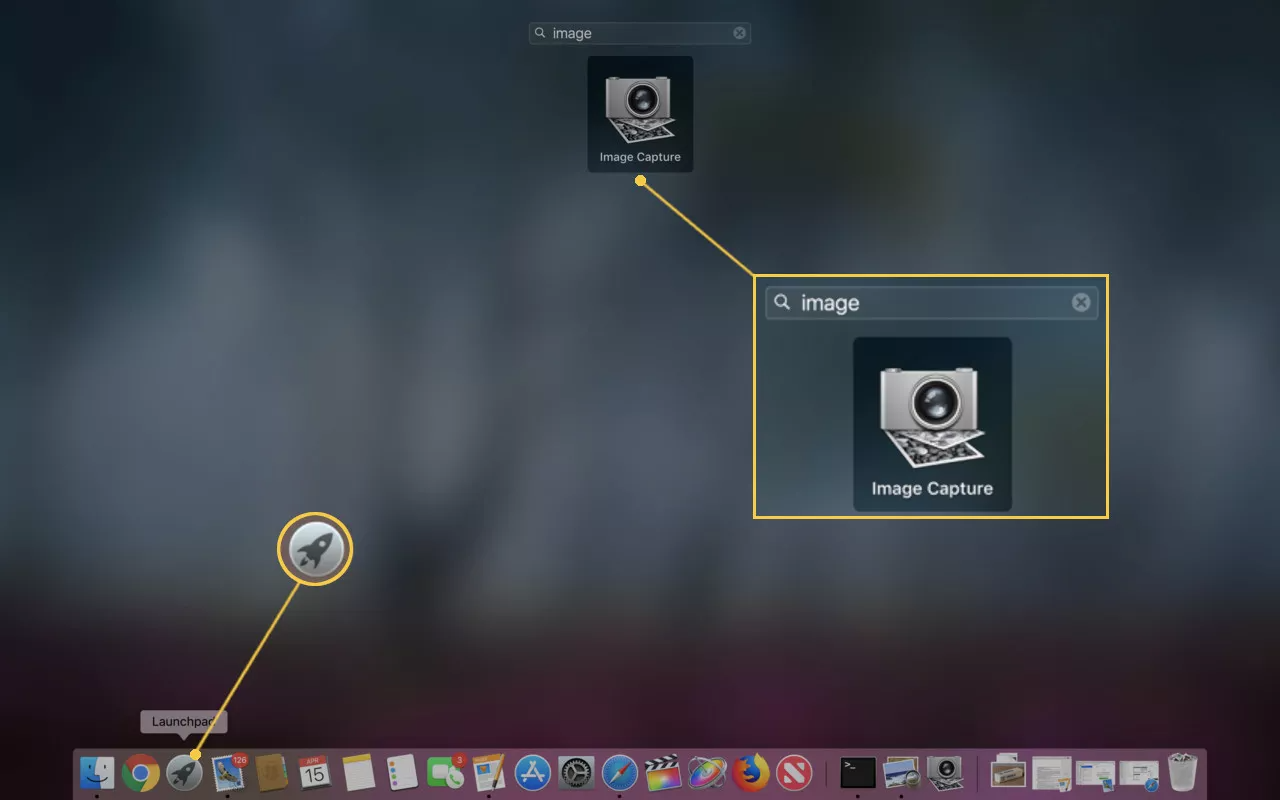
The Mac operating system includes Image Capture, a piece of software that gives you access to the GoPro. You need a USB-C cable to connect the GoPro to the Mac. Here's how to make this happen:
- Plug the USB-C cable into the USB-C port of the GoPro and then plug the cable into one of the Mac's USB-C ports.
- Turn on the GoPro.
- Open Image Capture by clicking on it in the Applications folder or by clicking the Launchpad app on the Dock, typing "image" into the search field, and then clicking Image Capture.
- Click the name of your GoPro in the left navigation window to open GoPro folder.
- Select the folder to choose the imported files from the “Import To” drop-down menu and click the “Import All” option.
- After the import is complete, close Image Capture and unplug the GoPro from the Mac safely.
It’s quite easy as well to connect GoPro camera to Mac computer, and transfer GoPro camera recorded videos and photos to Mac computer for editing and viewing.
Part 2. Connect GoPro to PC/Mac with SD Card Reader
With a USB-C cable, you could easily connect GoPro camera to Mac and PC before you could transfer GoPro camera recorded videos and photos to Mac/PC, as mentioned above. Actually, with a SD card reader, you could also connect GoPro camera to PC/Mac for GoPro video and photo transferring. In this method, your GoPro camera isn’t directly connected to your Mac computer. Because the main motive behind connecting a recording device to a computer is to access its file.
The process given below explains how you can use GoPro’s SD card populated with images and video recordings on your Mac, and access those files with ease:
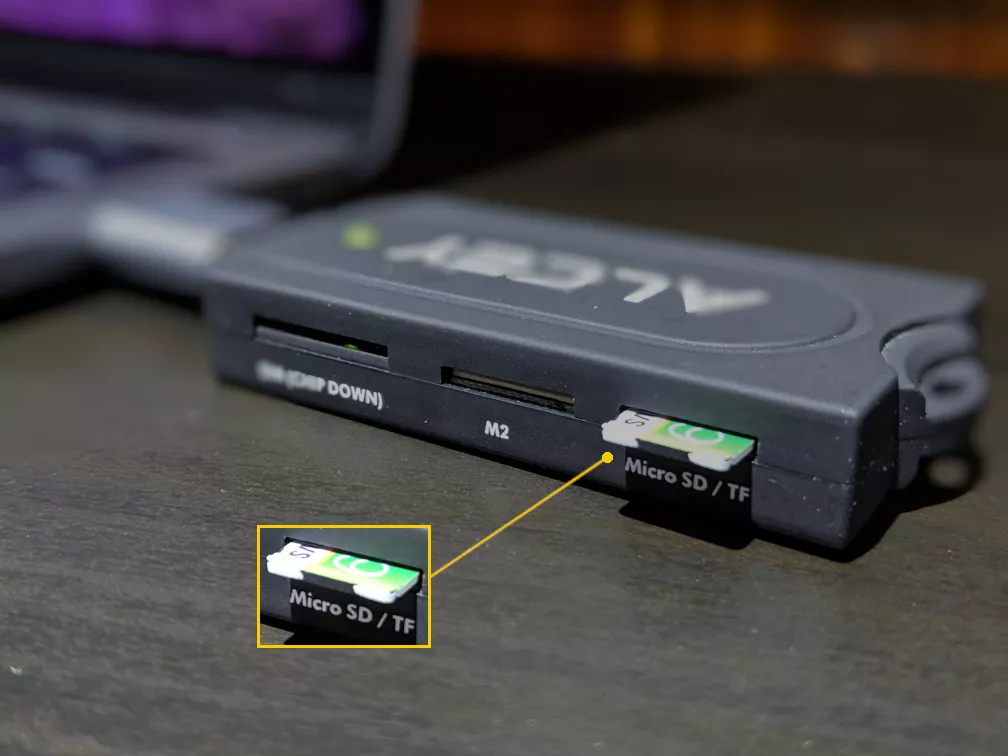
- Get the GoPro Memory Card. Power off your GoPro, depending on the model, open its cover and take out the SD card from the camera.
- Connect the Memory Card to Your Mac. Insert the SD card in a card reader, connect the reader to the memory card slot on your Mac, and wait while macOS detects the card and mounts it as a drive.
- Open the Finder.
- Click Untitled in the left navigation pane. If the SD card has a name other than Untitled, click it.
- Double-click the folder named DCIM and then double-click the folder named 101GOPRO.
- Two-finger tap (or right-click if using a mouse) any file you want to copy. To select more than one file, click and hold the Command key while selecting the files you want to copy.
- Two-finger tap one of the selected files and click Copy X Items, where X is the number of files selected.
- In the Finder app, navigate to the location where you want to copy the files.
- Two-finger tap (or right-click if using a mouse) and select Paste X Items, where X is the number of items to be pasted. The files are copied to the Mac.
- Eject the SD card from the Mac before removing the reader.
Part 3. Connect GoPro to PC/Mac using GoPro Quik for Desktop
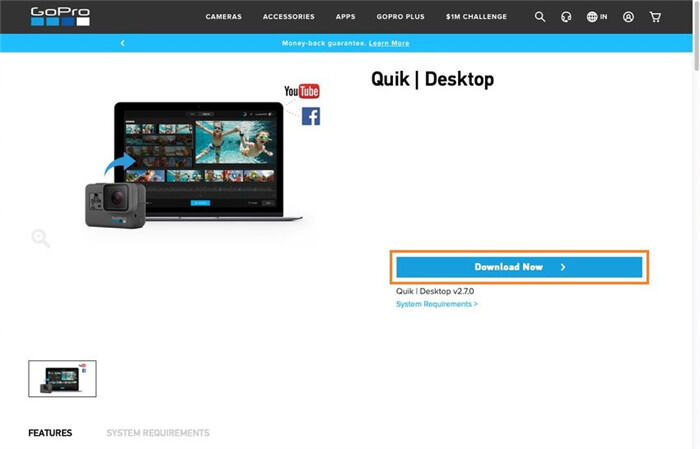
To connect GoPro camera to PC/Mac for photos and videos transferring, actually GoPro has its own software. That’s GoPro Quik. The free software is installed in the same way you install any app on the Mac - download the file and double-click to begin the installation process. The program may come in handy when you want to connect your GoPro camera to macOS to import media files for further processing.
You can follow the below steps to connect GoPro to Mac using Quik:
- Download and install GoPro Quik on your computer.
- Plug your GoPro camera into your Mac and turn on the camera.
- Click the LaunchPad on the Dock.
- Type "Quik" and click on the GoPro Quik launcher.
- Log in with your GoPro account username and password.
- Click IMPORT FILES and wait for the import to complete.
When the import is complete, you can find the files in the Movies folder, ready to be used. Close Quik and unplug the GoPro from the Mac. It should be noted that using Quik requires a free GoPro account. So sign up before launching the software.
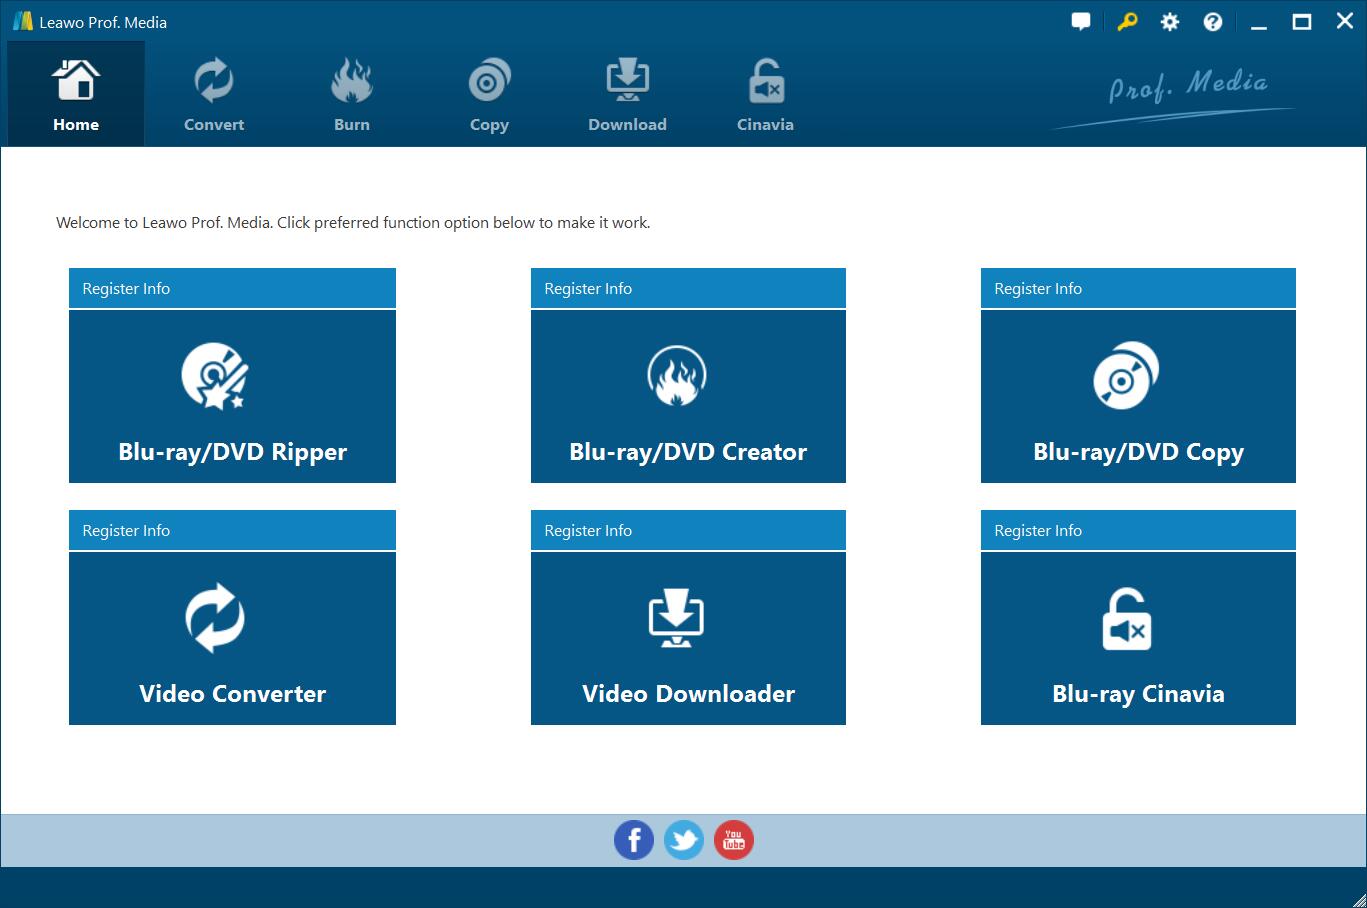
Part 4. Best GoPro Video Editor Mac/Windows -- Leawo Prof. Media
Through the above solutions, you could easily transfer GoPro videos to computer and then play back GoPro recorded videos on your media player to play back the imported GoPro camera recorded videos. As mentioned above, you could also edit GoPro recorded videos after transferring to Windows or Mac computer. The best GoPro video editor for Mac/Windows computer we would like to recommend to you is Leawo Prof. Media.
Leawo Prof. Media includes multiple useful converter tools, including: Blu-ray Ripper, DVD Ripper, Blu-ray Copy, DVD Copy, Blu-ray Creator, DVD Creator, Video Converter, and Video Downloader. Besides its major function in converting media files between Blu-ray, DVD, video, audio and online videos, Leawo Prof. Media also provides an internal video editor that enables you to edit GoPro camera recorded videos no matter you are going to convert GoPro camera videos to other formats, or burn GoPro videos to Blu-ray/DVD content. The internal media editor enables you to trim video length, crop video size, add image or text watermark, rotate video, adjust video effect, apply 3D effect and remove noise.
Download and install Leawo Prof. Media on your computer. Transfer your GoPro camera recorded videos to your computer in the ways mentioned above for editing. Then, follow the below steps to learn how to edit GoPro camera recorded videos within Leawo Prof. Media.

Leawo Prof. Media
☉ Decrypt, rip and convert Blu-ray/DVD to video/audio files.
☉ Convert and burn videos files to Blu-ray/DVD content.
☉ Download videos from YouTube, Facebook, VEVO, and 1000+ other video sites.
☉ Edit Blu-ray/DVD/video files to trim, crop, adjust effect, apply 3D effect, etc.
☉ Remove Cinavia protection upon Blu-ray discs
☉ Play back various media files including Blu-ray, DVD, video, audio files.
Step 1: Launch Leawo Prof. Media
Launch Leawo Prof. Media and then open the "Convert" module on the sub-menu.
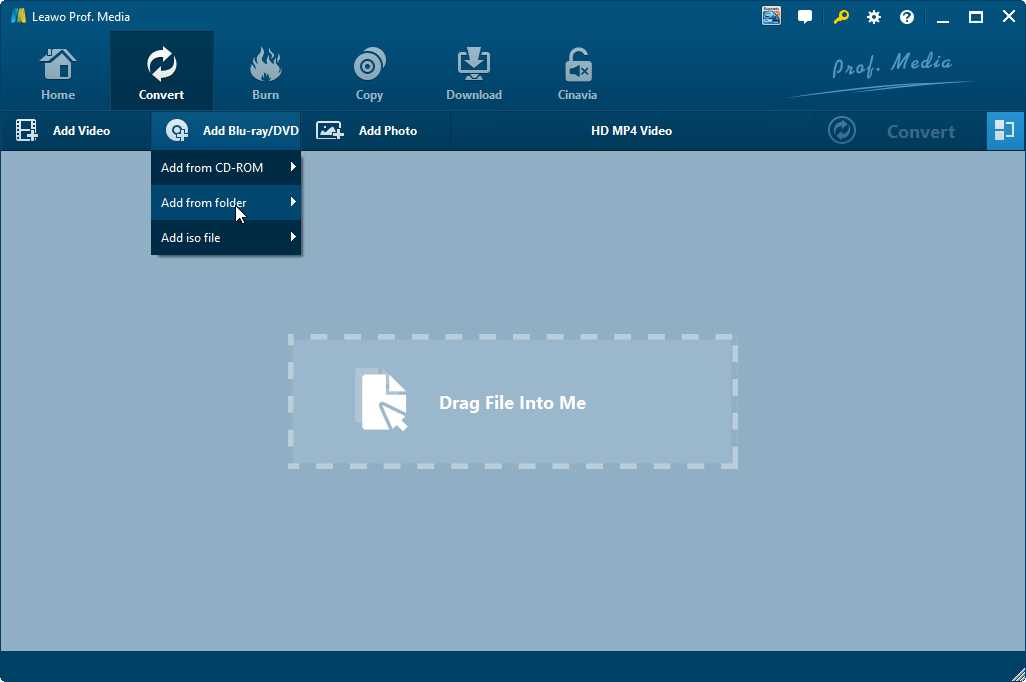
Step 2: Add source GoPro camera recorded video files
Under the "Convert" module, directly drag and drop source GoPro camera recorded video files from your computer to Leawo Prof. Media. After loading, you could play back loaded GoPro videos, merge files into one, etc.
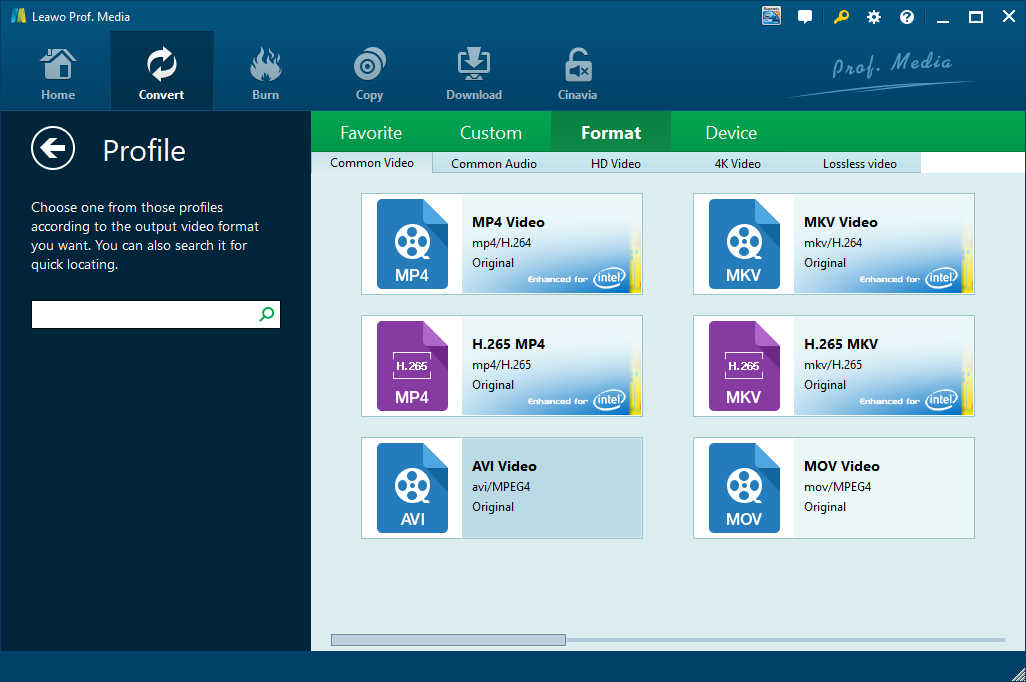
Step 3: Set output format
Hit the button next to the "Add Photo" button and then click "Change" option to enter the "Profile" panel. Choose output format from "Format" or "Device" group according to your needs.
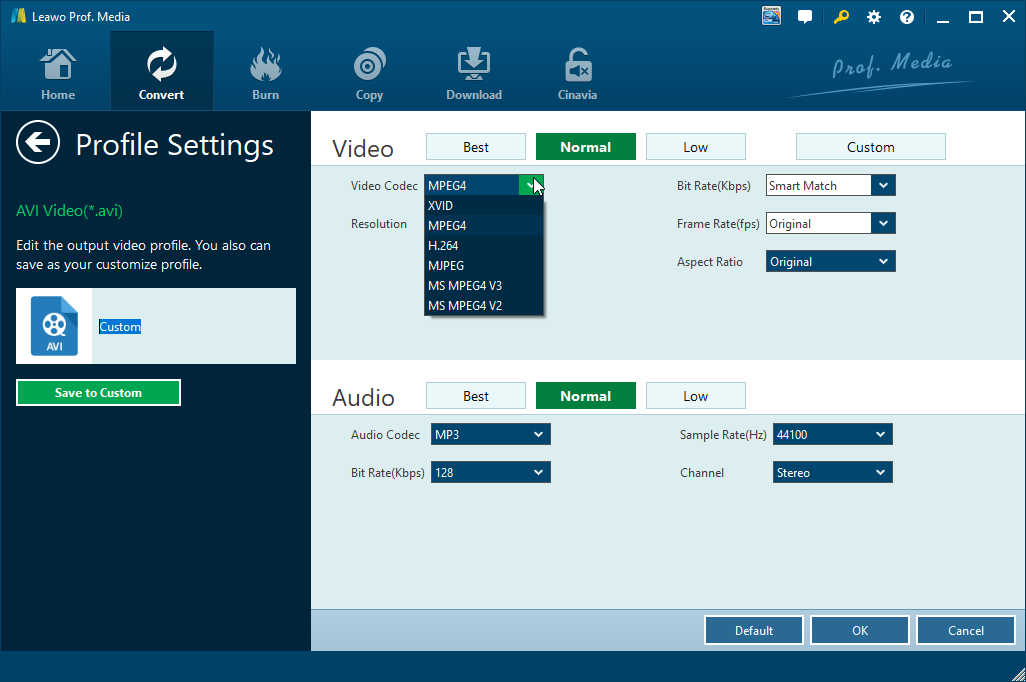
You can adjust the output profile parameters like video codec, video bit rate, aspect ratio, resolution, audio codec, sample rate, bit rate, channel, etc. To do these, just click the "Edit" option on the drop-down panel next to the "Add Photo" button. Just adjust these parameters according to your media player or device requirements.
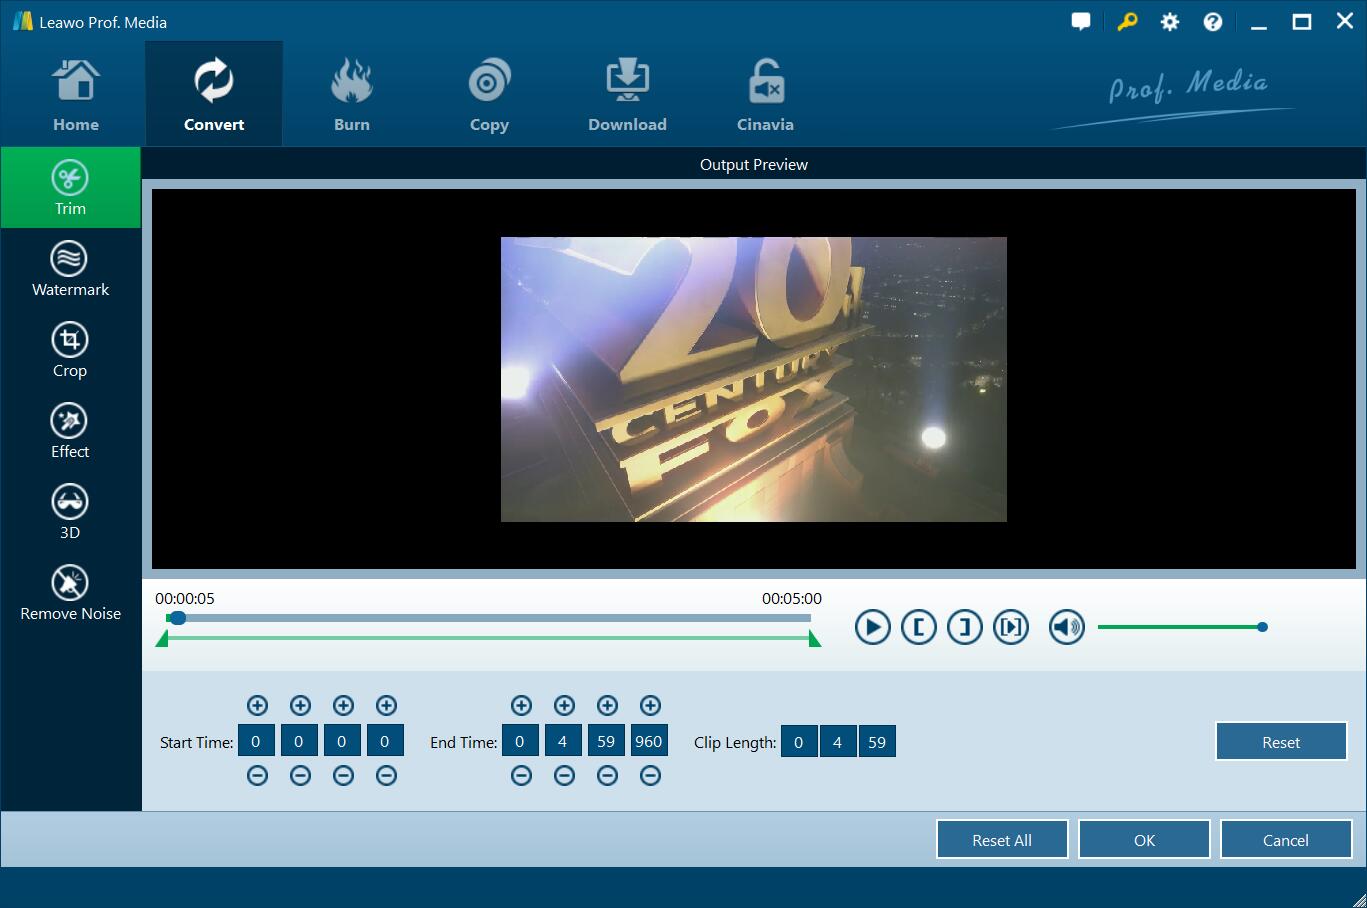
Step 4: Edit GoPro camera recorded videos
Trim video
In each loaded video title, click the "edit" icon to enter the editing panel. Open the "Trim" tab, dag the left limiter and the right limiter on the playbar to trim video clip and get rid of unwanted clip. You could also set the values of the "Start Time" and "End Time" below. Click "OK" to save trimming.
2: Add image or text watermark
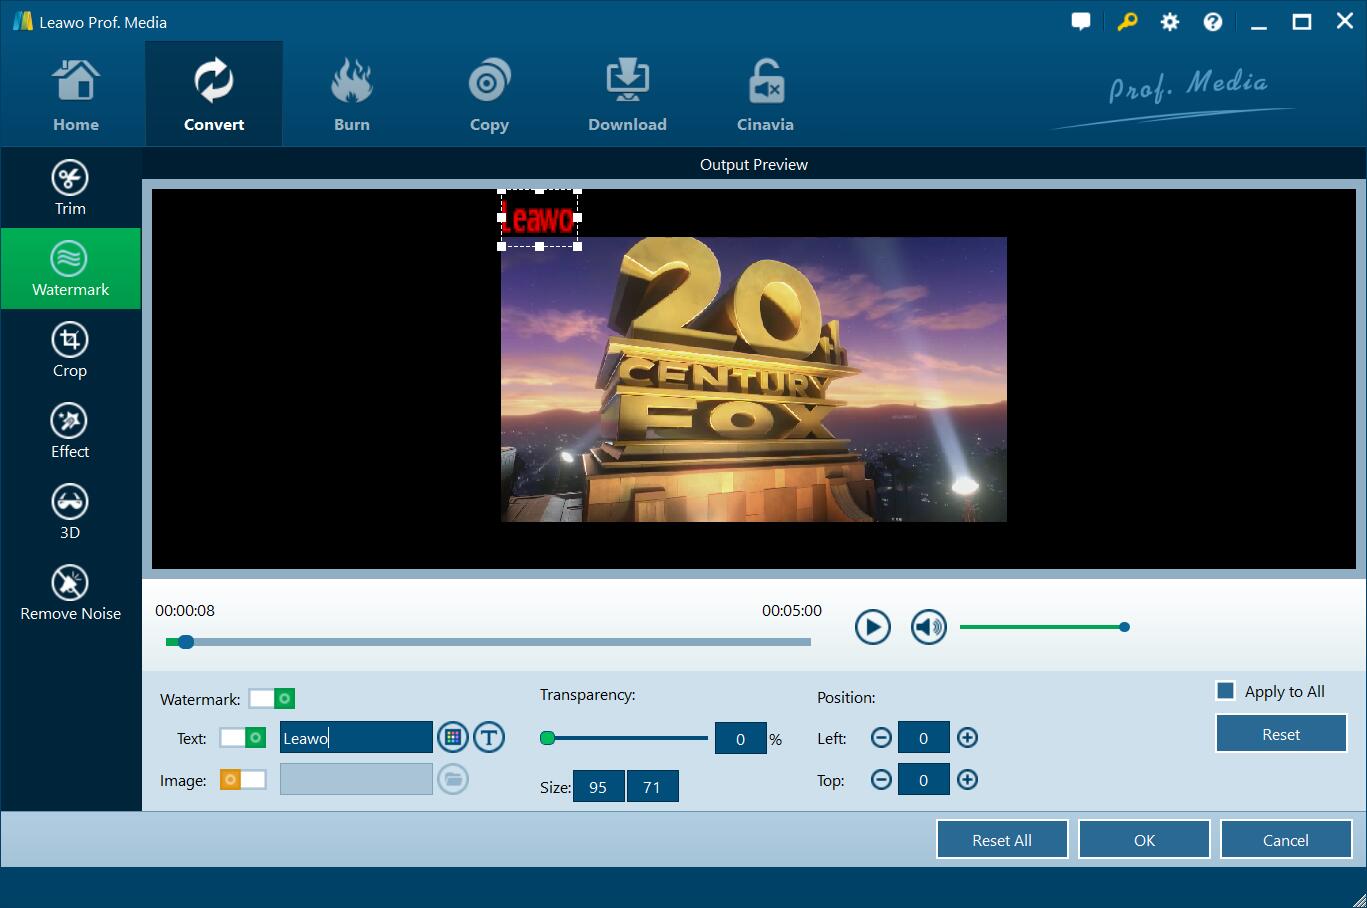
Under "Watermark" tab, you could add Text watermark or Image watermark as you like. Slide the Watermark to green and then add either text or image as watermark freely. You could even customize watermark.
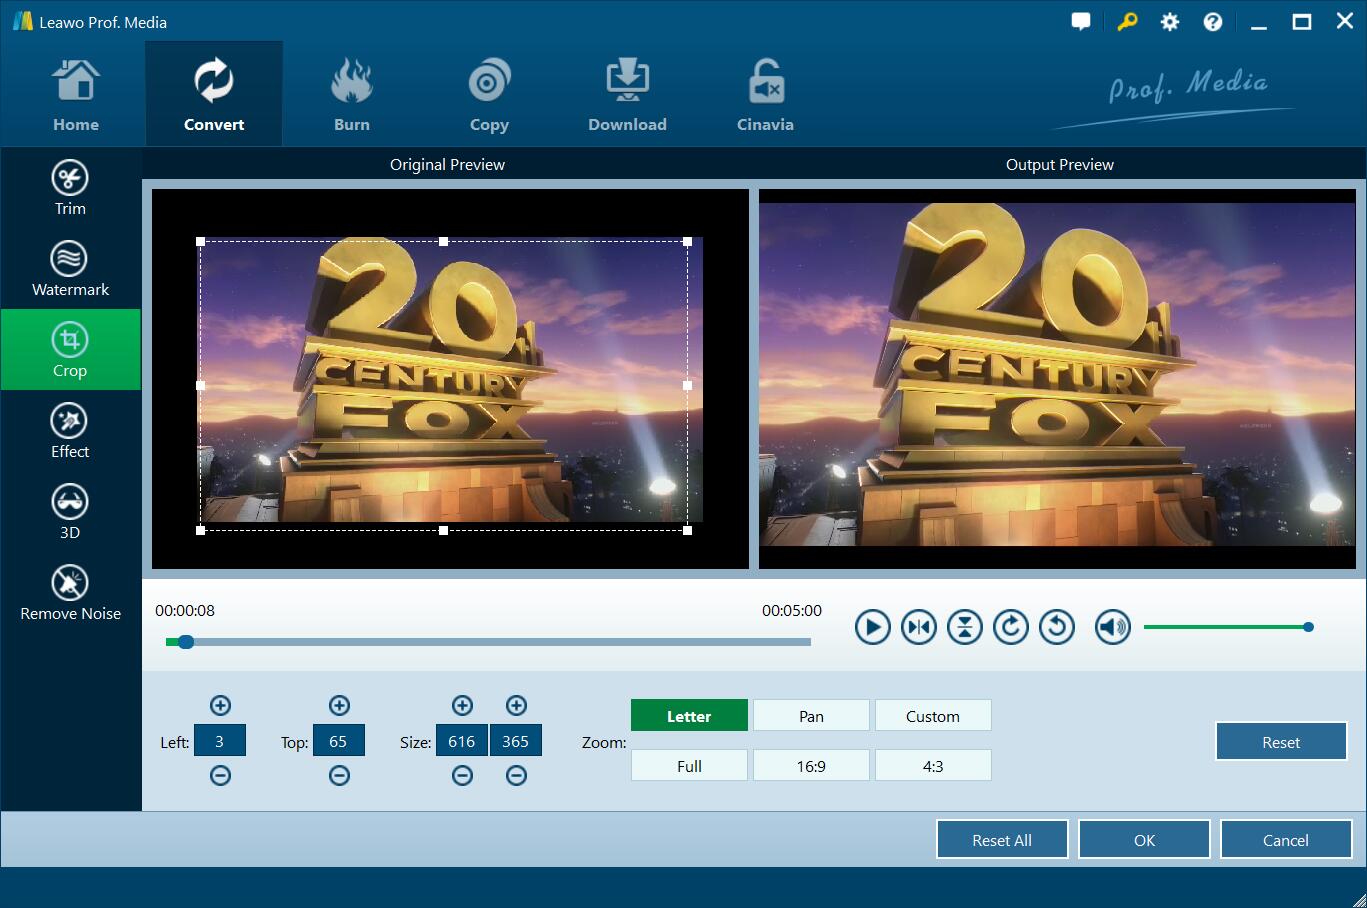
3: Crop video
Open the "Crop" tab and then you could crop video size to remove black margin or unwanted parts. You can firstly choose a Zoom style, and then drag the handlers of the frame on the left "Original Preview" window, or modify the parameters below for an accurate result to crop video size and remove black margins. You could also rotate video angle here. Click "OK" button to save cropping effect.
4: Adjust video effect
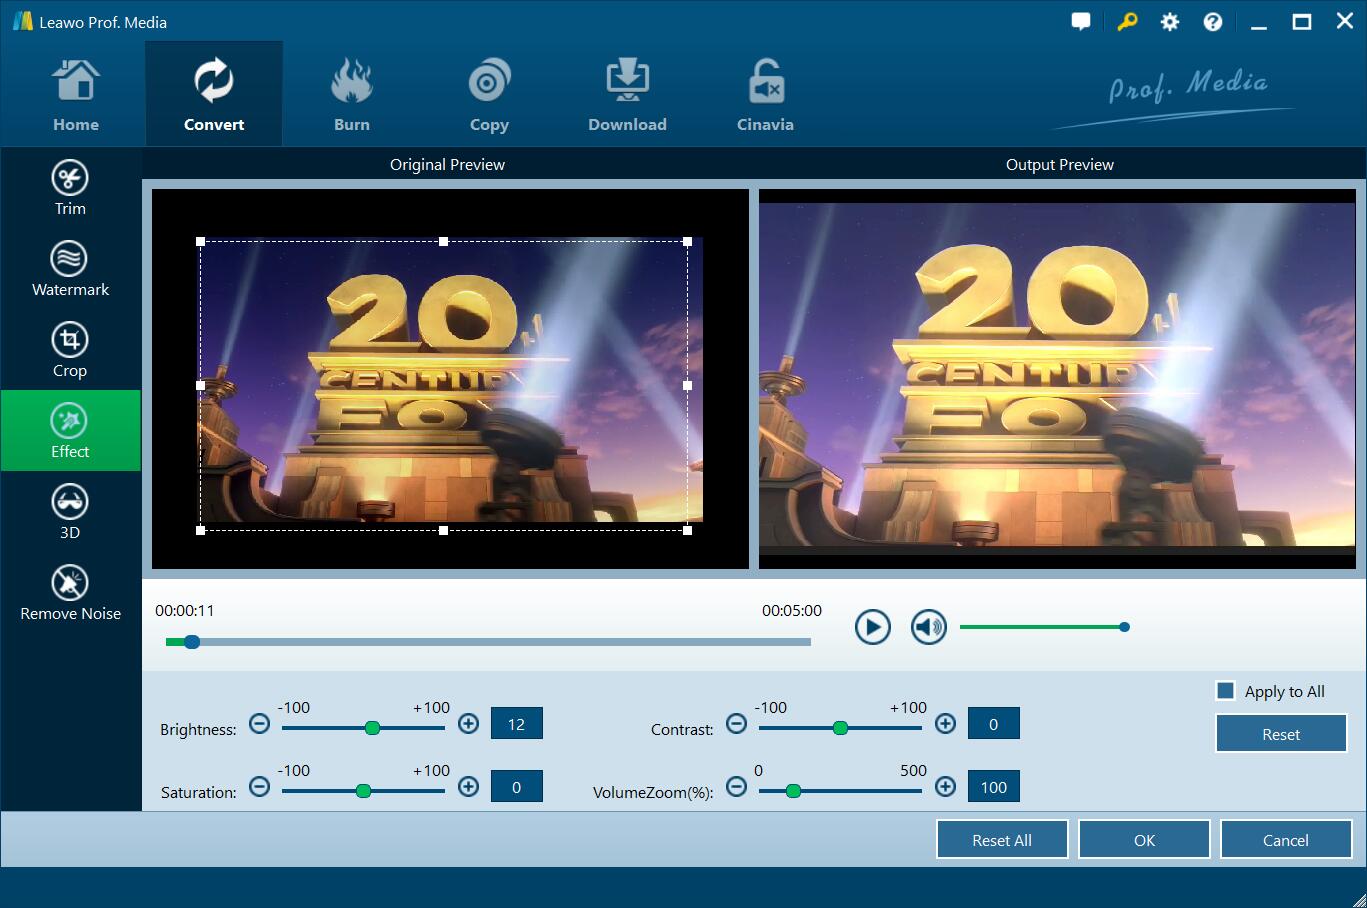
Under "Effect" tab, change video effect including Brightness, Contrast, Saturation and VolumeZoom by sliding the adjuster from -100 to 100, or directly setting a value in the box followed by.
5: Apply 3D effect
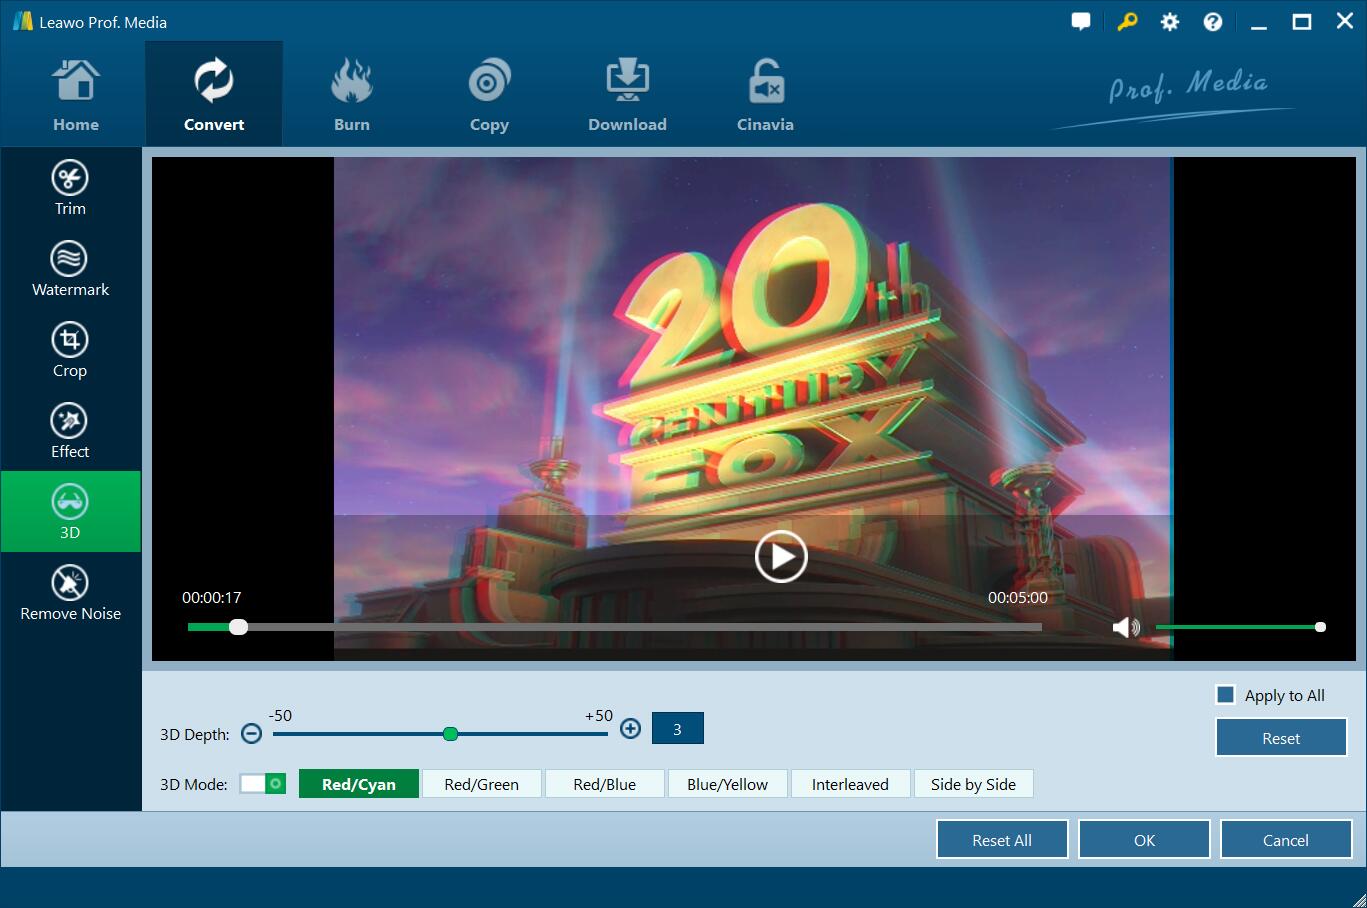
Under "3D" tab, you can slide the 3D Mode box to green and then select a 3D effect from Red/Cyan, Red/Green, Red/Blue, Blue/Yellow, Interleaved, and Side by Side for GoPro videos. You could adjust 3D Depth from -50 to 50 with instant preview from the internal player.
6: Remove noise
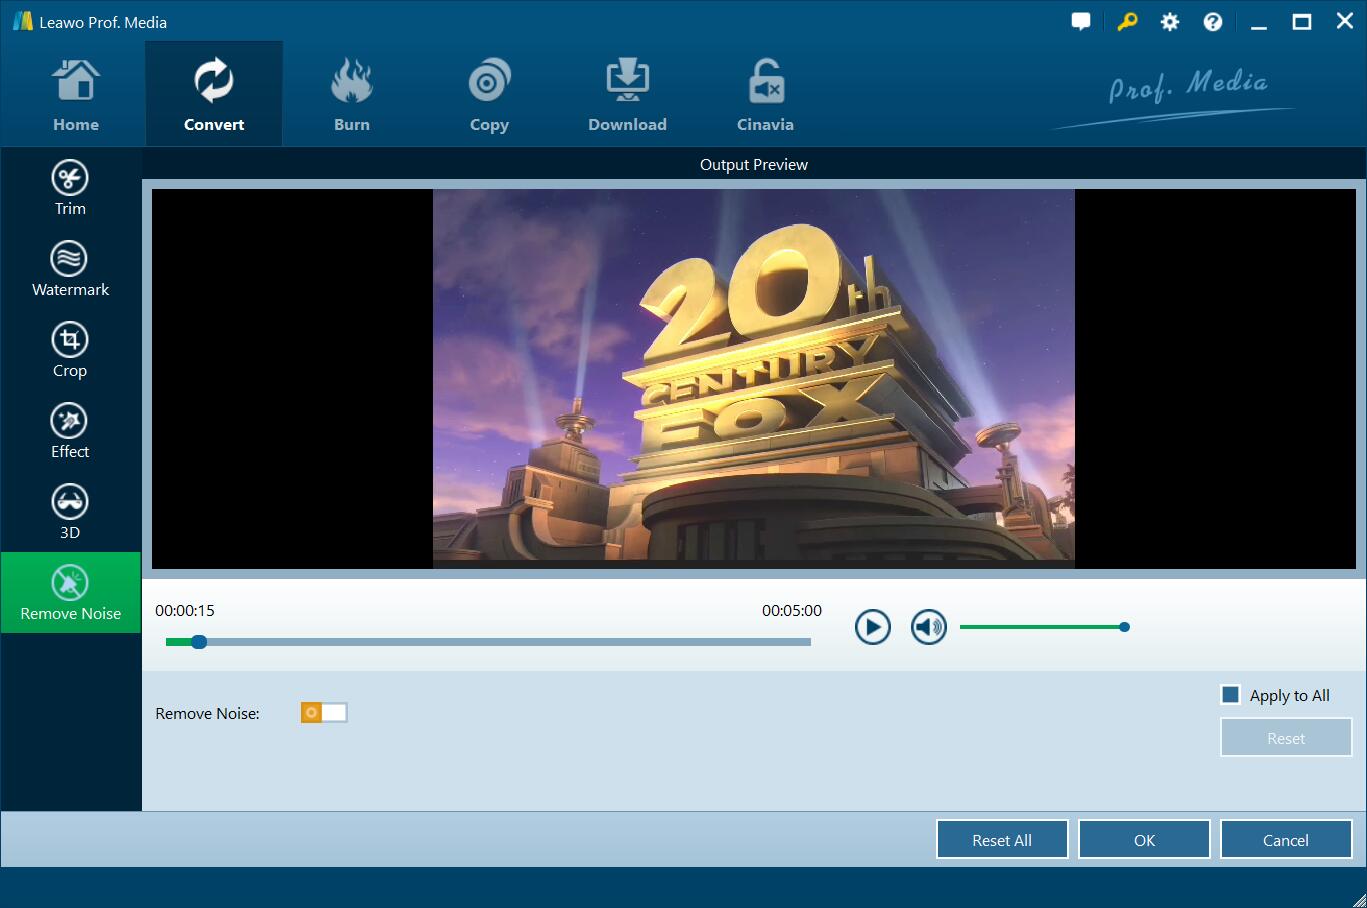
In "Remove Noise" tab, you could slide Remove Noise box to green to remove noise from source GoPro videos.
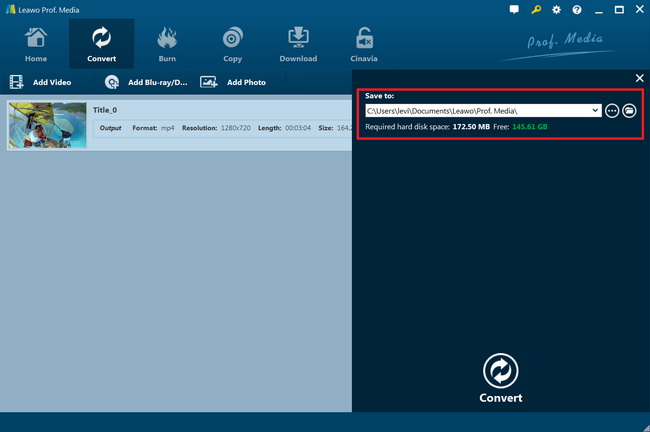
Step 5: Set output directory and start converting
On the main interface, click the big green "Convert" button. On the popup sidebar, set output directory in the "Save to" option before you hit the "Convert" option to start converting.
You then only need to wait for the conversion to complete. The conversion speed depends on the source file size and computer performance. But with advanced GPU graphics cards acceleration enabled, Leawo Prof. Media could complete the conversion at 6X higher speed.
Note: Leawo Prof. Media has both Windows and Mac versions. Leawo Prof. Media for Mac is quite similar to Leawo Prof. Media in operation. Therefore, we choose the Windows version here as an example to show you how to edit GoPro videos effectively.
-

Best Ways to Watch YouTube Without AdsSunny Wen/2026-04-02
-
How to Cancel Your YouTube TV SubscriptionSunny Wen/2026-03-27
-
YouTube TV vs Fubo for Sports Fans: Which One Wins?Sunny Wen/2026-03-27
-
Is Movavi Screen Recorder Worth It? Full Review and AlternativesSunny Wen/2026-03-26
-
Netflix vs HBO Max: Which Should You Choose?Cassie J./2026-03-11
-
How to DVR on YouTube TV and Fix Recording IssuesSunny Wen/2026-03-11
-
Loom Screen Recorder Guide: How It Works + Free Alternative ToolsSunny Wen/2026-03-26
-
Locoloader OnlyFans Downloader Review: Is It Really Working?Patrick Murray/2026-03-26
-
How to Download YouTube 8K Video Without Quality LossCassie J./2026-03-09
-
Disney Plus 8-Digit Code: How to Activate Your Account on Any DeviceLeia Liu/2026-03-06


-
12 Best Sites Like BestGore for Shocking VideosAugust/2025-03-17
-
12 Best Sites Like BestGore for Shocking VideosAugust/2024-02-22
-
12 Best Free Web Series Download Websites 2026August/2025-02-05
-
Top 10 Sites to Download Anime FreeAugust/2024-12-27
-
Top 5 OnlyFans Viewer Tools to View OnlyFans FreeAugust/2024-04-29
-
Top 10 Websites to Watch Uncensored AnimeAugust/2024-02-21
-
[2026] AudioBookBay Proxy Sites & Alternatives for Free AudiobooksCassie J./2026-01-06
-
How to download videos from MissAV? – Ways to download MissAV JavPatrick Murray/2025-02-08
-
Top 10 OnlyFans Search to Find Someone on OnlyFansAugust/2024-02-29
-
7 Best Free Sites for Pinoy Movies Download in 2026August/2024-10-31


Leave a Reply
You must be logged in to post a comment.