Featuring UHD Creator, Blu-ray Creator, DVD to Blu-ray Converter, and DVD Creator, Leawo Prof. Media 13 helps you easily convert and burn video to 4K Blu-ray/Blu-ray/DVD, convert DVD to Blu-ray, and offers one-click operation to burn ISO image file to 4K Blu-ray/Blu-ray/DVD disc. In this Leawo Prof. Media 13 user guide part, you will learn how to use the Burn module of Leawo Prof. Media 13.
Step 1. Import source files
On the Home interface, directly click UHD Creator, Blu-ray Creator, DVD to Blu-ray Converter or DVD Creator module, or open the "Burn" tab 


You could load multiple video files or video folders as you like. After importing, the imported media files could be displayed on the left processing panel. You could choose to display loaded media files in thumbnail by clicking Thumbnail button 


Loaded video file could be played back via clicking the 


Also, you could directly drag loaded video files for moving up or down.
Step 2. Set disc menu
Leawo Prof. Media 13 allows you to select disc menu from built-in menu gallery or design disc menu yourself with the internal menu designer for output Blu-ray/DVD content. On the right sidebar, you could see various menu template themes: Standard, Business, Childhood, Education, Holiday, Nature, Sports and Wedding. (Note: Click the "No Menu" option on the top of right sidebar if you don't want to add disc menu.)
Under the Built-in menu tab, you could select any disc menu theme for output. Or, if you want more, you could open the Online tab and then download more disc menu templates from Leawo's disc menu online database. The Custom tab would collect all disc menu templates you've customized with the internal disc menu designer.
Keeping mouse on any disc menu theme template on the right sidebar would call out an eye-shape icon , by clicking which you could enter the disc menu preview panel.
On the disc menu preview interface, you could move mouse to the Play button 

On the scene menu preview panel, you could play back scene via direct-click, click the Previous button 


Step 3. Edit disc menu (optional)
On the disc menu preview interface, click the Pencil icon to enter the disc menu editing panel.
On the top of disc menu editing panel, you could see a home icon followed by several serial numbers 

At the bottom, you could click the 
Slide the Background Music to green and then open the Source from box to browse and load local music as background music. You could also set the Duration and other audio effects like Fade in, Fade out and Loop Play.
Also, you could add background image by clicking 
Slide the Background Image box to green and then load either Image File or Video File as background.
After editing disc menu, click the Save template icon at the bottom to save edited template into Custom group for future use.
Step 4. Burning settings
After setting the disc menu, click the big green "Burn" button 
The Burn to option allows multiple choices. If you want to burn video to DVD/Blu-ray disc, insert a blank writable disc into the disc recorder drive and then select it as target under the Burn to option.
Required hard disk space is listed as well to indicate you whether your computer hard drive gets enough space to save output file.
Step 5. Burn video to DVD/Blu-ray
After burning settings, on the burning setting panel, click the bottom right "Burn" button 
On the Burning interface, you could stop burning by clicking the Cancel button 

Featuring an ISO burner inside the Burner module, Leawo Prof. Media 13 could also help you directly burn ISO image file to DVD/Blu-ray disc in one click. This section of Leawo Prof. Media 13 user guide would show you how to burn ISO to DVD/Blu-ray disc.
Step 1. Import ISO file
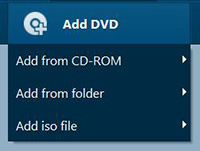
Beforehand, insert a blank writable disc into the disc drive. It's up to your ISO image file type for whether you should insert a DVD disc or Blu-ray disc (Blu-ray ISO image file could be burned to Blu-ray disc only, while DVD ISO image file could be burned to both DVD and Blu-ray disc). Then, launch Leawo Prof. Media 13. Under the "Burn" tab, click the "Add Video" button 

Step 2. Burn ISO to disc settings
After importing ISO file, the program would pop up an "Add iso file" window as below:
On the Add iso file window, you need to set Copy to and Disc Label options. If Copy to option is empty, click the refresh button 
Step 3. Burn ISO to disc
After setting Copy to and Disc Label options, click the "Burn" button 
If you click the Erase button 

If you click Cancel button on the Warning window that shows you the inserted disc is not empty, Leawo Prof. Media 13 would automatically eject your inserted disc and show you a warning windows that advises you to insert a writable disc and click "Retry" button.
After burning ISO file to DVD/Blu-ray disc, Leawo Prof. Media 13 would automatically eject burned disc for you. You can then click the Finish button 
Note: To burn NTSC or PAL DVD disc or set output Blu-ray disc region, you need to open the settings wheel icon 
Any 3rd-party product names, trademarks, logos and images occasionally mentioned on this site belong to their owners. These might include but not be limited to YouTube, Apple, Amazon, Adobe, Netflix, etc. Leawo Software is independent of all of these property owners.