As one of the most popular and well-known free media player software tools, VLC has long been used for merely a media player to play back media files like video, DVD, or even Blu-ray movies. Actually, VLC media player could do far more than these things. Besides playing back media files, VLC media player could also rip and convert DVD movies to MP4 or other videos, convert video files between various formats, and edit video files with multiple hidden editing features. Some people have been wondering how to edit video within VLC media player. Well, in the below content, we would like to share the detailed editing features within VLC media player with detailed guide of how to use VLC as a video editor. You will find it’s extremely easy to edit videos within VLC media player.
Part 1: How to Use VLC As a Video Editor?
Firstly, let’s learn what editing features VLC media player has in its built-in video editor. We will show its editing features in the below table:
| Editing features in VLC |
Details |
|
Crop |
Crop video from top, bottom, left or right to remove unwanted black margin |
|
Cut |
Cut video through its internal recorder |
|
Adjust video effect |
|
|
Color settings |
|
|
Rotate |
|
|
Overlay |
|
|
Advanced |
Anti-flickering, motion blur, spatial blur, clone, denoiser, anaglyph 3D, mirror, water effect, wave |
Now, with the editing features listed above, we could go to the detailed guide on how to use VLC’s internal video editor to edit videos within VLC media player.
Use VLC to cut video
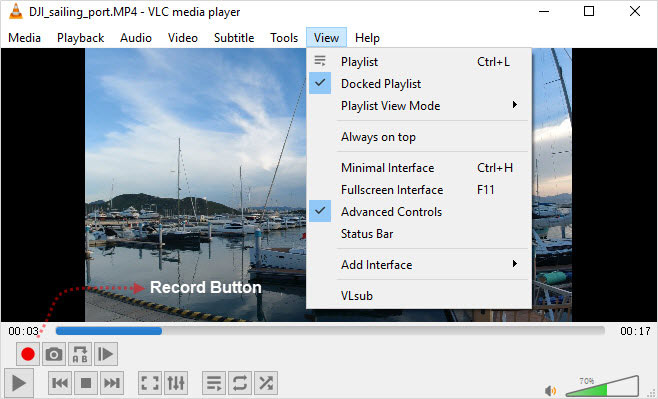
As mentioned above, you could use VCL media player’s internal recorder to cut videos. The internal video recorder enables you to record the video clips you want and then remove the clips you don’t need.
Follow the below steps to learn how to trim/cut video within VLC:
- Drag the playing slide bar to the start point you'd like to cut the video.
- Click "Record" button and "Play" button, and VLC media player will begin recording the video.
- Click "Record" button again to stop the recording at the end point of desired video part.
- Check the trimmed video clips in Videos library or My Documents folder.
In this way, you could easily cut/trim video within VLC media player precisely.
Use VLC to crop video
VLC media player enables you to remove the unwanted corners or black margins through its internal cropper feature. There are even 2 ways for you to crop a video within VLC media player.
Check the below 2 methods to learn how to crop a video within VLC media player:
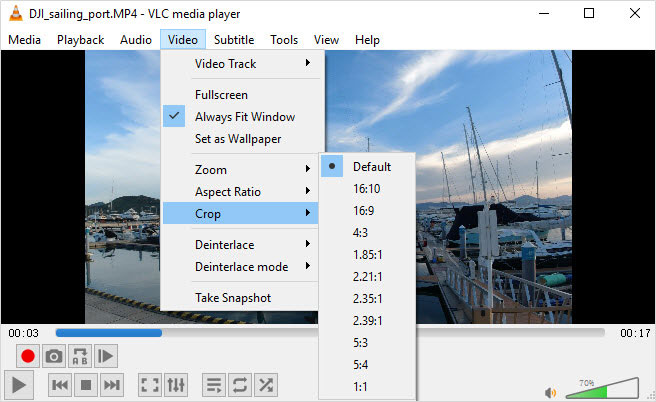
- Method 1: Click "Video" in the menu bar, move down to "Crop" option, on the pop-up side menu select a specific aspect ratio, like 16:10, 4:3, 1.85:1, 1:1, etc., and then video will be cropped for playback at that aspect ratio.
- Method 2: Scroll down to the bottom of the player and click "Show extended settings" in the toolbar, switch to "Video Effects" tab, choose “Crop” option, set different values in the four positions (left, right, top and bottom), and then click the “Save” button.
You could just choose the one that meets you more for cropping video within VLC media player.
Merge video files in VLC
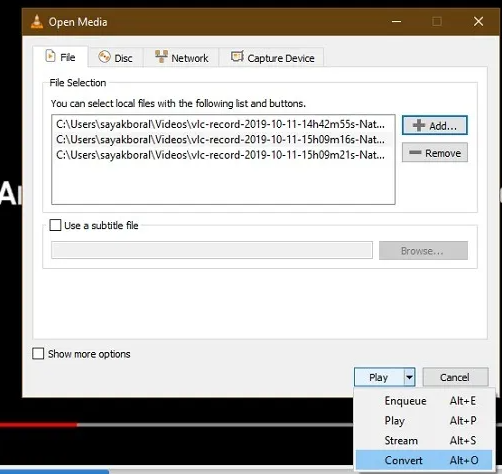
VLC media players could convert multiple files into one file, therefore helping you merge files into one. You could actually load multiple video files and then make use of the internal convert feature to get one big file from VLC media player.
Follow the below steps to learn how to merge video files into one in VLC media player.
- Launch VLC media player.
- Go to “Media" option on the menu bar and then choose "Open Multiple Files” option.
- Select all the video files you want to merge into one and click “Open” button.
- Click “Convert”button to merge all the trimmed files.
- Select an output format on the follow-up "Convert" window in the "Profile" drop-down menu.
- Set output directory and name the output file in the "Destination file" box.
- After that, click the "Start" button to start converting multiple video files into one within VLC media player.
Now, you have to wait for the conversion to complete. It won’t take you long to get the merged file.
Rotate video in VLC
You could also use VLC media player to rotate video for special angle of view in different degrees: 90/180/270 degrees, Flip horizontally or vertically, Transcope or Anti-transcope.
There are two settings for you to change video orientation inside VLC: Transform and Rotate. From the drop-down list of Transform, you can choose Rotate by 90/180/270 degrees, Flip horizontally or vertically, Transcope or Anti-transcope. Or just turn on the Rotate option and set a specific rotate angle. You could visit how to rotate video in VLC for detail.
Note that enable Transform and Rotate simultaneously only if needed, or you will have to rotate the video at a cropped aspect ratio.
Add subtitles to video in VLC
You may also like to play movies and videos with preferred subtitles. VLC media player enables you to insert subtitles to video.
The operations are different between new and old versions of VLC media player for you to insert subtitles to video in VLC media player.
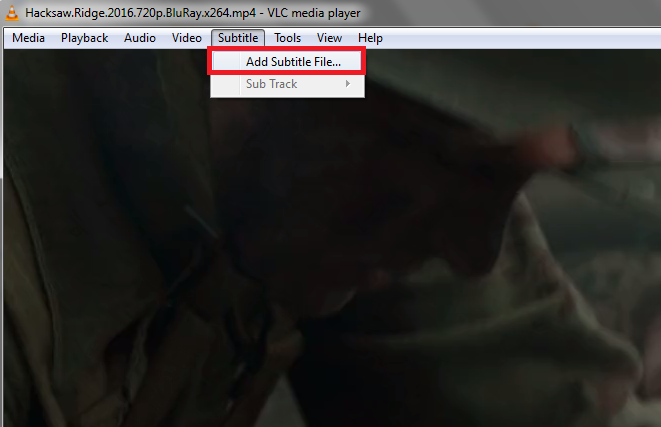
- On new version of VLC: After loading source video file, select "Subtitle" menu and then click "Add Subtitle File" option to browse and add your subtitle file.
- On old version of VLC: Play back the video in VLC media player, click the Video button on the menu bar, and then select "Subtitles Track" option. Click "Open File" button to browse and add subtitle file.
Just choose the way according to the version of your VLC media player.
VLC media player also provides other editing features such as adjusting video and audio effects, setting image colors, etc. You could get these editing features within VLC media player to improve the movie watching experience easily.
Part 2: Best VLC Alternative to Edit Video with Ease -- Leawo Prof. Media
VLC media player could edit videos with multiple editing features. VLC is absolutely a good free video playing and editing tool. But sometimes it is just not good enough. For example, when you try to make the video your own patent or add your own signature, VLC media player won’t do it. VLC media player could also not apply 3D effect for you. In such case, we would like to recommend you the best VLC alternative to help you edit and convert video/Blu-ray/DVD files with ease - Leawo Prof. Media.
Compared to VLC media player, Leawo Prof. Media offers more editing features, like adjusting effect, rotating video, adding image or text watermark, applying 3D effect, removing noise, etc. These editing features are accessible in an easier way.
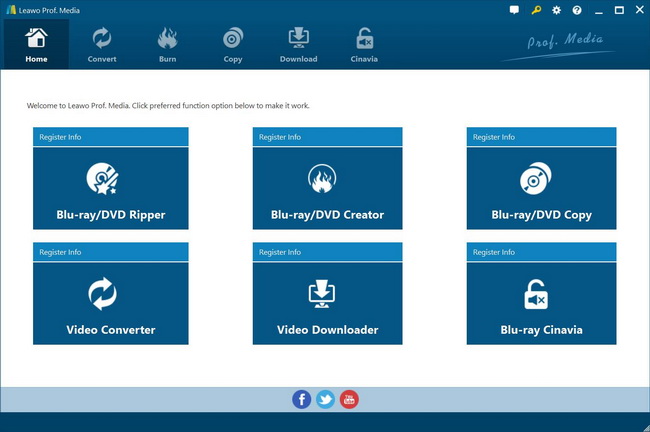
The below guide would show you how to edit video with the best VLC alternative in detail. Firstly, download and install Leawo Prof. Media on your computer.
Step 1: Launch Leawo Prof. Media
On Leawo Prof. Media program interface, open “Convert” menu to enter the “Convert” module.
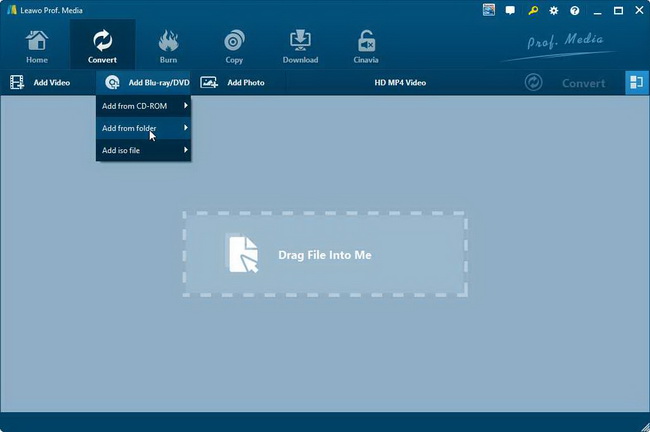
Step 2: Add source video files
Under the “Convert” module, you could directly drag and drop source media files, or click “Add Video” button to browse and load video files from your computer.
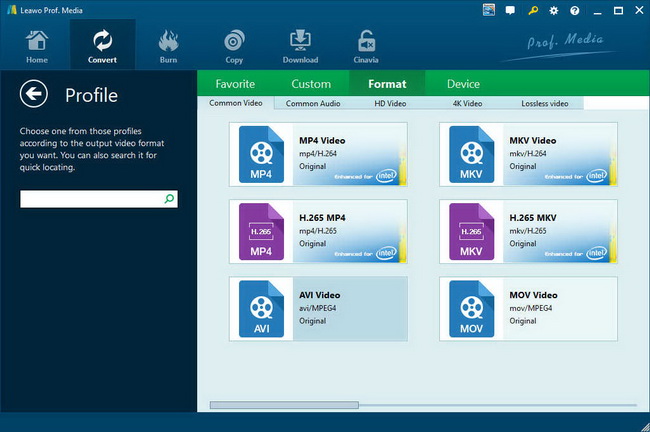
Step 3: Set output format
As mentioned above, Leawo Prof. Media could not only edit videos, but also convert video files between various formats. We firstly set an output format for video files. Hit the button next to the “Add Photo” button and then click “Change” option to enter the “Profile” panel. Choose output format from “Format” or “Device” group according to your needs.
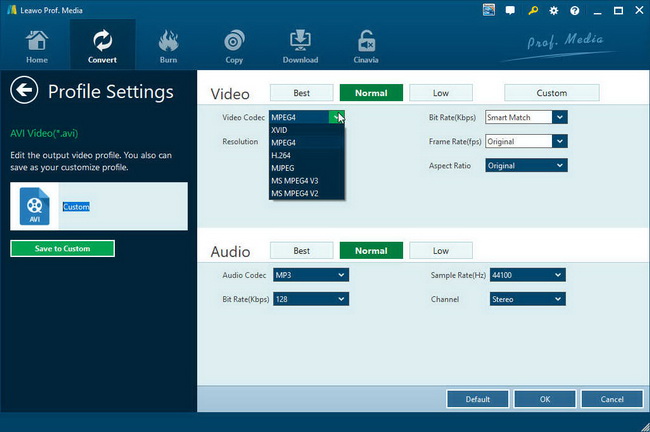
Click the “Edit” option on the drop-down panel next to the “Add Photo” button and then you can adjust the output video and audio parameters like video codec, video bit rate, aspect ratio, resolution, audio codec, sample rate, bit rate, channel, etc.
Step 4: Edit videos within this VLC alternative
Now, let’s focus on how to edit videos within the best VLC media player alliterative. In each loaded video title, click the “edit” icon to enter the editing panel, where you could see multiple editing features on the left panel: Trim, Watermark, Crop, Effect, 3D, Remove Noise, etc.
Trim video with VLC alternative
Open the “Trim” tab, dag the left limiter and the right limiter on the playbar to trim video clip and get rid of unwanted clip. You could also set the values of the “Start Time” and “End Time” below. Click “OK” to save trimming.
Add image or text watermark
Open the “Watermark” tab to add image or text watermark. You need firstly to slide the “Watermark” to green and then choose to add either image or text watermark. You could also edit watermark parameters here like transparency, position, etc.
Crop video
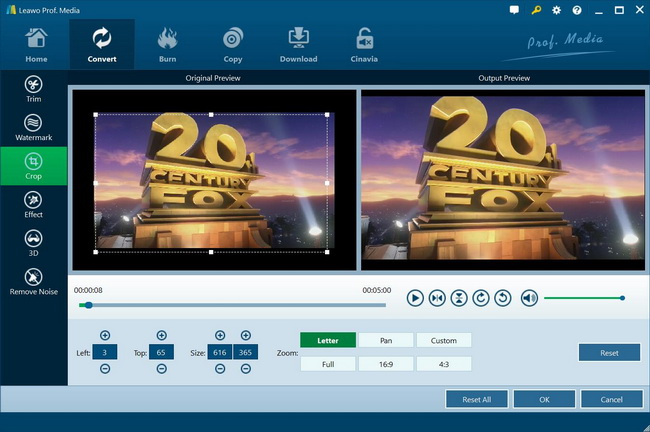
Open the “Crop” tab and then you could crop video size to remove black margin or unwanted parts. You can firstly choose a Zoom style, and then drag the handlers of the frame on the left "Original Preview" window, or modify the parameters below for an accurate result to crop video size and remove black margins. Here you could also rotate video for special angle of view.
Adjust video effect
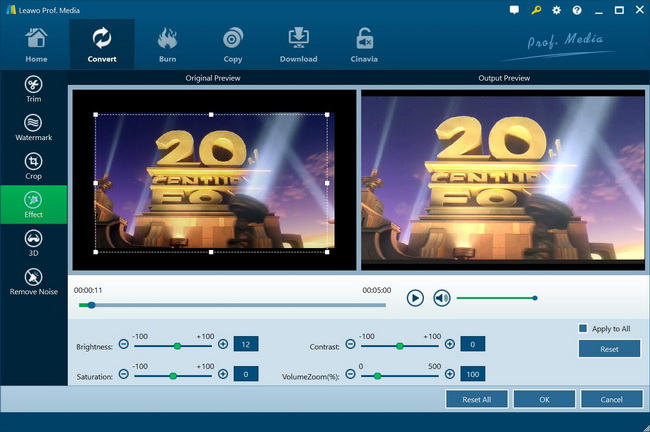
Under Effect tab, change video effect including Brightness, Contrast, Saturation and VolumeZoom by sliding the adjuster from -100 to 100, or directly setting a value in the box followed by.
Apply 3D effect
Under 3D tab, you can slide the 3D Mode box to green and then select a 3D effect from Red/Cyan, Red/Green, Red/Blue, Blue/Yellow, Interleaved, and Side by Side to convert 2D to 3D. 3D Depth could also be adjusted from -50 to 50 for more vivid 3D movie effect.
Remove noise
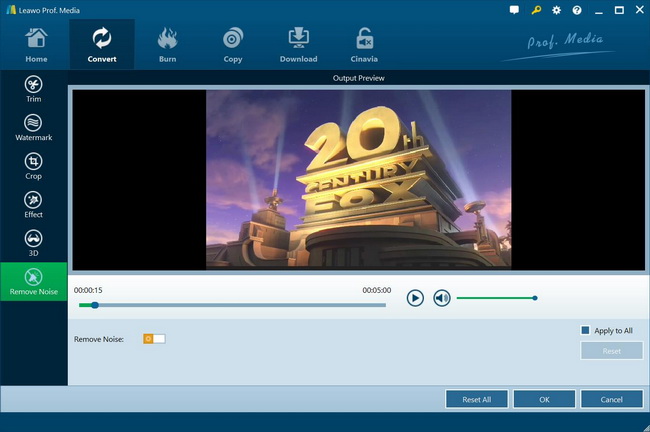
Open the “Remove Noise” tab and enable it to green to remove noise from source video files. It should be noted that this feature only removes noise from source video files. Blu-ray/DVD content is not applicable to this feature.
With all editing work completed, click the “OK” button to save editing and exit the editing panel.
Step 5: Set output directory and start converting
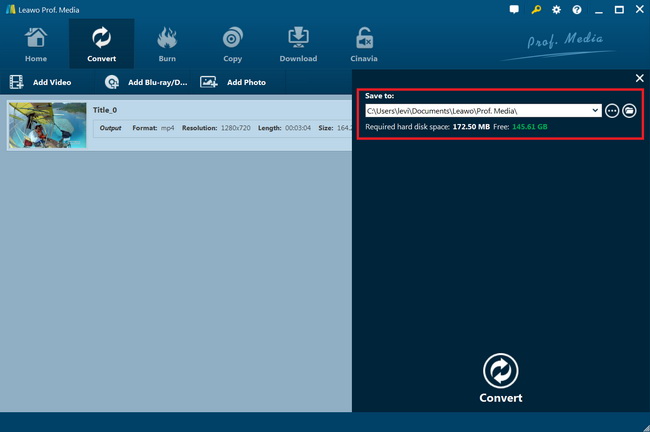
On the main interface, click the green button of “Convert” and then click the “Save to” option to set a directory, and hit the “Convert” option to start converting.
Leawo Prof. Media will convert edited media files for you quickly.
Part 3: Conclusion
Both VLC media player and Leawo Prof. Media enable you to play, convert and edit video files with various editing features. Obviously, Leawo Prof. Media offers easier and more practical editing features for you. What’s more, Leawo Prof. Media not only edits video files, but also Blu-ray/DVD movie files as well, regardless of disc protection and region restrictions. Meanwhile, as an all-inclusive media converter suite, Leawo Prof. Media enables you to convert Blu-ray/DVD/video/audio/ISO image files, burn video/photos to Blu-ray/DVD, download online videos, copy and back up Blu-ray/DVD movies, etc.

