It is quite hard for photo lovers to get the perfect snap. Usually, a slight jolt when you take a photo will make your image blurry. Luckily, there are various photo editing tools like Adobe Photoshop that enables you to sharpen your images just with a few clicks. This guidance will introduce Adobe Photoshop in detail and share with you 5 great methods to fix how to sharpen photo in Photoshop. Another great photo editor will be presented to you in this tutorial as well. Read on to check it out.
Menu
Part 1: About Photoshop
Before we begin to learn how to sharpen image in Photoshop, let’s first know the detailed info of Photoshop in this part.
1.1 What Is Photoshop
Adobe Photoshop is an excellent and popular photo and graphic editing tool, which is quite well-known around the world. It was developed in 1988, which is compatible with both Windows and Mac computers. Adobe Photoshop is considered to be the best raster graphics editor, which allows users to create and edit pictures and save them in many formats. It becomes one mainstay for users who would like to edit existing images or even create their own pictures and graphics. The layer-based editing system enables users to create and alter photos with many overlays. Shadows and other effects can be created via layers, and the layers can also act as filters to affect underlying colors. The automation features included in the actions of Adobe Photoshop can help users to reduce the need for repetitive tasks. It is widely employed by photographers, graphic designers, video game artists, advertising and meme designers. It is available for a monthly fee and you can have a try to know its powerful features.
1.2 What Does Photoshop Do?
After a brief introduction of Photoshop, you may desire to know what you can do with this great software.
What Does Photoshop Do:
- You can use it to remove objects, retouch, and recolor, which is able to turn your imagery into artistry. To sharpen image in Photoshop is just a piece of cake.
- It allows you to create what your camera can’t capture quickly just with one-click selections, easy masking, and virtually unlimited layers, which can easily turn your images into wonderful pieces of artwork.
- You can make use of this tool to paint and draw with thousands of custom brushes or create your own.
- Graphic designs are also available in Photoshop.
Part 2: 5 Ways to Sharpen Image in Photoshop
Since Photoshop is powerful, it can help you sharpen photo with several great tools. When you find your image does not look tack sharp at 100%, there is no need for you to worry about this issue at all. To sharpen an image is one of the basic things to learn when you desire to edit photos. This is one normal case, and you are lucky to get here to learn the methods to settle how to sharpen photo in Photoshop, which is more advanced and practical than to sharpen photo online.
△Method 1: Unsharp Mask
Photoshop, as a sharpen photo editor, allows you to use Unsharp Mask to realize your goal. This is a tried and true method for you to give it a go.
Steps:
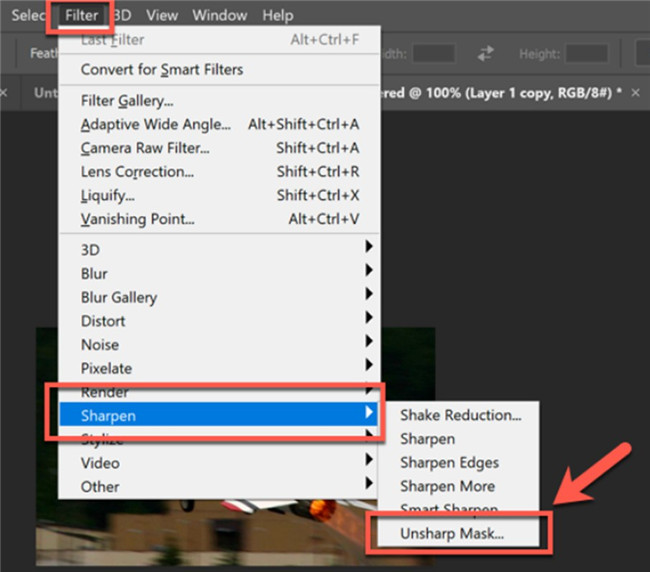
- You just need to navigate to “Filter> Sharpen> Unsharp Mask”.
- There are three sliders for you to make use of:
a) You can use the first slider “Amount” to adjust the amount of contrast of your photo edges.
b) The slider “Radius” can be applied to adjust the pixels on either side of an edge.
c) The slider “Threshold” enables you to kill off sharpening in areas of the image that don’t have much contrast.
You can sharpen image in Photoshop with this method at ease.
△Method 2: High Pass Filter
To sharpen image in Photoshop with the High Pass filter tool is also a good idea. Now let’s see how to make it with this method.
Steps:
- First you need to go to click on “Layers Panel” and then hit on the menu icon at the top right corner of this panel.
- After that, you need to choose the option of “Convert to Smart Object”. A smart object icon will show in the lower right of the preview thumbnail.
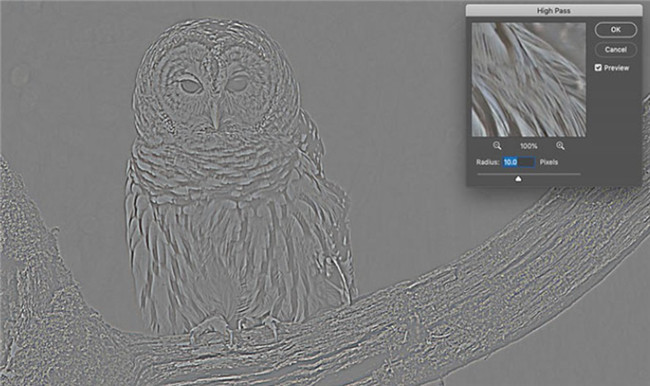
- Go ahead to the Filter menu in the Menu Bar and select “Other> High Pass” to enter the panel to begin to use the radius slider in the High Pass Filter to sharpen your images. This tool allows you to enhance edges in a picture and leave other areas untouched.
△Method 3: Adjustment Brush- Camera Raw
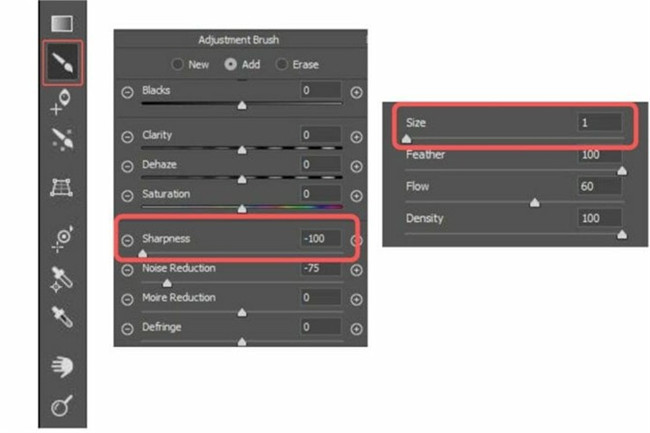
As for the task of fixing how to sharpen photo in Photoshop, the adjustment brush in Camera Raw is also a good choice for you to make. Just adjust the sharpness slider and brush over the locations in the photo you would like to sharpen.
Steps:
- With a high positive value, both the sharpness and noise in an image will be increased.
- To sharpen the whole photo, you can max out the size slider and brush over the entire picture.
- To sharpen fine details of the image, you need to reduce the size of the brush and brush over the features where you would like to perform sharpening.
△Method 4: Smart Sharpenw
Now let’s continue to see how to take advantage of Smart Sharpen to deal with how to sharpen photo in Photoshop perfectly.
Steps:
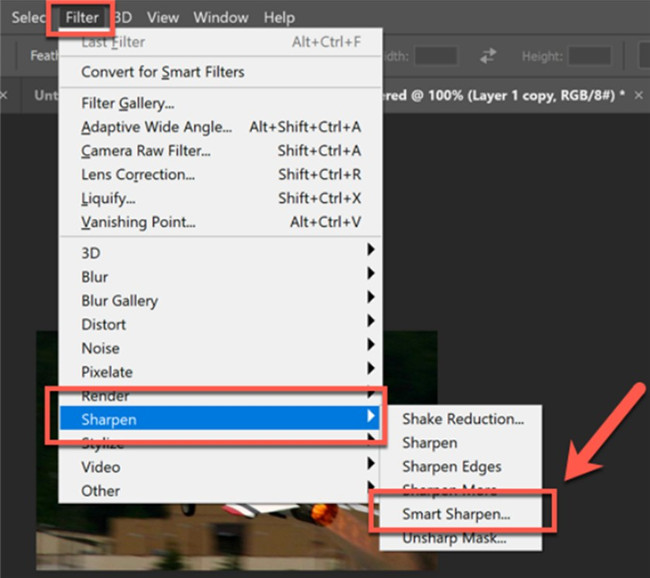
- Go to click on “Filter >Sharpen >Smart Sharpen” and you will see two sliders in this tool: “Amount” and “Radius”. You can drag the slider to adjust your photo to your ideal effects.
- The little “Shadows/Highlights” arrow is also quite useful. Hit on it and a bunch more sliders will show up, which enables you to control exactly how your sharpness displays in the bright and dark areas of your photo.
- Use the “Fade Amount” and “Tonal Width” to sharpen your photo in detail including the shadows, highlights, dark area of the image. The “Radius” slider allows you to modify the smooth degree of a transition from the faded sharpness back to the regular old sharpened pixels.
△Method 5: Camera Raw Detail Panel
In order to figure out how to sharpen photo in Photoshop, you can also resort to the Camera Raw Detail Panel.
Steps:
- Open Photoshop software and then click on “File> Browse in Bridge” to choose the photo you desire to sharpen.
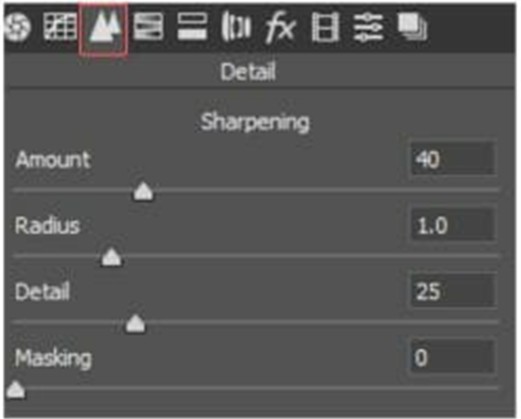
- Hit on “Open in Camera Raw” icon at the top of the screen, and the Detail Panel allows you to sharpen your photo amount, radius, detail, and masking.
In fact, there are other filters that can be used in this sharpen photo editor and if you are interested in them, you can continue to search on the Internet to find out.
Part 3: How to Sharpen Photos Automatically with Leawo PhotoIns?
Apart from Photoshop, Leawo PhotoIns also comes in handy to help you to sharpen an image. It is a simple sharpen photo editor, which can improve your image quality just with several clicks. The interface is user-friendly and the system is intelligent. The files it supports include RAW, JPEG, TIFF, and PNG which are at least 800x600px. The efficiency for you to use it to handle pictures is quite high. Check out the following step-by-step instruction and you will know how to apply Leawo PhotoIns to sharpen photos.
Step 1: Download Leawo PhotoIns
Go to the official website of Leawo PhotoIns and download the proper version of it. Then install this tool on your computer.

-
Leawo PhotoIns
- Enhance portrait photos easily with advanced AI technology
- Fix photo exposure and white balance issues automatically
- Optimize photo colors and perfect photo tints
- Make photos perfectly clear with smart dehaze
- Boost photo lighting and color quality
- Process RAW and JPG files
Step 2: Import photos to the program
Start Leawo PhotoIns on your computer and then click on “Add Photo” button in the middle of the software to choose photos that you desire to sharpen from your computer folder. It also allows you to drag and drop your source photos into the program directly.
Step 3: Sharpen photo intelligently
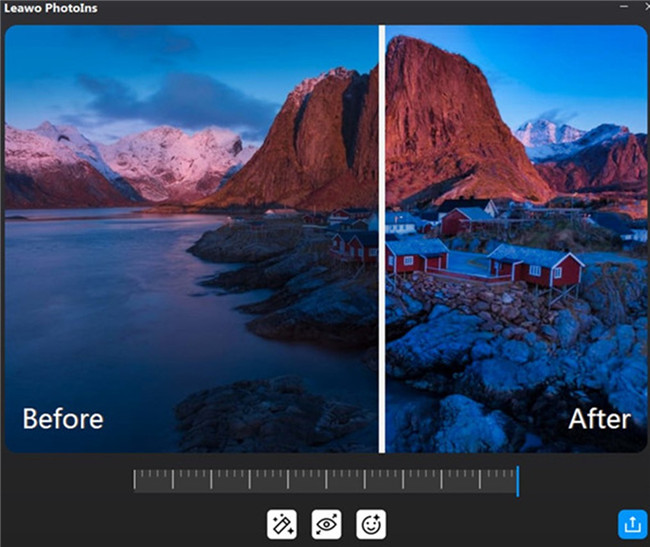
After your source photos are imported to the software, you need to click on the gear button to turn on the features of "Automatic Lens Correction", "Face enhance" and/or "Enlarge eyes" to allow the tool to automatically sharpen your images and reduce noise in photos. The effect adjuster bar can also be used to adjust the image sharpening degrees. By moving the slider to the left or right to set the sharpening effect according to your need.
Step 4: Determine output settings
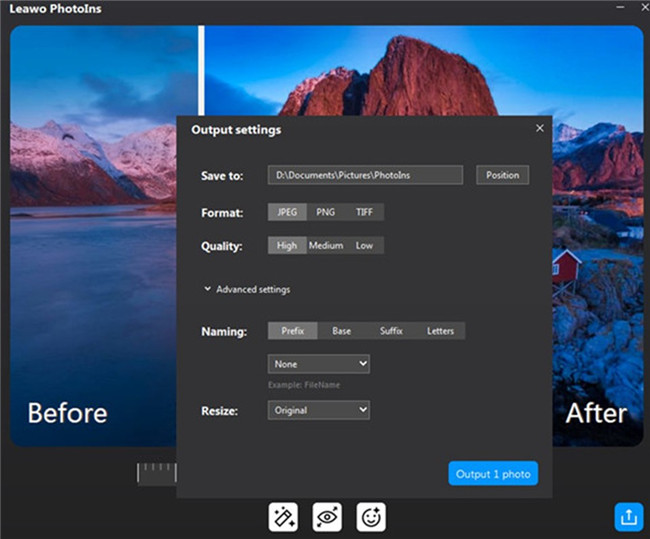
After you sharpen photo with this editor, you can click on the "Output" button at the bottom of the interface to enter the "Output settings" panel.
a) Hit on the “Position” button to choose a suitable place on your computer to save the sharpened images.
b) Select the format from JPEG, PNG and TIFF to set your sharpened images.
c) The “Quality” feature can be used to set your photo effects.
d) You can name your image files and set proper sizes for your photos within this panel as well.
Step 5: Output sharpened pictures
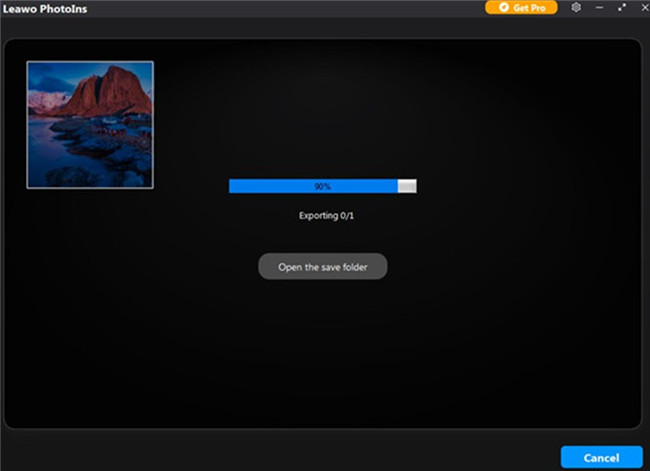
At last, you can hit on the “Output” button to export your sharpened photos to the output folder you have just set. You can view the processing bar in this tool very clearly. You can just wait to gain your photos with fantastic sharpened effects. Click on "Cancel" button when you want to end the exporting process.
Part 4: Conclusion
Almost all digital photos need some amount of sharpening. Photoshop is just the very tool that can assist you to solve the problem perfectly. Leawo PhotoIns is also helpful when you have the need to sharpen your images. You’d better first decide what you desire to sharpen and then focus on what looks most natural to you. It is not pleasant to overdo the sharpening. Besides, it is also very quick and easy for you to make use of Leawo PhotoIns or PhotoShop to enlarge eyes of your images. You can have a try to find out more features of these two amazing tools.


 Try for Free
 Try for Free


