“Can I burn an audio CD on a DVD-R and have it behaved as a CD-R so I can play it in all cars and players?”
DVD-R and DVD-RW are two wonderful media to store and transport music of far more storage capacity. Undoubtedly, more and more people have portable media players like iPods, but the memory tends to fill up quickly and we have to remove some old music to make room for new music. Besides, it takes plenty of our PC space to keep the audio files.
It would be better if we can burn audio DVD, for DVD-RW media is cheap and versatile. Moreover, burning audio to DVD is also a great way to create a backup of all the music that you’ve accumulated in case your hard drive crashes. Without this kind of backup, all your music could be lost.
In the below content, we would like to show you different DVD audio burner tools to help you burn audio files to DVD file with detailed steps. You could choose the one that meets you most.
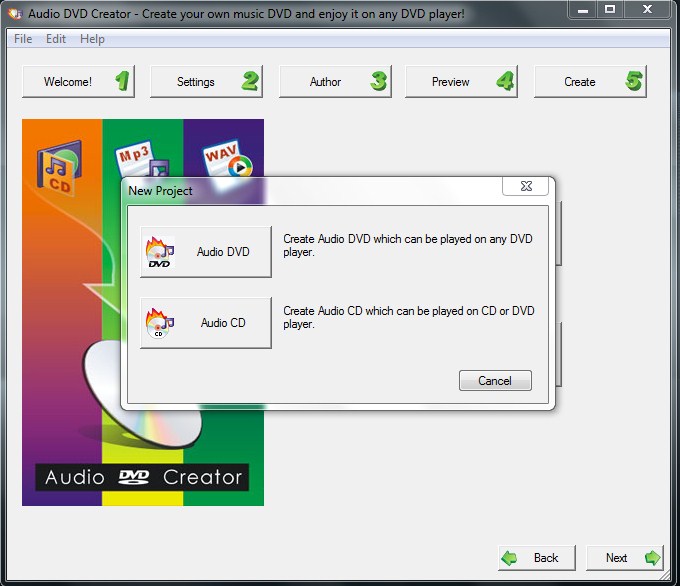
Part 1: How to burn audio files to DVD with Audio DVD Creator
The Audio DVD Creator is a utility tool that completely changes the way that is used by people to listen to music files. This DVD audio burning software is specially designed to create a revolution in the traditional way of listening to music. The users can freely create DVD disc from simple audio CDs and can play it on the DVD player. The software is only compatible with Windows but is still very popular. It has only the audio compliance features and therefore termed as one of the topmost choices for burning audio files to a DVD.
The below steps would show you how to burn audio files to DVD with Audio DVD Creator in detail:
- Download and install Audio DVD Creator on your computer.
- You can click "Add Audio CD" button in the left upper corner of "Author" Page.
- In "Add Audio CD" window, you can see all your CD/DVD drives in the CD-ROM list.
- Please insert an Audio CD disc to your CD-ROM, and select it in the CD-ROM list. Audio DVD Creator will select all the tracks by default.
- Click “Add to Project”, and Audio DVD Creator will rip the selected audio tracks to WAV files on hard disk at first, then import them to the project automatically.
- By clicking "Add Music Files", you can add audio files on your hard disk to the project.
- You can preview your Audio DVD anytime when you are authoring it.
- You can "export the Audio DVD to hard disk folder", so that you can check it with a software DVD player at first, then you can burn it with you favorite DVD burning software.
- You can also burn the Audio DVD directly with the internal burning engine of Audio DVD Creator if you have multiple DVD drives. Insert a blank writable DVD disc into the empty DVD drive and select it as target.
- Click “Go!” to create your Audio DVD!
It is quite easy to convert and burn audio files to DVD with Audio DVD Creator. However, it should be noted that Audio DVD Creator only works on Windows 95/98/NT/2000/XP. If you want to burn audio files to DVD on Windows 7 or later, you need to try the below tools.
Part 2: How to burn audio files to DVD with Leawo DVD Creator by inserting photo slideshow?
It should be known that most DVD burner software tools don’t support direct audio to DVD burning. However, some DVD burning tools could realize this by adopting extra work. For example, Leawo DVD Creator enables you to burn audio files to DVD directly by inserting audio files to DVD photo slideshow as background music during burning photos to DVD.
As a professional DVD burner, Leawo DVD Creator enables you to turn photos into DVD photo slideshow in disc, folder and/or ISO image file. During this procedure, Leawo DVD Creator enables you to insert audio files as background music for burning to DVD.
Just download and install Leawo DVD Creator on your computer. Get source audio files and image files ready for burning.
Note: Leawo DVD Creator is a module built in Leawo Prof. Media.
Step 1: Add photo files
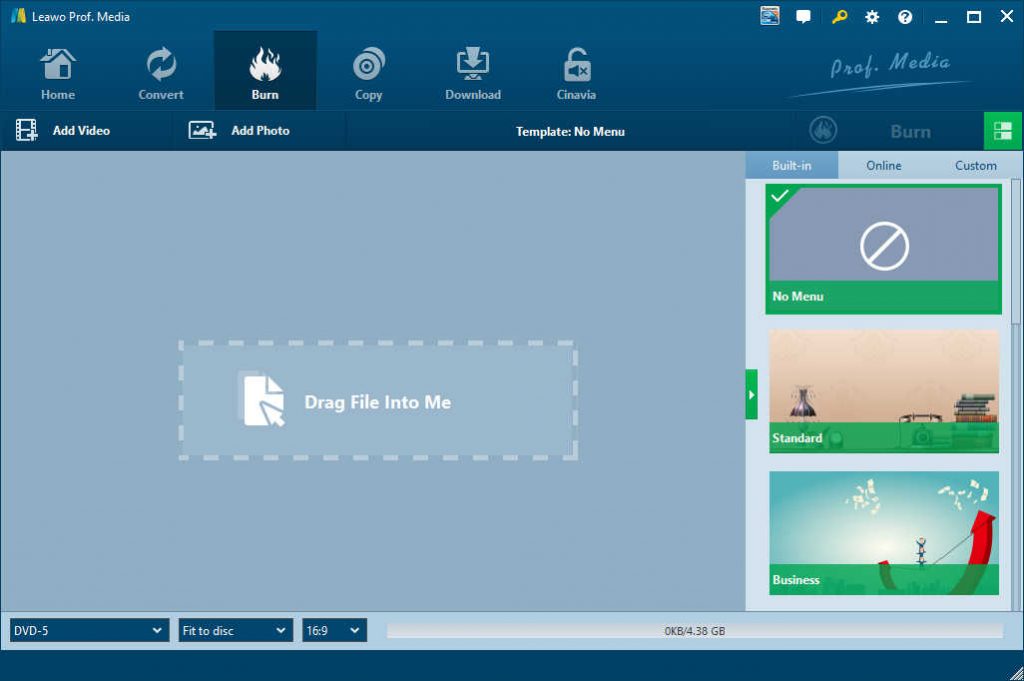
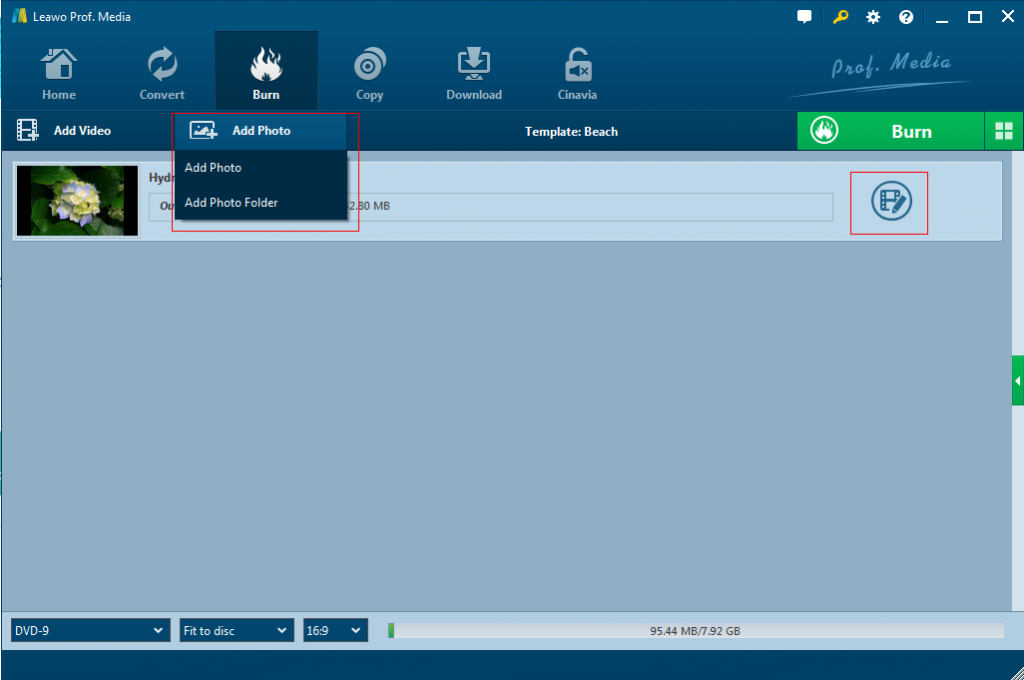
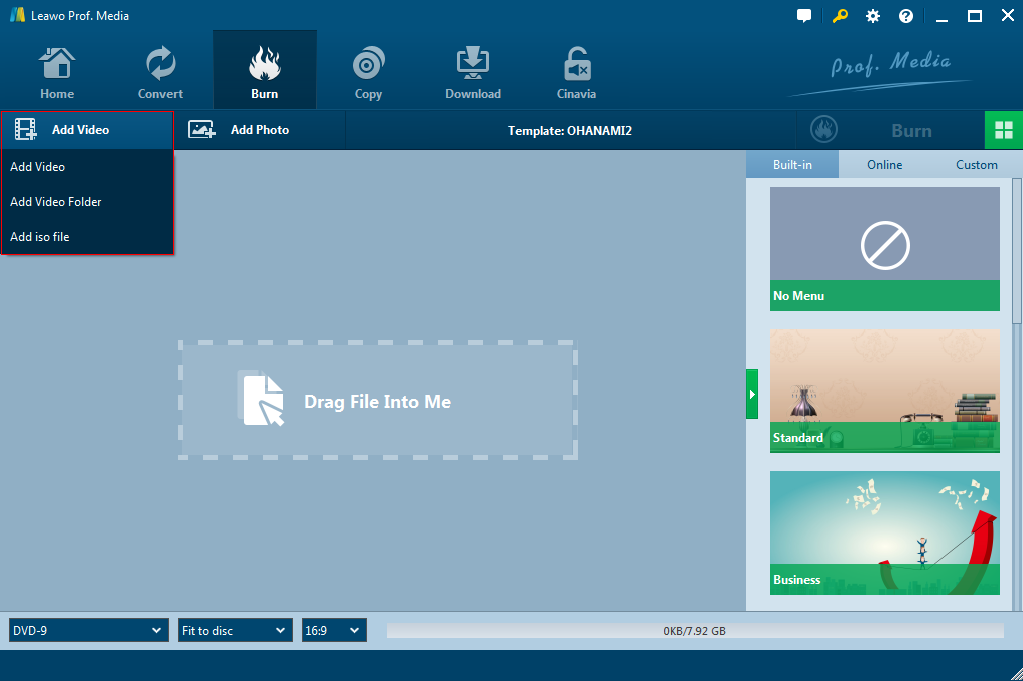
Launch Leawo Prof. Media and then open “Burn” module. Click “Add Photo” button on “Burn” module to browse and load photos for burning to DVD from your computer. Or you can directly drag and drop to browse. After loading photos, set output DVD disc type, bit rate and aspect ratio at the bottom.
Step 2: Edit photo
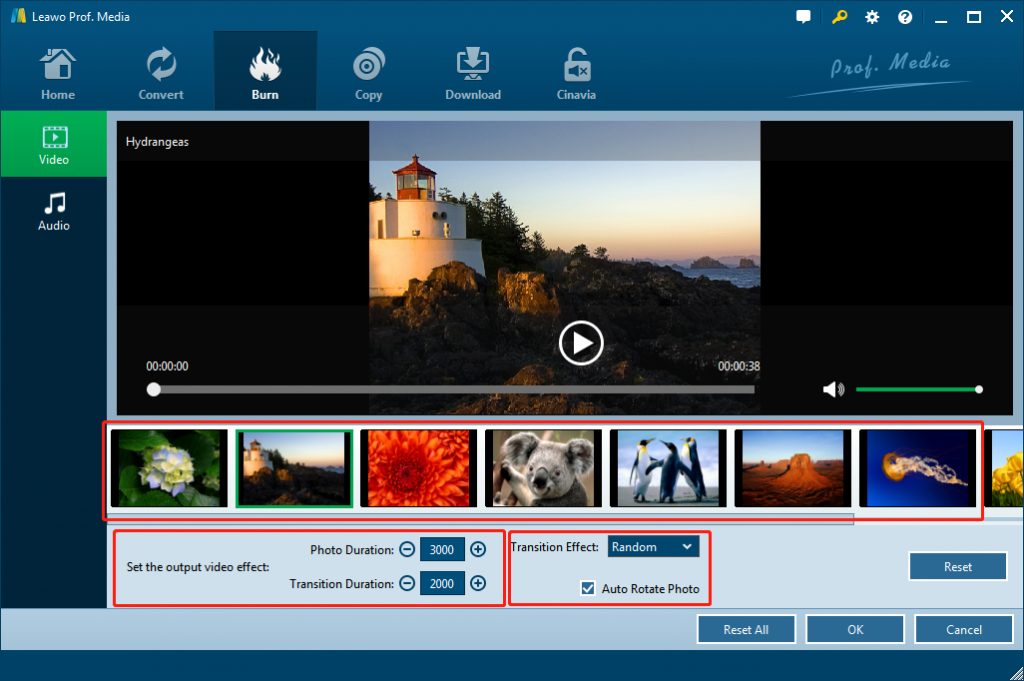
Clicking the “Edit” button in each loaded video title to enter the photo editing panel.
Under the “Video” tab, user can add external photos, remove unwanted photos.
Step 3: Add audio file
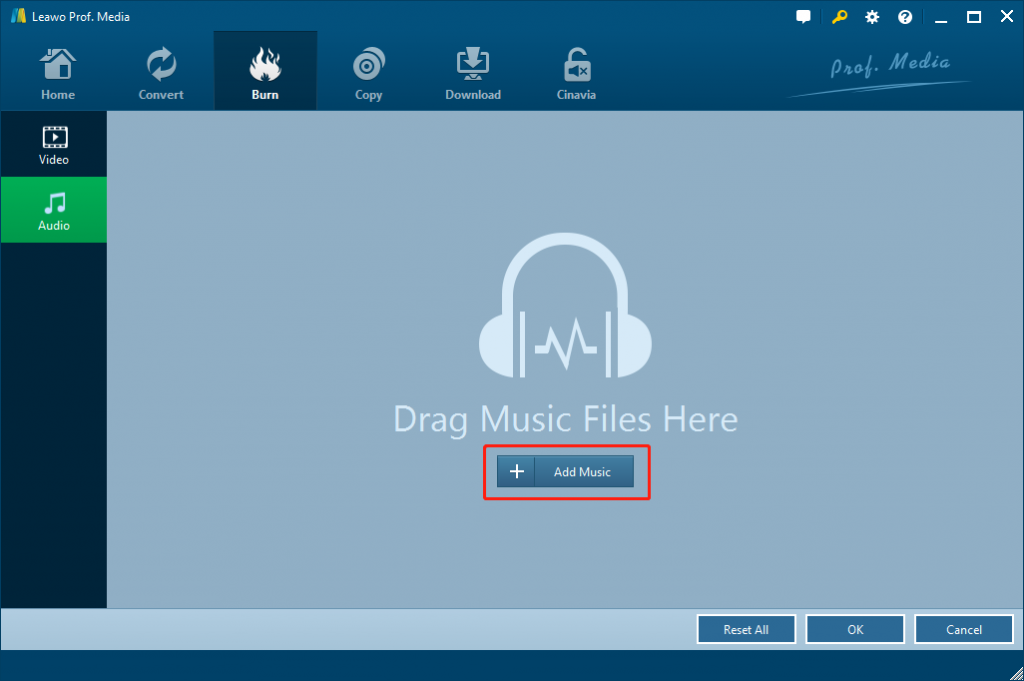
User can add audio files and set audio effect on the Audio tab of the photo slideshow editing panel. There are Fade in, Fade out, Loop play audio effects for you to choose.
Step 4: Add disc music
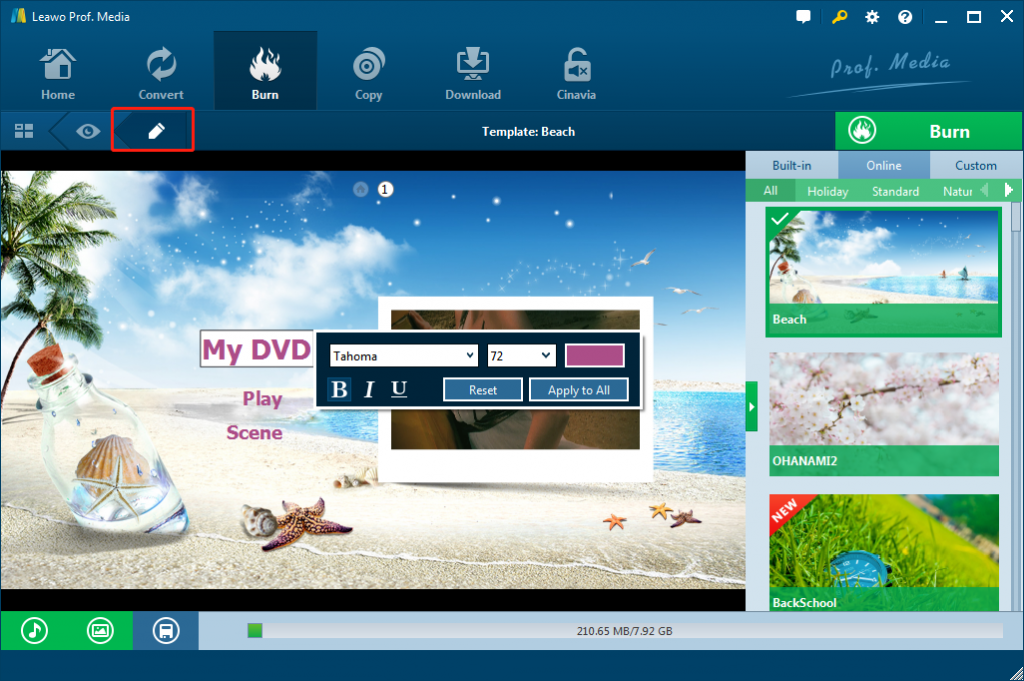
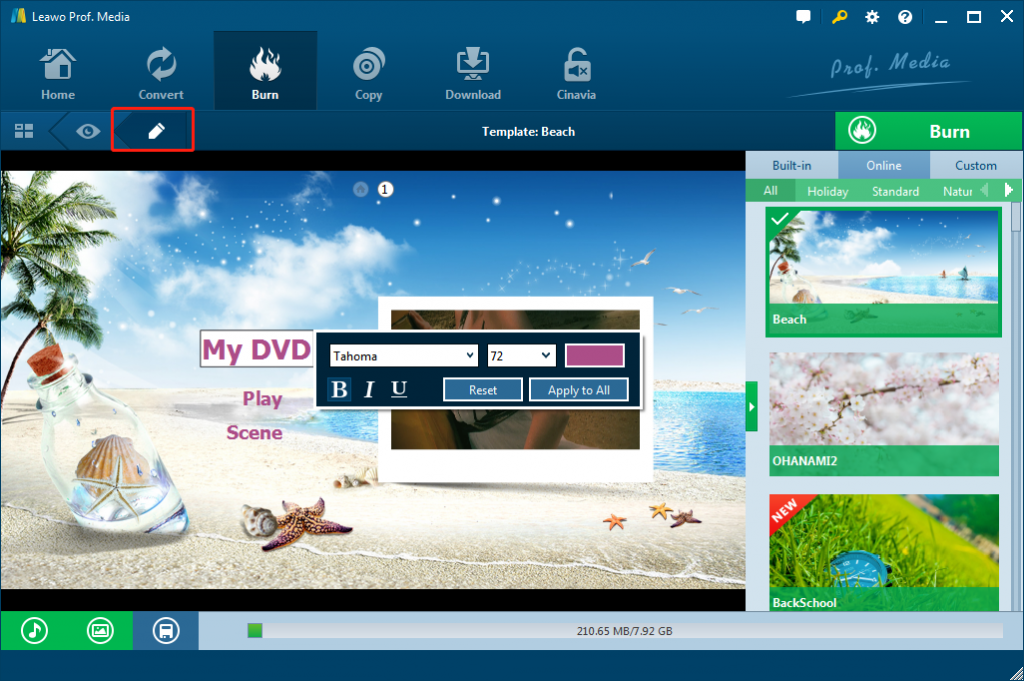
After setting the output audio effect, click OK to return to the main interface. Leawo DVD Creator, the DVD audio burner offers you many disc menu templates in different themes. You could select one disc menu from the right panel and then enter the disc menu preview and editing panel. On the editing panel of disc menu (click the pencil icon on the disc menu preview panel), you could add audio as background music, select background image/video, set disc menu title, and do other things to edit disc menu.
Step 5: Set output DVD video mode
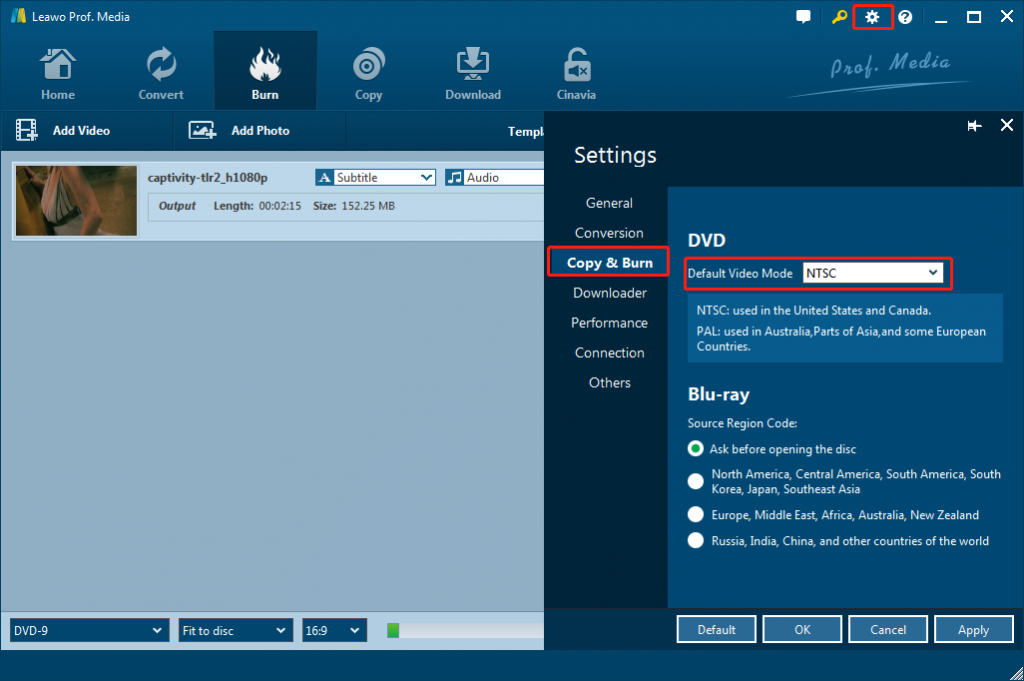
Click the wheel icon on the top-right corner and then navigate to the “Copy & Burn” tab to choose default output DVD video mode from NTSC and PAL.
Step 6: More audio DVD burning settings
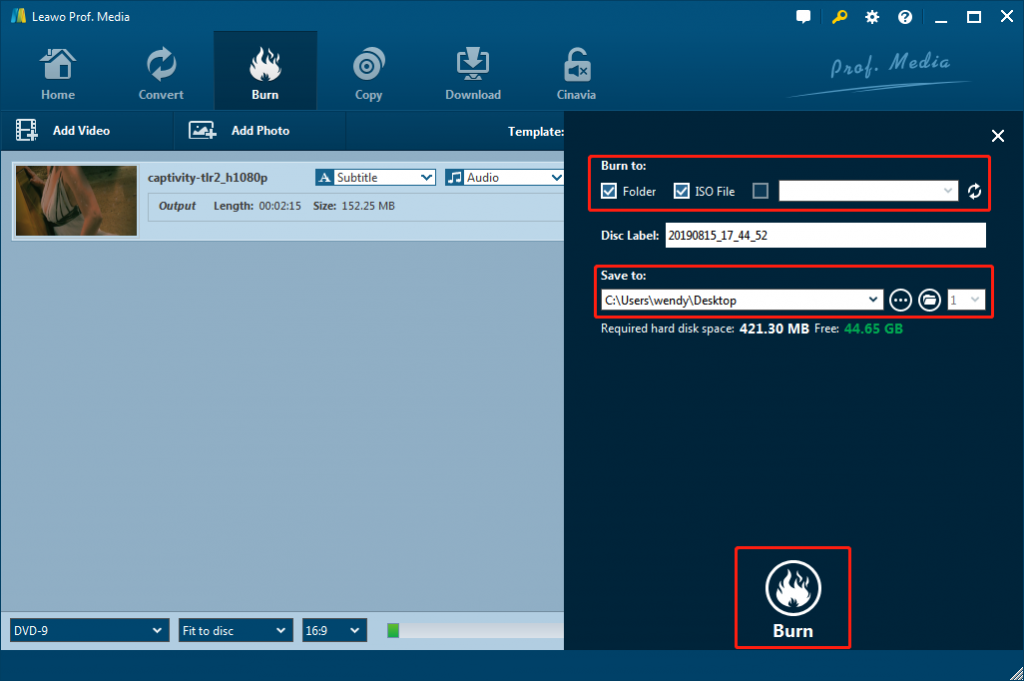
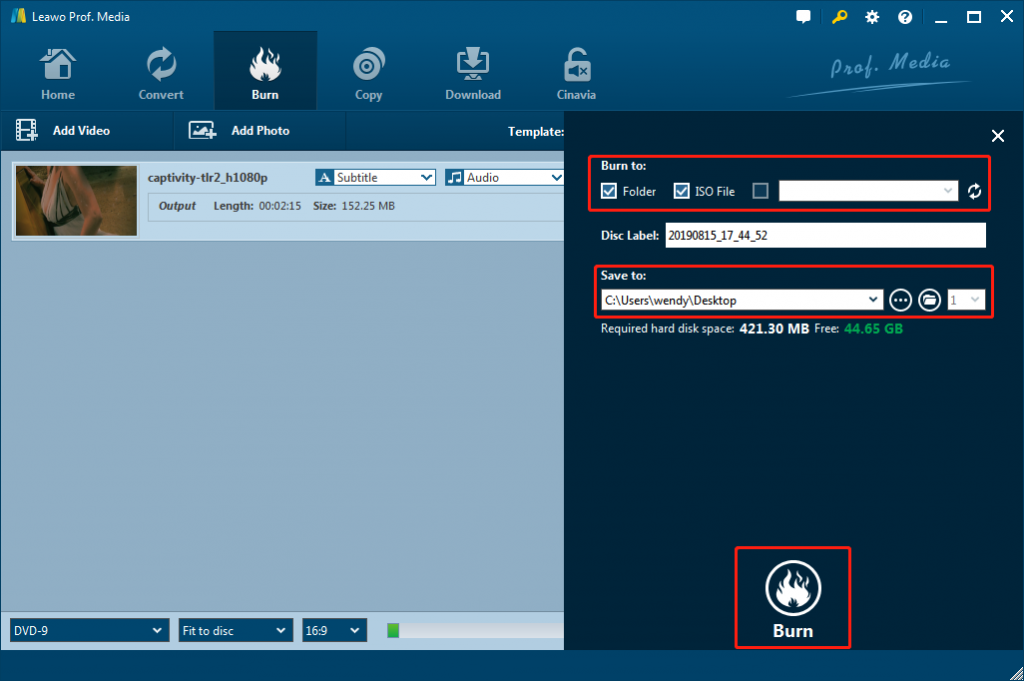
Click the big green Burn button on the sub-menu bar. Set the Burn to, Disc Label and Save to option. The Burn to option allows many choices. To burn audio files to DVD disc, insert a blank writable DVD disc into disc recorder drive and then select it as target under the Burn to option.
After that, click the bottom “Burn” button to start burning audio files to DVD with photo slideshow generated. When the burning process completes, you have successfully turned your audio files into DVD content.
Part 3: How to burn audio files to DVD with Leawo Video Converter and Leawo DVD Creator?
Currently, there are just a few programs or pieces of software that support converting audio files to DVD directly. In general, user is supposed to convert audio files to video at first, then burn video to DVD. In this way, you could easily convert and burn audio files to DVD content. Leawo Prof. Media, which includes video converter and DVD creator, could help you easily complete this task.
Make sure you have downloaded and installed Leawo Prof. Media on your computer. Follow the below 2 sections to learn how to burn audio files to DVD with Leawo Prof. Media.
![]()
![]()
Section 1: Convert audio file to video with Leawo Video Converter
Step 1: Load audio files
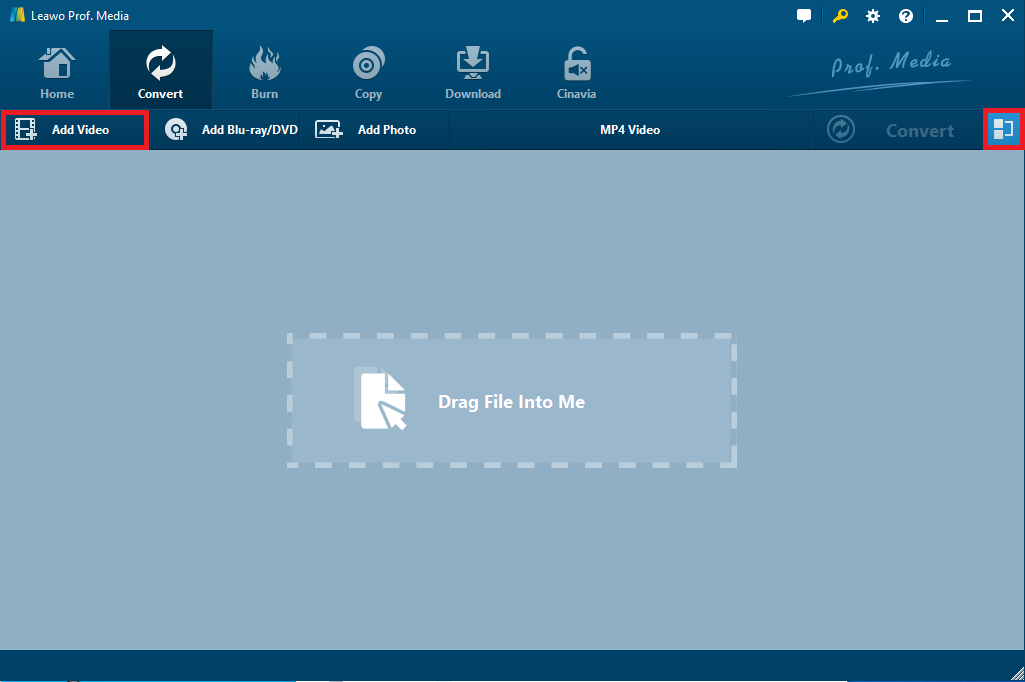
Launch Leawo Prof. Media and then open the “Convert” module. Click on the Add Video icon on the top bar of the software to load audio files.
Step 2: Choose output format
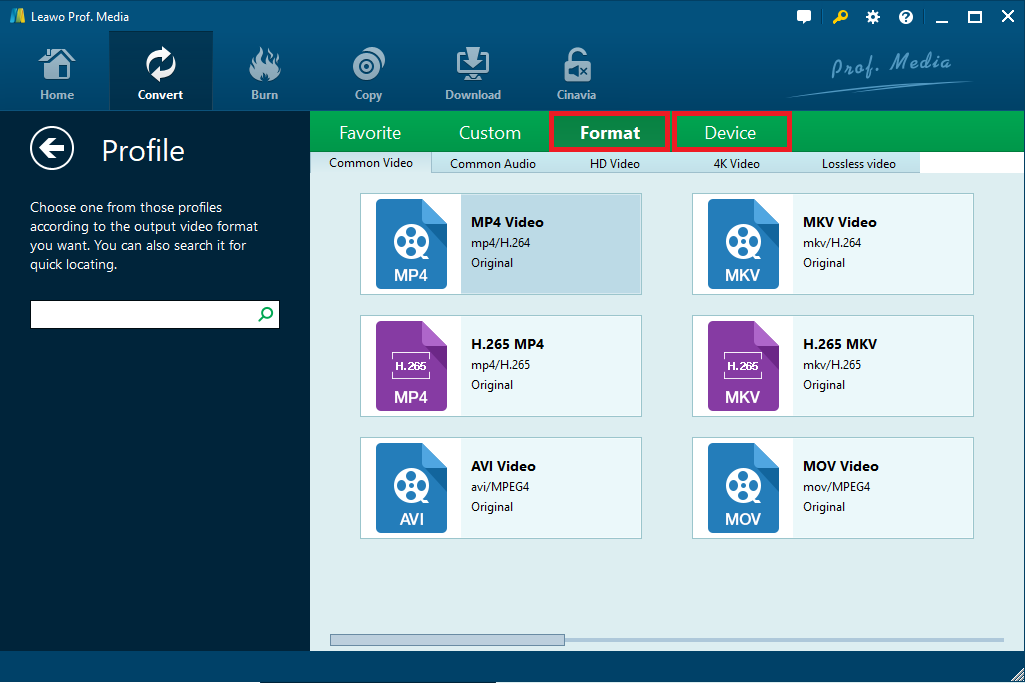
Click the drop-down box next to the Add Photo button, and then click “Change” option to enter the Profile panel, where you could select output file format from “Format” or “Device” group.
Step 3: Set audio parameters
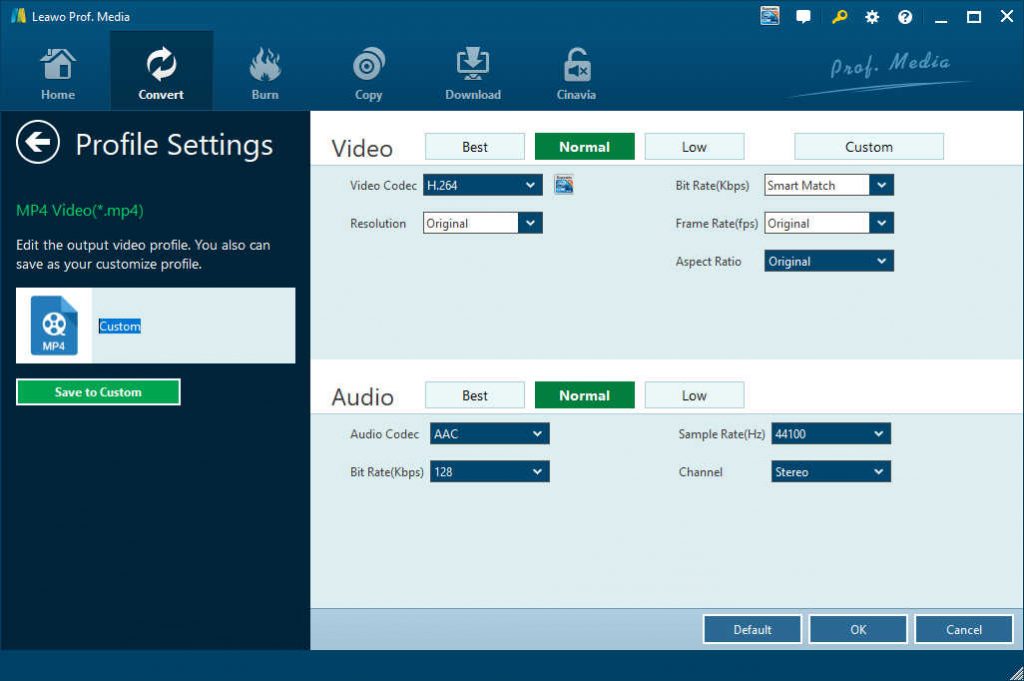
On the drop-down box, click the Edit option to enter the Profile Settings interface to adjust audio parameters of selected output profile. You could change video codec, audio codec, bit rate, aspect ratio, frame rate, sample rate, etc.
Step 4: Convert audio to video
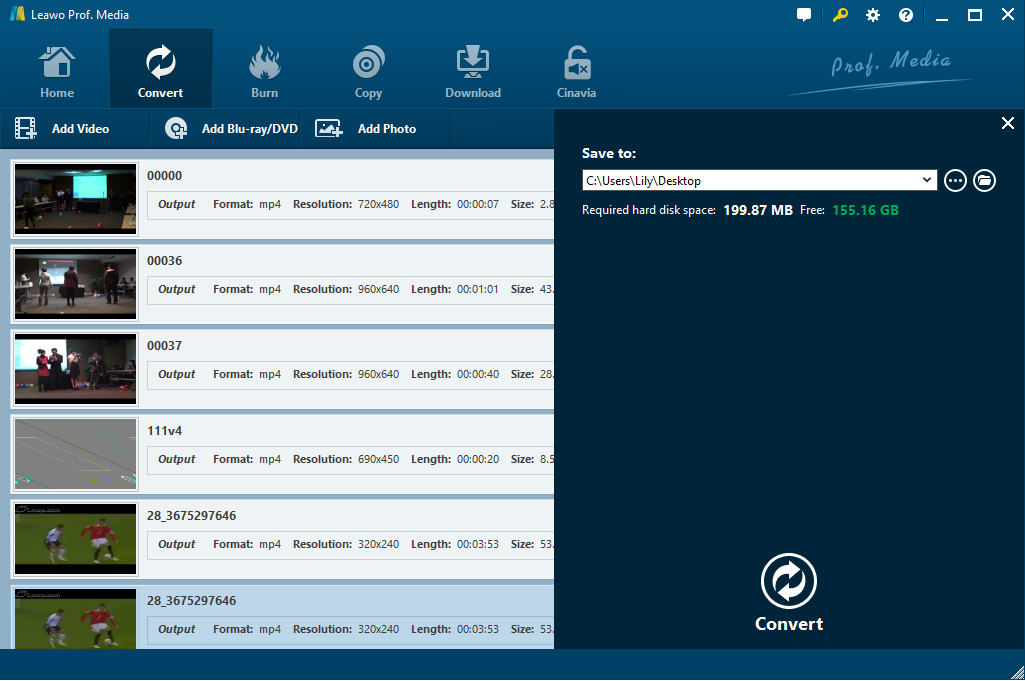
Click Convert button on main interface. On the pop-up sidebar, set output directory in the “Save to” box. Then, click the bottom “Convert” button to start converting audio files to video files.
Section 2: Burn Video to DVD with audio DVD burner Leawo DVD Creator
Step 1: Add generated videos to DVD creator
After converting audio files to video files, open the “Burn” module. Click the Add Video button to load generated videos to the Burn module. After loading video files, set output DVD disc type, bit rate and aspect ratio. You could also edit loaded videos.
Step 2: Set disc menu (optional)
Leawo DVD Creator enables you to add disc menu from preset disc menu templates. You could even edit disc menu like adding background music/image/video, changing title content, text color, etc.
Step 3: Set output DVD video mode
Click the wheel icon on the top-right corner and then navigate to the “Copy & Burn” tab to choose default output DVD video mode from NTSC and PAL.
Step 4: DVD burning settings
After setting disc menu, click Burn button to call out a sidebar with burning settings on it. Put a DVD disc in your DVD-ROM and set it as the destination by checking the third option under Burn to. You can also choose to convert it to a DVD folder or an ISO image file and store it in your computer, in which case you’ll have to set the directory for it under Save to option.
Step 5: Burn video to DVD
16
Click the Burn button at the bottom of the sdiebar to start burning videos to DVD. This DVD audio burner would immediately start burning audio video to DVD and finish it in a few minutes.
Part 4. Comparison and Conclusion
The below comparison table would show you the differences of the above-mentioned 3 solutions. You will see which one is better for you.
| Features |
Audio DVD Creator |
Leawo DVD Creator |
Leawo Prof. Media |
|
Burn audio to DVD |
Yes |
Yes. As background music |
Yes |
|
Burn video to DVD disc |
No |
Yes |
Yes |
|
Burn videos to DVD folder |
No |
No |
Yes |
|
Burn videos to DVD ISO file |
No |
No |
Yes |
|
Burn photos to DVD disc, folder or ISO file |
No |
Yes |
Yes |
|
Burn ISO file to DVD disc |
No |
Yes |
Yes |
|
Select subtitles and audio tracks |
No |
Yes |
Yes |
|
Add external subtitles |
No |
Yes |
Yes |
|
Edit video files |
No |
Yes. Trim, crop, adjust effect, rotate, merge files, add image/text watermark, apply 3D effect |
Yes. Trim, crop, adjust effect, rotate, merge files, add image/text watermark, apply 3D effect |
|
Edit photos for photo slideshow |
No |
Yes |
Yes |
|
Play back source videos |
No |
Yes |
Yes |
|
Set output DVD video mode |
No |
Yes. NTSC or PAL |
Yes. NTSC or PAL |
|
Convert video/audio/Blu-ray/DVD |
No |
No |
Yes |
|
Copy Blu-ray/DVD for backup |
No |
No |
Yes |
|
Burn video to Blu-ray |
No |
No |
Yes |
|
Download online videos |
No |
No |
Yes |
|
Remove Cinavia from Blu-ray |
No |
No |
Yes |
No matter which tool you are using, you could turn your audio files to DVD content. However, you could see that Leawo Prof. Media offers you most comprehensive solutions for you to handle all media solutions covering Blu-ray, DVD, audio, video, image, and online videos.


 Try for Free
 Try for Free

