Case 1: iMovie is not uploading videos to YouTube - When I click “File > Share > YouTube (username)” a box pops up, but the "next" button is not highlighted and is not clickable. I've also tried to upload the files from the YouTube website but when I do I get this error and a 0% upload: "We did not recognize the format of this file, but we will try to process it anyway. See this article on recommended formats for more information." The file extension is .imovieevent. What can I do to successfully upload to YouTube?
Case 2: Publishing from iMovie to YouTube failed - Hey guys, I couldn't find any YouTube video to help me with my problem. Two times now I have tried uploading my videos from iMovie to YouTube, the progression circle in the top right goes half way then I get a pop up saying it failed. It says it's unauthorized but I re-log in my YouTube account many times to authorize it but it still fails to publish. If anyone has any ideas to help me overcome this problem, it would be greatly appreciated! thanks so much!
How to troubleshoot if your video won't upload to YouTube? Many people must have encountered such occasions. This is quite normal. Even though Apple has made iMovie export video for uploading to YouTube, the uploading might get failed due to various errors. Well, in this guide, we would like to show you why iMovie video won’t upload to YouTube sometimes and how to upload iMovie video to YouTube successfully.
Part 1: How to Upload iMovie Video to YouTube
Actually, iMovie has enabled you to directly upload videos from iMovie to YouTube account in simple clicks, though there might be no official guide on how to do this. However, this process is extremely simple.
It only takes a few steps to upload a video from iMovie to YouTube. Check the below steps to learn how:
- Get prepared: You have created a YouTube account and iMovie is installed on your computer
- On your iMovie, once you have added and finished editing, click the Share option at the very top of the screen and then select the YouTube from the drop-down menu.
- Choose your YouTube account or create a new one.
- Sign in your YouTube account and confirm the signin.
- Select the category, name, description, and tags for your video, as you usually do on YouTube.
- Select your publish size and click Next.
- Now click the publish button.
- Your video will be ready to watch on YouTube in 2-120 minutes.
In this way, you could actually upload your videos from iMovie to YouTube, unless there is something wrong with the uploading.
Part 2: Why won't iMovie Video Upload to YouTube Sometimes?
When you have come across the problem of iMovie video won’t be able to be uploaded to YouTube, there are some possible reasons for that:
- If your video won't upload to YouTube, it could be because of issues with available bandwidth on the network you're using.
- On other occasions, an extremely high volume of upload traffic by other users can delay or impede your video upload.
- Certain video file types cannot be uploaded to YouTube — the ideal file type is an MP4 with a frame rate between 24 and 60 frames per second.
- YouTube has a limitation upon the size of videos to be uploaded. YouTubers with basic accounts cannot upload videos larger than 2 GB or longer than 15 minutes (or both, of course).
Well, according to these possible reasons, you could try the below solutions to see if the uploading failure could be solved or not.
- Check your Internet connection. Make sure your computer is well connected to the Internet, and your Internet has enough bandwidth for you to upload videos to YouTube.
- Make sure you have enough traffic for uploading a video to YouTube.
- Make sure the videos you are going to upload to YouTube are in the formats YouTube accepts, and the video parameters are well suitable for YouTube.
- Make sure your file size and length are under the requirements of YouTube.
If your Internet connection is well connected and you have enough bandwidth and traffic for video uploading, and you would like to change the video file formats for YouTube, the below content would be helpful.
Part 3: Convert iMovie Video to QuickTime for Uploading to YouTube
As mentioned above, when you come across iMovie video can’t be uploaded to YouTube error, it might be due to the file format issue. You could upload high quality videos from iMovie HD 7 to YouTube directly by converting iMovie videos to QuickTime. It won’t be complicated.
Just follow the below steps to learn how to convert iMovie videos to QuickTime for uploading to YouTube in detail.
- Get prepared: Make sure you have iMovie installed on your computer and you have created a YouTube account already.
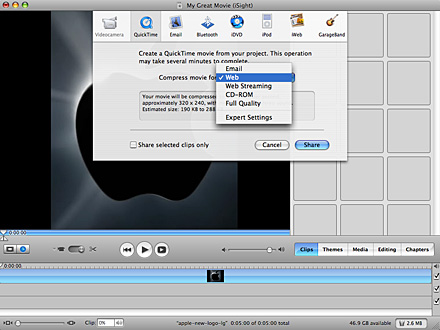
- After editing videos within iMovie, click on the Share option at the very top of the screen.
- Select QuickTime from the drop down menu and then select “Expert Setting” from the “Compress Movie” drop-down menu
- Click “Share” button.
- Click on options in the “Save exported file as...” box.
- Open the “Settings” button under the video menu. And then set compression type to H.264, set frame rate to 30, set key frames to every 30 frames, set data rate to Restrict to 5000kbits /sec, and set optimization for streaming.
- Click “Size” button under the video menu to set as 1280x720 HD and check the deinterlace source video box.
- For audio settings under the sound menu, choose AAC format, stereo channel, 44.100 kHZ rate, normal quality, average bit rate encoding strategy, 320kbps target bit rate.
- Click “OK” button under the movie settings menu to save settings.
- Click on “Save” under the “Save exported file” box to start exporting raw video.
- Log into your YouTube account.
- Select “Upload” button at the top right corner.
- Click on “Upload video” option and then open a “Finder” window containing the newly created .MOV video exported from iMovie.
- Drag .MOV video to the dashed rectangle on YouTube upload screen and then click “OK” button.
- Select desired settings under the video information and privacy setting boxes.
- Click save changes below the license selection boxes.
The upload procedure might take a few minutes, and few more hours before you can find the iMovie on YouTube. By default, you can upload videos that are up to 15 minutes long. For uploading a video up to 15 minutes, you can trim the video into parts in iMovie, or you should verify your account to upload videos longer than 15 minutes.
Part 4: Upload iMovie Video to YouTube using Leawo Prof. Media
iMovie itself could convert videos to QuickTime MOV for uploading to YouTube. However, you could see that it’s really complicated and actually MOV is not the friendliest file format to YouTube. Is there a better choice? Yes. Try Leawo Prof. Media.
With a video converter built in, Leawo Prof. Media enables you to convert videos between 200+ formats like MP4, AVI, WMV, MKV, MOV, 3GP, and 200+ other formats for almost all media players, devices, video editors, etc. You could easily convert iMovie videos to MP4 for uploading to YouTube channels.
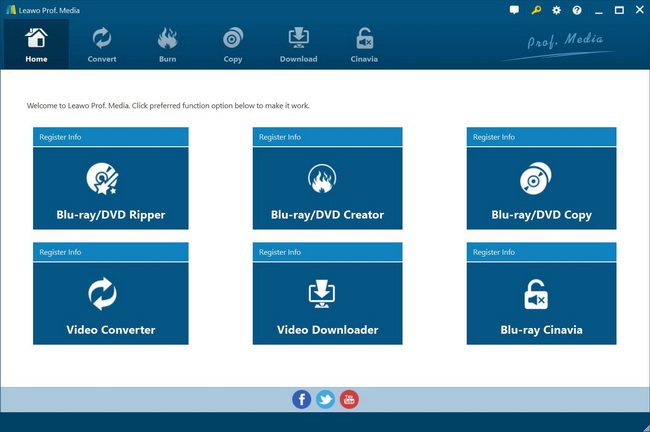
The below guide would show you how to convert iMovie video with the Leawo Prof. Media. Firstly, download and install it on your computer.
Step 1: Enter the Convert module
On Leawo Prof. Media program interface, open “Convert” menu to enter the “Convert” module.
Step 2: Add iMovie videos
Under the “Convert” module, you could directly drag and drop source iMovie videos, or click the “Add Video” button to browse and load iMovie videos from your computer hard drive.
Note: After loading source videos, you could play back loaded videos, edit loaded videos, select subtitles and audio tracks, take screenshots, etc.
Step 3: Set output format
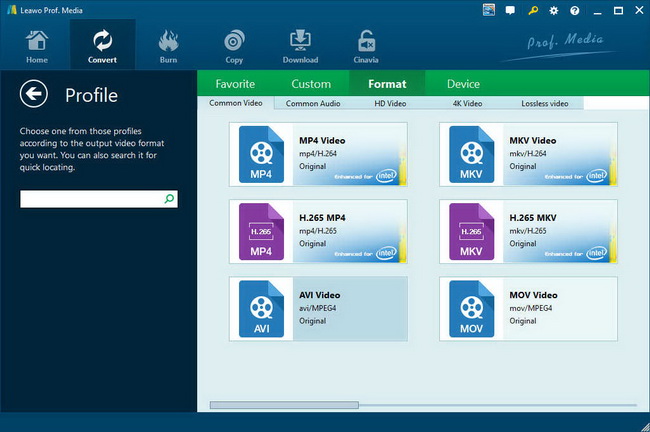
Set an output format for video files. Hit the button next to the “Add Photo” button and then click “Change” option to enter the “Profile” panel. Choose output format from “Format” or “Device” group according to your needs. Since you need to convert iMovie videos for uploading to YouTube, choose MP4 Video from the “Format > Common Video” group.
Step 4: Change video and audio parameters of output file
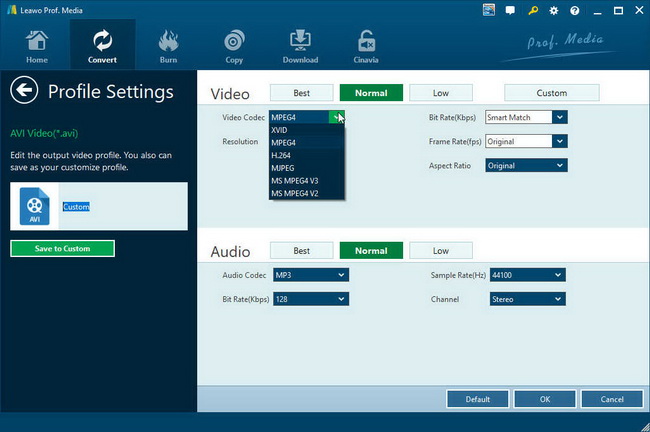
If you need, you could click the “Edit” option on the drop-down panel next to the “Add Photo” button and then adjust the output video and audio parameters like video codec, video bit rate, aspect ratio, resolution, audio codec, sample rate, bit rate, channel, etc. By adjusting these parameters, the output video files would meet your media players or devices exactly. Just adjust these parameters according to YouTube.
Step 5: Cut videos
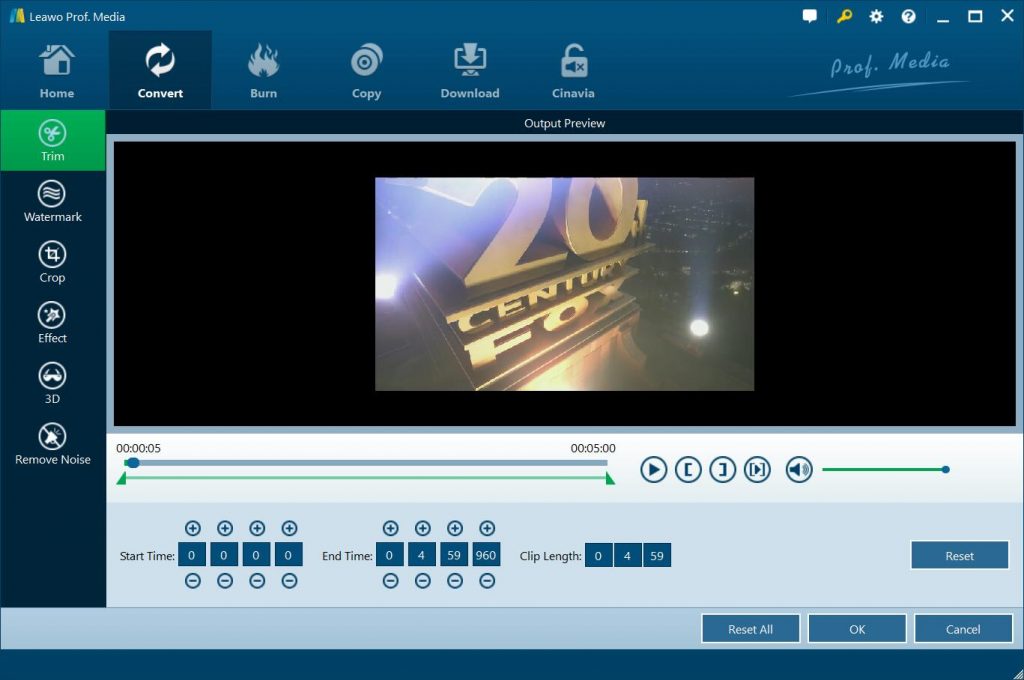
As mentioned above, YouTube only accepts videos in less than 2GB and shorter than 15 minutes. Leawo Prof. Media enables you to cut videos to get the desired video files converted only. Click the edit icon in each loaded video title to go to the editing panel, then go to “Trim” tab to cut videos according to your needs.
Step 6: Set output directory and convert
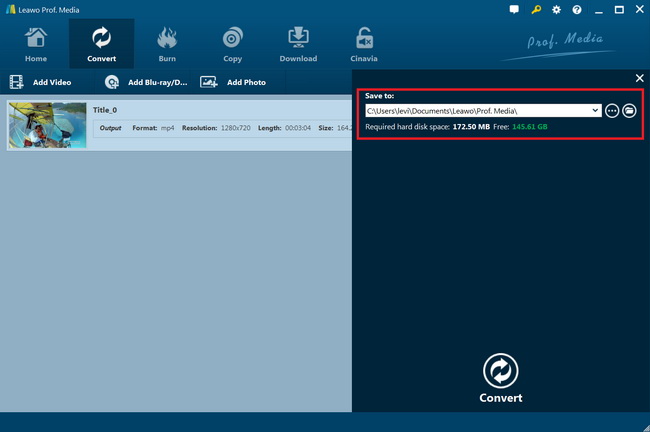
After setting output format, click the green “Convert” button on the main Convert interface. On the popup sidebar, set output directory in the “Save to” option. After that, click the “Convert” option to start converting iMovie videos to YouTube friendly video files.
When the conversion completes, you could then freely upload the converted iMovie videos to YouTube for sharing.
Part 5: Conclusion
If you have come across iMovie video uploading to YouTube error, try the above solutions to see if they work or not. Adopting a video converter like Leawo Prof. Media could be the ultimate solution since it in most cas will definitely settle the problem down.

