As we know, iPhone is developed by Apple company and has become one of the most popular Smartphones nowadays. The new model of iPhone will be launched every year and the latest iOS version has been updated to iOS 13. But, as a matter of fact, iPhone users may meet many problems during the usage, and the situations of data loss from iPhone may happen unexpectedly, which will bring much inconvenience to us in our life and job. So, in this article, we will teach you how to recover data erased iPhone to prevent data loss.
Method 1: Recover iPhone data from erased iPhone via iCloud
Before using this method to recover iPhone data, you should make sure that the sync option has been enabled on your iPhone, then the missing files can be recovered easily. You can follow the steps as below to recover data from erased iPhone with iCloud backup.
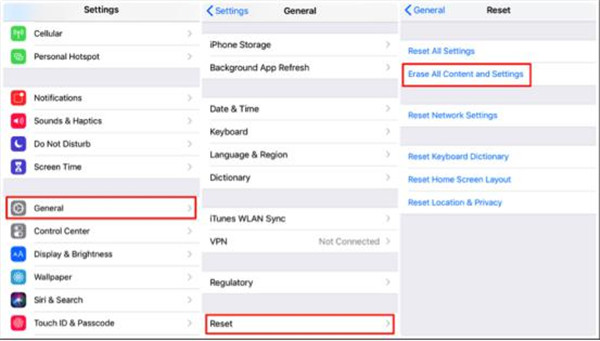
1. Open the Settings app on your iPhone and tap on the General option. Then click on the option Reset and choose Erase All Content and Settings.
2. Afterwards, a popup can be seen and then you need to tap on the option Erase iPhone.
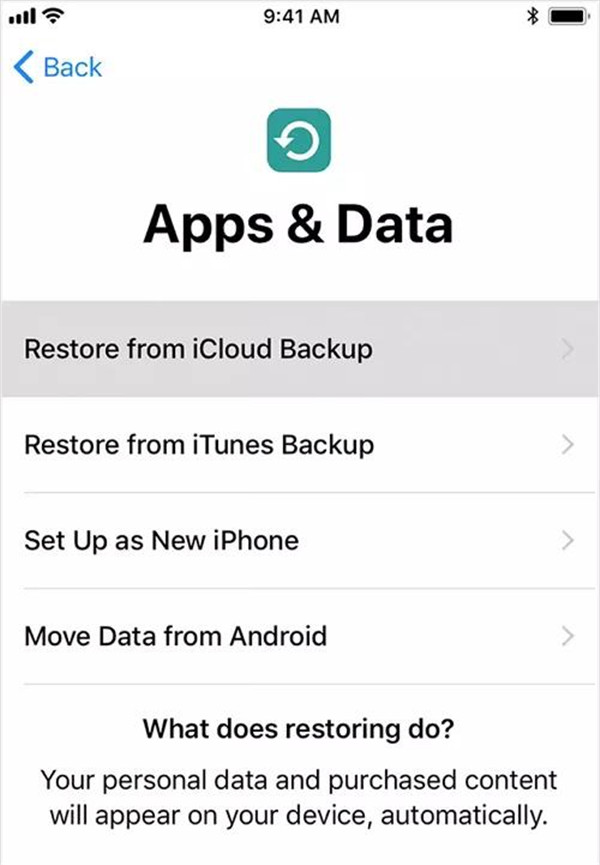
3. Once your iPhone reboots, click on Set up iPhone and then choose the option Restore from iCloud backup.
4. Now log in your iCloud account and then choose to backup including the deleted data, then tap on the option Restore. After a while, all the missing data will be recovered to your iPhone.
But there is a drawback in this method, that is some existing data and the settings still get lost on iPhone.
Method 2: Recover iPhone data from erased iPhone via iTunes
iTunes backup is well-known among Apple users, but you should keep in mind that if you have backed up all your deleted data previously via iTunes, then it can be retrieved with ease. Here the following steps will show how to recover from iPhone erase data via iTunes.
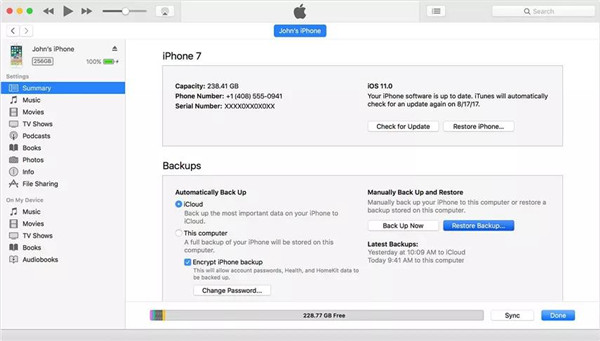
1. Launch iTunes on your computer or Mac which you have chosen to back up your data previously.
2. Connect your iPhone to the computer or Mac with supported USB cable.
3. Click on the device icon on the upper left side in iTunes.
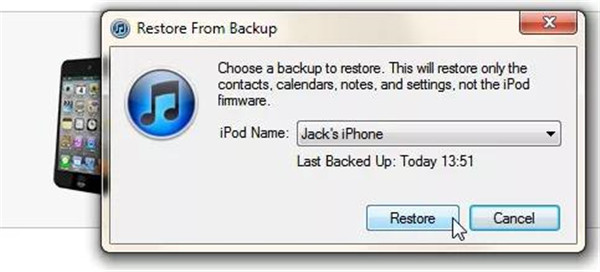
4. Afterwards, have right-click on your phone and choose Restore from Backup.
5. Then the latest backup can be chosen to go on further.
Method 3: Recover data from erased iPhone without any backup - iOS Data Recovery
Can you recover data from an erased iPhone without any backup? Certainly. If you haven’t backed up your deleted data before, here the great method to help you recover the data from your erased iPhone is to use the third party recovery tool. Leawo iOS Data Recovery is a powerful recovery software tool that can do a favour to recover the all data from locked iPhone, such as restore deleted photos, videos, contacts, notes, recordings and others. This comprehensive data recovery software is compatible with Apple devices like iPhone, iPad and iPod devices. No matter what reasons caused the data loss, it can help to recover the missing or deleted data from different models of iPhone, which can effectively prevent the data loss in the accidental case. More than 14 types of files are supported in recovery in a simple way. Moreover, Leawo iOS data recovery also can be a great backup tool for the data from Apple devices.
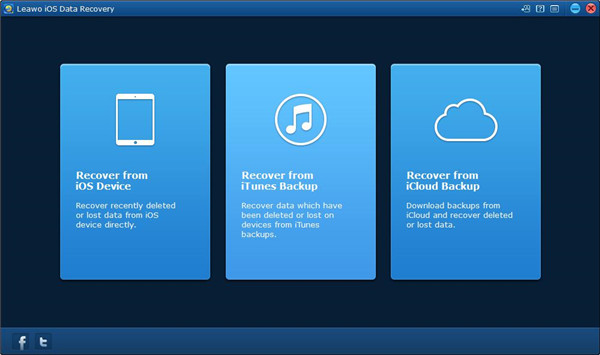
There are three optional recovery modes for users to choose in data recovery, which includes iOS data recovery mode, iTunes data recovery mode and iCloud data recovery mode.
Here below we will show you how to recover data from erased iPhone with Leawo iOS data recovery in three modes separately.
1. How to recover data from erased iPhone via iOS data recovery mode?
Two modes are offered to recover data from erased iPhone from iOS devices. One is Normal mode, the other is DFU mode. The data like Contacts, Notes, Messages, Call history and more can be recovered via the Normal mode. While DFU mode not only can recover the data that DFU mode can recover, it also can recover the data like Camera roll, Message attachments, Photo Library, etc. But, DFU mode is only available for iPhone 4 and iPoad touch 4. And Normal mode can support all models of iOS devices. Below you can follow the specific steps of how to recover data from erased iPhone under the Normal mode.
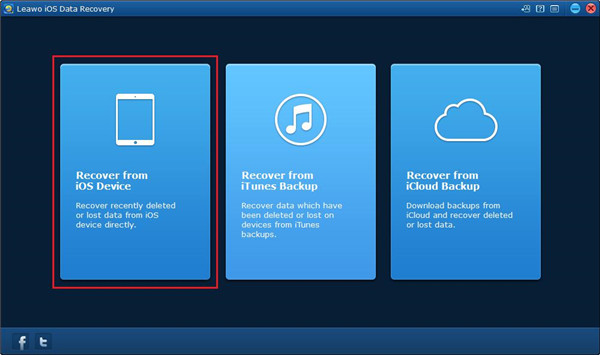
1.1 Launch Leawo iOS data recovery on computer and click on the first tab from the main interface of the software.
1.2 Connect your iPhone to the computer and then select your iPhone model from the bottom device list. After that, press on the “Start” button to begin scanning your iPhone.
1.3 After the scanning is finished, all the data from your iPhone can be seen in the list on the left sidebar. And specific content of the data is displayed on the right part. Then choose the data you would like to recover and click on the “Recover” button.
1.4 A small panel will pop up and you need to choose a target folder to save the recovered files. By clicking on the button “Open” to choose the target folder and you also can enable the option “Automatically open the output folder after finishing recovery” below the “Save to” box to make the target folder open in an automatic way once the recovery is completed. Then click on the button “Go” to begin recovering data from your iPhone to computer.
2. How to recover data from erased iPhone via iTunes data recovery mode?
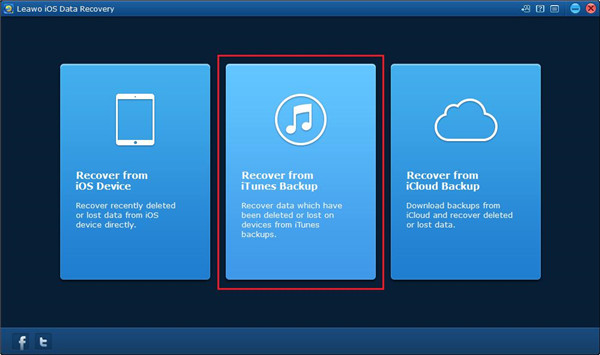
2.1 Go back into the main interface of Leawo iOS data recovery. Then choose the second tab on the main interface to enter iTunes data recovery mode.
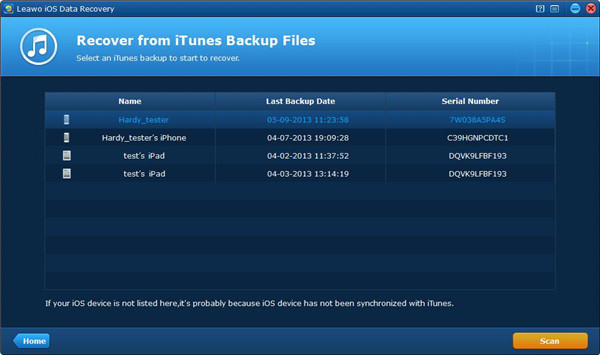
2.2 After you have chosen the second tap “Recover from iTunes Backup”, all backups from your various kinds of iOS devices which you have backed up previously through iTunes can be seen in the list. If the backup of your iPhone can be seen in the list, that probably means the data from your iPhone hasn’t been back up to this computer yet. Choose your device back up and then click on the “Scan” button to begin scanning.
2.3 Once the scanning process is finished, 14 types of data that can be recovered from iTunes backup are displayed on the left sidebar. Click on each type of the data and then the related file will be shown on the right part of the window. You can choose the files that you need for recovery.
2.4 Once you have chosen the files that you need to recover, click on the button “Recover” on the right corner bottom and then you will see a small pop-up panel. By clicking on the “Open” button, you can choose an output directory to save the files that you have chosen for recovery. If necessary, you can let the output directory open automatically after the recovery is completed by enabling the option “Automatically open the output folder after finishing recovery”. Finally, click on the “Go” button go begin recovering the data from iTunes backup to your computer.
3. How to recover data from iPhone via iCloud data recovery mode?
3.1 Choose the third tab from the main interface of Leawo iOS data recovery and you will enter iCloud data recovery mode.
3.2 Once you have chosen “Recover from iCloud backup”, you will go into the page which requires you to log in iCloud account by entering your Apple ID.
3.3 After you have logged in your iCloud, the backup from iCloud will be scanned by the software. Once the scanning process is completed, you will see your backup display in the list. Have a double click on the backup or press on the button “Download” on the left corner bottom to begin downloading the backup. During the downloading process of your backup, you can end the downloading by clicking on the button “Cancel”. The time taken on completing the downloading depends on the size of your backup.
3.4 Once the downloading of backup has been finished, the program will begin scanning the backup automatically. Once it is done, all the data from your backup will be listed on the left sidebar of the window. Choose one item from the left column and the specific files will be shown on the right part, you can choose the files you want for recovery.
3.5 Once you have chosen the files that you need to recover, click on the “Recover” button and then a small panel will show up, where you are required to choose the target folder to save the recovered files that you selected previously. Click on the “Open” button to choose target folder and then you can make the target folder opened by the program automatically by checking the option “Automatically open the output folder after finishing recovery”. Finally, click on the “Go” button to begin recovering the data from iCloud backup to the computer.


 Try for Free
 Try for Free

