Video resizing is a simple yet common video editing practice for both video editor beginner and professional practitioners. As one of the most powerful and popular video creating and editing tools in the world, Adobe Premiere Pro is a program that people use most frequently when they need to resize a video. However, the complicity of Adobe Premiere Pro also makes it kind of hard for beginners to resize a video in this program. So, in this article, we're going to provide you a detailed guide on how to resize a video in Adobe Premiere Pro. Besides that, we're also going to introduce a relatively simpler way to resize your videos. But first, let’s talk something about the reason why we should always consider resizing our videos for different purposes.
Part 1: Why Should We Resize Video?
Video resizing generally indicates the adjustment to the width and height of the video playback. video resizing is especially important when we need to adapt the video to a platform or a device with a different aspect ratio in display. For example, when you play a video with the resolution of 4:3 on a screen of 16:9, there will be a considerable amount of black bar at both side of the video picture. The same thing could also happen when we upload a phone recorded vertical video to websites like YouTube. The incompatibility of aspect ratio could cause black bars or white bars in the video picture which would drastically affect watching experience.
Besides that, video resizing is also a popular practice for advanced video editing techniques, and it's very useful for comparison videos, reaction videos or picture-in-picture videos. Since video resizing is useful and important in a lot of video editing scenarios, now let's have a look at how to resize a video in Adobe Premiere Pro.
Part 2: How to Resize a Video in Premiere?
Now we understand the importance of video resizing, let's see how we can easily resize a video in Adobe Premiere Pro. Premiere Pro is a professional video editing tool that allows you to perform all kinds of video editing practices like adding special effects, downscaling 4K to 1080P, and of course, resizing a video. Here is how to resize a video in Adobe Premiere Pro.
Step 1: Launch Adobe Premiere Pro and import source video.
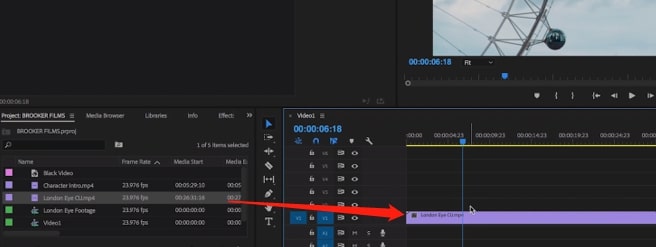
Launch Adobe Premiere Pro and drag your source video clip to the media box of your project. Then from the media box, drag your video clip to the timeline so you can do further editing to the clip.
Step 2: Search and apply “Crop” effect
Then go to the “Effects” tab, Search “Crop” in the search box, then drag and drop the crop effect to the video clip that you have just added to the timeline.
Step 3: Resize the video
Then go to the “Effect Controls” tab. Under there, you are able to see the “Crop” effect that has just been added to the video clip. Under the “Crop” effect, you are able to see left, top, right and bottom, 4 parameters. Simply drag the number besides each parameter and you can change the size of the video in the corresponding direction.
Step 4: Save and export
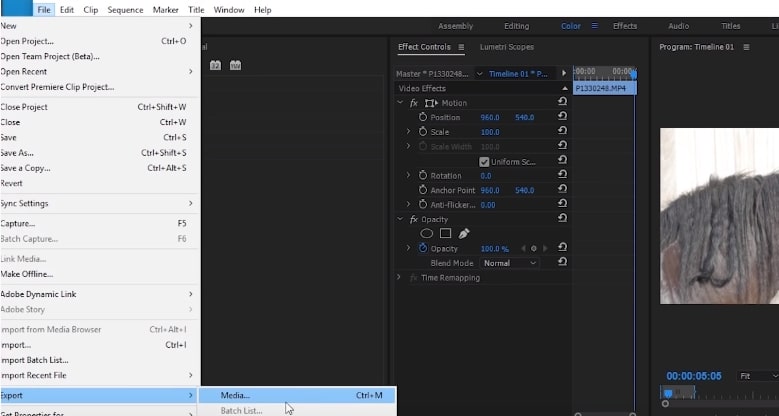
Finally, click “File” in the toolbar, then “Export”, and choose “Media” to open the Export Settings window.
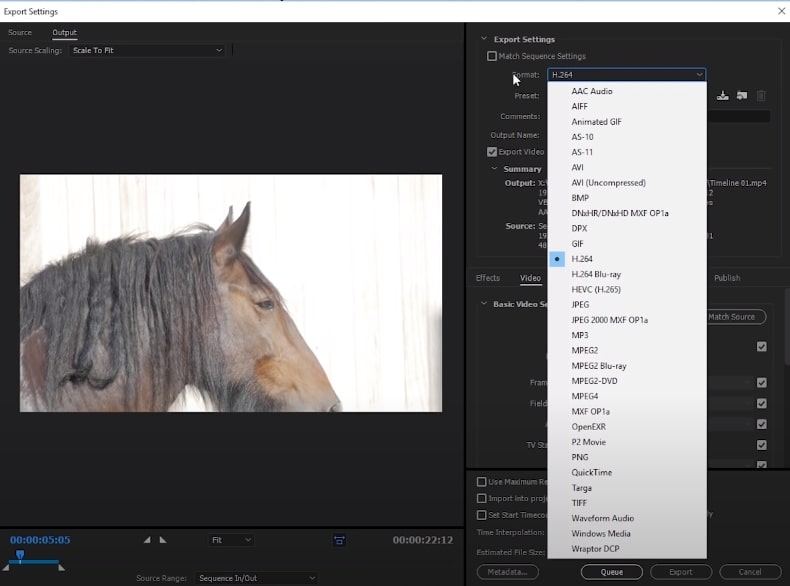
In the "Export" settings window, you can set various export parameters including video format, output name, rendering effects and a lot more. To initiate exporting video, click on the “Export” button after confirming that all parameters have been set properly. Wait for a while until the progress bar finishes and you are able to see the newly rendered and resized video in the output folder.
Part 3: Resize Video via Leawo Video Converter
Now we know how to resize any video in Adobe Premiere Pro. What as you have probably noticed, as a powerful and professional video creating application, Adobe Premiere Pro has made the video resizing process kind of more complicated than it's supposed to be. If you are looking for an easier and more efficient way to resize your video, then using Leawo Video Converter might be a better option than opting Adobe Premiere Pro.

-
Leawo Video Converter
- Convert video and audio files between 180+ formats without quality loss
- Support 720P, 1080P and even real 4K video output
- Create photo slideshows from photos stored on camera, computer, camcorder, etc
- Built-in video editor to trim, crop, add watermark, apply special effect, etc
- 2D to 3D converter with 6 different 3D movie effects available
Not like Adobe Premiere Pro, Leawo Video Converter it's a video editor and converter application that focuses more on the ease of use and efficiency of the application. With Leawo Video Converter, you can not only resize any video in the matter of seconds, but also perform various advanced video editing practices like turning 2D videos to 3D, reducing audio noise in the background, trimming the video length, adding watermarks to the video and more with only several mouse clicks.
Compared to Adobe Premiere Pro, Leawo Video Converter has a more user-friendly program interface. Now let's have a look at how to resize a video in Leawo Video Converter with a clear step-to-step guide.
Step 1: Download and launch Leawo Video Converter
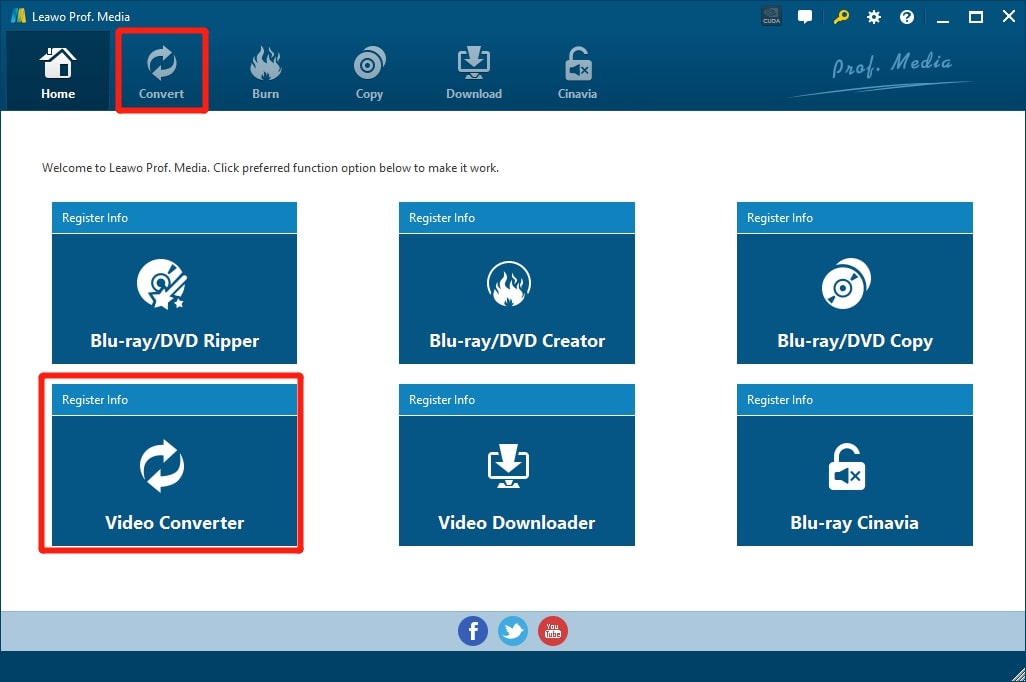
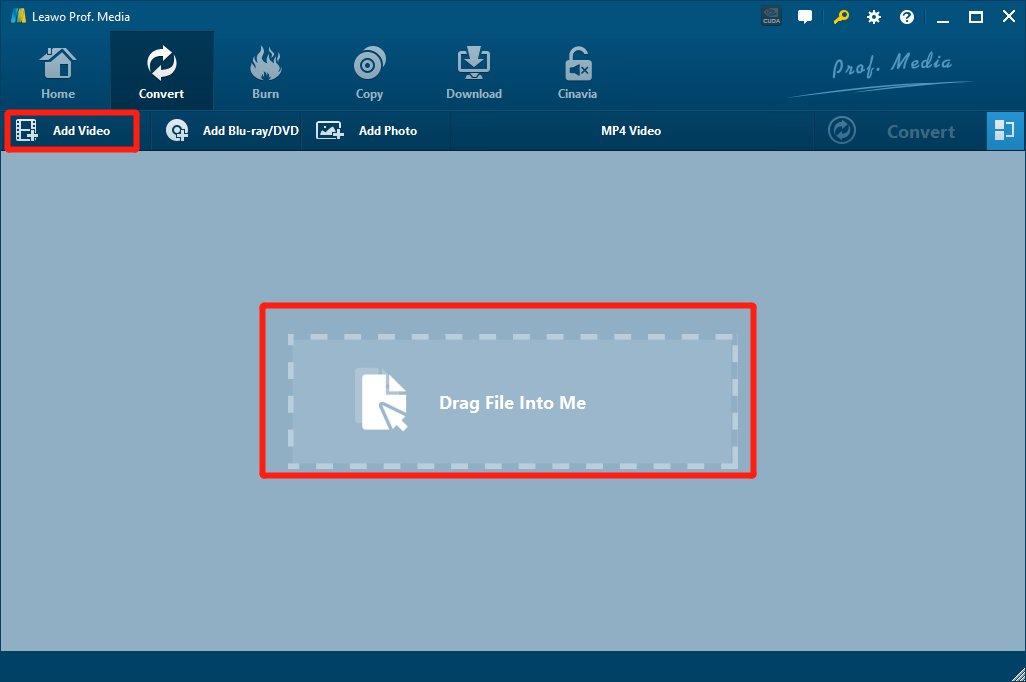
Leawo Video Converter has both Windows and Mac version. So, make sure you download the right version of the application, then install the program on your computer. Since Leawo Video Converter is a component of the all-in-one media toolkit Leawo Prof. Media, after launching the application, you need to click on the “Video Converter” entrance on the homepage, or the “Convert” button in the navigation bar at the top to enter the “Video Converter” function module.
Step 2: Import your source video
After entering the video converter function module, drag your source video from the original folder to the main interface of the application to import it. You can also click on the “Add Video” button and find your video manually in its file path.
Step 3: Go to the “Edit” panel
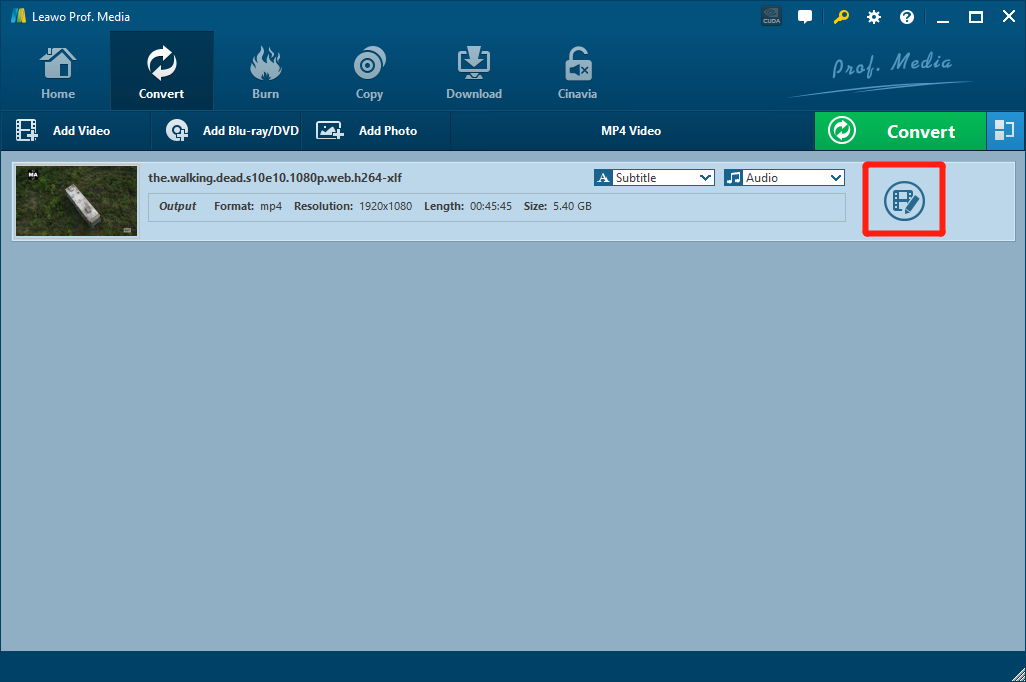
Once your video gets imported, click on the edit icon on the right side of the video so go to the edit panel, where you can find all kinds of video editing options for you to choose from.
Step 4: Resize the video
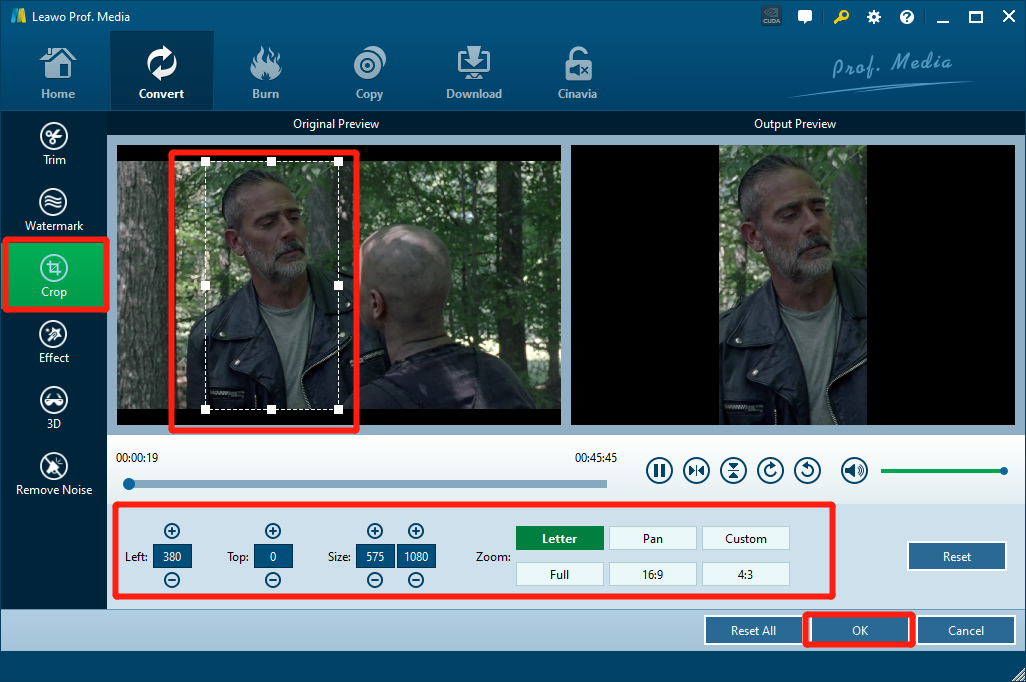
On the video editing panel, choose “Crop” and you are able to see the cropping parameters and settings on the right side. You can directly drag the frame in the “Original Preview” window to change the size of the video and have an instance preview in the “Output Preview” window. Below the preview windows there are cropping parameters that you can manually change if you want a more precise control of the resizing operation. You can change the number of the “Left” and “Top” to control the resizing degree, or change the number of the “Size” parameter to control the final output image size. There are also six “Zoom” modes for you to choose on the right.
As introduced above, on the video editing panel, you also have various video editing options that you can apply to the current video. Each option provides detailed and full control of necessary parameters. After getting a satisfied effect, simply click “OK” to confirm and apply the editing.
Step 5: Save and output
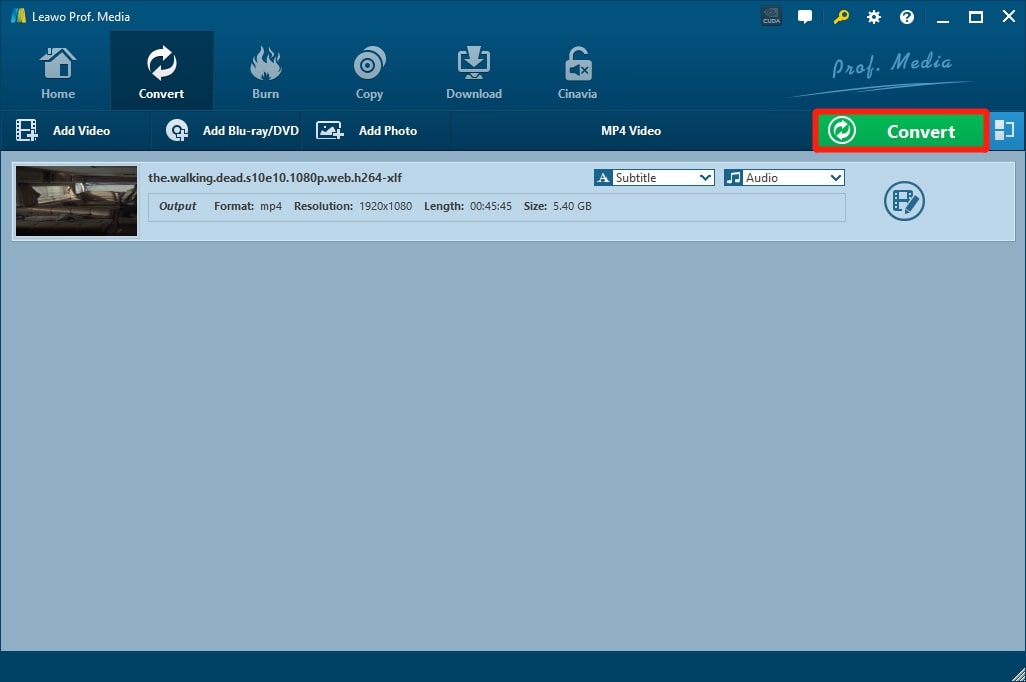
Finally, click on the green “Convert” button so fold the output settings panel.
On the output settings panel, set the output file path for your video in the “Save to” box, and then click on the “Convert” icon below to start rendering your final output video.
Leawo Video Converter itself is already powerful enough and can provide a great value for users. But in the Leawo Thanksgiving and Black Friday special deals, Leawo Video Converter is even more worth it in various promotional bundles and with 30% off coupon code. Besides Leawo Video Converter, there are also other great software on deal and provide extremely powerful discounts. You can even get the newly released AI photo enhancement software Leawo PhotoIn for absolutely free on the special deal page. Head to Leawo Thanksgiving and Black Friday special deals and enjoy the biggest discounts of the year before it wraps up.
Part 4: Comparison between Premiere and Leawo Video Converter
Today we introduced two of the best ways for you to easily resize a video. You can either use a professional video creating software Adobe Premiere Pro to resize a video, or use a relatively simpler tool Leawo Video Converter to do the same. Although they can both achieve the goal, there are still a lot of differences between the two solutions. Now let's have a better look at the differences between Adobe Premiere Pro and Leawo Video Converter with a simple comparison table.
| Features | Adobe Premiere Pro | Leawo Video Converter |
| Windows Version | √ | √ |
| Mac Version | √ | √ |
| Ease of Use | Low | High |
| Video Rendering Speed | High | Higher |
| Turn 2D video to 3D | × | √ |
| Software Size | 1.01 GB | 127M |
| Customize Output Profile | × | √ |
| Lossless Output | √ | √ |
| Mobile Device Preset and Optimization | × | √ |
| Quick Effect Adjustment | × | √ |
| Quick Audio Noise Removal | × | √ |
| Fast Trim and Crop Operation | × | √ |
| Price | $239.88/Year | $29.95/Year |

