“VLC Not casting to Chromecast - Hi, whenever I go to Playback > Renderer > My Chromecast, it won't play. Nothing happens (not on my Dell nor on the Chromecast). I'm using VLC 3.0.2 and Windows 10. How can I solve the VLC Chromecast not working? How can I use VLC to cast movies to Chromecast? Please help me with this. Any advice would be appreciated. Thanks in advance.”
As one of the most popular multi-platform media players, VLC media player has quite a lot of wonderful features to improve your digital entertainment, like editing videos, converting videos, playing back media files, downloading live shows, etc. As of version 3.0, VLC media player gets Chromecast support. Therefore you can cast media files from Windows (10) PC, Mac, and Android to Chromecast. You could then watch your movies on big screen displays. However, many people have come across VLC Chromecast not working or failure of VLC casting to Chromecast. What should you do when your VLC player fails to cast to Chromecast? What should you do to solve the issue of VLC renderer doesn’t find Chromecast? Well, if you have problem in casting VLC media player to Chromecast, this guide would be helpful. We here will show you how to successfully cast/stream videos from VLC to Chromecast.
Part 1. How to Stream Videos From VLC to Chromecast?
In case you have no idea on how to stream videos from VLC media player to Chromecast, we here would like to firstly show you detailed guide for casting videos from VLC to Chromecast from both Windows 10 and Mac computer.
How to Cast VLC from Windows 10 to Chromecast
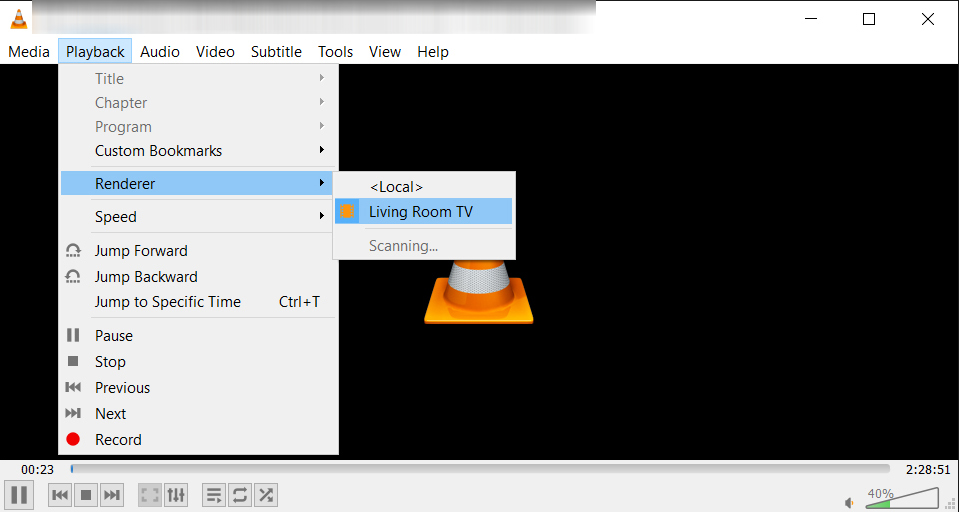
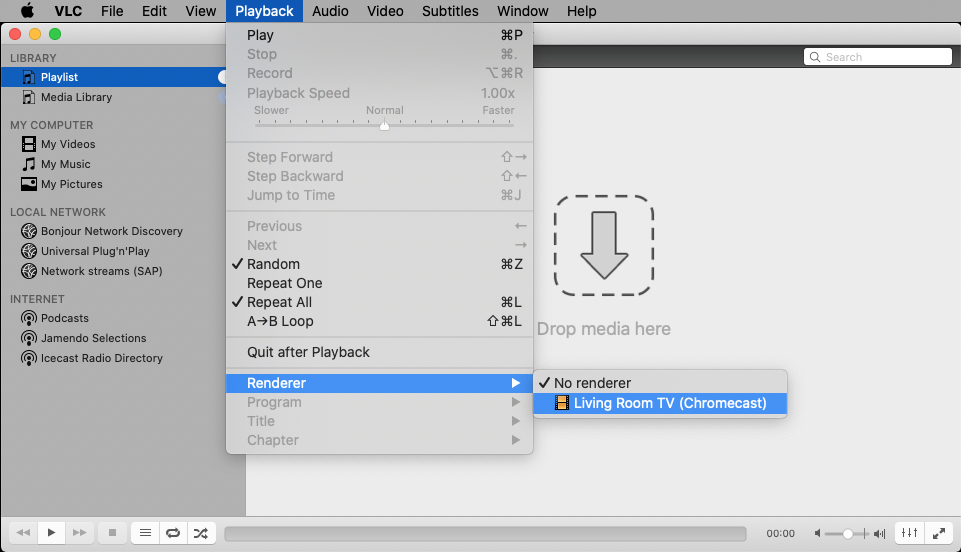
To cast VLC from Windows 10 to Chromecast, simply open VLC and select Playback > Renderer from the menu bar at the top of the player. Then select the name of your Chromecast device from the list.
The below steps to learn how to cast VLC from Windows 10 to Chromecast:
- Kick off the VLC media player on your Windows 10 computer.
- Then click “Playback” option in the menu bar located at the top of your VLC window.
- Hover your mouse pointer over Renderer. A menu will open. Select your Chromecast device from the list. It may be simply labeled as Chromecast, or you may have renamed it.
- Open a video or audio file for casting. If you see a window appear that says, “Insecure site,” just click “View Certificate” and then “Accept Permanently” button.
How to Cast VLC from Mac to Chromecast
It’s quite similar to cast your videos from your Mac to Chromecast. All you need to do is select “Playback > Renderer” option on VLC media player from the Apple menu bar, and then select the name of your Chromecast device from the list for casting.
For detailed steps, you could check the below guide:
- Open your Applications folder and then kick off VLC media player.
- Click “Playback” from the Apple menu bar, which is located at the top of your screen. If you don’t see Playback, make sure you click on the VLC app first.
- Then hover your mouse pointer over Renderer. A menu will open. Select your Chromecast device from the list. It may be labeled as Chromecast, or you may have renamed it.
- Then, open and browse a video or audio file for playback. VLC media player will cast the video file to your Chromecast TV immediately.
In these 2 ways, you could easily cast videos from VLC media player to Chromecast from your Windows 10 and Mac computer.
Part 2. Solutions to VLC Renderer Does Not Find Chromecast
Through the above operations, you could easily cast videos from Windows 10/Mac VLC media player to Chromecast. But sometimes, you may not find any Chromecast option on your VLC Renderer. How to fix this?
If you launch VLC, click through to “Playback > Renderer”, but find no Chromecast device. You could try the below tips to solve the VLC Renderer does not find Chromecast issue.
- Make sure your VLC and Chromecast are under the same WIFI network.
- Under Renderer, there's a Scan option. Click it to find your Chromecast. If VLC is stuck on scanning for renderer, you should use VLC to open a random multicast network stream in the range of address 224.0.0.X, where X is between 100 and 199. You should notice there is nothing played (since there is no such stream available). Wait for a while and then check for available renderers again. Now they should show up (might take a couple of seconds but not more than a minute).
- Click “Tools” in the top menu of VLC, tap “Preferences”, and then click “Reset Preferences” at the bottom left corner. Then, re-open the “Playback > Renderer” to see if there is any available Chromecast device
- Reboot VLC and Chromecast, and then see Chrome is available.
If you have tried these solutions but nothing found, you may try another computer.
Part 3. Solutions to Black Screen in VLC Casting
Some VLC and Chromecast users have reported that “Casting VLC to Chromecast results in black screen with only the title of the file displayed on TV”.
You could try the below solutions to see if the case could be solved or not:
- Make sure that VLC and Chromecast are on the same network.
- Disconnect from the VPN service if connected.
- Update the VLC app to its latest version.
- Turn your firewall off, because it may block the ports. Alternatively, allow VLC port in firewall configuration.
- Check your network configuration and change your network from public to private.
- Check your Chromecast settings in VLC and turn off Audio passthrough: click Tools > Preferences > click All at the bottom left > search Chromecast > uncheck Enable Audio passthrough > click Save.
Generally, this would help you out of the situation of black screen in VLC media player casting to Chromecast.
Part 4. Final Solution to VLC Chromecast not Working - Leawo Prof. Media
We have talked several solutions for solving VLC Chromecast not working issue above. If you find that all the above-mentioned solutions are not working, there is the final solution, which is to convert Blu-ray/DVD/video files to Chromecast compatible videos. That’s Leawo Prof. Media.
As an all-inclusive media converter suite, Leawo Prof. Media includes all multimedia solutions upon Blu-ray, DVD, video, audio, image, online video and even ISO image files. It could convert all these media files for Chromecast and other TV sets. It could help you convert Blu-ray/DVD/video movies to MP4, VP8, 3GP, WebM or 3G2 files for Chromecast or other TV sets. Leawo Prof. Media even enables you to adjust video and audio parameters like video codec, bit rate, aspect ratio, frame rate, audio codec, audio bit rate, channel, sample rate, etc. according to Chromecast or other players you have.
Download and install Leawo Prof. Media on your computer. And then follow the below steps to learn how to convert Blu-ray/DVD/video files for Chromecast.
Step 1: Add source Blu-ray/DVD/video file
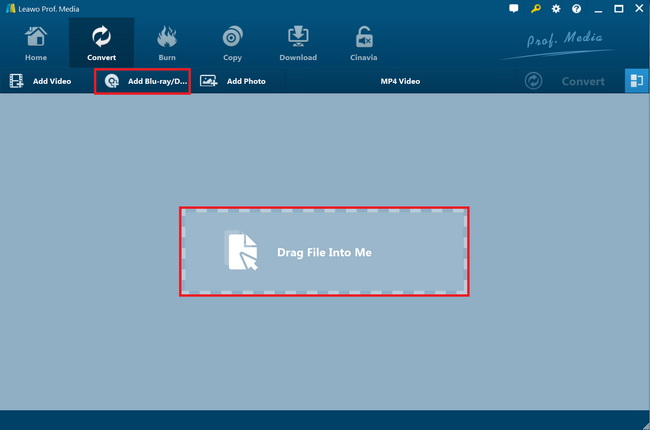
Launch Leawo Prof. Media and then open the “Convert” module on the menu bar. Under the “Convert” module, click on “Add Blu-ray/DVD” to add source Blu-ray disc, folder or ISO image file, or “Add Video” button to browse and add source video files.
Attention:
1. Leawo Prof. Media offers 3 options to load source Blu-ray/DVD movie: Full Movie, Main Movie and Custom Mode. Full Movie allows you to import all titles, and Main Movie only imports the longest title by default but allows you to switch, while under Custom Mode you could freely choose any title(s) for loading. Choose the one according to your needs and load source Blu-ray/DVD movies.
2. You could play back loaded Blu-ray/DVD/video files, select subtitles and audio tracks, edit loaded Blu-ray movie titles, etc.
Step 2: Set output format
Hit the button next to the “Add Photo” button and then click “Change” option on the drop-down panel to enter the “Profile” window. Choose output format from either “Format” or “Device” group according to Chromecast, say MP4 Video from “Format > Common Video” group.
Step 3: Adjust profile parameters
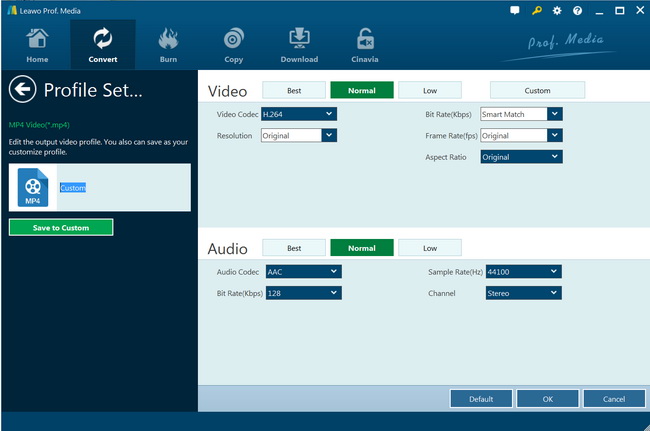
You could adjust video and audio parameters of output files to make sure the output files meet your Chromecast or TV set exactly, including video bit rate, aspect ratio, resolution, audio codec, sample rate, audio bit rate, audio channel, etc. To do these, just click the “Edit” option on the drop-down panel next to the “Add Photo” button.
Step 4: Set output directory and start converting
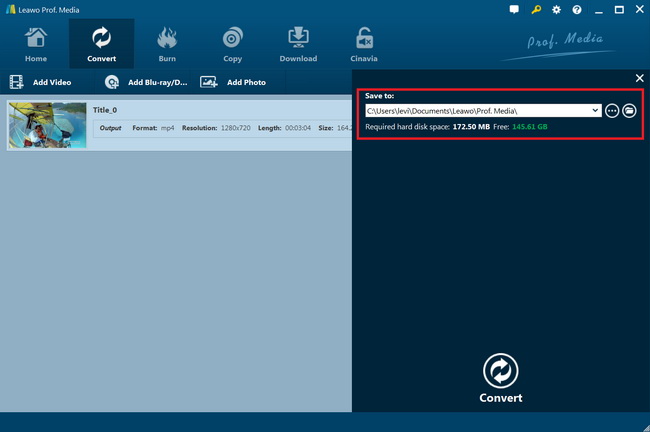
On the main interface, hit the green button of “Convert” and then click the “Save to” option to set a directory to save output video file. After that, hit the “Convert” button at the bottom to start converting Blu-ray/DVD/video files for Chromecast or other TV sets.
When the conversion completes, you then only need to import the converted Blu-ray/DVD/video files to Chromecast or other TV sets you have for unlimited playback.




 Sep. 09, 2021 by