After updating to iOS 9.2.1, I have lost ringtones that I've purchased. I'm using an iPhone 6s and I really don't want to have to keep buying ringtones over and over again if they are disappearing. I checked in iTunes for purchased ringtones and they aren't showing up.
Have you ever come up with the loss of purchased ringtones? This is not a common problem but it does occur among the iPhone users. If the iPhone users have purchased ringtones in iTunes Store, the ringtones will be saved in iTunes library. However, due to update of iOS 9.2.1, the purchasing history might be erased, and then the ringtones will get lost when users sync iPhone with iTunes. Therefore the post will show you how to transfer ringtones from iPhone to Mac with no any data loss.
Part 1. Transfer Ringtones from iPhone to Mac
As is known, when the ringtones are in iTunes library, users can find the location of the ringtones, and extract the ringtones from iTunes to computer. But if the users want to transfer ringtones from iPhone to Mac computer directly, they will need the third-party iPhone transfer software. Users are able to find many iPhone transfer programs on the Internet, among them, Leawo iTransfer for Mac is one of the best. This software enables users to transfer files among iOS devices, iTunes and Mac computers without the sync of iTunes, and it also helps users to backup iPhone, iPad and iPod files to computer. The following guidance will show you how to transfer ringtones from iPhone to Mac computer for a backup, and you are allowed to free download the program to have a try. Note that the trial version has limited transfer times.
Tips: Leawo iTransfer only works with iTunes installed on your PC.
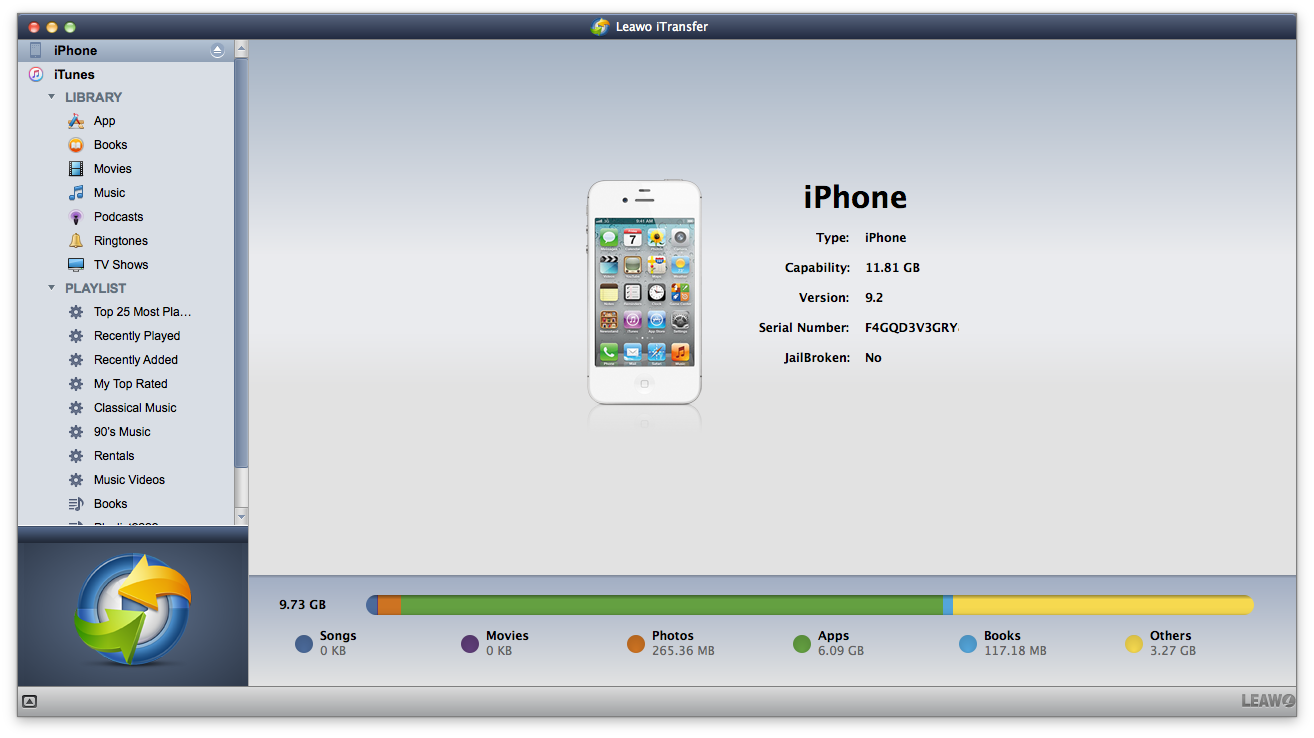
1. Run Leawo iTransfer for Mac and connect iPhone to computer with the USB cable. The software will automatically detect the libraries of your iPhone, and then display the libraries in the left sidebar.
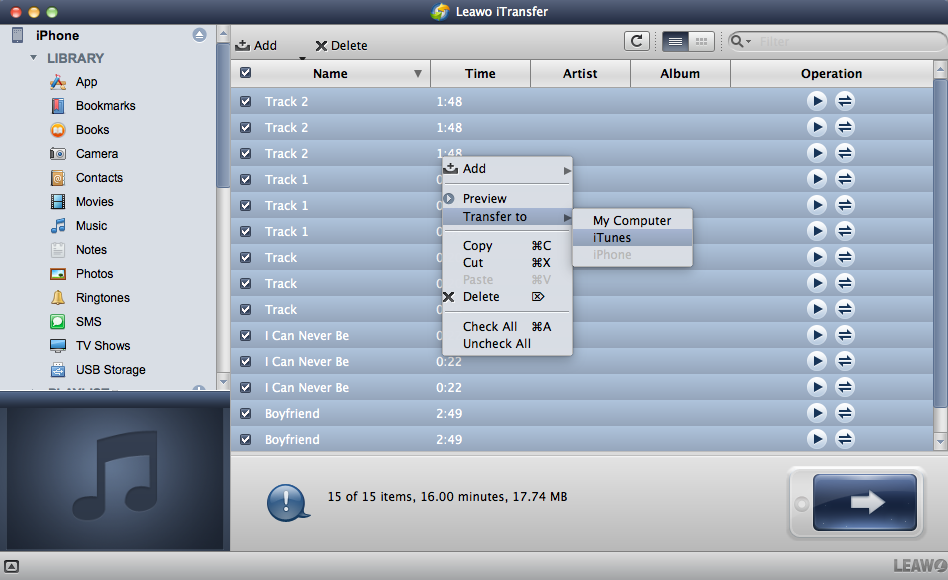
2. Choose "Ringtones" library in the sidebar and then the contents will be shown in the right part. Click the transfer button at the right bottom to transfer all the ringtones. Or hold "Ctrl" key and click to choose certain files, then right-click the chosen ringtones to "Transfer to > My Computer".
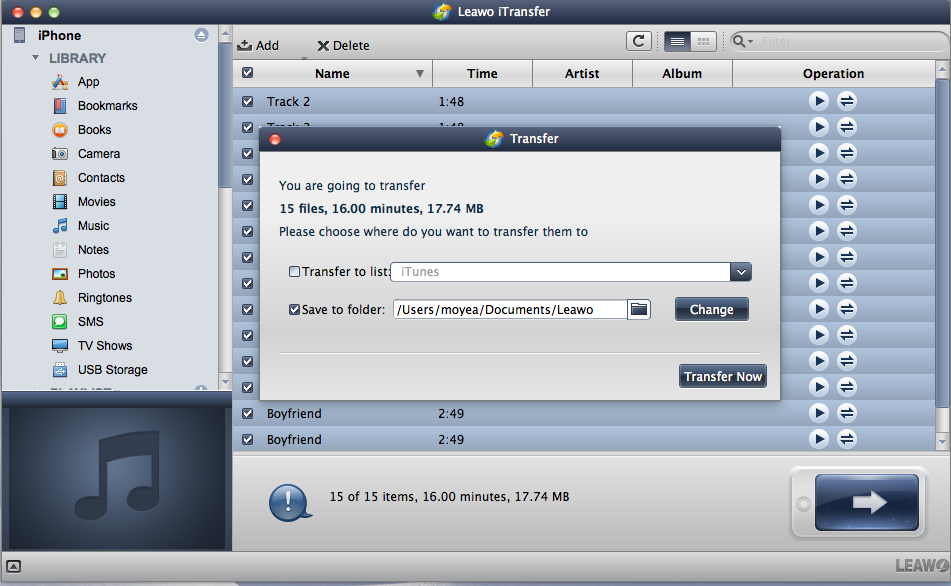
3. After selecting ringtones, you will see a pop-up dialog of transfer settings. Check "Save to Folder" and click "Change" to choose a folder on your computer to save the exported ringtones. You can also check "Transfer to List: iTunes" to transfer the ringtones to iTunes library.
When the transfer is ongoing, please don't disconnect your iPhone. The progress bar in the pop-up dialog will notice the percentage of the transfer process. When you finish transferring ringtones from iPhone to Mac, you will get the ringtones in the target folder.
Part 2. Transfer Ringtones from iPhone to iTunes on Mac
You may get these ringtones from iTunes store or other App store, even from your customization, and now you want to transfer them back to iTunes on Mac for backup, so you won’t lose them by accident. However, as we all know, iTunes only supports users to transfer purchased files from iPhone to iTunes on Mac. That is to say, if you have some purchased ringtones from iTunes on your iPhone, you are able to transfer them back to iTunes. But other non-purchased ringtones are no allowed to be backed up via iTunes.
Don’t worry, the following steps will introduce you an easy and quick way to transfer ringtones from iPhone to iTunes on Mac, including all your purchased and non-purchased ringtones. Besides, the following guide works with all iPhone modes and all versions of iTunes, including iPhone SE and iTunes 12.
Now, let’s see how to transfer ringtones from iPhone to iTunes on Mac with ease. Taking iPhone 6s as an example.
1. Run Leawo iTransfer and connect iPhone. The software will automatically detect the libraries of the iPhone, and then display the libraries in the left sidebar.
2. Click the transfer button (the dark-blue right-arrow button at the right bottom of the software) to transfer all ringtones. Or press "Ctrl" and click to choose certain files to transfer, and then right-click the chosen ringtones to "Transfer to > iTunes".
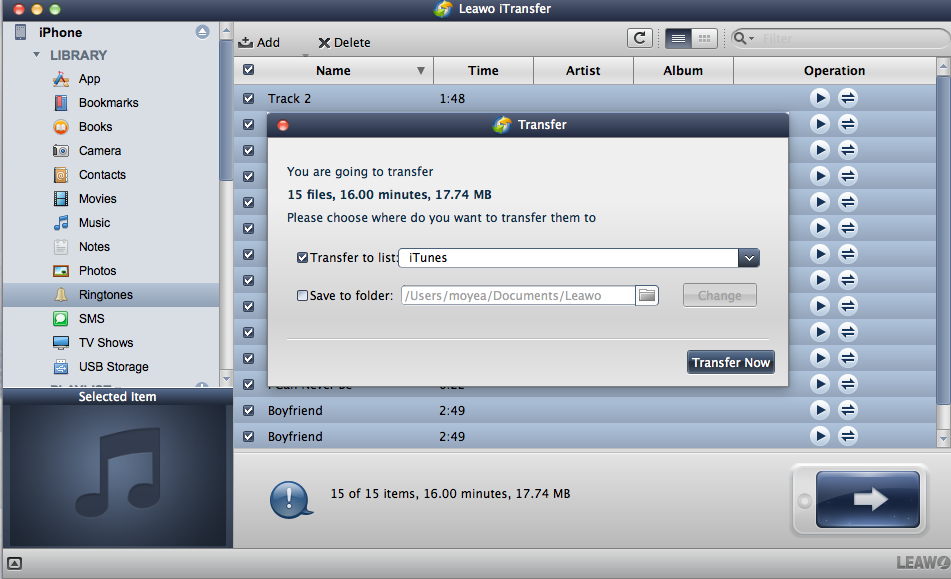
3. If you have clicked the transfer button, they will get to the dialog of transfer settings. In this dialog, check "Transfer to List: iTunes", and click "Transfer Now", then the ringtones will be transferred to iTunes.
Part 3. Related Tips: Make Ringtones for iPhone
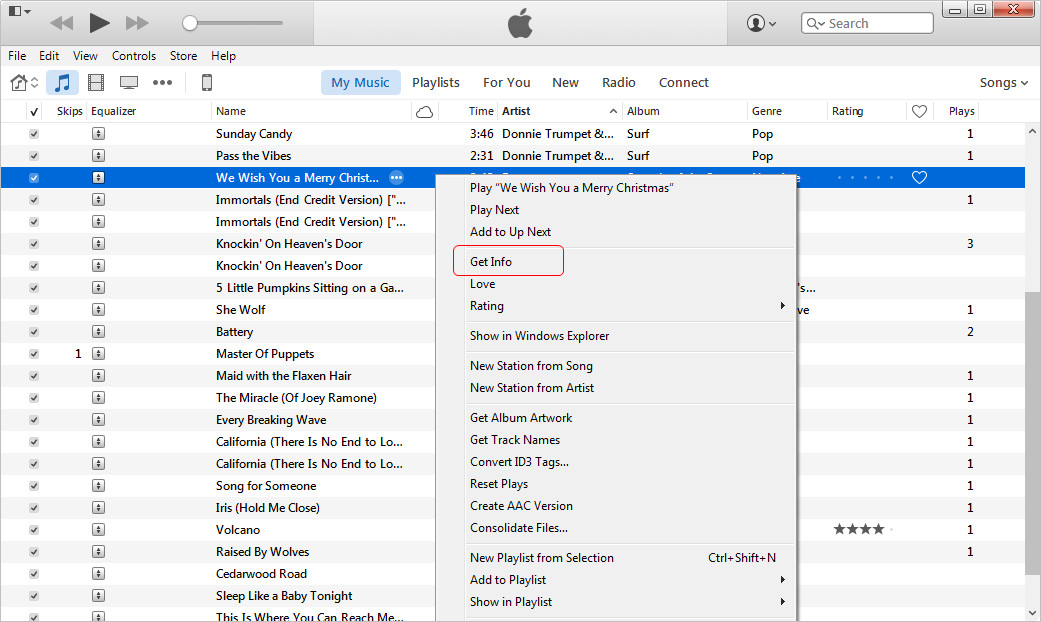
With the above steps, you may have known how to transfer ringtones from iPhone to Mac or iTunes. But some of users may not know the method to make ringtones for iPhone. If you are using iTunes to manage your iPhone data, you can make ringtones for iPhone with this application. iTunes provides a feature of creating AAC file, which will be helpful for making ringtones for iPhone. The following guidance will show you how to do it.
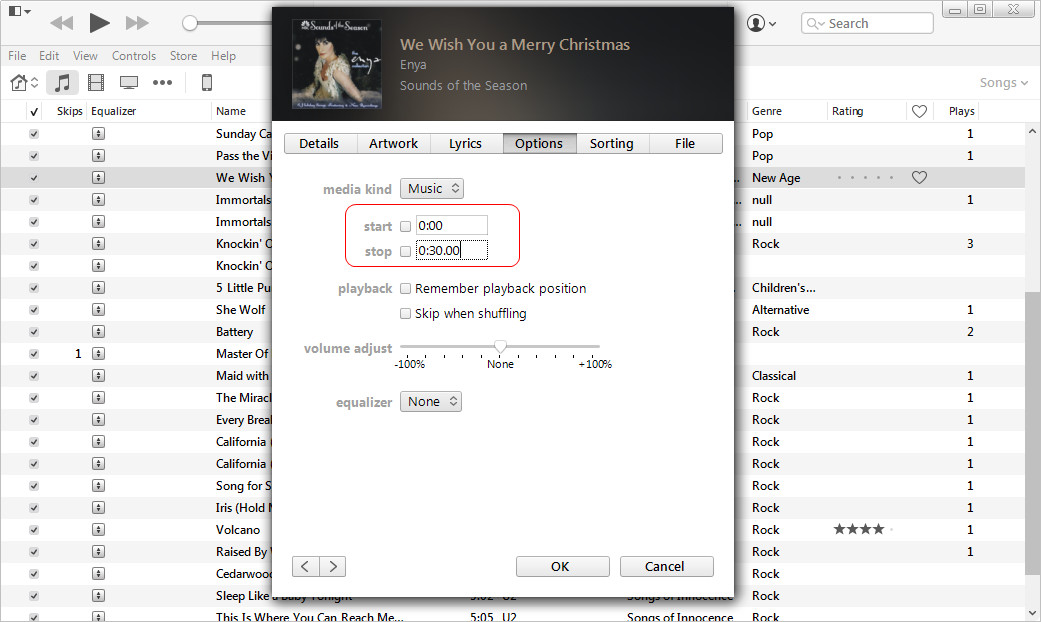
2. Click Options in the pop-up dialog, and crop the song into 30 seconds. Then click OK at the bottom.
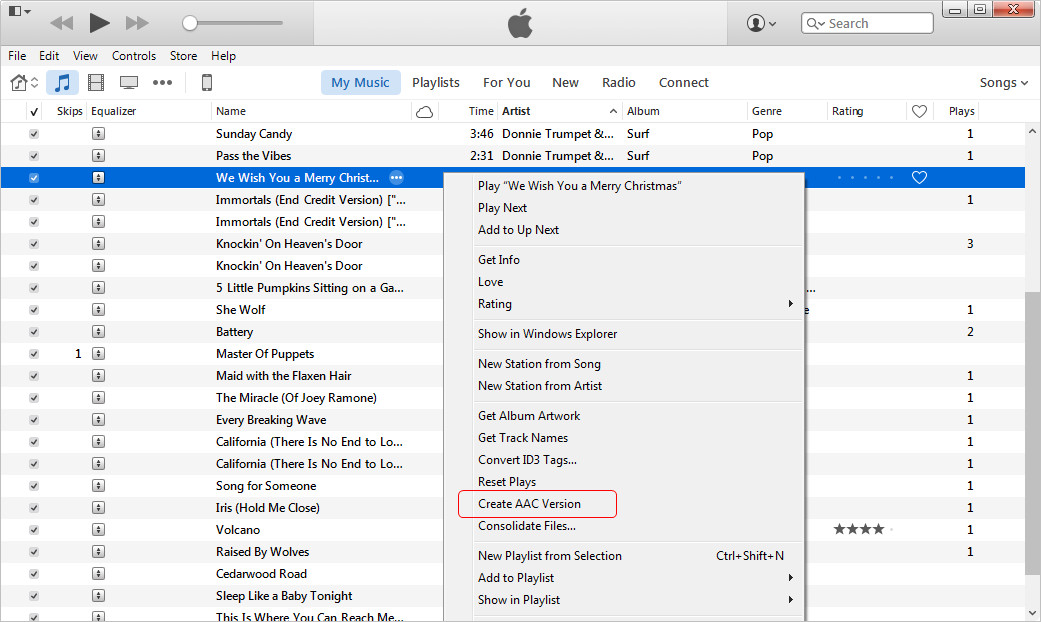
3. Right-click the song again and choose Create AAC Version. And you will find a 30-second duplicate of the song below.
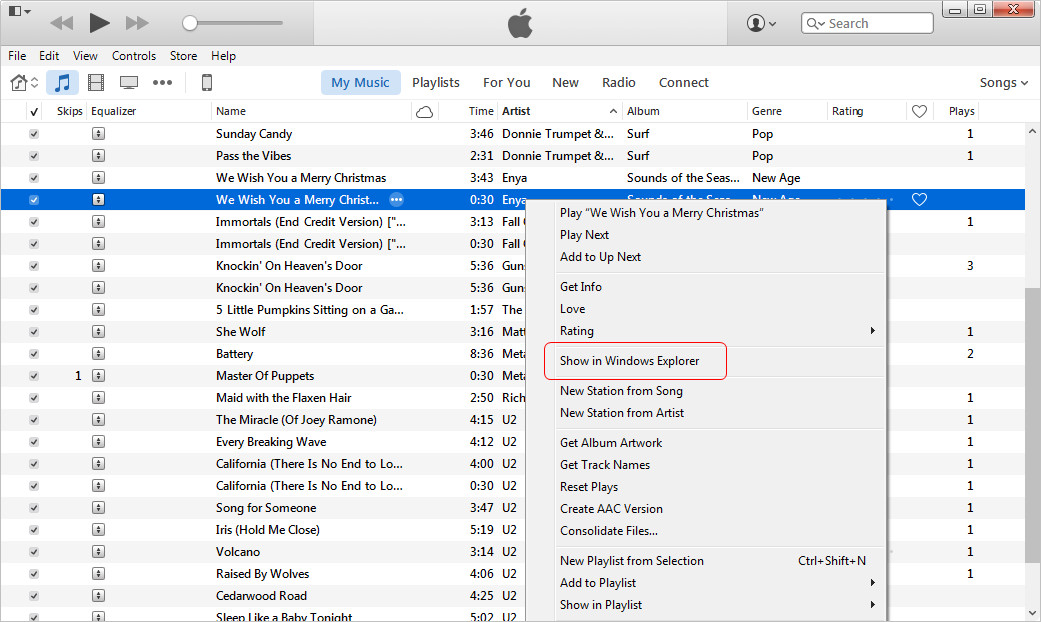
4. Right-click the duplicate and choose Show in Windows Explorer. Then change the file extension to .m4r.
Except for transferring ringtones from iPhone to Mac, users can take advantage of Leawo iTransfer to accomplish various kinds of data transfers of iOS devices, and they will find this software is powerful. Besides transferring files to Mac computer, Leawo iTransfer can also backup files to Mac computers, for example, you can backup your iPhone to Mac with this software. If you are interested in Leawo iTransfer, just free download it and have a try.

