
As the largest social network platform, Facebook offers great opportunity for people to communicate and share. You could freely upload photos and videos to Facebook for sharing with your friends. If you think it's too inconvenient to upload photos one by one, you could also upload a photo slideshow to Facebook. This guide tells you how to create Facebook photo slideshow videos with Leawo photo slideshow maker software.
Part 1: Tips and Notes for Making Facebook Slideshows
It is an undeniable fact that photo slideshows are video files once photos are turned into slideshows. In order to make a slideshow for Facebook, it is necessary for us to make clear what video formats are supported by Facebook. We can easily get Facebook supported video format list from Facebook official website. According to official, Facebook team recommend using the MP4 or MOV format while there are many other video formats on the list. To sum up, I make a table chart of Facebook supported video formats below.
| Facebook supported video formats | ||||||||||
| 3g2 (Mobile Video), 3gp (Mobile Video), 3gpp (Mobile Video), asf (Windows Media Video), avi (AVI Video), dat (MPEG Video), divx (DIVX Video), dv (DV Video), f4v (Flash Video), flv (Flash Video), m2ts (M2TS Video), m4v (MPEG-4 Video), mkv (Matroska Format), mod (MOD Video), mov (QuickTime Movie), mp4 (MPEG-4 Video), mpe (MPEG Video), mpeg (MPEG Video), mpeg4 (MPEG-4 Video), mpg (MPEG Video), mts (AVCHD Video), nsv (Nullsoft Video), ogm (Ogg Media Format), ogv (Ogg Video Format), qt (QuickTime Movie), tod (TOD Video), ts (MPEG Transport Stream), vob (DVD Video), wmv (Windows Media Video) |
Some tips for uploading video/slideshow onto Facebook:
- 1. Make sure your video/slideshow is in a supported format (MP4 or MOV is recommended).
- 2. Keep in mind that the maximum length for a video is 120 minutes and the maximum file size is 4.0 GB.
- 3. Check that you're using the latest version of your browser.
- 4. Uploading a video works best when you have a strong network connection.
Part 2: How to Make a Slideshow for Facebook
Leawo's Facebook slideshow maker is officially named as Leawo Video Converter Ultimate. It is professional Facebook slideshow maker software that can create a slideshow for Facebook within several mouse clicks. It's powerful, practical and easy to use. You only need to add source photos, then this Facebook slideshow maker software could generate slideshows immediately. The guide below shows you how to make a slideshow for Facebook. Free download and install this Facebook slideshow maker software via the following link beforehand. Mac users should download and install the Mac version Leawo Video Converter Ultimate for Mac.
Guide on how to make a slideshow for Facebook:
Step 1: Import source photos
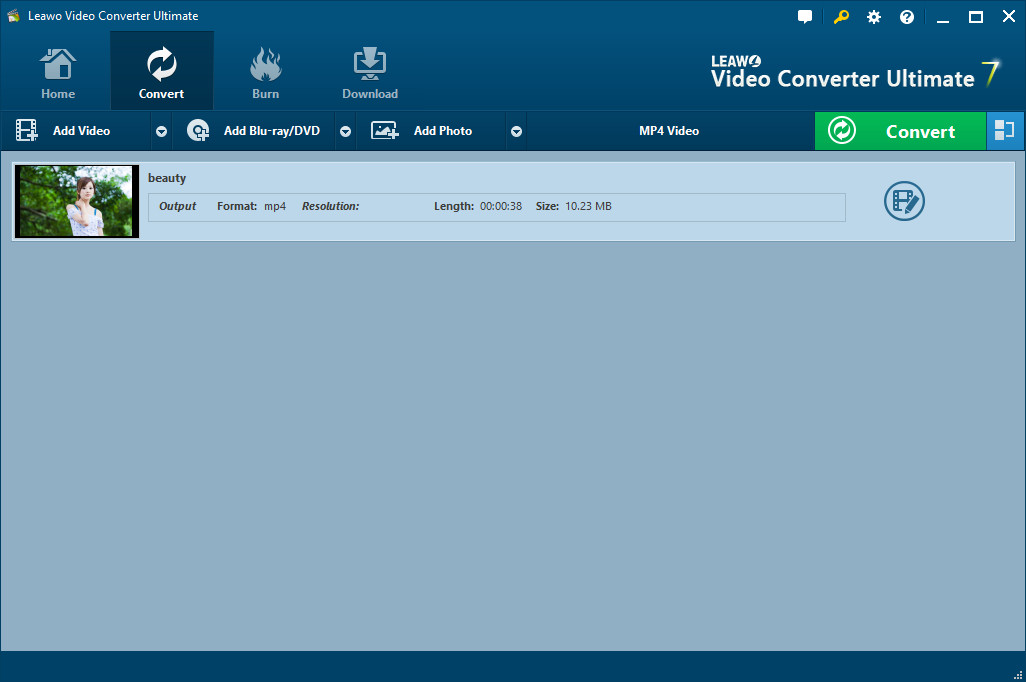
Switch to "Convert" module on the submenu after you enter the main interface of the Facebook slideshow maker. Click the "Add Photo" button to browse and add photos you want to turn into Facebook photo slideshows into this Facebook slideshow app. Selected photos would be automatically generated into a photo slideshow upon loading. You could click the thumbnail icon to play back generated photo slideshow.
Step 2: Edit photo slideshows
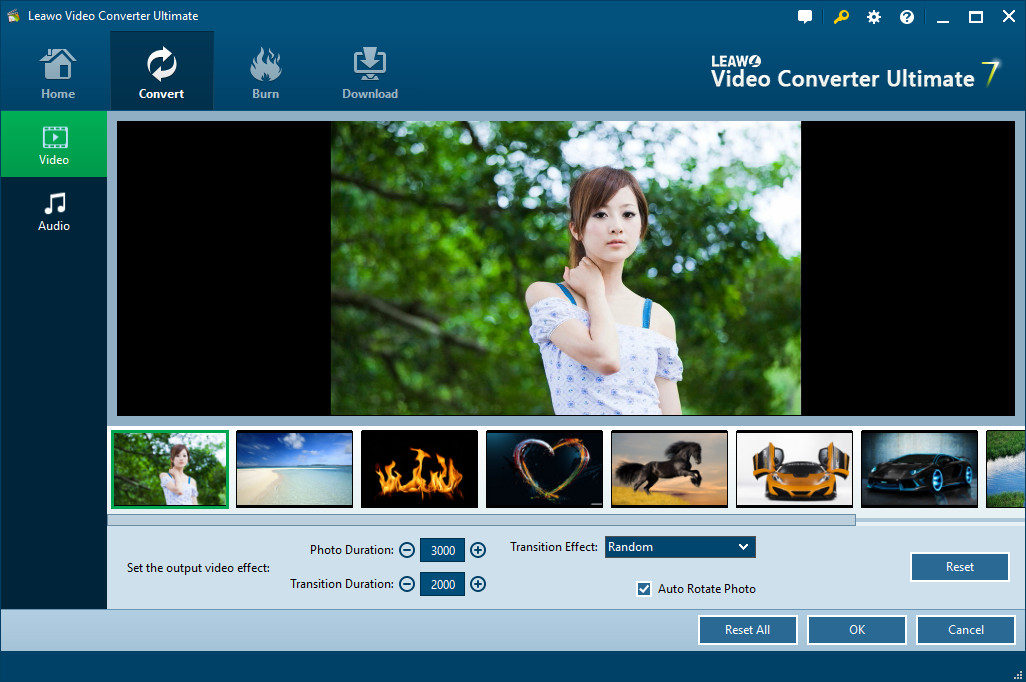
Click the "Edit" icon on the preview panel to enter the "Slideshow Editor" interface, where you need to open "Video" panel to adjust Video Settings (photo duration, transition duration, transition effect). You could adjust photo position via drag-and-drop, and insert other photos into the created photo slideshow on the photo timeline.
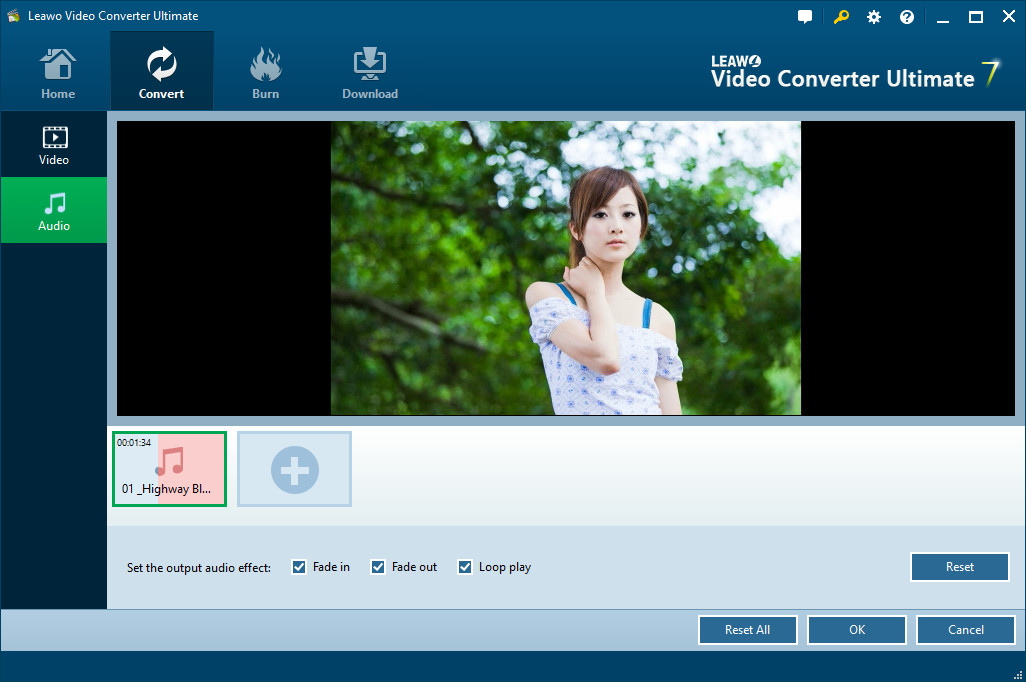
Open the "Audio" panel on the editing panel. You could click the "Add Music" button or directly drag music from your computer into generated photo slideshow to create a Facebook slideshow with music. You could drag one or several songs as background music, change music position and adjust output audio effect.
Step 3: Set output format
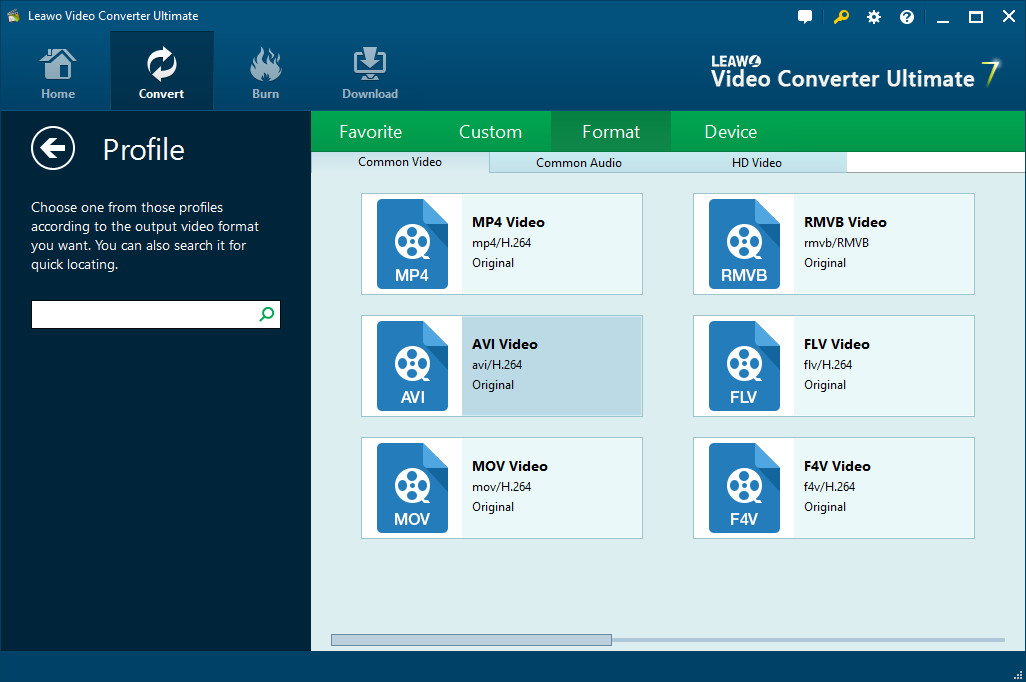
Next to the "Add Photo" button, click the drop-down box (named "MP4 Video" by default) and select "Change" option to enter the Profile panel, on which you could select profile as output format. As you want to create a slideshow for Facebook, MP4 or MOV is recommended.
Note: If needed, you could reopen the drop-down box and then select "Edit" option to enter the Profile Settings panel to adjust video and audio parameters of output profile, including: Video Codec, Bit Rate, Aspect Ratio, Resolution, Frame Rate, Audio Codec, Audio Bit Rate, Channel, etc.
Step 4: Output Facebook photo slideshow
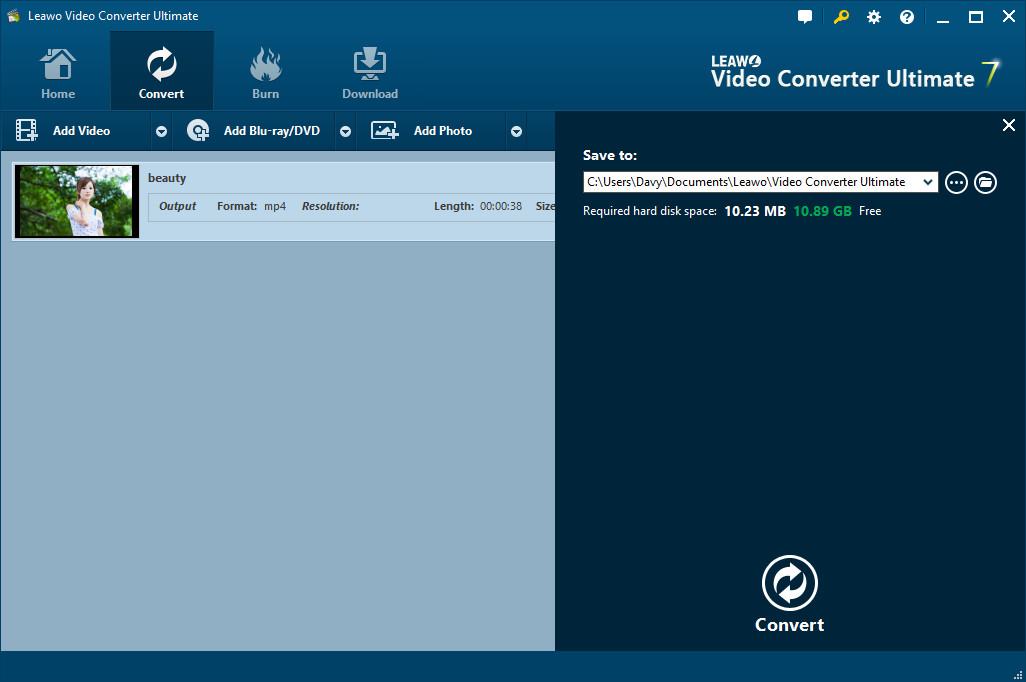
On the main interface, click the big green "Convert" button, set the output directory in the "Save to" box and then click the bottom "Convert" button to start converting generated photo slideshows to desired format. When completed, you can find Facebook photo slideshows on the output directory.
Part 3: How to Upload Facebook Slideshows onto Facebook
After getting Facebook photo slideshows, you are still one major step away from sharing Facebook photo slideshows with friends on Facebook. In order to share what you created with the Facebook slideshow maker, you are required to upload Facebook slideshows onto Facebook. It is an easy task to do so. If you don't know how to do it, you can follow ths guide below.
Guide on how to upload Facebook slideshows onto Facebook:
- Step 1: Log in Facebook account
- Step 2: Go to post writing page and click "Add Photo/Video" to choose the created Facebook photo slideshow to upload
- Step 3: Once choosen, the slideshow will be uploaded immediately. It will take a while to complete uploading. You can add a title for the slideshow, and say something in written form about the sildeshow.
- Step 4: When all finished, click "Post" to pubish.


 Try for Free
 Try for Free


