


 Try for Free
 Try for Free

iPhone users are able to find couple of ways to backup iPhone photos to a Windows PC, but they can only find few methods to backup iPhone photos to Mac. As a fan of Apple products, many people own iPhone, iPad and MacBook at the same time. Therefore, it is absolutely necessary for the users to figure out some easy methods to import iPhone photos to Mac. In this case, iTunes and iCloud are both helpful. However, with iTunes, you are probably not able to view the photos you have backed up on your MacBook. And as for iCloud, the limitations of this cloud service make it a lame duck for backing up iPhone photos. Actually, besides iTunes and iCloud, you still have other methods to backup iPhone photos to Mac with no efforts. Airdrop, iPhoto, the third-party software, and so on all can also provide the solutions for you to transfer photos from iPhone to Mac computers. The guidance below will show you how to do that in detail.
- Part 1: How to Backup iPhone Photos to Mac with Photos App?
- Part 2: How to Backup iPhone Photos to Mac with Image Capture?
- Part 3: How to Backup iPhone Photos to Mac with iTransfer?
- Part 4: How to Backup iPhone Photos to Mac with iCloud Photos?
- Part 5: How to Backup iPhone Photos to Mac with AirDrop?
Part 1: How to Backup iPhone Photos to Mac with Photos App?
One of the most instant ways to back up iPhones to Mac is to depend on the built-in Photos app on your Mac. All the photos you have taken with your iPhone would be saved in the Photos app and as the default app for iOS devices, including Mac. You can make full use of Photos App with ease and accuracy. Here are the detailed steps on how to back up iPhone photos to Mac with Photos app.
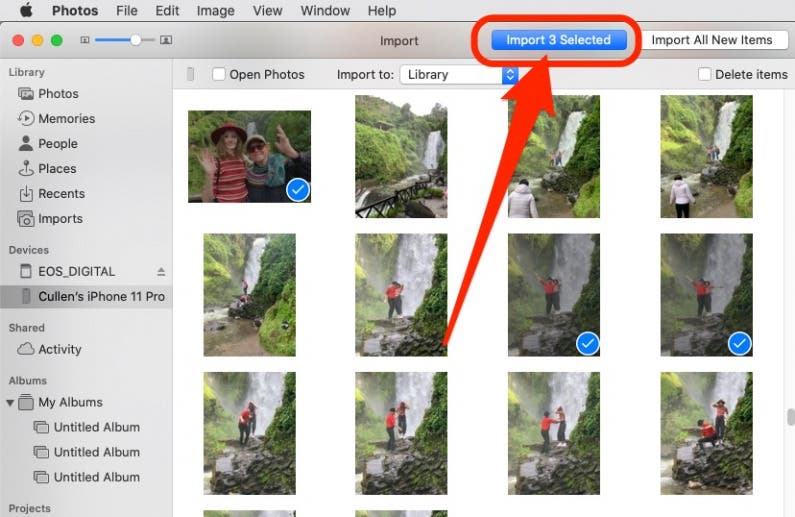
Step 1: Connect your iPhone to you Mac with a proper USB cable. Once your iPhone has been connected, you should give the access to your Mac to recognize your iPhone, so that the data on your iPhone can be viewed on your Mac.
Step 2: Open the Photos app on your Mac. Usually you can find the app in your Dock, or you can use Spotlight search to locate the app.
Step 3: Select the iPhone folder on the left of the Photo app main page. Once you have connected your iPhone to Mac, and you can view your iPhone’s folder. Click it to view all the photos on your iPhone.
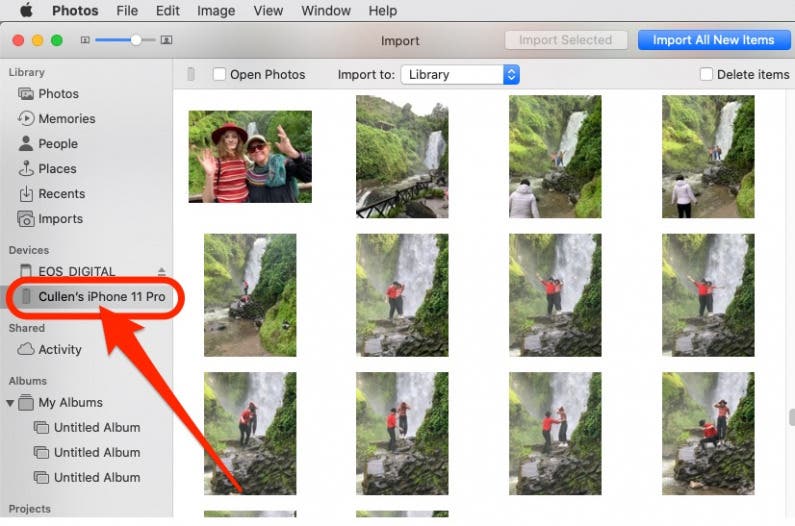
Step 4: Select your preferred photos and click Import button to upload these photos to your Mac. Wait patiently, and the importing process would be finished in minutes.
Part 2: How to Backup iPhone Photos to Mac with Image Capture?
Another efficient way to back up iPhone photos to Mac is to seek help from Image Capture which is embedded within MacOS system for your further convenience. Here are the steps to import iPhone photos to Mac with Image Capture.
Steps:
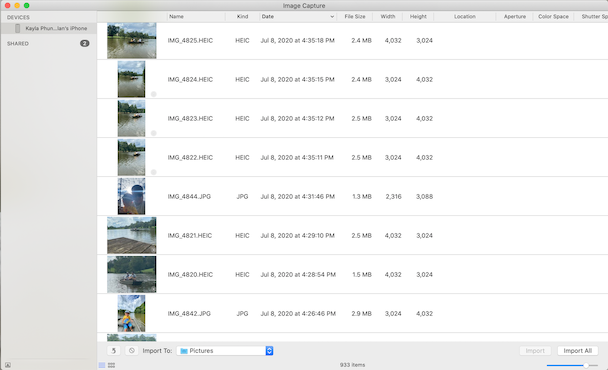
- Connect your iPhone to you Mac with a proper USB cable. Once your iPhone has been connected, you should give the access to your Mac to recognize your iPhone so that the data on your iPhone can be viewed on your Mac.
- Open Image Capture on your Mac.
- Under the Devices category, select your iPhone’s folder if it has been connected successfully. Then you can view the photos on your Mac.
- Click the Import To menu at the bottom of the main screen to confirm the final route to save your photos on your Mac. Then, all the photos you have selected would be saved immediately on your Mac.
Part 3: How to Backup iPhone Photos to Mac with iTransfer for Mac?
When it comes to transferring photos from iPhone to Mac, iPhone transfer software for Mac can always be regarded as one of the best choices. Among all the iPhone transfer programs, Leawo iTransfer for Mac is regarded as one of the best. This software is used for transferring files among iOS devices, iTunes and Mac computers, which enables users to transfer various kinds of files without using iTunes. As mentioned, this iPhone transfer software enables users to transfer various kinds of files, including apps, music, movies, TV shows, eBooks, ringtones, photos, Camera Roll, contacts, text messages, bookmarks, notes, and more. With this iPhone data transfer software, you are able to fully handle your iPhone without messing up the data inside. The following guidance will show you how to transfer photos from iPhone to Mac, and you can free download the software to have a try.
Step 1: Download Leawo iTransfer for Mac
Go to the official website and download the installation package of Leawo iTransfer for Mac. And then install the program on your computer in minutes.

-
Leawo iTransfer for Mac
- Transfer files among iOS devices, iTunes and Mac with ease.
- 6x faster than iTunes
- Transfer up to 14 kinds of data and files without iTunes.
- Support the latest iOS devices like iPhone 12, iPhone 12 Pro, etc.
- Play back, view, and delete data and files on iOS devices.
- Support Windows & Mac OS

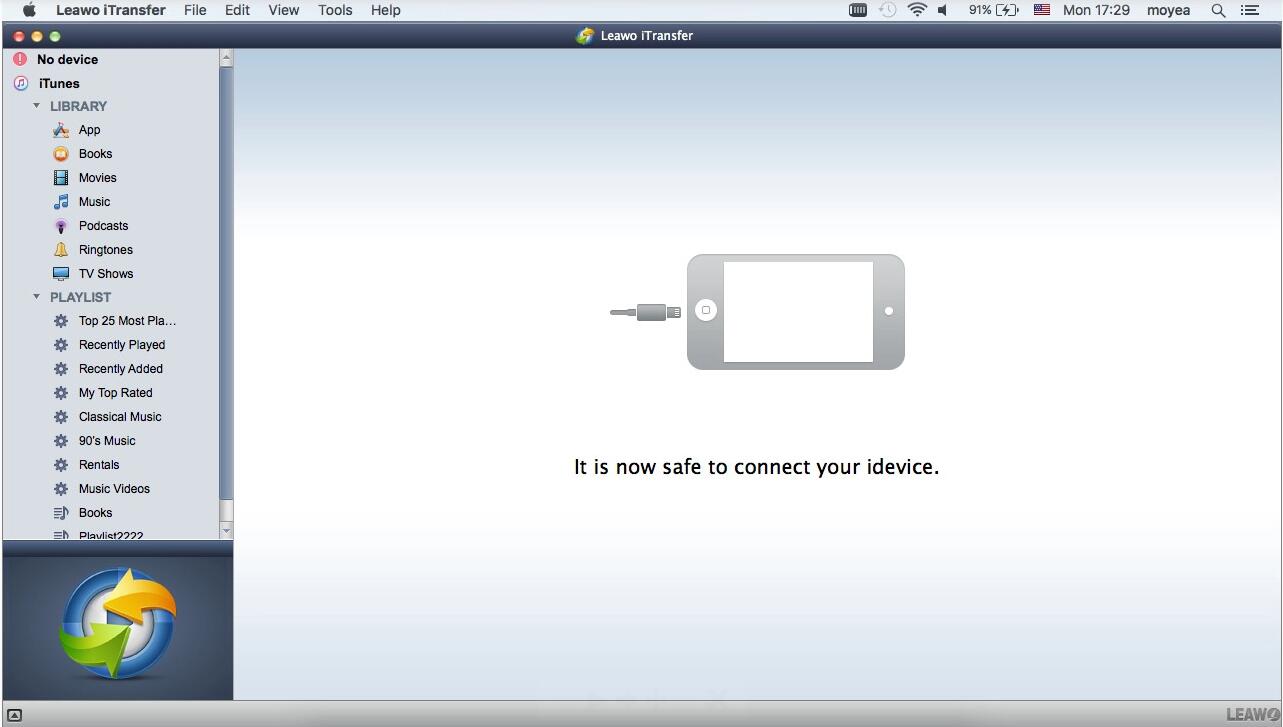
Step 2. Connect iPhone to computer
Run Leawo iTransfer and connect iPhone to computer with the USB cable. The software will recognize your iPhone.
Step 3. Show iPhone photos in iTransfer
Click the name of iPhone and choose Photos in the left sidebar. The iPhone photos will display in the right part of the software window.

Step 4. Choose photos to back up
Hold Command/Shift key to select the photos you want to transfer, and click the transfer button at the right bottom. Or right-click one selected photo and choose Transfer to > My Computer.

Step 5. Start to backup iPhone photos to Mac
After selecting photos, you'll see a pop-up dialog. Check Save to Folder and click Change to choose a folder on your computer to save the photos. Then click Transfer Now to backup photos from iPhone to Mac computers.

When the transfer finishes, you will get the photos in target folder. With Leawo iTransfer, you can easily copy photos from iPhone to Mac. By the way, if you would like to back up iPhone photos to your Windows, the steps would be similar with the help of Leawo iTransfer.
Part 4: How to Backup iPhone Photos to Mac with iCloud Photos?
iCloud is another useful tool to back up mails, contacts, photos, notes, etc. from iPhone, as long as you toggle on iCloud backup. As the default cloud storage devices on your iOS devices, iCloud can be your instant choice to sync and back up all kinds of data between your iPhone and other devices. But it is limited on the storage capacity which is only up to 5GB. If you don’t have any other good solutions to store these photos, you can select iCloud as one of the options to back up iPhone photos to your Mac. Now let's learn how to transfer iPhone photos from iPhone to Mac via iCloud.
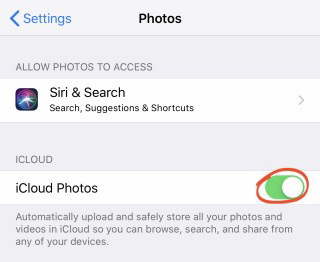
Step 1: Make sure you has enabled iCloud on your iPhone. Go to Settings > Photos > iCloud Photos or iCloud Photo library, then turn on the toggle to activate iCloud. Then, all the photos on your iPhone would be backed up to iCloud under the Wi-Fi network. For the new photos, they would be automatically uploaded to iCloud.
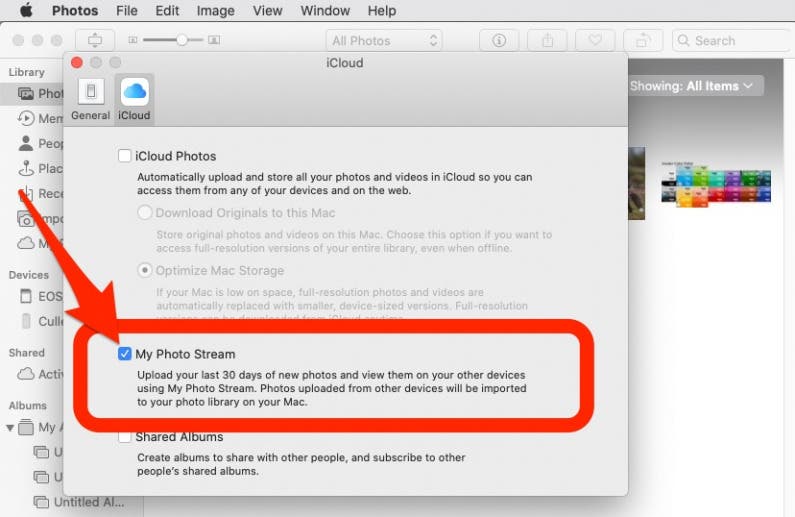
Step 2: On your Mac, click Photos app and from the Photos Menu to choose Preferences option where you can select the iCloud option.
Step 3: Check the box next to My Photo Stream. Click Done and the photos would be automatically synced from the Photo stream via iCloud library.
Part 5: How to Backup iPhone Photos to Mac with AirDrop?
AirDrop is somewhat like Bluetooth on Android devices, and it allows iOS users to share files with Mac computers. With AirDrop, people can easily transfer photos from iPhone to Mac. People need to start Bluetooth and Wi-Fi on their iPhone, and also turn on Bluetooth on their Mac computers. Then, turn on AirDrop on both iPhone and Mac computer. Now iPhone users should be able to connect iPhone with their Mac computer. After that, people can share photos from iPhone to Mac computer. Please note that you should keep Block All Incoming Connections unchecked on your Mac, and you can find that in System Preferences > General > Security & Privacy > Firewall > Firewall Options. If you prefer to transfer different files from iPhone to Mac wirelessly, then you can make full use of AirDrop transfer function. If your AirDrop is not working on Mac, you can fix the problem before using it. For the details related on how to back up iPhone photos to Mac with AirDrop, you can follow the steps below to complete the task.

Steps:
- Turn on AirDrop on your Mac following the route: Finder > Go > AirDrop > Turn on Bluetooth and Wi-Fi to activate the AirDrop feature on your Mac.
- Turn on AirDrop on your iPhone by simply swiping up from the bottom (or swiping down from the top) of your screen to launch the Bluetooth option where you can tap on AirDrop and you should set your iPhone to be discovered by everyone.
- Go to Photos on your iPhone and select the photos you would like to transfer to Mac, and tap on the Share button, then you can find your Mac’s name after clicking sharing. Confirm to send these photos to your Mac and receive the photos on your Mac.
-
Netflix vs HBO Max: Which Should You Choose?Cassie J./2026-03-11
-
How to DVR on YouTube TV and Fix Recording IssuesSunny Wen/2026-03-11
-
Loom Screen Recorder Guide: How It Works + Free Alternative ToolsSunny Wen/2026-03-10
-
Locoloader OnlyFans Downloader Review: Is It Really Working?Patrick Murray/2026-03-09
-
How to Download YouTube 8K Video Without Quality LossCassie J./2026-03-09
-
Disney Plus 8-Digit Code: How to Activate Your Account on Any DeviceLeia Liu/2026-03-06
-
Wondershare DVD Creator Review: Features, Test & PriceCassie J./2026-03-06
-
HiDIVE Downloads: Do They Expire? How to Keep Them Forever?Patrick Murray/2026-03-03
-
Paramount Plus Error Code 3205 Explained: Causes & Proven FixesLeia Liu/2026-02-27
-
Disney Plus HDCP Issue Explained: Causes, FixesLeia Liu/2026-02-25


-
12 Best Sites Like BestGore for Shocking VideosAugust/2025-03-17
-
12 Best Sites Like BestGore for Shocking VideosAugust/2024-02-22
-
12 Best Free Web Series Download Websites 2026August/2025-02-05
-
Top 10 Sites to Download Anime FreeAugust/2024-12-27
-
Top 5 OnlyFans Viewer Tools to View OnlyFans FreeAugust/2024-04-29
-
Top 10 Websites to Watch Uncensored AnimeAugust/2024-02-21
-
[2026] AudioBookBay Proxy Sites & Alternatives for Free AudiobooksCassie J./2026-01-06
-
How to download videos from MissAV? – Ways to download MissAV JavPatrick Murray/2025-02-08
-
Top 10 OnlyFans Search to Find Someone on OnlyFansAugust/2024-02-29
-
7 Best Free Sites for Pinoy Movies Download in 2026August/2024-10-31


Leave a Reply
You must be logged in to post a comment.