

Saving photos in iPhone is never a smart idea. Many iPhone users get the photos lost when syncing iPhone with iTunes or upgrading the iOS. Therefore, backing up iPhone photos seems to be an important work to iPhone users. In order to make a full back up of your photos on your iPhone, transferring all of photos from iPhone to your computer would be easier since you can refer to some powerful transfer programs for Windows and Mac. In this post, several methods would be introduced in details to show you how to transfer photos from iPhone to computer which are available for nearly all iPhone models. For the details, please get started now and search for the exact information.
MenuCLOSE
- How to Transfer Photos from iPhone to Computer with iTunes?
- How to Transfer Photos from iPhone to Computer Without iTunes?
- How to Transfer Photos from iPhone to Computer with iCloud?
- How to Transfer Photos from iPhone to PC with Windows Explorer?
- How to Transfer Photos from iPhone to Windows 10 with Photos App?
- How to Transfer Photos from iPhone to Mac?
Part 1: How to Transfer Photos from iPhone to Computer with iTunes?
iPhone users are able to manage the photos in the Camera Roll with ease. If the users want to delete some useless photos in the Camera Roll, they can tap the photo from right to left, and click the “Delete” button to delete the photo one by one. If the users wants to transfer photos from iPhone to computer, then turning to iTunes would be helpful. Next are the detailed steps.
Steps:
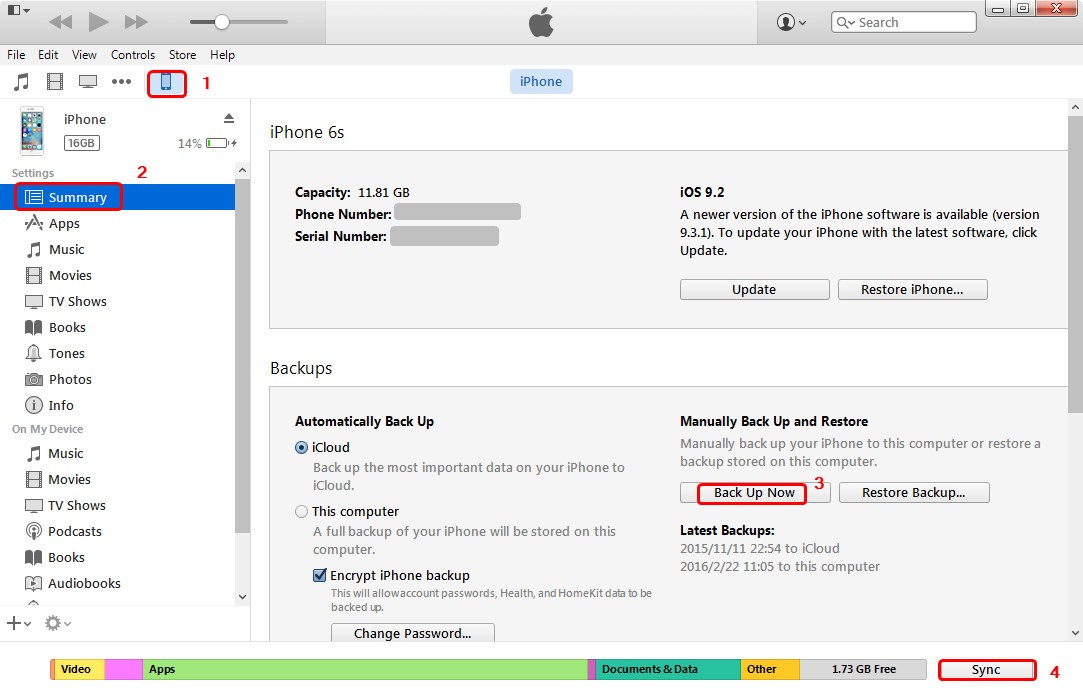
- Plug in your iPhone and open iTunes, then find the iPhone icon on the menu and click Photos tab under settings on the left sidebar.
- Check the box to "Sync Photos" and select "Choose folder..." from the drop down menu.
- Browse to the desired folder, and select the picture folder you'd like to sync. Click "Sync" button to start transferring. Wait for the transferring process to be completed. Once it is done, all the chosen photos would be saved immediately on your computer.
Part 2: How to Transfer Photos from iPhone to Computer Without iTunes?
Without iTunes, some other alternative ways would be available for iPhone users. One of the most efficient ways is to seek help from third-party iOS device transferring programs. Among various transferring programs for Windows, you should not miss Leawo iTransfer. Leawo iTransfer will provide you much help on this issue. This all-in-one iPad, iPod and iPhone transfer software is used for transferring files among iOS devices, iTunes and PCs, and the software helps users get rid of the sync of iTunes. Leawo iTransfer enables users to transfer apps, music, movies, TV shows, ringtones, eBooks, photos and Camera Roll, so if you want to transfer photos from iPhone to computer without iTunes, this software will help you. The following guidance will show you how to transfer photos from iPhone to computer with Leawo iTransfer, and you can free download this software to have a try. Note that the trial version has limited transfer times.
Step 1. Download Leawo iTransfer
Go to the website of Leawo iTransfer to download its installation package and then install it on your computer.

-
Leawo iTransfer
- Transfer files among iOS devices, iTunes and PCs with ease.
- 6x faster than iTunes
- Transfer up to 14 kinds of data and files without iTunes.
- Support the latest iOS devices like iPhone 12, iPhone 12 Pro, etc.
- Play back, view, and delete data and files on iOS devices.
- Support Windows & Mac OS
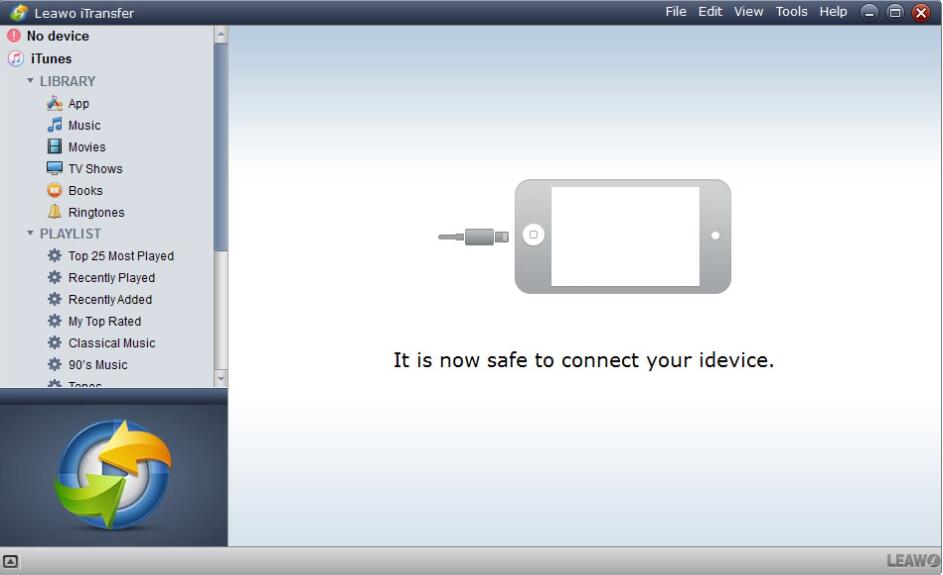
Step 2: Run Leawo iTransfer and connect your iPhone to computer
Run Leawo iTransfer after installing it on your computer. Then plug the iPhone into computer via the USB cable. The software will automatically detect your iPhone and show the libraries of your iPhone in the left sidebar.
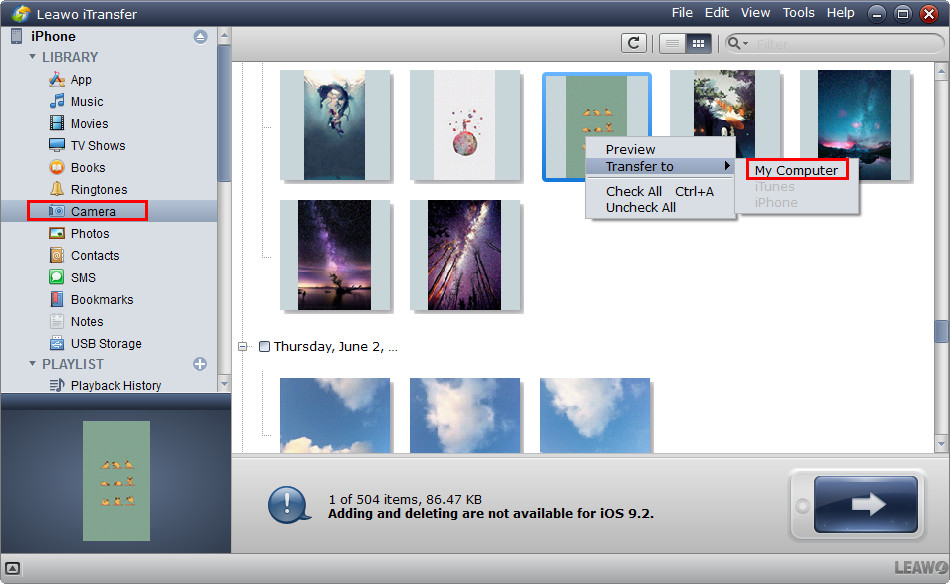
Step 3. Transfer photos from iPhone to computer
Choose "Photos" in the left sidebar and then the photos will be shown in the right part. Click the transfer button (right arrow in a dark blue rectangle) to transfer all the photos to computer. Or press "Ctrl" and click to choose certain photos, and then right click the chosen photos to "Transfer to > My Computer".
Step 4. Confirm the saving route
A dialog of transfer settings will show up. Check "Save to Folder" and click "Change" to choose a folder to save the photos. Then click "Transfer Now" to start backing up iPhone Photo Library to computer.

When the transfer is done, you can easily back up iPhone photos to computer. Some iPhone users may think this function is not useful. Actually, if the users have changed a new computer or new hard drive but forgotten to back up the iPhone photos, they can use Leawo iTransfer to transfer photos from iPhone to computer to keep them safe.
Part 3: How to Transfer Photos from iPhone to Computer with iCloud?
iCloud is a useful tool to back up mails, contacts, photos, notes, etc. from iPhone as long as you toggle on iCloud backup. If you have two or more iCloud accounts, you can transfer photos from one iCloud account to another. Now let's learn how to transfer iPhone photos from iPhone to computer via iCloud.
Step 1: Make sure you has enabled iCloud on your iPhone. Go to Settings >> Photos >> iCloud Photos or iCloud Photo library, then turn on the toggle to activate iCloud. Then, all the photos on your iPhone would be backed up to iCloud under the Wi-Fi network. For the new photos, they would be automatically uploaded to iCloud.

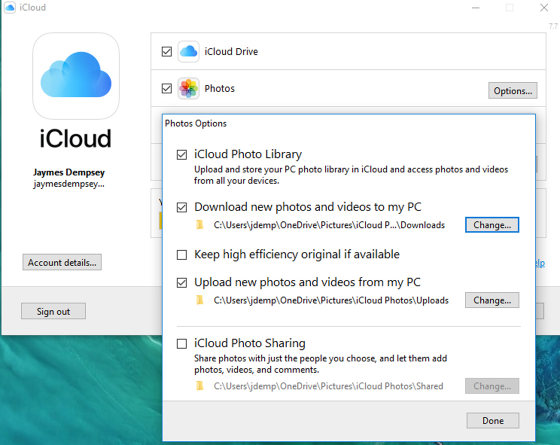
Step 2: Go to the iCloud website on your computer and log in with the same Apple ID and password. On the main screen, remember to put a check mark next to Photos. Then tap the corresponding Options button.
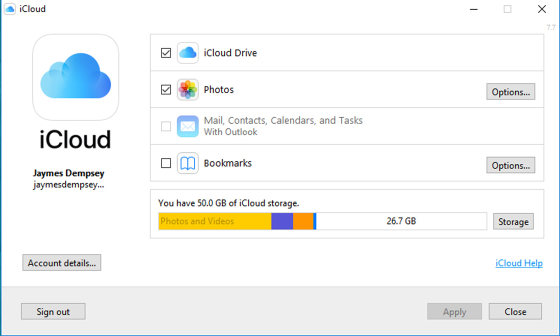
Step 3: Select the iCloud Photo Library option. Then select Download new photos and videos to my PC. If you want the new photos from your computer to iPhone, then you need to click Upload new photos and videos from my PC. Finally click Done and Apply buttons to start transferring photos from iPhone to computer with iCloud.
Part 4: How to Transfer Photos from iPhone to PC with Windows Explorer?
If your computer is a Windows PC, you can directly copy the photos from iPhone to your computer when your iPhone has been connected to your Windows PC with Windows Explorer.
Steps:
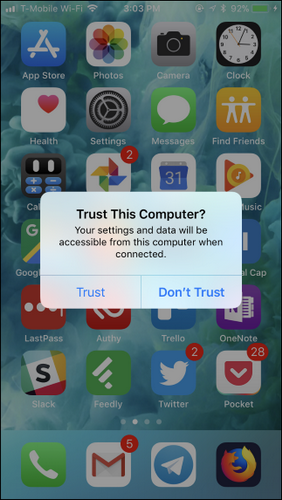
- Connect iPhone to your computer with a proper USB cable. Then, Tap “Trust” or “Allow” to give your computer access to your photos on your iPhone.
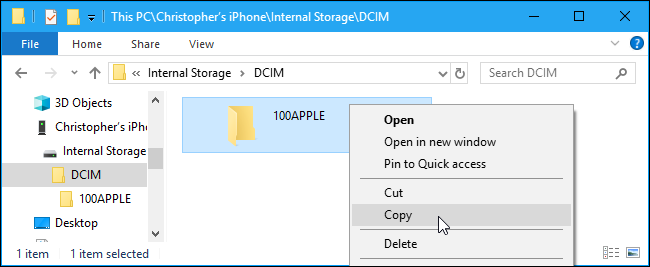
- Open the iPhone icon under the Windows Explorer and click the “DIMC” folder which contained all the photos and videos on your iPhone. Select all the preferred photos in the folder and right click to choose copy.
- Confirm the saving route you would like to put the iPhone photos and right click to choose paste. Then all the photos on your iPhone would be saved on your hard drive on the Windows.
Part 5: How to Transfer Photos from iPhone to Windows 10 with Photos App?
Asides from the above mentioned method, if you are now running on Windows 10 system, then you can make full use of the built-in Photos app on Windows 10 to transfer photos from iPhone to computer. Here are the detailed steps.
Step 1: Connect iPhone to your computer with a proper USB cable. Then, Tap “Trust” or “Allow” to give your computer access to your photos on your iPhone.
Step 2: On Windows, the Photos app would be automatically launched. You can search for Photos to call this program out. Then enter the main screen and click Import button on the top right corner of the app.

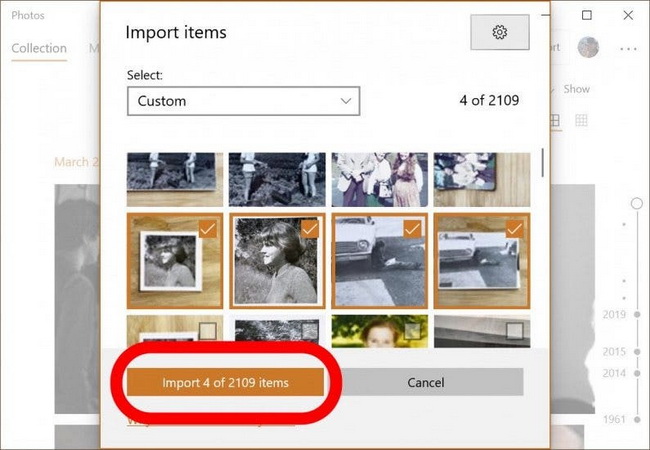
Step 3: In the drop-down menu, select From your iPhone once your iPhone has been detected by the computer. Then, the computer would search for the photos on your iPhone. Next, select your preferred photos you want to import to computer.

Step 4: Confirm the photos saving route by clicking the Setting button. Here you can see the final save to route, or you can change the saving route you prefer.

Step 5: Click Done to go back to the image selection screen. Finally click the Import icon to start transferring photos from iPhone to computer with Windows Photos application.
Part 6: How to Transfer Photos from iPhone to Mac?
Instead of Windows operating system, if you are running on Mac, you can also refer to the above solutions to transfer photos from iPhone to Mac. Here, the firm choice you can make is iCloud Photos. In other words, on your Mac, you can stream photos on your iPhone to Mac via Photos app. Usually, the photos streamed via iCloud photos would be stored on your Mac for only 30 days. Therefore, once you received the photos transferred from iPhone, you had better remove these photos to the local Mac for further keeping. If needed, you can also transfer photos from iCloud photos to external drive. Here are the detailed steps on how to transfer photos from iPhone to Mac.
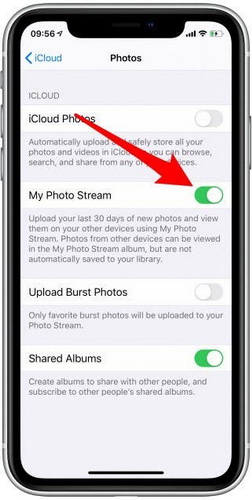
Step 1: Make sure you has enabled iCloud on your iPhone. Go to Settings >> Photos >> iCloud Photos or iCloud Photo library, then turn on the toggle to activate iCloud. Then, Toggle on Upload to My Photo Stream.
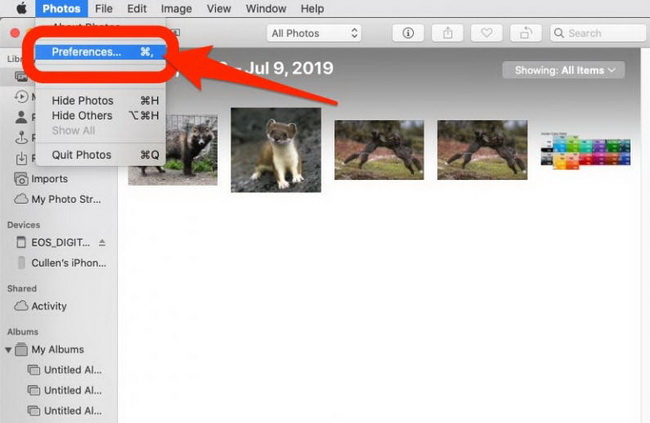
Step 2: Open Photos app on your Mac, and enter the main screen click Photos menu and choose Preferences.
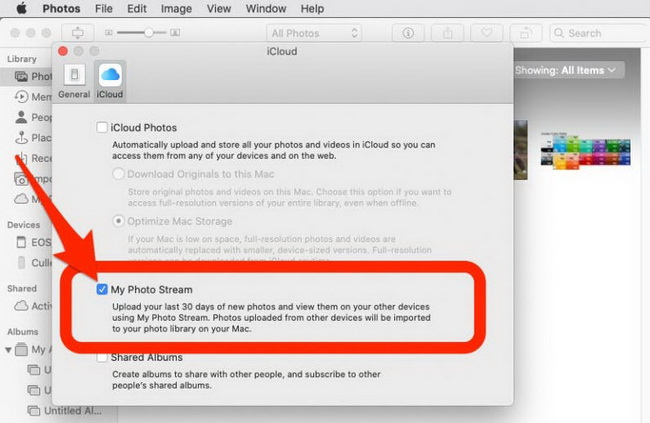
Step 3: Choose iCloud tab and check the box next to My Photo Stream. Click Done to save the change. Then, all the photos streamed via iCloud would be automatically synced to Photos app on your Mac.
 Sep. 06, 2021 by


 Prof. Media
 Blu-ray Ripper
 Blu-ray Copy
 iOS Data Recovery
 [12/29/23] MAX Downloader V15.0.0
 10,000,000 people are using Leawo!
 All Transactions are protected!
 30-Day Money Back Guarantee!