WMV is a very common video format often seen on Windows operating system. Developed by Microsoft. WMV, also known as Windows Media Video, is a series of video codecs and their corresponding video coding formats that is specially optimized for the Windows Media Player and its framework. If you are using a Windows computer and have Windows Media Player installed, WMV might be very easy to be opened and viewed. However, if you have the need to transfer the video to other devices for viewing, then the WMV video format could cause you some trouble because it’s sometimes incompatible with other platforms. To make WMV videos more compatible, sometimes you have no choice but to convert the WMV videos to some other formats. To do that, you need a solid WMV converter program. With so many video converting program choices on the market, most people don’t know which one to choose when converting a WMV video. In order to help you solve that problem, today we are going to introduce some of the best WMV video converter programs, and give some WMV video converting guides on these programs as well. With these program recommendations and guides, I’m sure you can get your WMV video converted easily and fast.
Part 1: Convert WMV video with Leawo Video Converter
The first WMV video converter program that I want to introduce, also my personal favorite one, is called Leawo Video Converter. The reason why I like this video converter program so much is that Leawo Video Converter has a great software design and powerful video converting ability. With Leawo Video Converter, you can basically do every kind of video converting task as well as video editing task within one single program.
Leawo Video Converter has a very advanced video converting engine, allowing the program to support the video conversion for more than 180 kinds of media format. In the video converting process, Leawo Video Converter can have a 6 times higher speed than the average, and can keep the original video and audio quality at the same time. What’s more, the free WMV converter also has a very powerful built-in video editor, which enables you to do various kinds of video editing like trimming, cropping, adding watermark to video, adjusting video parameters, turning 2D video to 3D and removing noise. While editing, you can have a real-time preview window so that you can have a full control over the customization of your video in the entire editing process.
Thanks to the intuitive software design, your WMV videos can be converted to any other format with only some clicks of your mouse. If you want to know more about the program, here is an inclusive guide on how to convert a video from one format to another using Leawo Video Converter. Read it and you should be able to convert your WMV videos easily and efficiently.
Step 1: Launch Leawo Video Converter
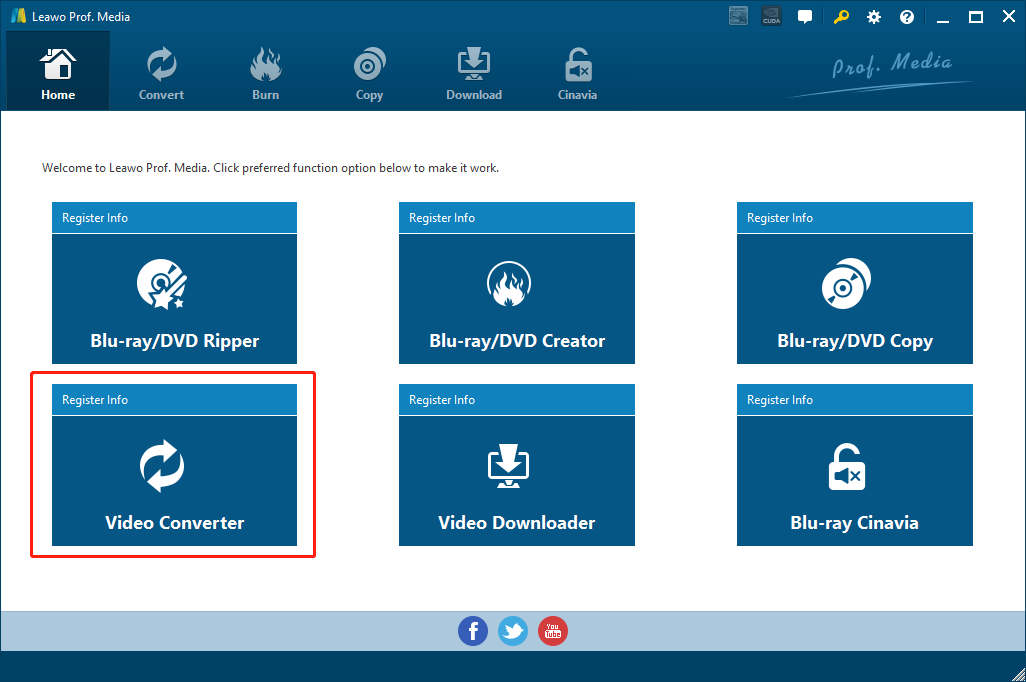
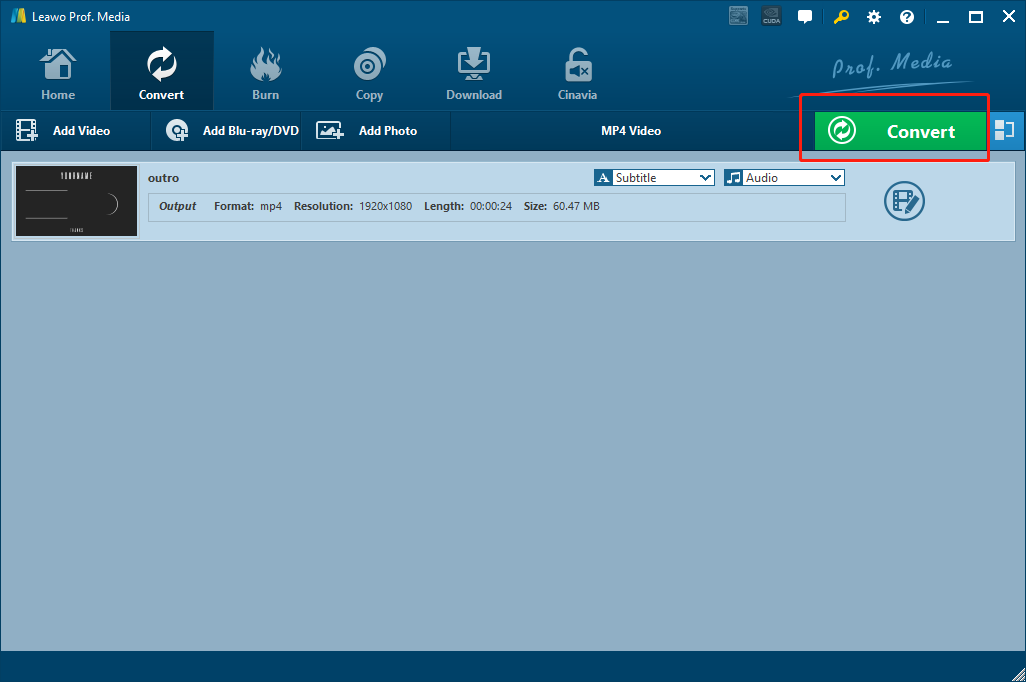
Download and install Leawo Video Converter. Since Leawo Video Converter supports both Windows and Mac operating system, you have to make sure you download the right version according to your working operating system. When you launch the program, you will see six different functional modules. Click “Video Converter” to enter the video converter function module.
Step 2: Import WMV file
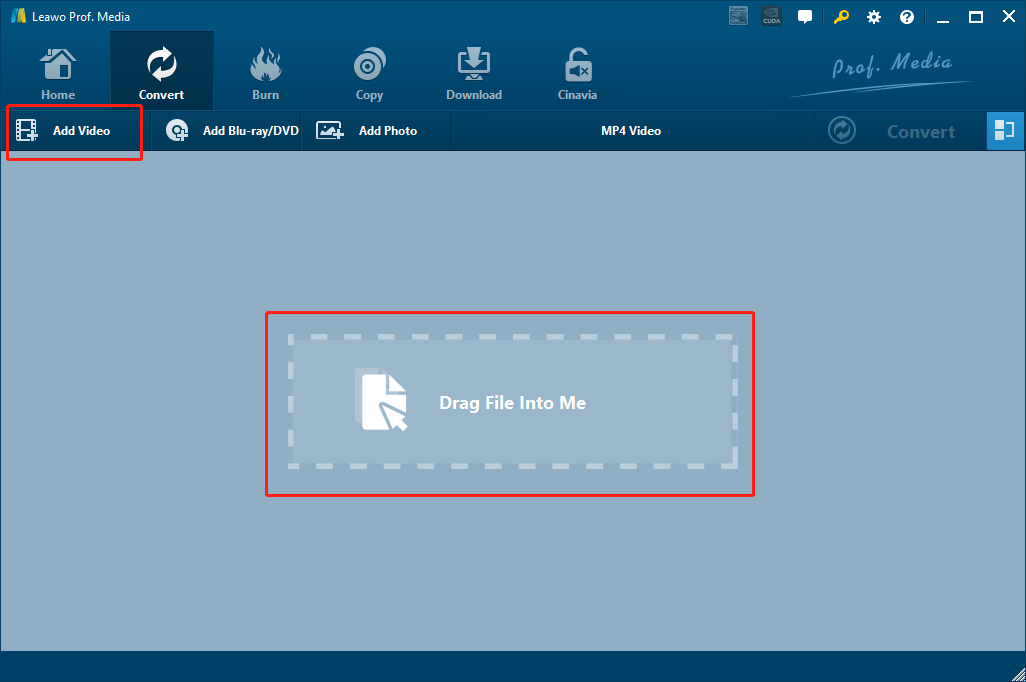
Once you have entered the video converter function module, you will see an “Add Video” button at the upper left corner. Click on the button and import your source WMV file into the program. You can also directly drag and drop the file into the center of the main interface to import it.
Step 3: Set output format
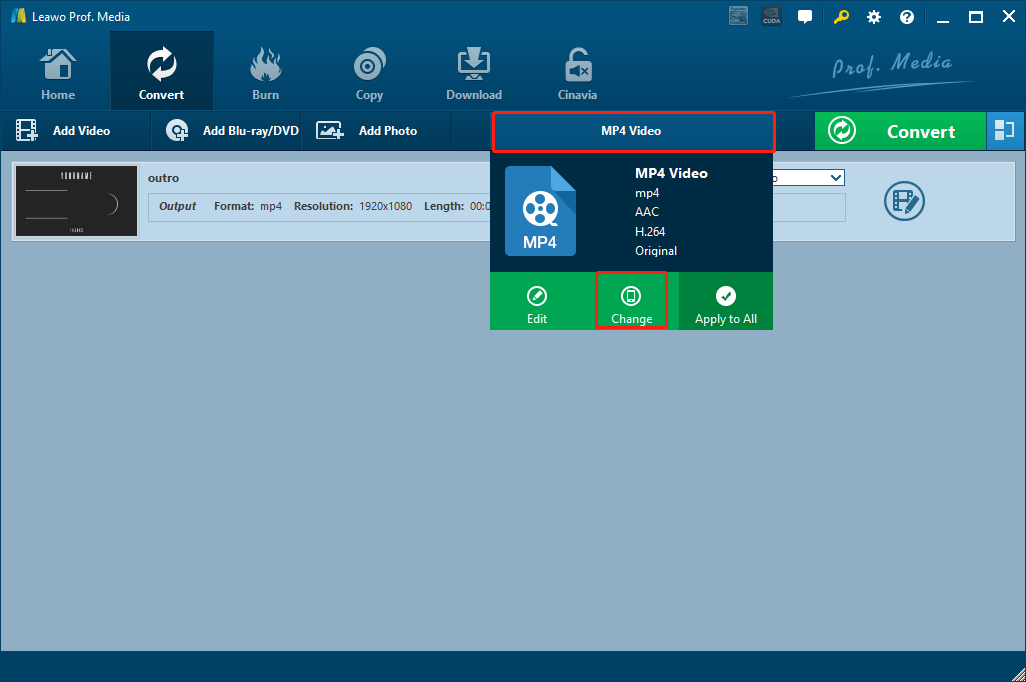
The default output format in Leawo Video Converter is “MP4 Video”, as you can see from the area next to the green “Convert” button. To change the output format, simply click on the “MP4 Video” area, then click “Change” to go to the format selection panel, where you can choose and set your desired output video format.
Step 4: Further editing
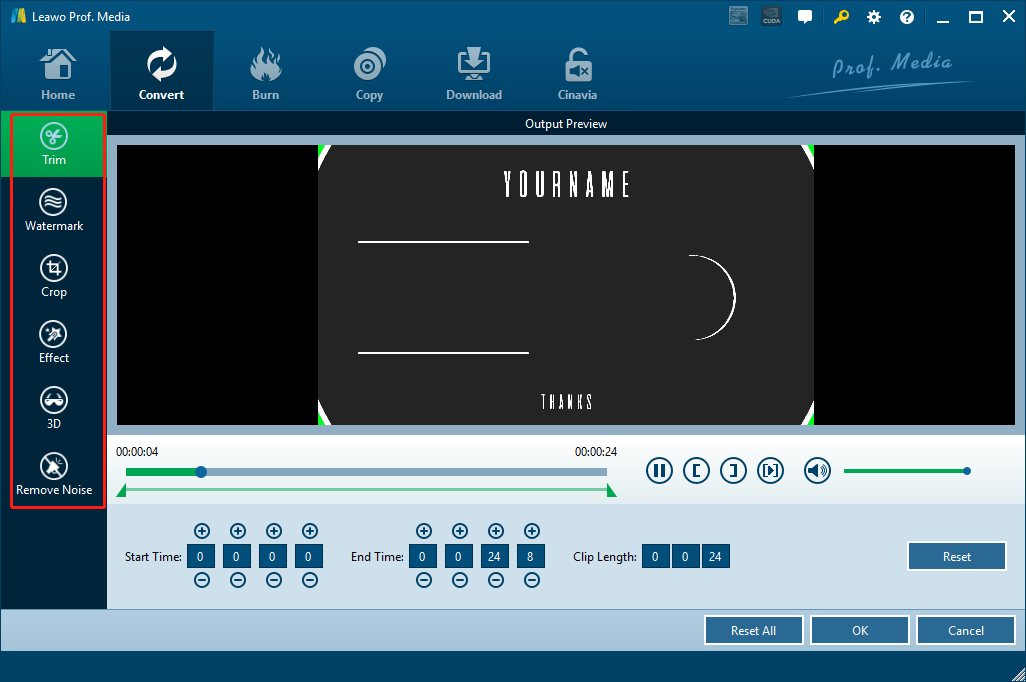
Leawo Video Converter provides various video editing options. Before the conversion task starts, you can do some further editing to your video by clicking the “Edit” icon next to your imported video item and enter the video editing window. On the video editing window, you can do editing like trimming, cropping, adding watermark to video, adjusting video parameters, adding 3D effects to video, and removing noise. When you are done editing, click “OK” to confirm and go back to the main interface.
Step 5: Start converting
When everything is set, click the green “Convert” button to call out the convert settings panel. On the panel, you need to designate an output directory, and then click the “Convert” icon to start the conversion task.
Part 2: Convert WMV video with Avidemux
Although Leawo Video Converter is an excellent choice for the WMV video converting task, it’s only one of the many practical options. Besides Leawo Video Converter, there are actually tons of other tools that can achieve the goal of converting WMV video to other formats. For an example, Avidemux is one of the best.
Avidemux is a free and open-source WMV converter program. Being written in C++, the program designed for simple video cutting, filtering and encoding tasks, and is available for Linux, BSD, Mac OS X and Microsoft Windows platform. Avidemux supports most of the mainstream video formats as input and output, including WMV, AVI, DVD compatible MPEG files, MP4 ASF and more. Although Avidemux is not as powerful and well designed as Leawo Video Converter, it is still capable of doing tasks like simple video conversions. Comparing to other video converting programs, the advantage of Avidemux is that the program is very light-weighted. You can download and install the program without spending too much time and being taken too much disk space. If you are interested in this little video converting tool, here is also a simple guide for you.
Step 1: Install and launch Avidemux
Step 2: Import your source WMV video by dragging and dropping the file onto the program interface.
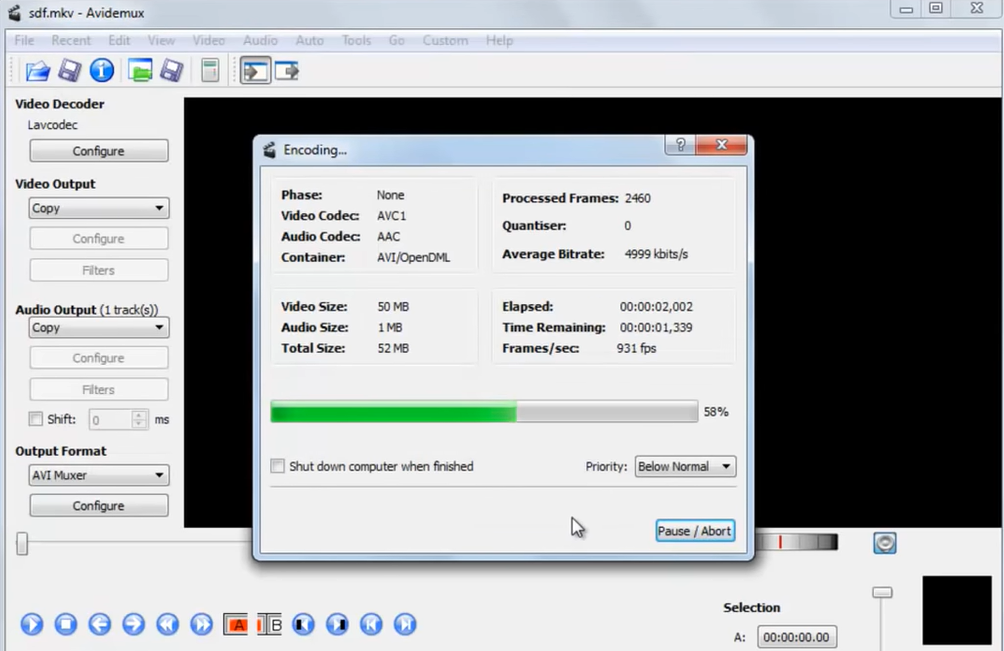
Step 3: If you have multiple video or audio tracks in your video, you can select a track from the “Video Output” and “Audio Output” area on the left. The output format can be selected from the “Output Format” area below the “Audio Output” area.
Step 4: Once you have set the output format, click “File” in the menu bar at the top, then choose “Save” to save the converted video file.
Part 3: Convert WMV video with Handbrake
The third tool that I would like to introduce for the WMV video conversion task is Handbrake. As a free and open source video converter program, Handbrake has been popular in the video converter industry for more than a decade. The program was initially designed as one of the best free DVD ripper programs, and then evolved into a multi-functional media processing and converting program. The advantage of Handbrake is that the program provides many advanced video processing functions and customizations, but that brings its disadvantage as well. As a powerful video processing tool, Handbrake doesn’t have an excellent graphical user interface to keep everything in order. So if you are a new user to the program, you might have to take some time to learn and adjust yourself to the program.
However, for a simple task like converting a WMV video, you can still do it easily with Handbrake with some instructions. If you want to convert your WMV video with Handbrake but don’t know how, here is a guide for your reference.
Step 1: Download, install and launch Handbrake.
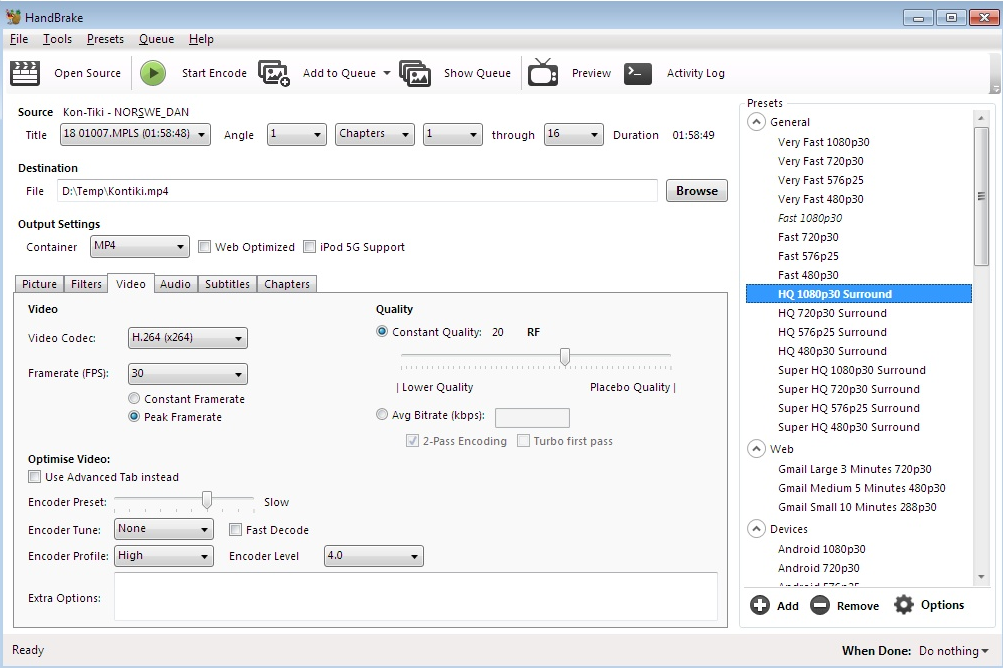
Step 2: Click the “Open Source” button to import your source WMV into the program.
Step 3: After importing the video, you can designate an output folder in the “Destination” box. Click “Browse” to browse and select a folder. The output format can be set in the “Output Settings” area. Click the dropdown button next to “Container” to see all of the available output formats.
Step 4: When the output format is set, you can do some further editing in the area below. Or you can directly start the conversion by clicking the “Start Encode” button next to the “Open Source” button. When you click the “Start Encode” button, the conversion process will start immediately.
Part 4: Convert WMV video with KeepVid
The last free WMV converter tool in today’s article is KeepVid. Keepvid is a dedicated video converting program which also includes an online video converter tool. When you want to convert your video with KeepVid, you can either go to the official website of KeepVid and use the online video converter tool, or download and install the KeepVid Video Converter program. The KeepVid Video Converter program can convert most of the mainstream video formats and offers a decent converting experience, while the online converter tool only supports a very limited number of video and audio formats. So when you have the needs of converting a video like WMV, you will most likely have to download the program for the conversion.
The KeepVid Video Converter program is simple and easy to operate. Here is a guide on how to convert a video with KeepVid Video Converter.
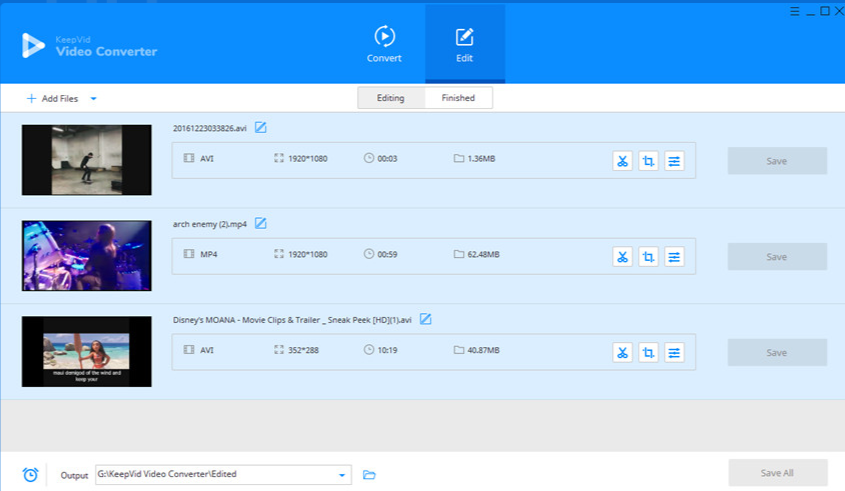
Step 1: Download and launch KeepVid Video Converter. To import your source video, just click the “Add Files” button and select the video that you need to convert.
Step 2: When the video is imported, you can change the output format by clicking the format element in the video description area. You can also trim, crop and adjust parameters by clicking the corresponding button at the right end of the video description box.
Step 3: Set an output folder in the “Output” bus below, and then click the “Save” button on the right side of the video item. If you have more than one video imported, you can click the “Save All” button to convert them in batch.

