I've always manually managed music and videos by dragging and dropping them into the iPhone through iTunes. And I did that for ringtones as well but for some reason this time when I drag and drop my ringtones to the iPhone, they appear in the iPhone, they appear in the iPhone's Tones folder but they are greyed out with dotted circle beside them. That's usually a sign that a transfer is not complete. I've done all the necessary steps for ringtones. In fact I just added ringtones successfully to the same phone last month. Perhaps it's an iTunes thing? Interestingly, I can add the ringtones to my iTunes Tones library fine. I tried to sync the ringtones to sync the ringtones to my iPhone but in order to that iTunes also wants to sync music too. Can't these 2 syncs be done separately?
Coming up with the sync of iTunes is a very annoying issue, iPhone users cannot transfer the wanted media files easily, and they will get stuck in transferring other media files. For example, when people want to transfer ringtones from computer to iPhone, they will need to transfer the ringtones to iTunes Library at first, and then they can transfer ringtones from iTunes to iPhone.
Part 1. Transfer Ringtones from iTunes to iPhone with iTunes
As posted, the user can play ringtones normally in iTunes library, and has converted the MP3 files to M4R files. So the problem probably occurs during the transfer from iTunes to iPhone. The user manually syncs ringtone with iTunes, so he/she is able to select the ringtones they want to sync. iTunes will sync media files together in one sync, when users sync ringtones to iPhone, they will get music synced as well. So this may lead to the loss of non-purchased music files. Follow the steps below to learn how to sync ringtones to iPhone through iTunes.
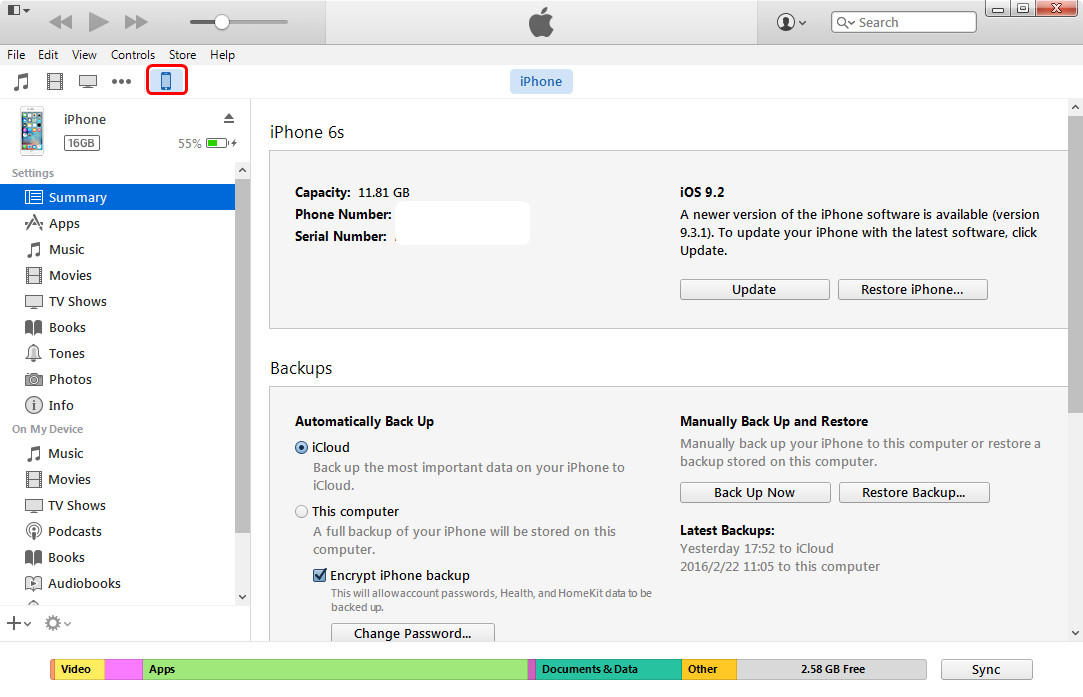
Step 1. Connect your iPhone to PC via USB cable, then double click on the iTunes icon to launch the iTunes app on your computer if it did not start automatically when your iPhone is connected to computer.
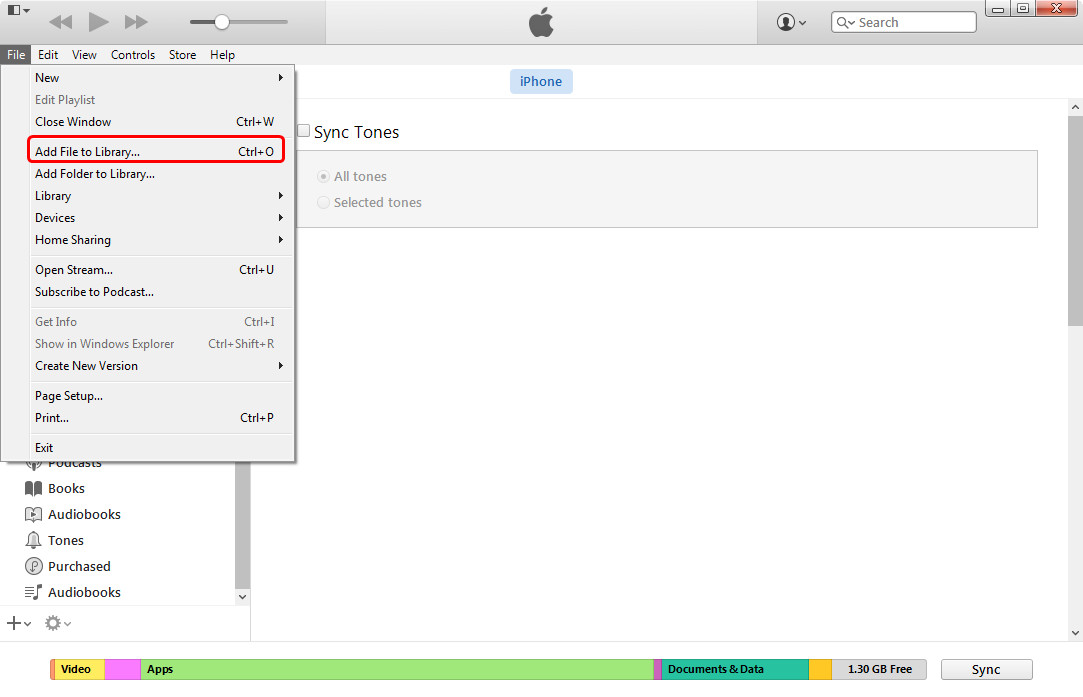
Step 2. You firstly need to import or add the ringtones from computer to iTunes library if you have no ringtones on iTunes. Go to File menu > select Add File to library/Add Folder to Library, then you can choose the ringtones on your computer and transfer them to iTunes.
Step 3. Click on your iPhone, click the "Tones" to open the ringtones tab. Check the box for "Sync Tones" and then check the boxes for the ringtones you want to sync. There are 2 options avaliable, check "All tones" to choose all the ringtone files to sync, or check "Selected tones" to select the specified ringtones that you want to transfer. Finally click "Sync" button in the bottom right corner of iTunes to sync ringtones to iPhone via iTunes. The synced ringtone files will appear on your iPhone as a ringtone automatically.
Part 2. Transfer Ringtones from iTunes to iPhone with Leawo iTransfer
Manually syncing ringtones from iTunes to iPhone is the easiest way, but when the users get stuck, they may need the iPhone transfer software. There are various kinds of data transfer programs for iOS devices, and among them, Leawo iTransfer is regarded as one of the best. This software is used for transferring files among iOS devices, iTunes and computers, and it enables users to transfer files without the sync of iTunes. With Leawo iTransfer, users can transfer ringtones from iTunes to iPhone, or copy ringtones from computer to iPhone directly. The following guidance will show you how to transfer ringtones from iTunes to iPhone, and how to transfer ringtones from computer to iPhone. You are allowed to free download the software to have a try. Note that the trial version has limited transfer times.
Tips: Leawo iTransfer only works with iTunes installed on your PC.
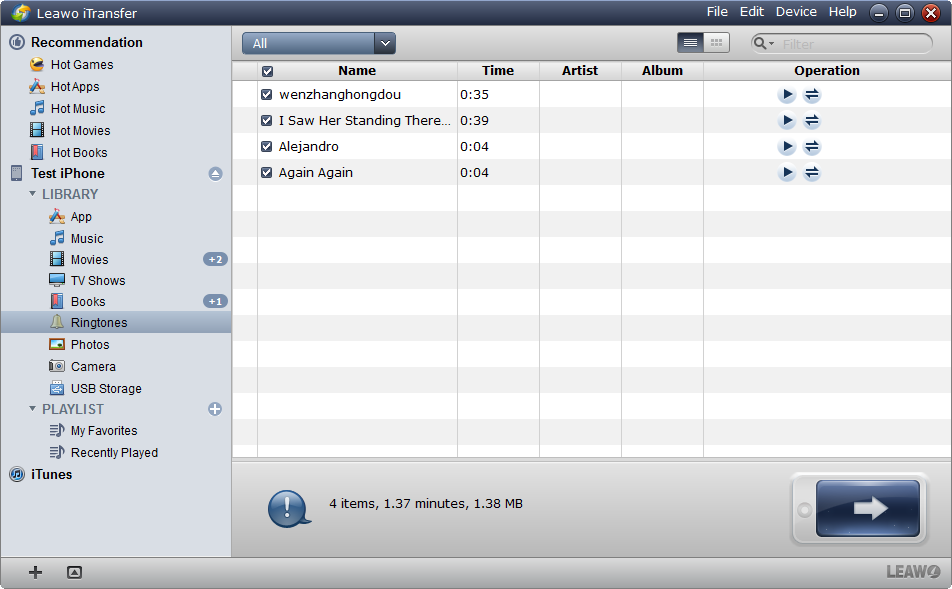
Step 1. Run Leawo iTransfer and connect iPhone to computer with the USB cable. The software will automatically detect the libraries of your iPhone and display the libraries in the left sidebar.
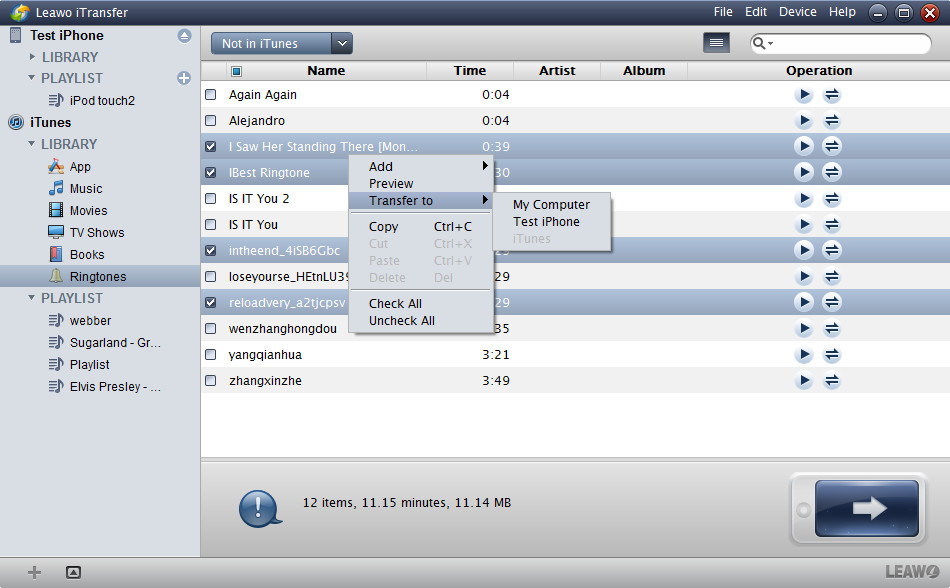
Step 2. The libraries of iTunes are just below the libraries of iPhone. Choose "Tones" library of iTunes and then the contents will be shown in the right part. Click the transfer button at the right bottom to transfer all the ringtones from iTunes to iPhone; or click the "Ctrl" key and select certain ringtones, then right-click the selected ringtones to "Transfer to > iPhone".
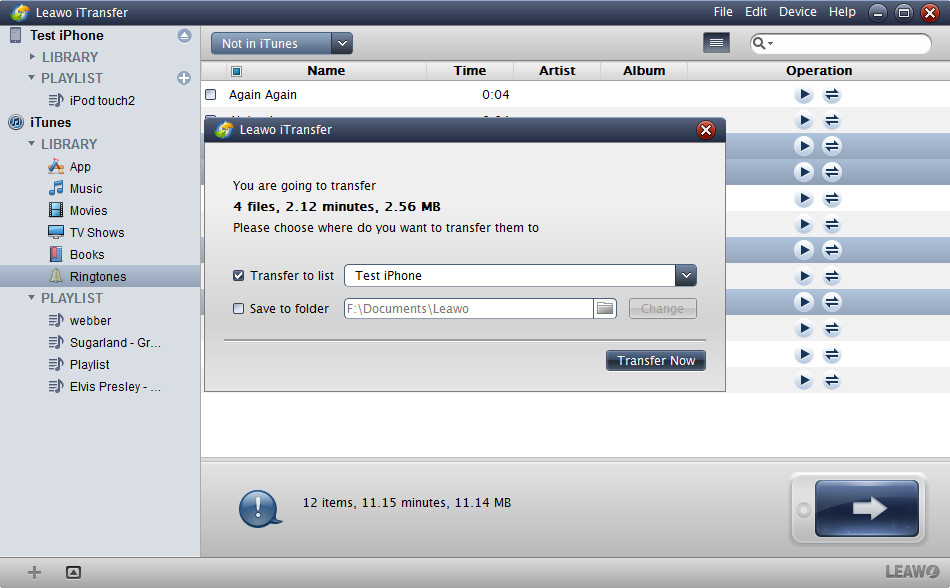
3. After clicking the transfer button, you will see the pop-up dialog of transfer settings. Check "Transfer to List" and choose "iPhone" in the drop-down menu. Then click "Transfer Now" at the right bottom to start transferring ringtones from iTunes to iPhone.
Part 3. Related Tip: Create Ringtones for iPhone Using iTunes
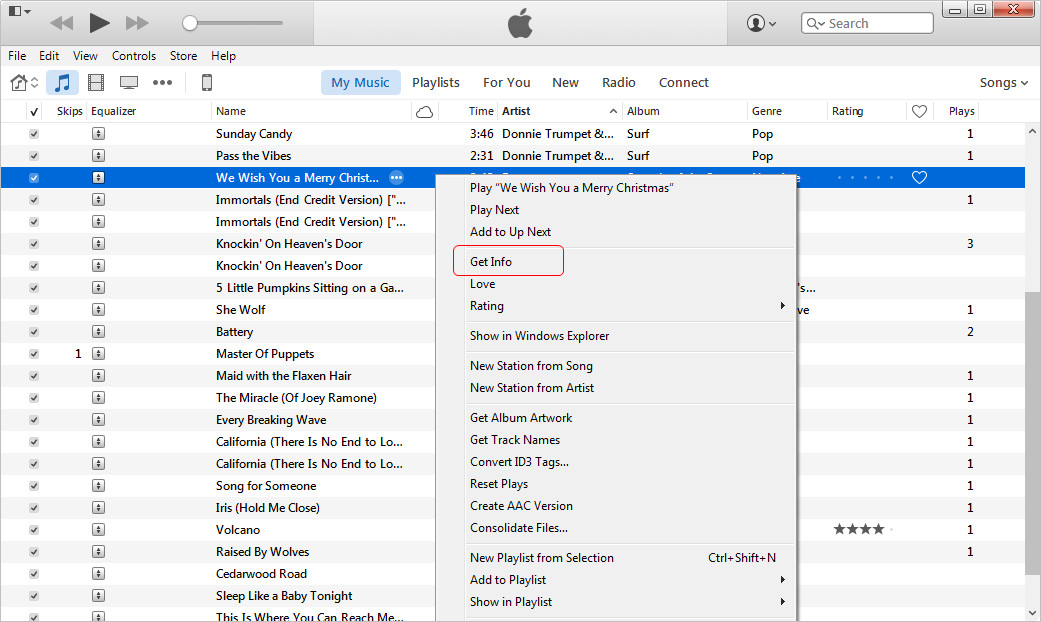
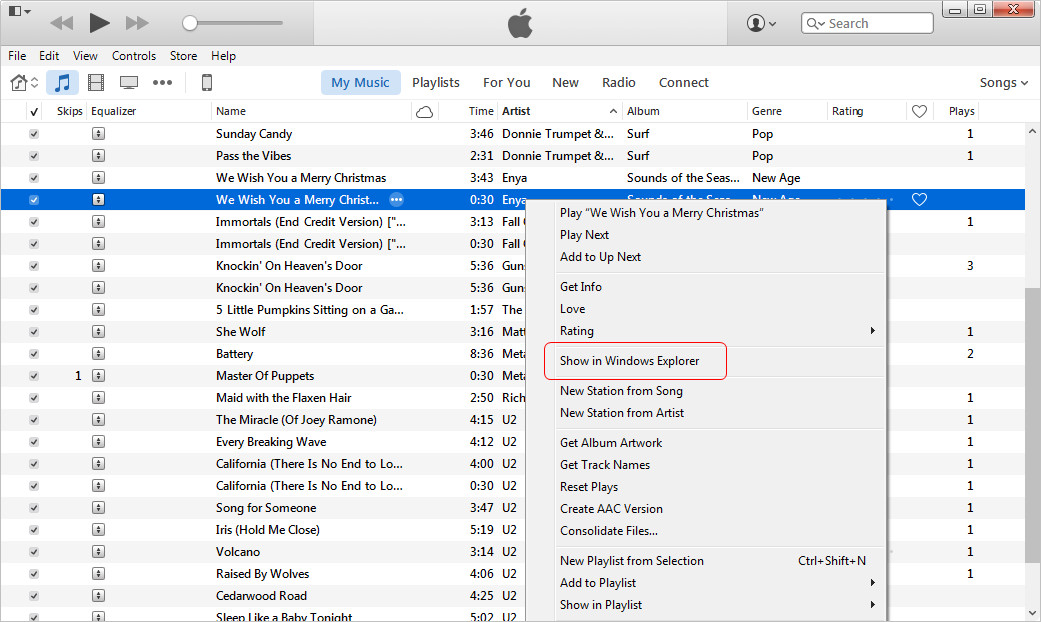
With the above steps, you may have known how to transfer ringtones from iTunes to iPhone. However some of users may not know that iTunes can be used as creating ringtones for iPhone. If you are using iTunes to manage your iPhone data, you can create ringtones for iPhone with this application. iTunes provides a feature of creating AAC file, which will be helpful for making ringtones for iPhone. You can convert any song or audio clip in your iTunes library into a ringtone with a few simple steps.The following guidance will show you how to do it.
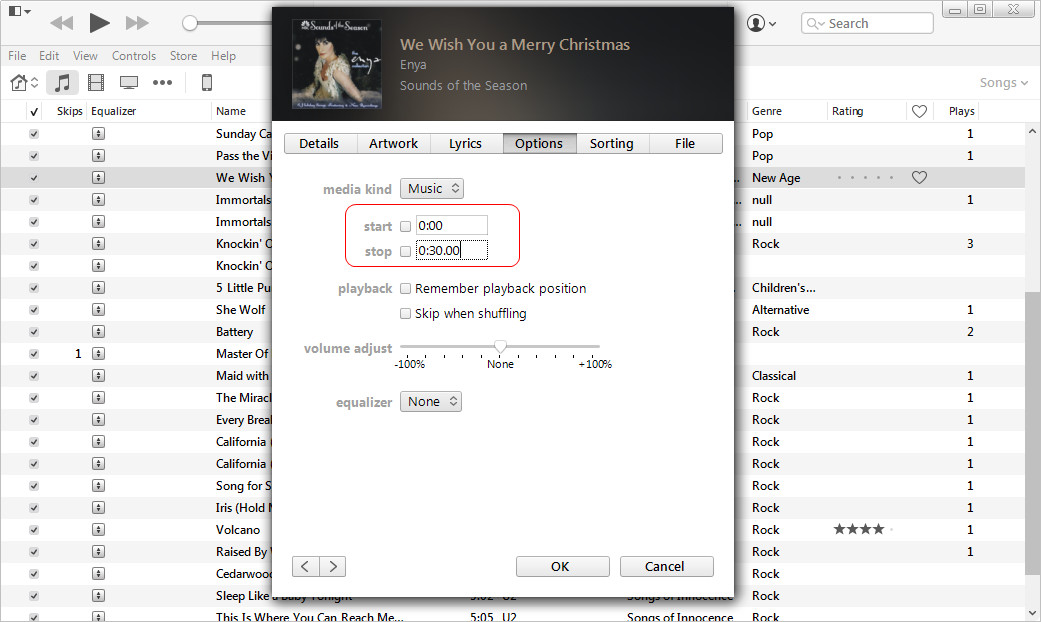
2. Click Options in the pop-up dialog, and crop the song into 30 seconds. Then click OK at the bottom.
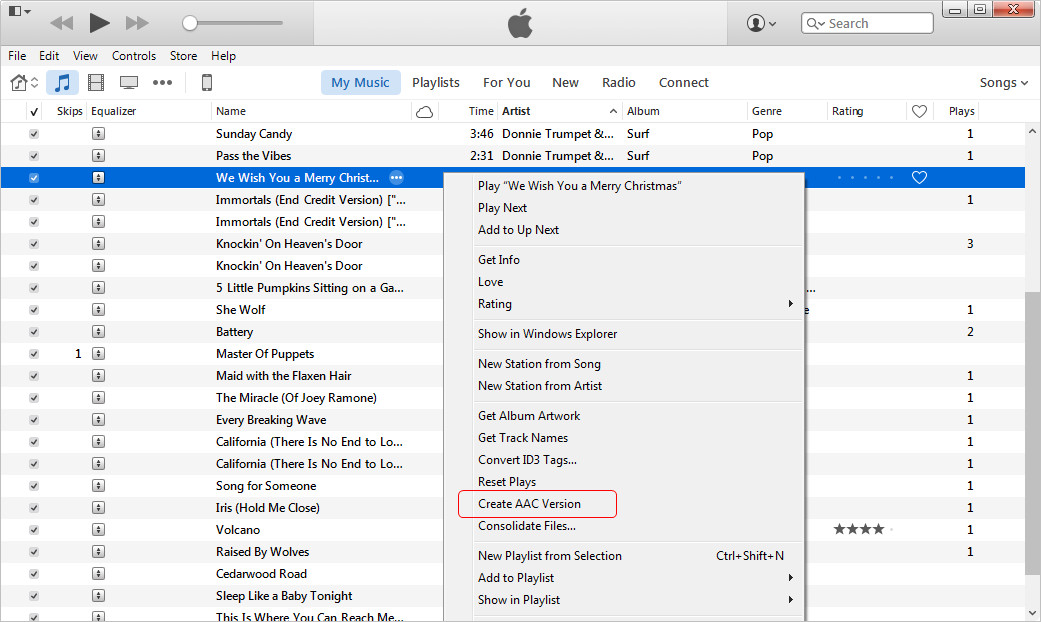
3. Right-click the song again and choose Create AAC Version. And you will find a 30-second duplicate of the song below.
4. Right-click the duplicate and choose Show in Windows Explorer. Then change the file extension to .m4r.
Users can take advantage of Leawo iTransfer to accomplish various kinds of data transfers of iOS devices, and they will find this software is powerful. Besides transferring ringtones from iTunes to iPhone, Leawo iTransfer can also transfer files between iOS devices, for example, you can transfer music from iPhone to computer with this software. If you are interested in Leawo iTransfer, just free download it and have a try.


 Sep. 07, 2021 by


