With the development of technology, iPhone and iPad has been added the feature to enable you to print files wirelessly, which offers you much convenience. In order to know this new feature more clearly, you are just in the right place to check out the contents in this guidance. You can learn the introduction of AirPrint and how to use it on iPad/Mac easily.
Part 1: What's AirPrint
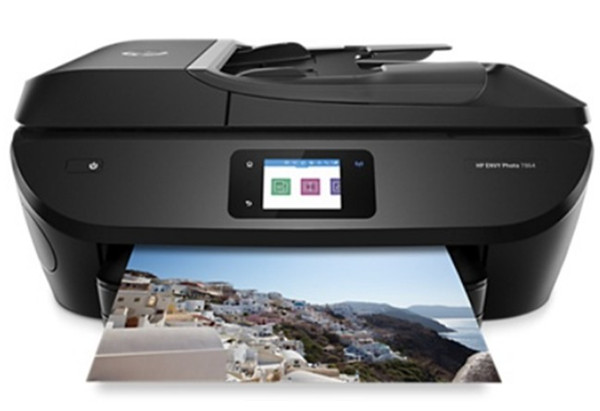
AirPrint is a quite convenient and interesting wireless printing service of Apple Company. This can save you much time to print files you need to use right away. It is designed to be fairly easy and stable, which enables you to print documents you need from a long distance when connected good Wi-Fi network. It requires your iOS device to be connected to the same Wi-Fi network. It supports some built-in apps in Apple devices, such as Mail, Safari, Photos, iBooks and so on. It is quite easy to handle by clicking on the share button on iOS app and then choose your AirPrint printer to print files quickly.
Part 2: How to Use AirPrint on iPad
After you know what's AirPrint, you may also want to fix how to set up AirPrint on iPad and how to apply AirPrint on iPad. In order to make it clear, here I would like to use a few steps to tell you the method. Follow me to read the contents shown below to fix this issue. Here I would like to take Safari for instance.
1. On your printer, connect it to the Wi-Fi network in the house. As for how to make it, you can refer to the manual of your printer, for different type of printer has different set of options or procedure. Wait until the printer detect Wi-Fi network. You'd better put it next to the router.
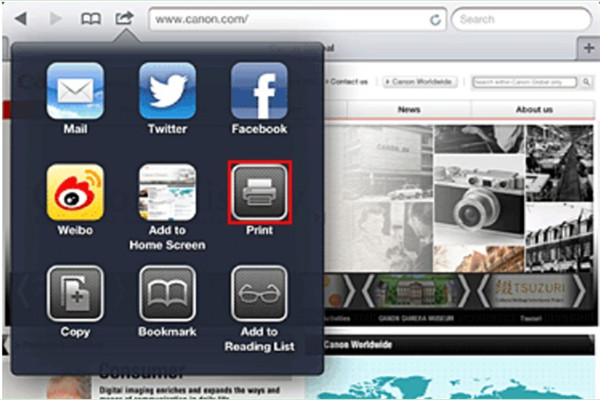
2. On your iPad, swipe upwards to connect to the same Wi-Fi network that your printer is using. Open iPad Safari app and then open one webpage that you want to print from iPad. After that, click on the share icon at the top left of the interface.
3. Tap on the "Print" option in the next panel. Continue to solve how to apply AirPrint on iPad by choosing the printer model in the list and set the copy numbers you'd like to print.
4. Wait until the process terminates. You will get the printed pages.
As you can see, it is quite simple to deal with how to set up AirPrint on iPad and how to use AirPrint on iPad. Have a try and you will know how effective this feature is.
Part 3: How to Use AirPrint on Mac
iPad is one of Apple devices that can make use of AirPrint feature. In fact, Mac can also apply this function well. If you have no clue on how to set up AirPrint on Mac and how to AirPrint from Mac, this part will illustrate to you clearly.
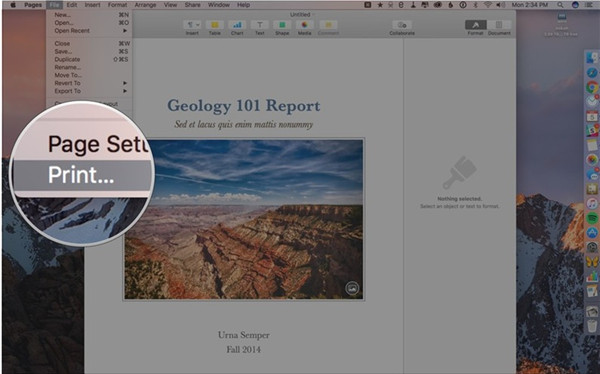
1. Connect Mac to stable Wi-Fi network and then connect your printer to the same Wi-Fi network as well. Click on "File > Print" on the menu bar of Mac interface to check out whether your printer shows in the list.
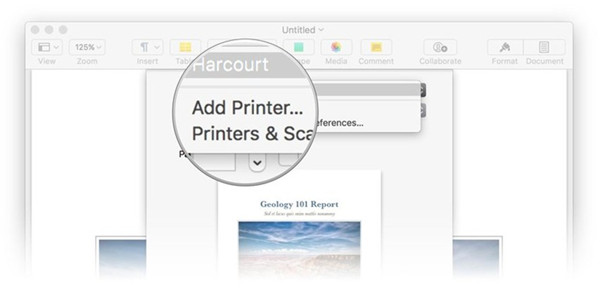
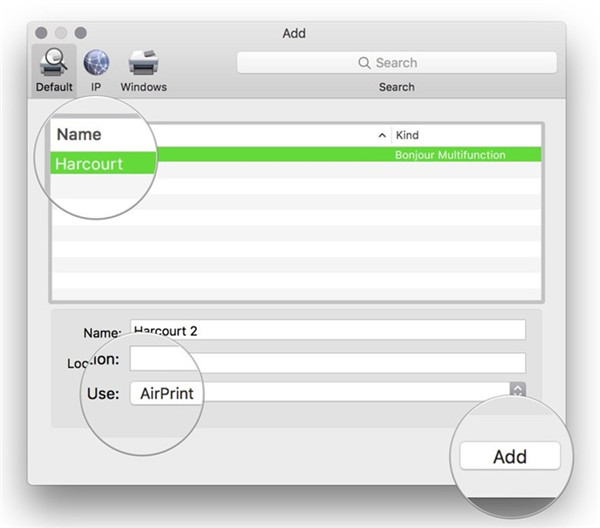
2. If it is in the list, you are prepared well to print. If not, you need to click on "Add Printer" to choose the name of your printer.
3. After that, click on "Add" button at the bottom right of the panel.
4. Open a file on Mac and then click the "Command + P" key on keyboard to call out the menu to choose "Print". Thus, you can choose your printer from the list and set the copy number or other options you need. After a while, you can get the copies you desire from your printer.
You now know the problem of how to set up AirPrint on Mac and how to AirPrint from Mac is easy to cope with. Try the steps listed above and you will begin to like this amazing feature.
Part 4: How to Print iPad Contacts and SMS on Mac via iTransfer for Mac
As we all know that contacts and SMS on iPad are listed one by one, which is not convenient for us to print all of them at once via AirPrinter feature. If this is the problem that you are worrying about, actually, Leawo iTransfer for Mac is always prepared to settle this issue well. You can first use iTransfer to transfer iPad contacts and SMS to Mac and then print them at ease. iTransfer has been developed for many years with a good reputation among users around the world. The file number that it can manage reaches 12, which is a powerful tool. As for how to make it, please continue to read the following step-by-step introductions.
Leawo iTransfer for Mac
☉ copy files among iOS devices, iTunes and PCs with ease.
☉ copy up to 14 kinds of data and files without iTunes.
☉ Support the latest iOS devices like iPhone X, iPhone XR, etc.
☉ Play back, view, and delete data and files on iOS devices.
4.1 How to Print iPad Contacts on Mac via iTransfer for Mac
This part will show you how to print iPad contacts on Mac computer. First you need to use iTransfer to export contacts from iPad to Mac. Then, you can use AirPrint to realize your goal.
1. Launch Leawo iTransfer and Connect iPad to Mac
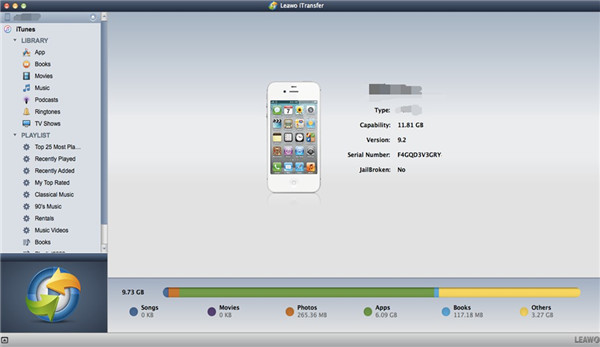
On Mac, you need to launch iTransfer for Mac and then insert iPad into Mac via USB cable. Wait for a seconds, you can see iPad information in the main interface.
2. Click on "Contacts" Tab
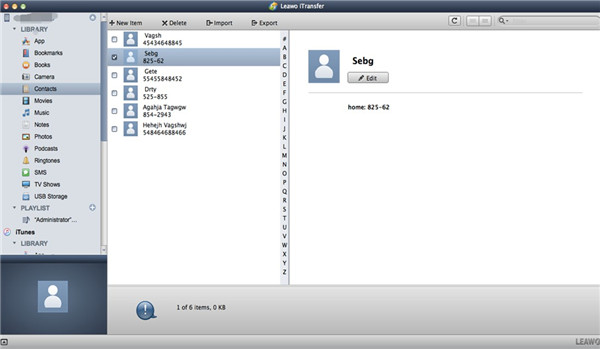
Click on iPad icon and then move to "LIBRARY > Contacts" in the left sidebar. You can check out all contacts on iPad at the right part of the window.
3. Choose Contacts and Transfer to Mac
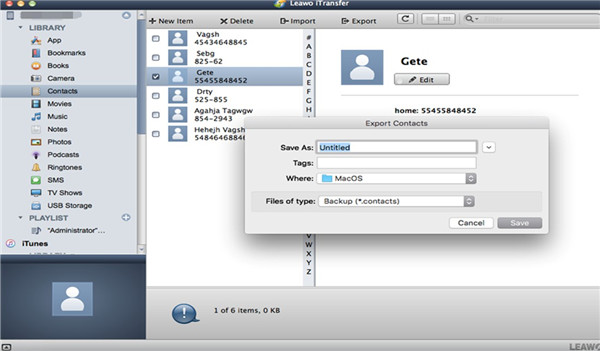
Choose the contacts that you want to share to Mac and then click on "Export" button. In the panel that pops up, you need to name the exported file and choose a Mac folder to save the contacts file. Choose "*.contacts" as the format and then tap on "Save" button. The software will begin to send contacts to Mac folder immediately. In several seconds, you can get the iPad contacts on Mac.
4. Print Contacts on Mac via AirPrint
As for how to make it, please refer to Part 3. You just need to set up AirPrint on Mac and open the contacts file on Mac to call out "Print" option to get your copies.
Note:
iPad contacts can be saved in the format of CSV for users to print directly on Mac.
4.2 How to Print iPad SMS on Mac via iTransfer for Mac
After you know how to use AirPrint on Mac to print iPad contacts, you can continue to read the following introductions to see how to print iPad SMS on Mac via iTransfer for Mac.
1. Connect iPad to Mac and Check Out SMS
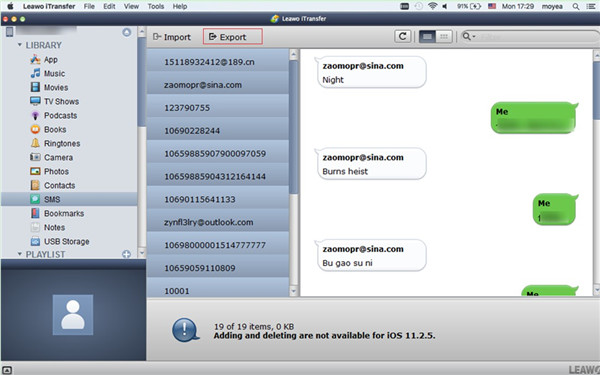
Plug iPad into Mac and run Leawo iTransfer for Mac. Move to click on "iPad icon> LIBRARY> SMS" on the left sidebar. After that, you can view all iPad SMS on the right part of the interface of the software.
2. Choose SMS and Transfer to Mac
Choose the message that you want to export to Mac and then click on "Export" button. A panel will show up and you need to find a location on Mac to save the exported SMS files. Fill in the "File name" as you prefer and then choose " *.messages" as the format. In the end, you can tap on "Save" button to ignite the process to transfer messages from iPad to Mac computer. When this process comes to an end, the iPad SMS will be accessible on Mac.
3. Print SMS Files on Mac
As for how to print iPad message files on Mac, you need to move to check out the steps in Part 3 for reference. In a word, after you set up AirPrint on Mac, you only need to open the file and then click on "Print" option to achieve your aim.
Note:
The SMS on iPad will be exported as "*.plist" file, which needs to be converted to printable format via a plist converter software. Therefore, it is necessary for you to download one plist converter program for the conversion and the successful AirPrint on Mac.
As you can see, it is not tough to fix how to use AirPrint on Mac to print iPad contacts and SMS at all. Have a try and you will know its efficient results. This software has benefited a lot of users all over the world, which makes it stand out among similar programs in the market. If you just want to print some photos on iPad, you could also try iTransfer.


