The space of your computer and iPhone is limited. If you are a photo lover, maybe you will take a lot of photos every day. When there is not enough space on your computer and iPhone to store pictures, what can you do? Actually, you can solve this problem by saving pictures to iCloud. You may not know how, and this guidance is just for you to refer to. In fact, there are many ways to help you, this guidance will introduce 4 easy ways for you to use to solve how to move pictures to iCloud.
Part 1: How to Move Pictures to iCloud via iCloud for Windows
You can take advantage of iCloud for Windows to download all of the photos and videos from your iDevices to your computer, or upload your photos to iCloud. If you enable "iCloud Photo Sharing", you can share your photos with the person you select. This is a direct way to solve the issue on how to save pictures to iCloud. First you need to download and install iCloud for Windows. The following steps will tell you the details on how to upload pictures to iCloud with iCloud for Windows.
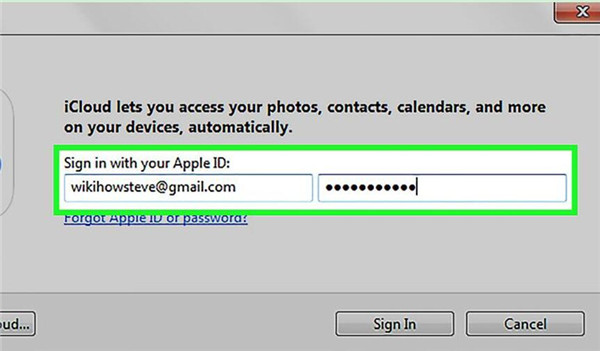
1. Download and install the iCloud for Windows on PC. Then launch it and fill in the Apple ID and password.
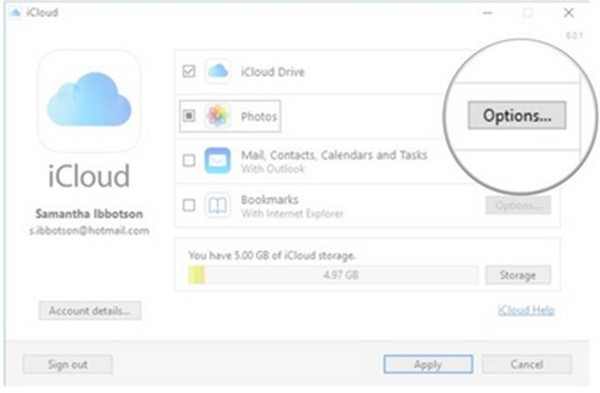
2. Click on the "Options" button next to "Photos".
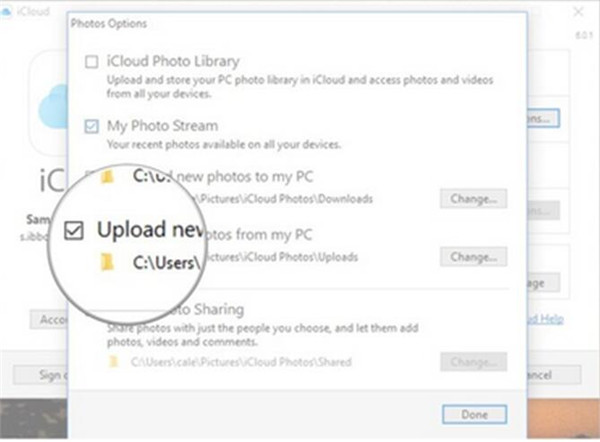
3. Put a check mark on the left of "Upload new photos from my PC". You can set other options as you like, but this can ensure you to move pictures to iCloud from your computer. Then you can click on "Change" just under "Upload new photos from my PC" on the right side to navigate to the photos you have saved on your computer.
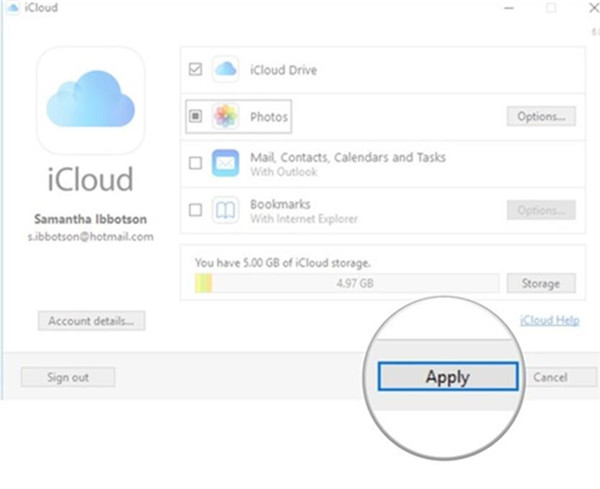
4. Click "Done" at the bottom right of the panel and then tap "Apply" to confirm your changes. All photos saved in the folder on your computer will be uploaded to iCloud.
As for how to save pictures to iCloud, you can use this method to help you. If you want to upload other files to iCloud with iCloud for Windows, you can choose the files you need to transfer to iCloud by referring to this way as well. If you don't want to use iCloud for Windows to solve how to move pictures to iCloud, you can also use iCloud.com to assist you. The introductions on how to send pictures to iCloud with iCloud.com will be written in the second part.
Part 2: How to Upload Pictures to iCloud on iCloud.com
It is really simple to use iCloud.com to solve how to save pictures to iCloud. You only need a few clicks to realize your goal. Below are the instructions for how to send pictures to iCloud from your computer with iCloud.com.
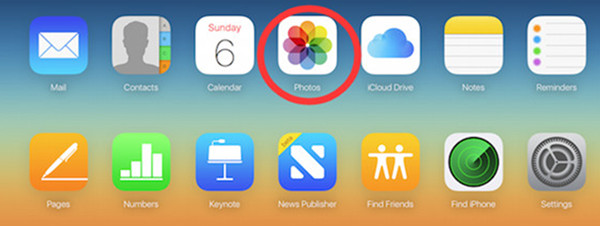
1. Go to iCloud.com on web browser on your computer and sign into it with your Apple ID and password. Then you can tap "Photos" panel in the main interface.
2. Click on the cloud-like upload icon at the top right corner and then navigate to the photo folder on your computer to move pictures to iCloud.
As for how to transfer pictures to iCloud, this method is quite easy to handle. But do you know how to move pictures from iPhone to iCloud? The following two parts will tell you the answer. Continue to look at this guidance to know how to send pictures to iCloud from iPhone.
Part 3: How to Move Pictures from iPhone to iCloud via iCloud Photo Library
When you want to make room for other files by moving pictures to iCloud for backup, you can use iCloud Photo Library to help you. With several clicks on your iPhone, the iPhone photos will be synced to iCloud via iCloud Photo Library.
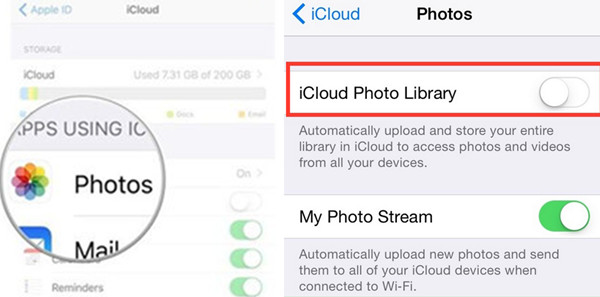
1. First, you need to head to "Settings > Name/Apple ID > iCloud" on your iPhone.
2. Then you need to click on "Photos" to turn on "iCloud Photo Library". The iPhone photos will be synced to your iCloud automatically.
After you use this method, the photos on your iPhone can be deleted, for you have backed them up to iCloud. Then your iPhone space will be able to store more photos and other files. If you don't have a computer on hand when you want to solve the issue on how to move pictures from iPhone to iCloud, you can take advantage of this method. If you want a third-party tool to help you to move pictures to iCloud from iPhone, I recommend you choose iTransfer. The next part will tell you how to transfer pictures from iPhone to iCloud with iTransfer.
Part 4: How to Transfer Pictures from iPhone to iCloud via iTransfer
Leawo iTransfer is easy and convenient to use to transfer pictures from iPhone to computer and then upload to iCloud. This method is accurate. If you download and install it, when you encounter other transfer problems, it can also help you to solve them. It can transfer up to 12 kinds of files among iDevices, iTunes and computers, which is quite professional. Let's check out how to upload pictures from iPhone to iCloud with iTransfer.

Leawo iTransfer
☉ Transfer files among iOS devices, iTunes and PCs with ease.
☉ Transfer up to 14 kinds of data and files without iTunes.
☉ Support the latest iOS devices like iPhone X, iPhone 11, etc.
☉ Play back, view, and delete data and files on iOS devices.
Step 1: Transfer Pictures from iPhone to Computer
1. Plug iPhone into Computer
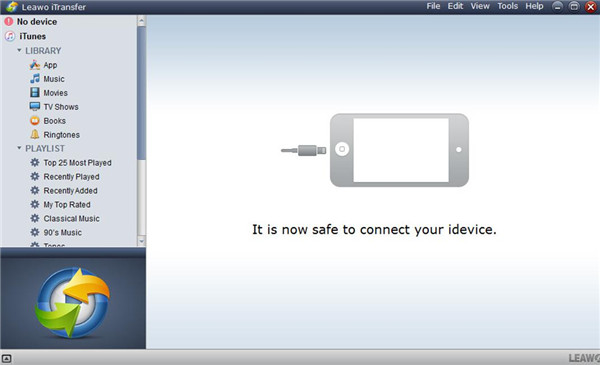
Download and install iTransfer on your computer and then click to launch it. Plug iPhone to PC with the USB cable. Your iPhone contents will show in the main interface of iTransfer.
2. Choose Pictures and Transfer to PC
Click on "iPhone icon > LIBRARY > Photos", the photos on your iPhone will show in the right side of the main interface. Then you can select the photos you want to transfer to PC and right click on one of the pictures to choose "Transfer to > My Computer". In the next pop-up panel, you need to choose a folder on your computer to save the photos by tapping "Change". After that, you can tap "Transfer Now" to move photos to PC. Wait until the transfer is completed. Finally, your iPhone photos will be on your computer.
Step 2: Move Pictures to iCloud from Computer
The first step has helped you to save pictures from iPhone to your PC. Now, you only need to save pictures to iCloud from computer. As for this step, you can refer to part 1 and part 2, for the two parts are just the instructions on how to upload pictures to iCloud from PC. By completing this step, you finally can solve the issue on how to transfer pictures from iPhone to iCloud thoroughly.

