As the official software released by Apple, iTunes is always the first choice and the necessary choice for Apple users to manage files of their iPhone, iPad and iPod on computers. If you have an iPhone, you might want to use it to sync iPhone photos and other data to iTunes for backup. But you may also find that it is difficult to sync iPhone to iTunes without any data loss. Undoubtedly, with a Mac to sync iPhone to iTunes will be easier than that with a PC, because the two work more seamlessly together. However, they are still rough to use. The good news is that iTunes is no longer the only bridge, there are more and more third-party software helping you to sync iPhone with iTunes. Some of them can even sync iPhone to iTunes without erasing. This tutorial will show you how to sync iPhone to iTunes using 3 different methods.
Part 1: How to Sync iPhone to iTunes via USB Cable?
iTunes is a library for storing a wide range of media files. As the name suggests, the most common use of iTunes is to sync music. Actually, iTunes can also be used to sync videos, podcasts, photos, etc. from your iPhone to computer for backup. And syncing iPhone to iTunes via a USB cable is the most common way. If you have a USB cable at hand, then follow the steps below to sync iPhone with iTunes via USB cable.
Steps:
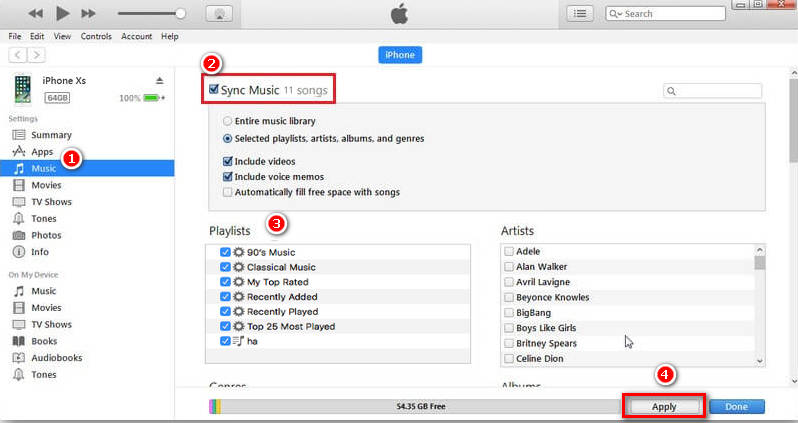
- Launch the latest version of iTunes on your computer. Then, connect your iPhone to computer via a USB cable.
- After iTunes detects your device, click the iPhone icon in the top sub-menu bar.
- In the left sidebar, click the type of content you want to sync iPhone with iTunes under Settings. To turn syncing on for a specific content type, check the box next to Sync [type of content].
- To sync the whole library, you can tick the box next to Entire [type of content] library. Or, to selectively sync iPhone with iTunes, tick the box below the entire option, then check the box next to each item you want to sync.
- Finally, click the Apply button in the bottom-right corner to start the process. If the syncing process doesn't start automatically, click the Sync button
Part 2: How to Sync iPhone to iTunes Using Wi-Fi?
Another situation - if you don't like to connect your iPhone to computer, iTunes also provides you with a method to sync iPhone with iTunes via Wi-Fi. However, there are two premises to sync iPhone to iTunes using Wi-Fi - both devices are on the same network, and you have to enable the function in iTunes last time when your iPhone is connected to computer with a USB cable. For how to enable this feature in iTunes and how to sync iPhone to iTunes over Wi-Fi, see the detailed steps below.
- Step 1: Open iTunes on computer, and connect your iPhone to computer via a USB cable.
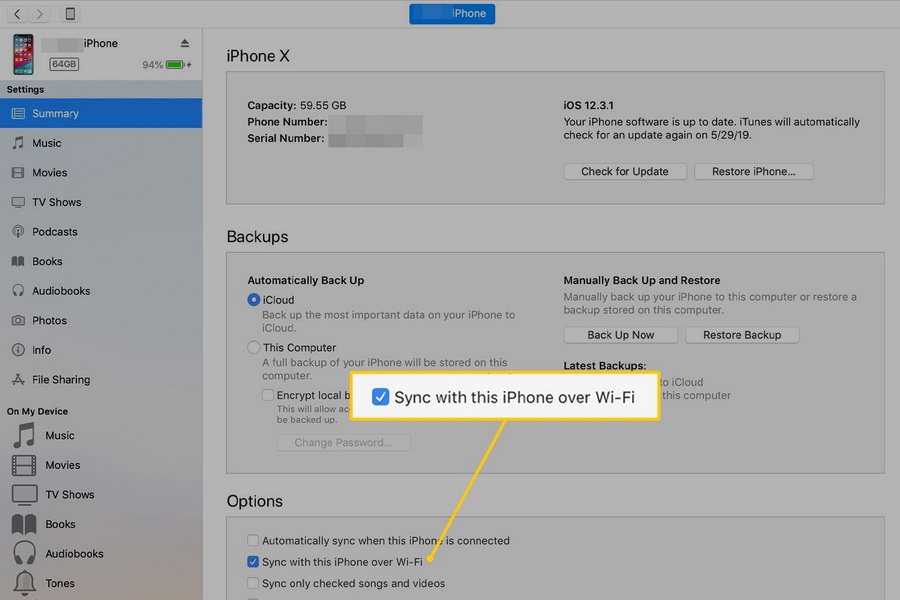
- Step 2: After iTunes detects your device, click the iPhone icon in the top sub-menu bar. Then, go to Summary tab in the left sidebar.
- Step 3: In the right panel, scroll down to the Options, and check the box next to Sync with this iPhone over Wi-Fi.
- Step 4: Click Apply button in this bottom-right corner to save the editing. Then, disconnect your iPhone from computer.
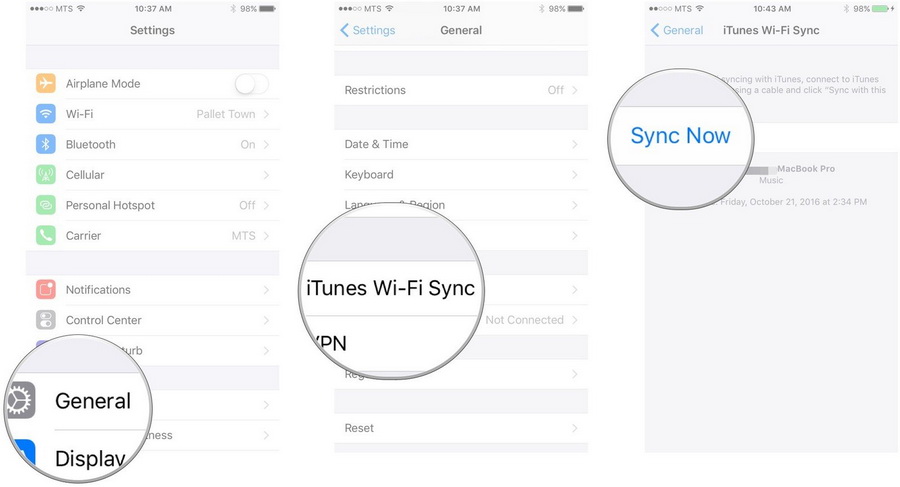
- Step 5: Open Settings app on your iPhone. Make sure your iPhone is connected to the same Wi-Fi network as your computer.
- Step 6: Scroll down and tap General > iTunes Wi-Fi Sync, which is near the bottom of the menu.
- Step 7: In the secondary menu, if more than one computer is listed, tap the computer you want to sync with. Then, tap Sync Now to wirelessly sync iPhone to iTunes.
Note
Make sure iTunes is open on your computer during the syncing process.
Part 3: How to Sync iPhone to iTunes Without Erasing?
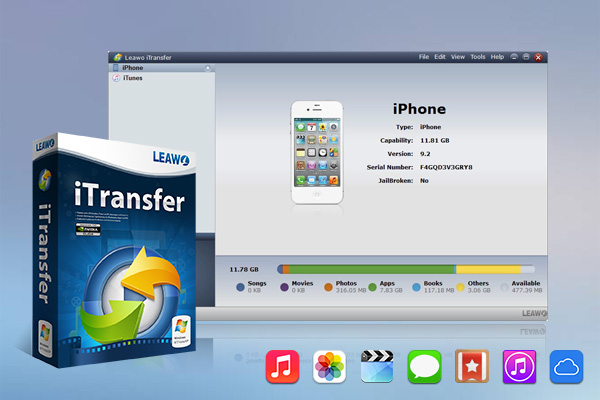
Although iTunes provides two ways to sync iPhone to iTunes over Wi-Fi and via USB cable, people are wary about syncing iTunes and iPhone. Because iTunes will overwrite data on iPhone before syncing. Plus, if you download a song from the internet, when you sync iPhone music with iTunes, it will delete music in iPhone that is not in the account. To avoid data loss, many people dare not use iTunes to sync their iPhone. Fortunately, there are some iPhone transfer software ready to help. Among all iPhone transfer software, Leawo iTransfer is regarded as the best. This software can transfer various files between iOS devices, iTunes and computer, such as music, photos, videos, ringtones, etc. The following guidance will show you how to sync iPhone to iTunes without erasing.
Step 1: Download Leawo iTransfer
Download and install Leawo iTransfer on your computer. You can click the download button below according to your computer system.

-
Leawo iTransfer
- Transfer files among iOS devices, iTunes and PCs with ease.
- 6x faster than iTunes
- Transfer up to 14 kinds of data and files without iTunes.
- Support the latest iOS devices like iPhone 12, iPhone 12 Pro, etc.
- Play back, view, and delete data and files on iOS devices.
- Support Windows & Mac OS
Step 2: Connect your iPhone to computer
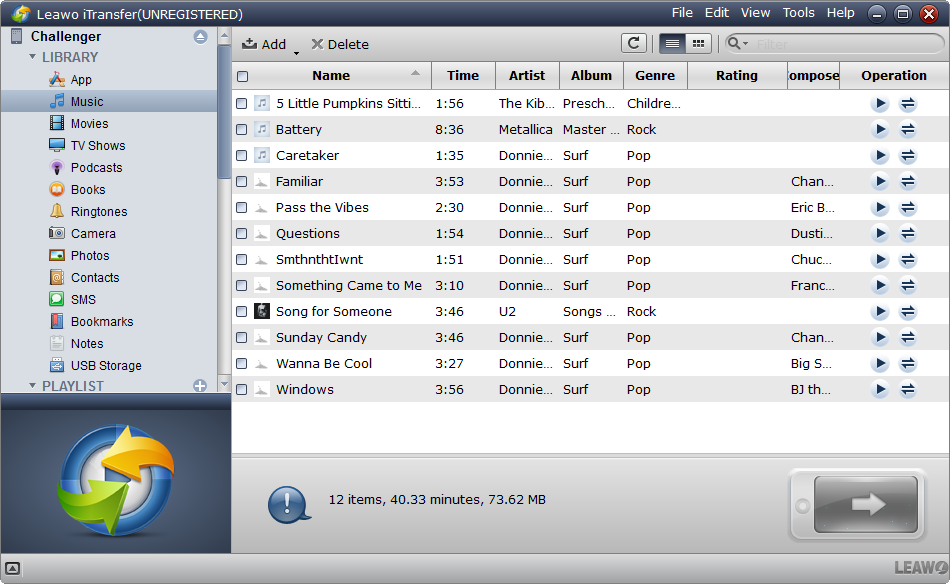
Launch the software after installation. Then, connect your iPhone to computer with a USB cable. The software will recognize your iPhone at once.
Step 3: Start to sync iPhone to iTunes
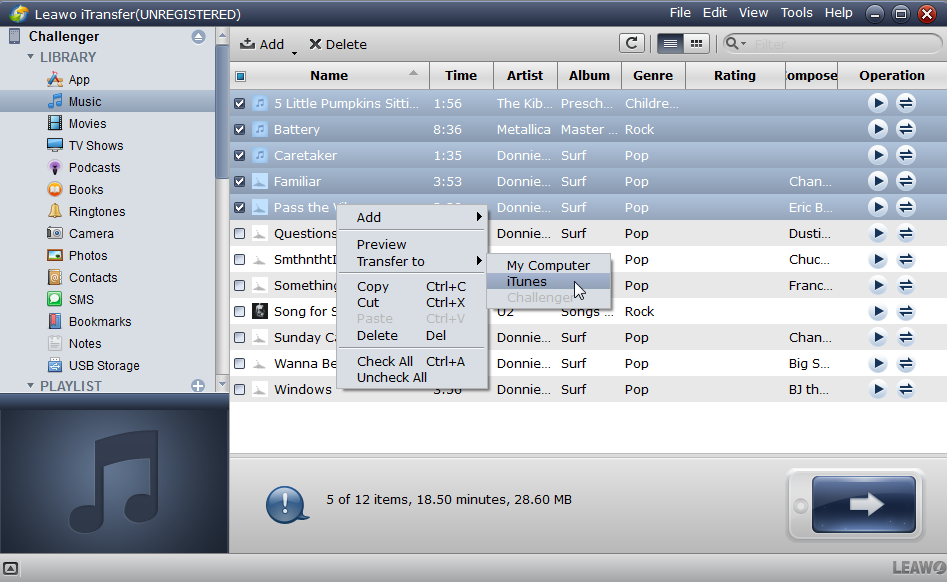
Click a type of content you want to sync from iPhone to iTunes in the left sidebar. Then, in the right panel, choose the target content. Alternatively, you can click the transfer button in the bottom-right corner to transfer all content in this category.
Step 4: Set output directory
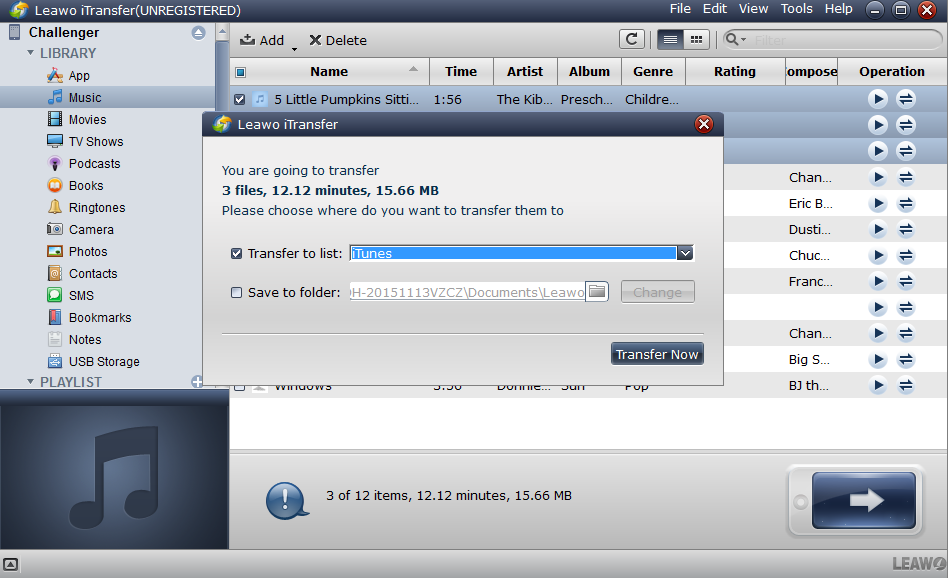
After selection, right-click on the selected items and head to Transfer to > iTunes. In the pop-up window, confirm iTunes as the destination, then click Transfer Now button to start syncing iPhone with iTunes.


 Try for Free
 Try for Free

