Old photos always have a huge amount of unforgettable moments in our daily lives. No matter how they came or what they are like, they had been valued a lot for carrying the treasured memory. Thus, it's better to be saved as digital files then back up into a DVD since most old photos are suffering from natural deterioration. Here we have prepared some tutorials to help convert old photos to DVD. What stands out for most benefits is making amazing slideshows with some of your memorable old photos! Slide down to acquire those useful skills!
Part 1: Why to Convert Old Photos to DVD
While our grandparents were living in the age of films, there were big collections of photos everywhere in houses. Meanwhile, they seem always happy to spend lots of spare time looking for some particular photos of big events and so on. Our friends and families in all past generations had a fabulous period of sharing memories with the tool of film photos, admittedly, film photos have the power of feeling real.
However, people living in a fast pace barely consider old photos are convenient as digital ones especially with the boost of technology, there seems to be unnecessary to even print out photos as they can easily be seen on multiple devices and stored properly thanks to the portability. Moreover, it helps save more materials to protect the environment, at the same time, no worries about the deterioration. As you may imagine, film photos can be an explosion to some certain degree if you have printed and stored out of your expectation. One way to solve this problem effectively is to convert old photos to DVD, you are able to recall the beautiful moments all the time later on if you even want special selections.
At present, digital old photos are getting more prevalent because of network communication. To convert old photos to DVD is inevitable and it is the best way to protect those photos. The digital world saves us so much time and energy, let's give it some appreciation and get started to how to convert old photos to DVD.
Part 2: How to Convert Old Photos to Digital Files
The first to kick off is to convert old photos to digital files by scanning and converting to picture formats such as PNG, JPG, JPEG, BMP, TIFF, TIF, GIF, JFIF, ICO, EMF, and WMF.
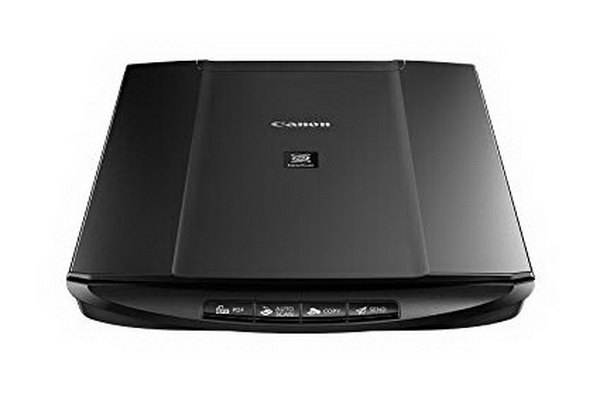
You can complete all of those complicated processes within just one correct photo scanner. What we recommend is at the best value and the reasonable price makes most people affordable to enjoy the outstanding function of scanning photos and display a clear image in digital formats. The Canon CanoScan LiDE 120 Color Image Scanner does this excellent job and it fits in the best photo scanner if you only consider the unique scanning function instead of what multifunction printers can handle.
As the lowest-cost photo scanner, it offers high resolution scans up to 2400 x 4800 dpi with CIS sensor which is to say you can even scan photographic prints. It is fast by delivering 300 dpi A4 color scan in 16 seconds and featuring EZ one-touch technology to save time and energy.
To start with, there is an application you need to use to let you complete from scanning to saving photos easily at one time, which is the IJ Scan Utility that works for all Canon printers and scanner devices. You can go to the Canon Support page and find the one matching your scanner model to download and install. If you already have this, then you are good to go with these steps:
Step 1: Place the old photos face-down on the platen.
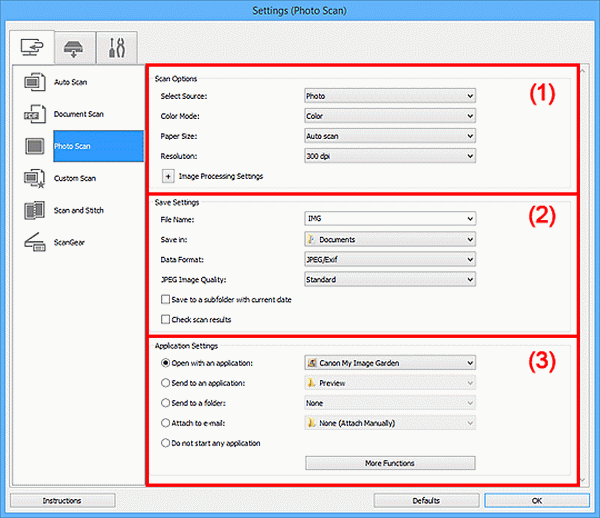
Step 2: Launch the IJ Scan Utility and make changes in "settings...". For the output formats, you can select JPEG/Exif, TIFF, or PNG from the "Data Format" box and also specify the image quality of JPEG files. There are also other options for you to adjust as required.
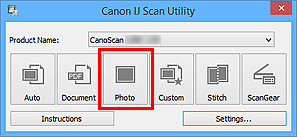
Step 3: Click "OK" and get back to the main interface, now just click "Photo" then the scanning process will start automatically.
Next, we will jump to a magic part before we officially get to convert old photos to DVD as the final part.
Part 3: How to Make Slideshows with Old Photos
Here comes to an additional exciting part whereas some individuals are trying to make every old photo full of emotion or get others into the vibe. Therefore, slideshows are great options for those artistic ideas. If you are right-handed, then Leawo DVD Creator, one of the best tools to make slideshows, could be an excellent left hand as it does me innumerable favors whereas making a slideshow is troublesome. Detailed steps as below will tell you how to create slideshows with old photos with Leawo DVD Creator. Download and install Leawo DVD Creator, then steps are followed as below.
Step 1: Select old photos to make a slideshow
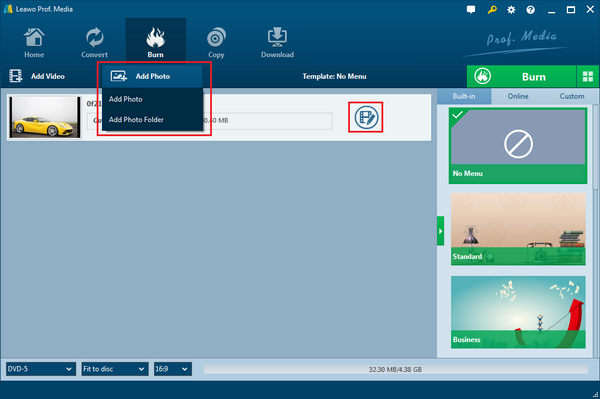
When you open the program, you will see the main interface as the picture shows. Find the "Add Photo" in the red box to import your old photos to the program, which can also be accessed by dragging and dropping straightly. A slideshow video of old photos should be created automatically on the video list right after adding source photos.
Step 2: Edit the slideshow of old photos
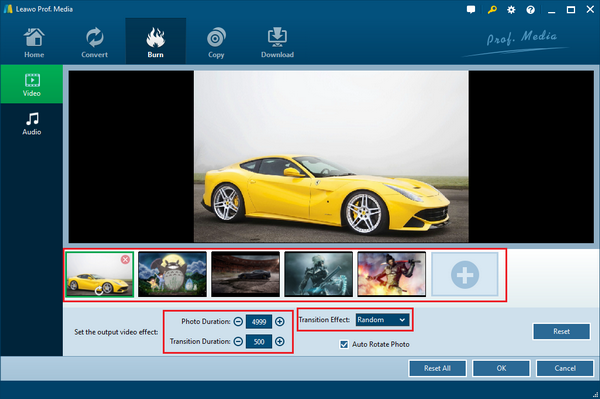
After getting the editing panel, you are able to have a review of old photos you've imported to the program under the preview window at the Video section. For your convenience, there's an "Add Photo" at the end of the photo list, add more old photos if you like. You can do rotation and deletion to any each of them by moving your mouse onto it.
Some reasonable video effects are provided such as Photo Duration, Transition Duration, and Transition Effect. Photo duration and Transition Duration run from 1000 to 5000 and 500 to 5000 respectively. Many Transition Effect can be found by clicking the drop box.
Step 3: Have some background music for old photos
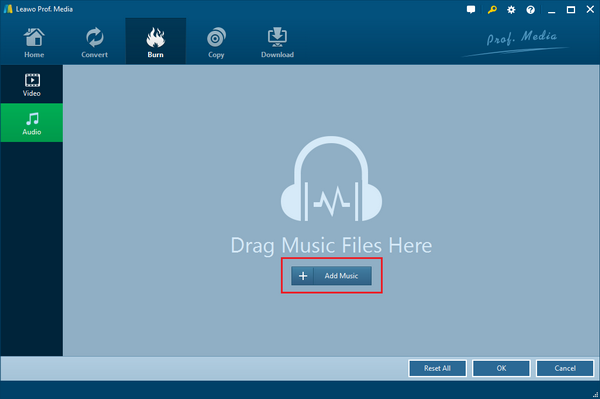
Down the video section is the Audio section, enter the audio section and click "Add Music" to import music you want as the background vibe to make the slideshow more interesting.
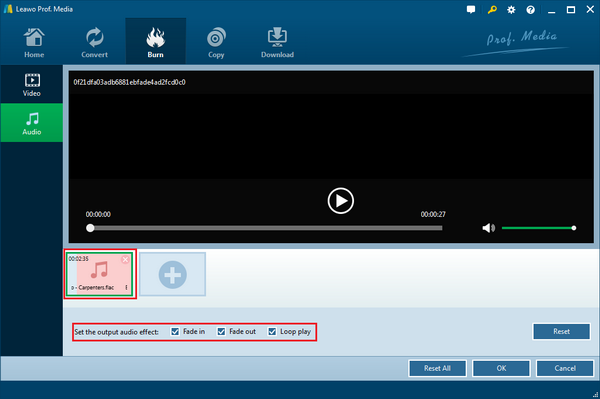
You have multiple options of the sound effect, Fade In, Fade Out and Loop Play.
Step 4: Burn slideshow of old photos
If you are ready with the slideshow video, now we can convert old photos to DVD as what we promised to show you earlier. Of course, you also have the option to convert it to an ISO file then save it to your hard drive.
Part 4: How to Burn the Slideshows with Old Photos to DVD
The eventual technique here is to convert old photos to DVD with Leawo DVD Creator, one of the best burning software tools. After representing the slideshow functions, this Leawo DVD Creator is also born to convert slideshows or old digital photos to DVD. You can easily finish every important step with just one powerful program.
Step 1: Import slideshows of old photos
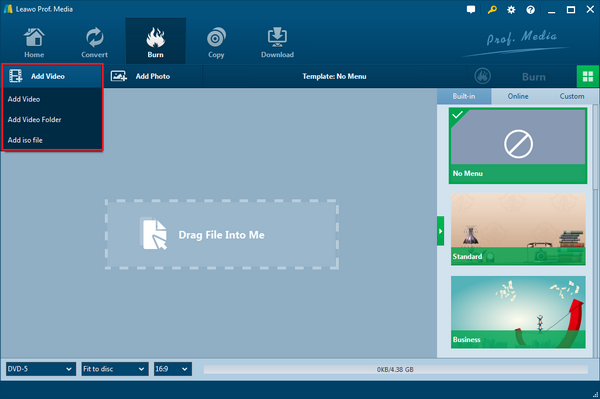
When you have made some slideshow videos of old photos, you can directly drag-drop them to the interface of this program. Another way is to click "Add Video" to select a slideshow or multiple slideshows you made with old photos.
Step 2: Output settings
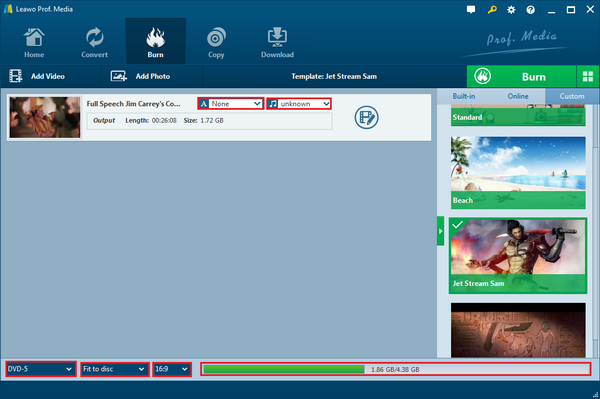
Make sure the DVD type and choose the right one you need. The video aspect ratio can be set in 4:3 or 16:9. You are able to find the size of the output file on this indicator. Besides, you can require the quality "Fit to disc".
Step 3: Start burning
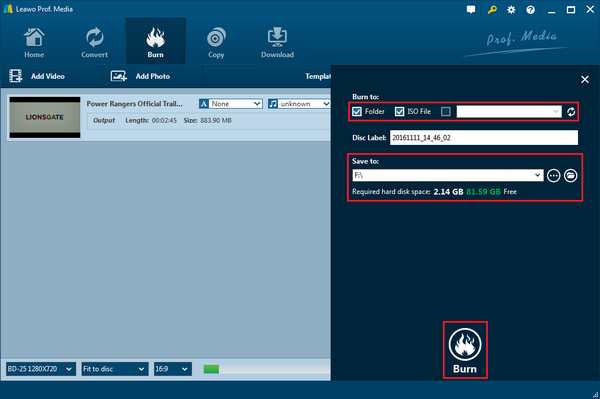
Notice the big green "Burn" button on the main interface, that's the key to the sidebar of burning settings. Give your slideshow of old photos a proper name so that you can put it in the label of the output file on the Disc Label box. At this point, what we need is a writable disc to store the old photos. Be sure you insert one and choose the "Burn to" inserted disc. "Save to" is the directory for the output file as you can browse to choose. Here is the final goal to convert old photos to DVD by clicking the bottom of the sidebar - "Burn" and it will begin the burning process at a fast speed.
Related: What type of disc is needed to burn slideshows or pictures?
Here is a bonus section telling you what type of disc you should obtain to burn slideshows or pictures. Not all disc is suitable for burning, you know. First of all, it should be blank. Anything else? Well here you are.
When we talk about the disc type, it is not really just about the disc type but also relates to what DVD burner you are using. Hence, you need to check your DVD burner to see what formats it uses: DVD-R, DVD-RW, DVD+R, DVD+RW, and/or DVD-RAM. Currently, most new DVD burners support all of the first four formats, making your choice much easier. Just like CDs, DVDs come with precedings -R, RW as well. The difference between DVD-R and DVD-RW lies in whether you require the disc to be a temporary backup disc or a permanent storage disc. Like its name indicates, DVD-R lets you write to the disc until it fills up. That’s it. However, DVD-RW lets you write information for example your photos/slideshows etc to fill the disc up, but then if you erase the data, the disc becomes a new clean plate for you to fill information up again. It is all up to you.

