"I heard that AirDrop is an extremely useful tool for people to share files wirelessly among Mac and iOS devices, but I have no idea how it works, can you tell me how I can AirDrop my files from iPhone to mac?"
AirDrop indeed is useful in transferring files from iPhone to Mac, apart from that, you can also send files to a person that standing right beside you while there is no Wi-Fi available. It can be used to share almost anything by communicating with other devices over Wi-Fi and Bluetooth.
This tutorial will let you know what AirDrop is and how to AirDrop files from iPhone to mac. In the following content, I'll use photos as an example to show you how to AirDrop from iPhone to Mac. Follow these steps to start airdrop iPhone to Mac.
A Brief Introduction to AirDrop
It is alway necessary for you to understand one thing before you want to utilize it. Here, we introduce AirDrop briefly for you. AirDrop is a useful tool designed by Apple company. With it you can wirelessly send photos, videos, websites, locations, and more to a nearby iPhone, iPad, iPod touch, or Mac. Only Mac model released in 2012 or later with OS X Yosemite or later support AirDrop.
How to AirDrop from iPhone to Mac
Just as is introduced above, it is simple to share files from iPhone to Mac. You can AirDrop from iPhone to mac simply by turning on AirDrop on both of your iPhone and Mac computer. The following steps introduce details about how to turn on AirDrop from iPhone and Mac and how to AirDrop photos from iPhone to Mac.
Step 1. Turn on Airdrop on iPhone
Normally, if you have turned on your Bluetooth and Wi-Fi on your iPhone, AirDrop would be automatically turned on. If yours isn't turned on, then swipe up from bottom of your iPhone then you can see that your AirDrop is in the control centre. Tap on it then three options will show up. Select Contacts Only or Everyone.
Step 2. Turn on AirDrop on Mac
It is also quite simple to turn on AirDrop on Mac. Open a Finder window and click AirDrop in the left sidebar. And at the bottom of the window, click on the blue words Allow me to be discovered by: and then select either Everyone or "Contacts Only. You need to make sure that this Finder window should be kept open because it enables AirDrop.
Step 3. Connect your iPhone with Mac with AirDrop
Wait a few seconds, then your iPhone will be presented in the window of AirDrop.
Step 4. Prepare sending photos to Mac
Now open your Photos app on iPhone then tap share button. You will see that there is a sentence says "Tap to Share with AirDrop" then tap the logo of your computer.
Step 5: Receive Photos
Here you need to know if your Mac is signed in to the same iCloud account with iPhone, if it is, the photo you're sending will be automatically accepted and saved. Otherwise, you will be asked whether to accept the item before it's saved to your computer.
Now on your computer, click on Accept to save the photo to your computer or click decline to terminate the process. You can also click Open in Photos to preview the picture.
How to Airdrop from iPhone to Mac with iTunes
As a free AirDrop alternative, iTunes allows you to view, play and sync files and data of iPhone easily, such as music, videos, and podcasts, etc. You can take advantage of this software when there is no network. Its interface is also user friendly and you can use it to airdrop from iPhone to Mac without any difficulty. Continue to see the detailed steps.
1. Download and launch the latest version of iTunes on Mac.
2. Plug iPhone into Mac via USB cable and your iPhone will be detected automatically. The icon of your device will show at top left corner.
3. Use "File Sharing" to airdrop iPhone to iMac.
1) Click the iPhone icon on the main interface of iTunes and click "Apps > File Sharing" to select one app to confirm which data can be shared by this app on your iPhone. However, if you don't see the "File Sharing" section in the interface of iTunes, there is no file-sharing app in your iPhone.
2) In the "File Sharing" panel, select one app from the listed ones. Head to "Documents" list, and scroll to copy files to a folder or window in your Mac computer. You can also select the files you need to airdrop from iPhone to Mac from the "Documents" list and click "Save to". Then navigate to the folder on your Mac to which you are willing to airdrop the files and click on "Save To".
4. Airdrop iPhone to iMac Directly
1) Install and run iTunes on your Mac computer. Plug iPhone into Mac via the USB cable, and iTunes will launch automatically. If not, you will need to manually open it.
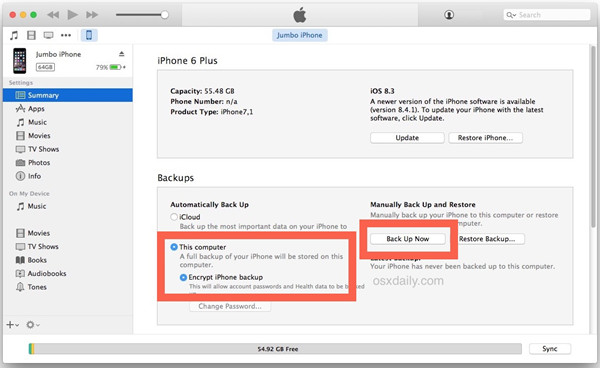
2) iTunes will recognize your iPhone. Click the iPad icon, and then click on "Summary" panel under the category of "Settings" .
3) Select "Back Up Now" under "Manually Back Up and Restore". Or you can select "This computer" under "Automatically Back Up". Then click "Done" to confirm the option. Finally, the iPhone files and data will be backed up to iTunes.
How to Transfer Data that Can't be Transferred using AirDrop from iPhone to Mac?
To transfer files like photos, notes from iPhone to Mac is easy as you can use AirDrop, but there are files that you can't transferred via iTunes, like songs you purchased from the iTunes Store on iPhone. To transfer those kind of files that are not supported by AirDrop, you are going to need some help from some third-party data transfer programs. Here I would recommend to you Leawo iTransfer, it's a powerful data transfer program which allows users to transfer 12 kinds of files, like apps, photos, music, videos, SMS, contacts, and so on between iOS devices, iTunes and PCs. It can transfer data that you can't transfer with Airdrop and when it comes to massive file tranfer, it's definitely a better choice than AirDrop.
Below are the detailed instructions for transferring data from your iPhone to your Mac.
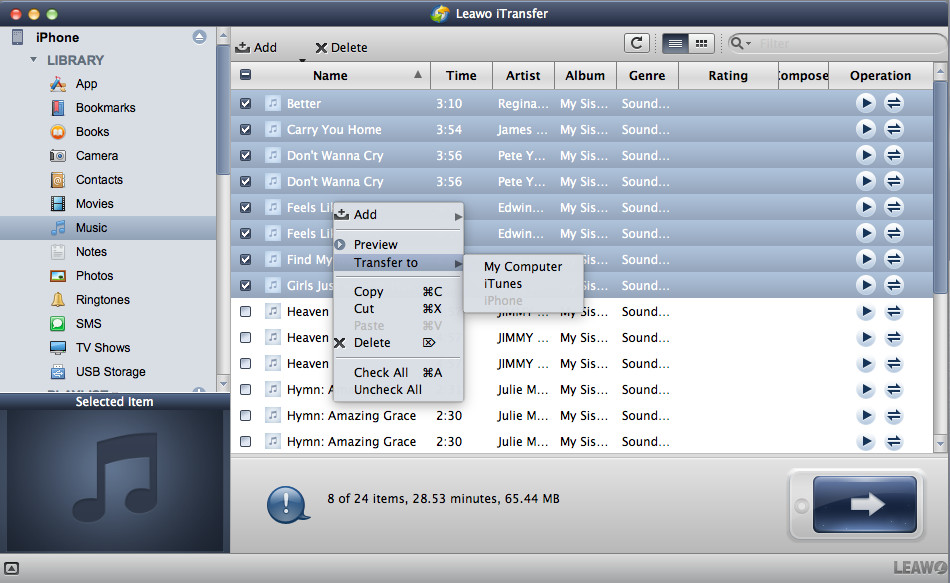
1. Open Leawo iTransfer on your Mac, and then plug your iPhone into your Mac. The program will soon detect your device and you can find your device on the top of the left sidebar.
2. Click on the name of your device on the left sidebar and click on the type of file you want to transfer to Mac. Select the files you want and then right-click them. Select Transfer to>My Computer.
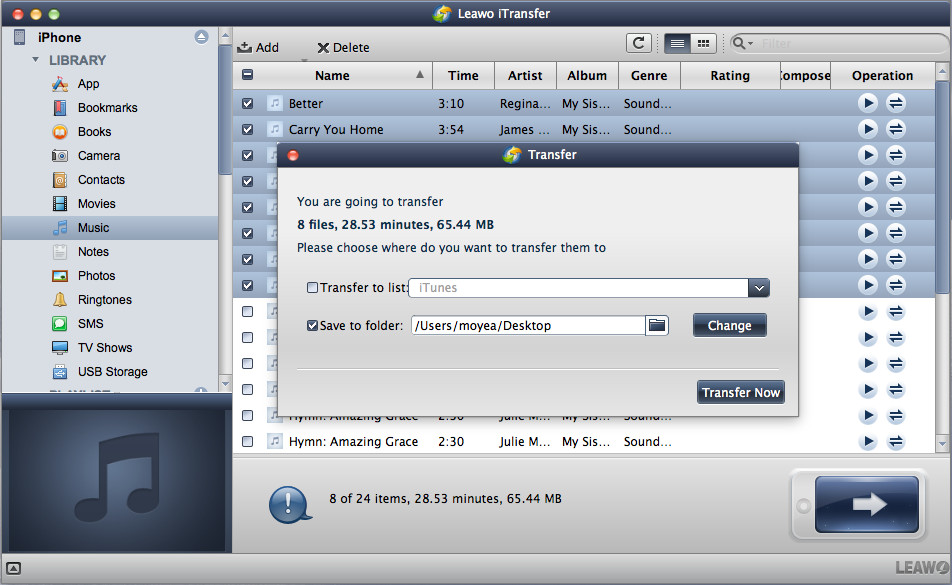
3. A window would pop up. Click Change to select a folder to store the files you've selected and click Transfer Now to start transferring.
AirDrop is quite convenient for you to transfer files. And by reading this post you'll know how to Airdrop from iPhone to Mac. This tutorial provides the procedure of transferring photos only but it doesn't mean that you cannot transfer other files. Besides, not all process can be as smooth as this one, if your Mac fails to find iPhone, then you need to restart both devices. If not working, then make sure AirDrop is set to "Everyone" instead of "Contacts Only".


