Have you ever thought of making a slideshow of your photos? If your answer is Yes, do you know how to make a photo slideshow with music and pictures? Congratulations, now you are in the right place! With a photo slideshow maker, you can feel free to make a cool slideshow which can attract, entertain, and engage your family and friends. There are a lot of slideshow making applications as well as online slideshow makers to transform all video clips and images into eye-catching slideshow videos. But we know you may not have a ton of time to research the best slideshow makers. That’s why we’ve done it for you. Check out our top 3 picks below! You can easily find the one you like.
Part 1: Top 3 Slideshow Makers for Mac
When looking for a photo slideshow maker, you may always prefer it to be convenient enough to use which can save you much time, at the same time, and hope it would be powerful if it has some fantastic music sound. It would be better if you can add titles, words for good expression. It is the right time to read on for our picks of the top 3 Slideshow Makers for Mac available today, iMovie, iPhoto and Leawo DVD Creator for Mac. Obviously, these slideshow software have a bit of a learning curve, simply because there are various tools. But once you get more and more familiar with these top 3 tools, the large toolset and intuitive interface can help you create professional-looking slideshows.
Part 2: Make a Slideshow on Mac with iMovie
Like all Apple products, iMovie is simple and functions easily across connected Apple libraries and devices. Once videos and photos have been imported, you can trim clips, add close-ups, enhance audio, and even remove sound, and comes handily when you want to make changes. In all, iMovie is one of the easiest video editing tools to use, letting editors click and drag imported clips into the timeline, as well as automatically lock on adjacent videos. The Mac version is more powerful with more advanced editing features, so be sure take advantage of that if you can!
Here you will find a step-by-step guide on how to create a slideshow with Apple’s free video editing software iMovie for Mac.
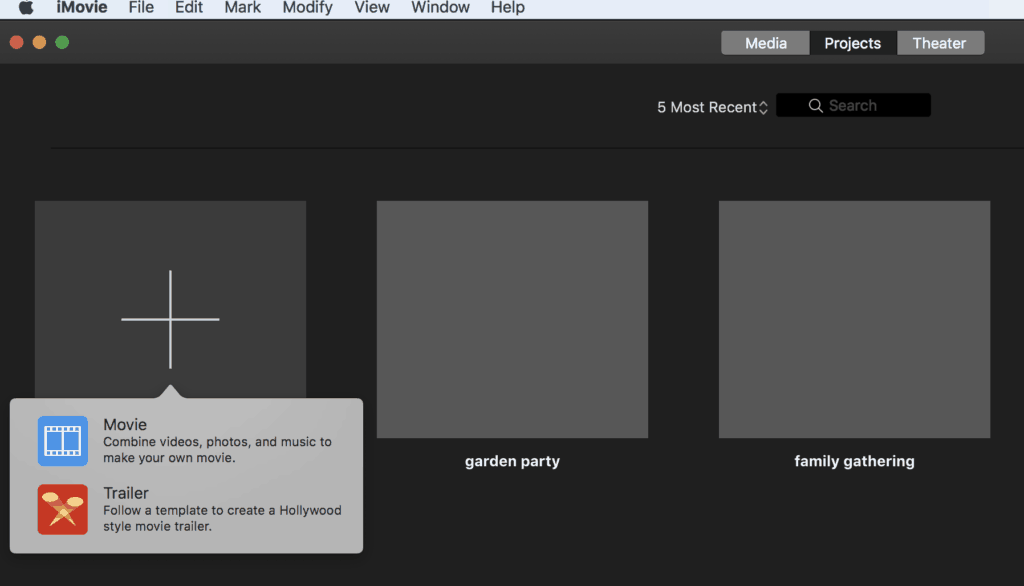
Step 1. When you open iMovie, click on the Projects button which lies between Media and Theater. Then click Create New. Select Movie to create a slideshow with the combination of photos, videos, and music.
Step 2. Now go to the My Media tab and click the Import icon to add your photos, videos and music to iMovie. Drag and drop them on the Project pane.
Step 3. You can change the order of your photos and videos on the Project pane by simply dragging them from one point on the timeline to another one. You can delete a photo or video by simply clicking on it with two fingers and select Delete.
Step 4. At the video editing stage, you can still fine-tune your photos and videos with some extra editing options available on the Viewer pane.
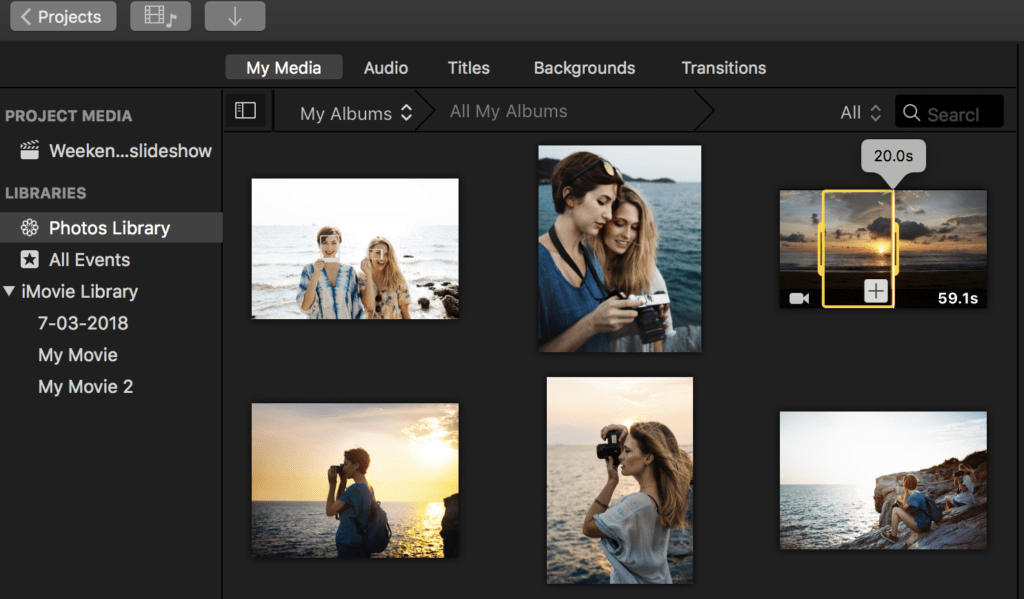
Step 5. In the Browser pane or the Project pane, you can trim some of the footage by clicking and adjusting the desired length from the beginning and the end by moving the yellow frame from both sides. Then drag and drop the trimmed video into its place in the timeline (in the Project pane).
Step 6. Sometimes, transitions and effects help to create a slideshow in a more professional way, such as cross dissolve, fade and cross blur. To apply a transition in the slideshow, just drag and drop it between two photos in the timeline.
Step 7. To insert a title slide, select Titles from the top menu of the Browser pane, select the type of slide you want, and drag & drop it on the Project timeline. Insert the text and adjust typography settings simply by double clicking on the slide from the Project timeline. Then you can write your text directly in the Viewer pane.
Step 8. To add Music to iMovie for your slideshow, click on the Audio button at the top of the Browser pane, select music from iTunes, use sound effects, or choose from your productions in GarageBand. Just drag and drop the music you want from your iTunes account to the project timeline.
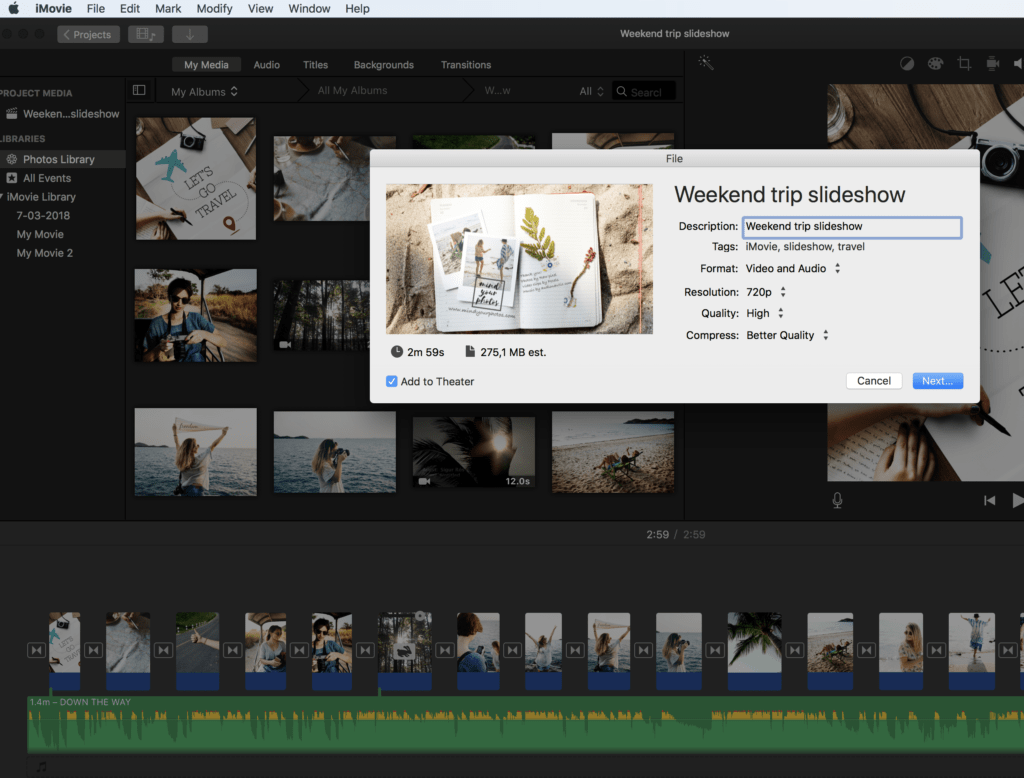
Step 9. If everything goes well, you can now export and share or save it. In the main iMovie menu, select File / Share / File to export your slideshow. You also have the option to share your slideshow on Facebook, YouTube, Vimeo and iTunes. You can even share it by email, although that might be a less attractive option.
Are you also using an iPhone or an iPad? The good news is that iMovie is designed to work together in MacOS and iOS, so you can work on your slideshow across different Apple devices.
Part 3: Make a Slideshow on Mac with iPhoto
Apple iPhoto is used for editing and organizing photos. You can organize by date or event, edit photos, and import video, although you cannot edit video. It comes standard with Apple iLife. iPhoto helps you easily manage and enjoy all your digital photos in exciting ways, and share your favorite memories with family and friends. Learn how to make Photo Slideshows on Mac with iPhoto.
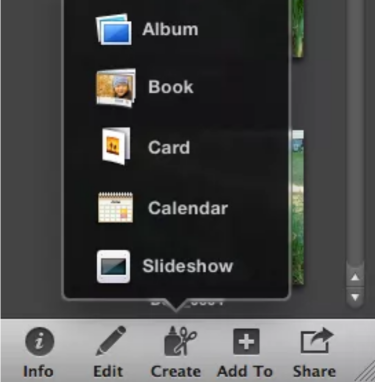
Step 1. Click the “Create” button in the toolbar in the lower-right corner of iPhoto and select Slideshow. Then the photos you have chosen will get dumped into a slideshow, complete with a title page. Type in a title, you can also name the slideshow in iPhoto's source list in the left-hand column.
Step 2. To remove a photo from a slideshow, open the slideshow and highlight the photo from the strip of thumbnails at the top of the page and hit the Delete key. You can also drag photos around to change the order.
Step 3. iPhoto offers 12 themes for slideshow. To its left is a Text Slide button that lets you add a caption to a slide, and to its right is a Music button that lets you add a song or songs to the slideshow. Choose a song from iTunes or GarageBand. Before you select a song, be sure you check the Play music during slideshow box.
Step 4. In the Settings button, you can choose to use photo titles, description, Places, or dates as captions. Other settings let you add a transition to the entire slideshow or just to specific photos.
Step 5. After all the settings are done, hit the “Preview” button at the bottom to check how the current slide you're working on looks. To view your completed slideshow from start to finish, hit the “Play” button.
Part 4: Best Slideshow Make on Mac -- Leawo DVD Creator for Mac
There is an excellent iMovie equivalent for Mac, its name is Leawo DVD Creator for Mac. To edit the Video and apply effects, it's very similar to iMovie. If you try it, you'll really like the ease of use. As the Best DVD Software Tools to Make Photo Slideshow, Leawo DVD Creator for Mac can create photo slideshow videos and burn them to DVD with its built-in photo slideshow maker. What is more, as the Best Slideshow Make on Mac, it has the capability to convert videos in more than 180 formats to DVD without quality loss.
If you use the Windows version, you can also try Leawo DVD Creator for Windows, the method mentioned below is almost the same. Now try to learn how to make a Slideshow and play an iPhoto Slideshow on a PC.
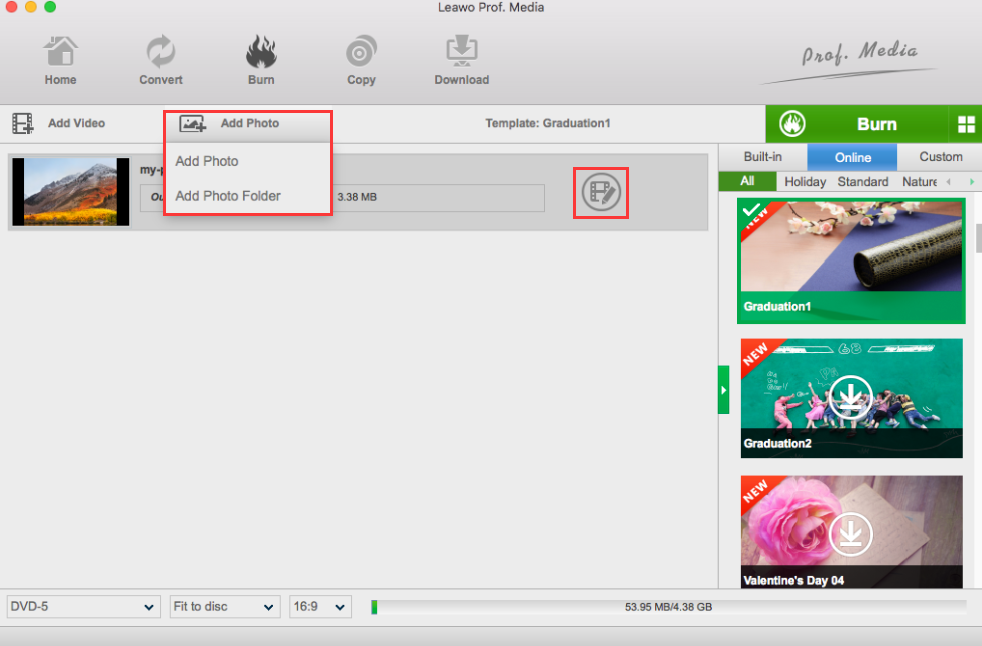
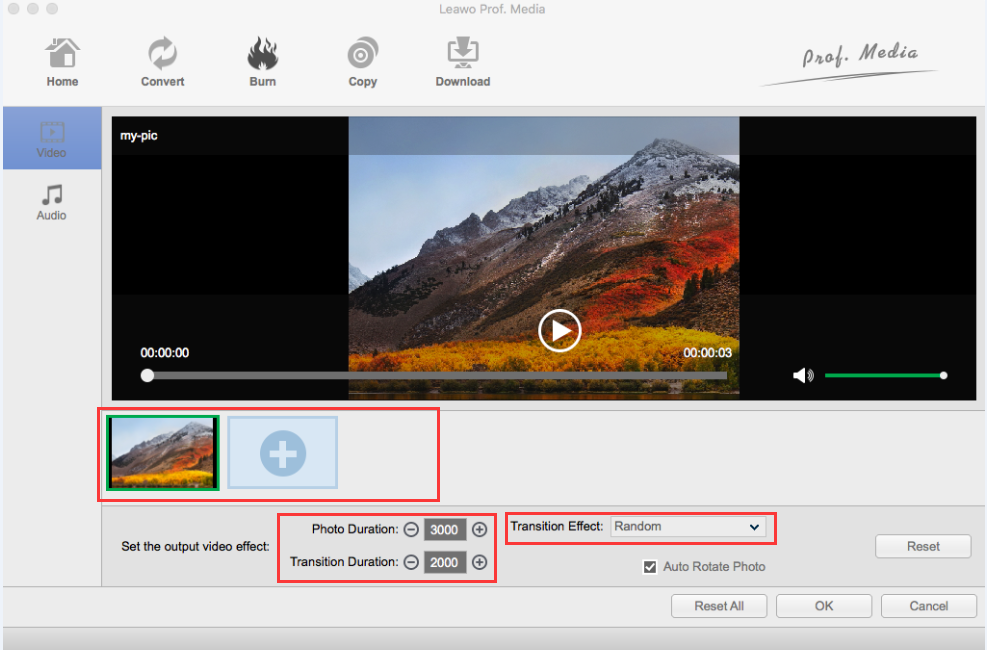
Step 1. Download and launch Leawo DVD Creator for Mac, on the drop-down menu, choose Add Photo to add one or more photos, or Add Photo Folder to add all the photos in a folder at once. Then you can notice a slideshow of the photos would be generated when all the photos are loaded to the program.
Step 2. Click the “edit” button, go to the slideshow editing panel. Under the preview window, there is a photo timeline. You are able to rotate, delete and rearrange photo order in the timeline. There are options to set the output video effect under the photo list. Select the one you like.
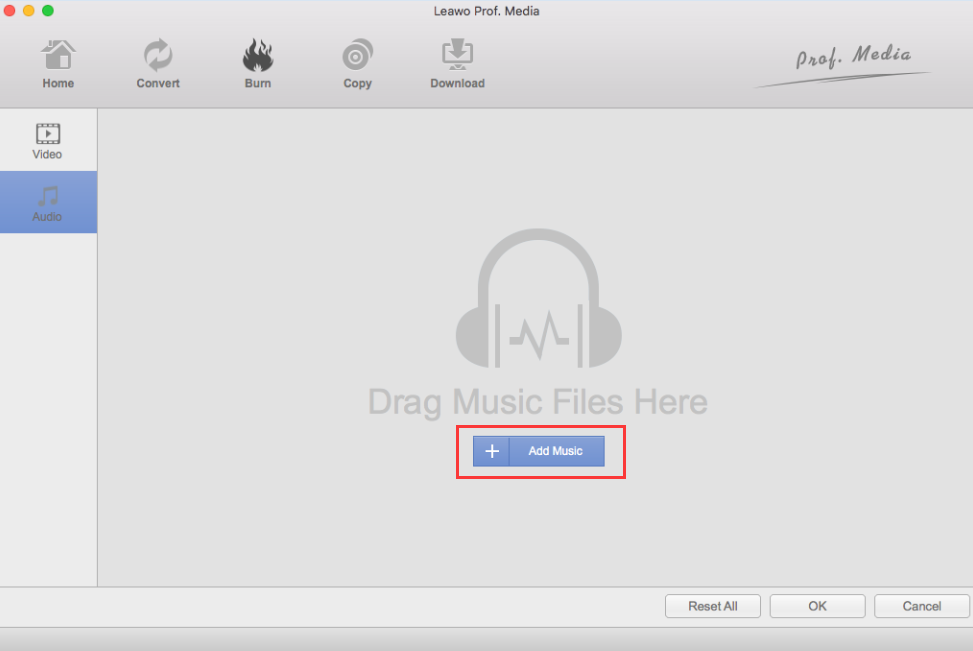
Step 3. To make Photo Slideshows with Music, simply click Add Music button to import background music from your computer to the program. To remove the music you’ve imported, move your mouse onto the music file and click on the Delete button on it.
Step 4. When you finish editing the slideshow video, Then click “OK” to apply the settings. Start burning these photos to slideshow after applying all the settings. Just wait in patience and you can obtain a photo slideshow in seconds.
What is more, if you want to customize your own Slideshow, you could even add logo to PowerPoint. Now, you can export, play and share your great masterpiece.
Part 5: Comparison and Conclusion
Below, we have made a comparison of the top 3 Slideshow Makers for Mac.
|
|
iMovie |
iPhoto |
Leawo DVD Creator |
|
Supported OS |
Mac |
Mac |
Mac and Windows |
|
Input formats |
Limited |
Limited |
Supports all popular and commonly used image, video and audio formats, support 180+ |
|
Burning Speed |
Slow |
Slow |
Fast |
|
Burn videos to DVD, Blu-ray disc, ISO files and DVD folders |
Limited |
Limited |
Yes |
|
Built-in video editor |
No |
No |
Yes |
|
Download and record videos |
No |
No |
Yes |
|
Edit effects |
Only support simple effects |
Only support simple effects |
3D effect, crop video, adjust effect, add watermark, remove noise, trim video... |
|
Update Frequency |
Yes |
Stop updating |
Yes |
There is no doubt that Leawo DVD Creator for Mac is a cut above the rest. The built-in photo slideshow maker allows you to create photo slideshow videos and burn them to DVD. The Leawo DVD Creator for Macworks efficiently without any lags on both Windows and the Mac systems. You can edit video to make it your own style, such as add 3D effect, crop video, adjust effect, add watermark, remove noise, trim video... For screening your slideshows, the best quality and compression combination with relatively compact file will be with the above selected options. You can select different options and see how it affects the size of the file in MB. Take your pick!


 Jul. 24, 2014 by

