iTunes is the multi-media application developed by the Apple, which could be used to manage our ios devices like iPad, iPhone, iPod Touch,etc. When using devices with ios system, it is quite optional to use the iTunes to backup the data from the portable devices, which enables us to take fully control of our mobile devices. Instead of using the portable devices, computer is still employed by many people since it would offer conveniences like portable and easy-to-use advantages, which still brings the social effect and economic benefit.
However, a great number of people fail to get the methods of authorization of the windows and ios system on iTunes, resulting in that a lot of people avoid using the function of the authorization, therefore risking in losing their important information. In order to solve this problem, here are our ways in authorizing a computer on iTunes windows and on iTunes Mac.
How to Authorize a Computer on iTunes on Windows
Before the start of the introduction, here comes the necessities for the authorization of iTunes windows or Mac. Firstly, your own apple account should be applied. Secondly, you should have your account password in order to protect your own privacy. Lastly, the up-to-date version of the iTunes on the windows or Mac should be downloaded.
Since there are numerous people using the computers equipped with windows system. Therefore, authorizing a computer on iTunes windows would be firstly introduced. Here are the key steps.
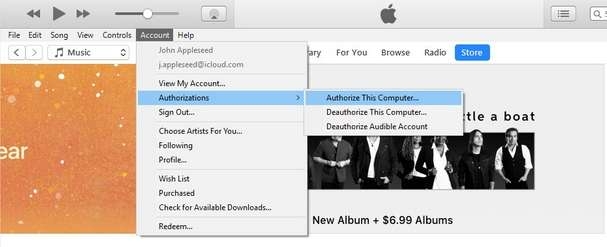
- Step 1: First, you should open your computer, download the latest version of iTunes on the computer and operate it. You could firstly sign in your Apple ID or you could sign in later. the icon "Account" on the top of the column on the screen should be clicked first.
- Step 2: Click the item “Authorizations” on the submenu items and click the "Authorize the Computer" on the submenu item. After entering the account and the password to authorize the computer, the iTunes Store would visit the server of the Apple to do the verification of the authorization.
- Step 3: When passing the verification, the windows would give a hint that the authorization is done and that how many equipment this account has authorized. By the way, if you want to cancel the authorization, you could also click the submenu item of the authorization and click the item "Deauthorize the computer".
How to Authorize a Computer on iTunes on Mac OS
After introducing the way in how to authorize a computer on iTunes windows, here are steps on how to authorize a computer on iTunes on Mac OS.
- Step 1: Open the latest version of the iTunes. Make sure you have downloaded the up-to-date version since it would impact your next operation.
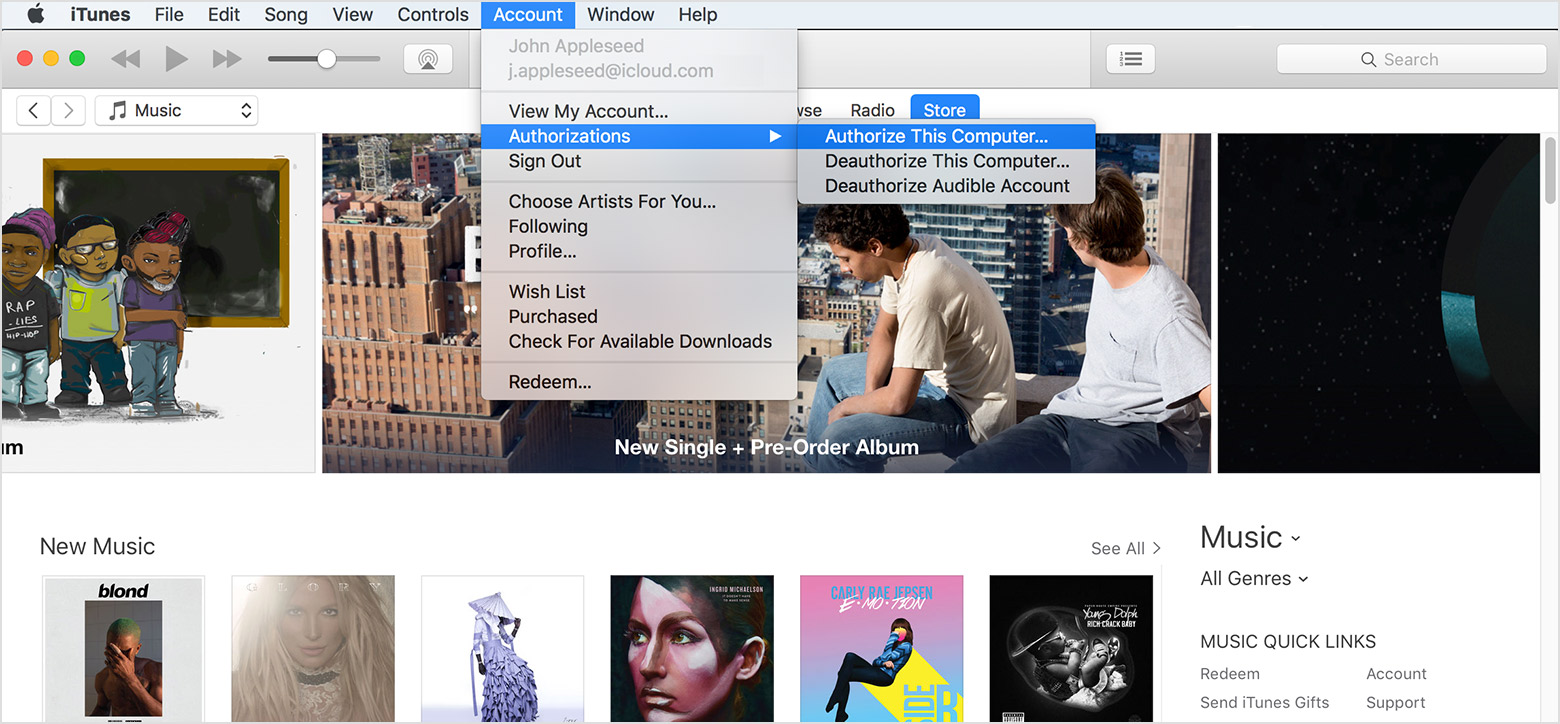
- Step 2: On the top of the Mac screen, here goes the menu items. You should choose the “Account” and it will show the submenu items.
- Step 3: Clicking the item "Authorizations", it will show the "Authorize the Computer" , which is crucial step you should do.
- Step 4: After authorizing the computer, the iTunes Store would visit the server of the Apple to do the verification, which is the important procedure to protect your account from being hacked.
- Step 5: When passing the verification, the screen would show a reminder that the authorization is done and that how many devices this account has authorized. Well, if you want to cancel the authorization, you could also click the submenu item of the authorization and click the item "Deauthorize the computer".
Learning how to authorize a computer on iTunes Mac and how to authorize a computer on iTunes windows is quite important for our daily life, which could make the using of windows and ios system more convenient.
How to Transfer Data to iOS Device from PC
Instead of using the iTunes Store to do the back up, you could download the Leawo iTransfer which is the multi-functional software to solve this problem. If you want to bring more facility on your operation on your equipment like iPad, iPhone or iPod, such as transferring the photos, videos or music, you could avail Leawo iTransfer to transfer them and it could back up your equipment as well.
Here's how you can use iTransfer to transfer files from PC to your iOS device.
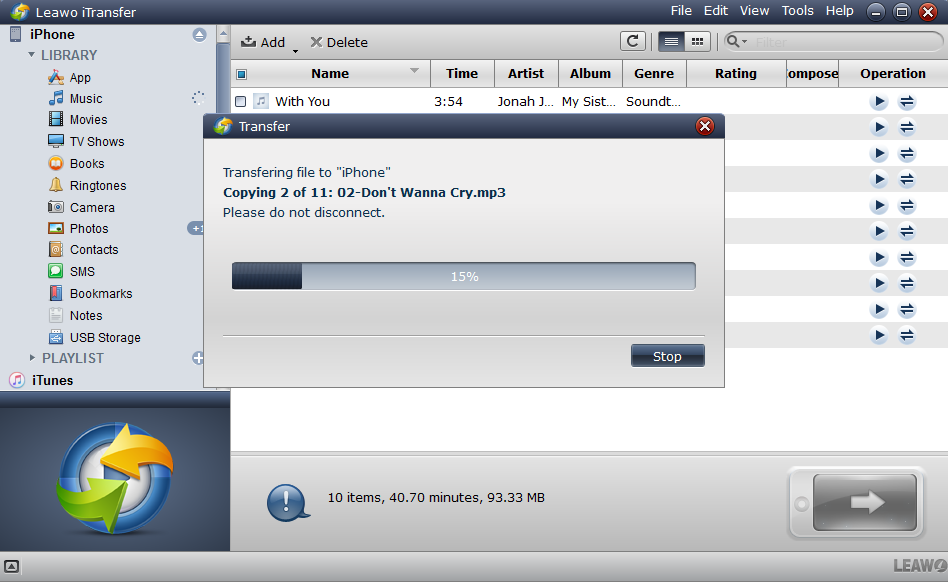
Step 1: First open iTransfer and connect your device to computer. You could find the library and playlist on the left column.
Step 2: Right-click one of the items on the left column, and on the pop-up menu, click Add File and choose the files you'd like to transfer to your device.
Step 3: A window would pop up and show you the progress of the transfer, remember not to disconnect your device during the process.
Knowing how to authorize a computer on iTunes would make using iTunes easier as the program is not that user-friendly as it should be. And with the help of Leawo iTransfer, you can transfer files to your iOS device from PC with ease.

