
Q: "I am iTunes Music fan and have my favorite songs on iTunes. But when I attach a song file to PowerPoint as background music, it says 'PowerPoint cannot insert a sound from the selected file. Verify that the path and file format are correct, and try again'. Any ideas on what I can do for this problem?"
It is not strange for you to encounter such questions, either. You may be once trapped by such problem as well when you want to add iTunes music tracks as PowerPoint background music. To solve this problem, you can follow the guide to the effective solution.
- Part 1. Why can't directly insert iTunes music into PowerPoint?
- Part 2. How to remove DRM and convert iTunes music to MP3 with Leawo Prof.DRM
- Part 3: How to remove DRM and convert iTunes music to MP3 with Leawo Music Recorder
- Part 4: How to add iTunes Music tracks as PowerPoint background?
- Extension: How to burn PowerPoint to video or DVD for safekeeping
Part 1. Why can't directly insert iTunes music into PowerPoint?
You may have this kind of problem as well since it is necessary to insert suitable music files into slides to make impressive presentation with PowerPoint. And iTunes Music offers different kinds of music from different countries, which gives you numerous choices. However, even if users can find or purchase all kinds of songs in iTunes Store easily, they are still not able to directly add iTunes music tracks as PowerPoint background music since PowerPoint only accepts WMA, MP3, WAV, AIFF, AU, MID or MIDI as background music instead of iTunes M4P files purchased or M4A audio downloaded. What's more, the DRM protection of iTunes Music also prevents you from adding iTunes music to PowerPoint. Then, how to insert music into PowerPoint from iTunes? It is recommended to Leawo Prof.DRM to remove the DRM from iTunes music and then convert M4P/M4A to MP3 so as to add iTunes music to PowerPoint.
Part 2. How to remove DRM and convert iTunes music to MP3 with Leawo Prof.DRM
Leawo Prof. DRM is designed not only as a powerful iTunes DRM removal program for removing DRM from iTunes videos, music and audiobooks, but also an all-in-one iTunes DRM media converter for converting iTunes M4V to DRM-free MP4 for playing back in other devices and players, and converting iTunes M4P/iTunes M4B/M4A to MP3 so that you can add iTunes music to PowerPoint. Besides, this program empowers you to remove iTunes DRM protection in 50X faster speed and reserve 100% original audio tracks and subtitles without quality loss. Then, to add music to PowerPoint from iTunes, you can follow the simple guide.
Before that, you could download and install Leawo Prof.DRM, then launch it to enter the main interface. And remember to authorize the computer by signing in with your Apple ID to play the iTunes music file purchased or downloaded. And you will not be able to open iTunes during the iTunes DRM removal process.
![]()
![]()
STEP 1: Add iTunes Music to the Program
Click "Add Files" button in the main interface to pop up "Add File" panel where you can find the iTunes music. Choose the music file you want and click "Add" to import iTunes music into Prof. DRM. Or you can also drag and drop the target iTunes music files to the program.

STEP 2: Choose Channel, Sampling Rate and Bit Rate
When the iTunes music is added, you can view the files under the Music category. And then you can choose the music and click the "edit" button to choose Channels, Sampling Rates and Bit Rates you like for the output MP3 audio file.
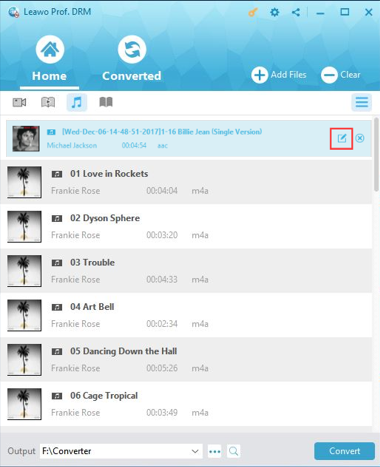
STEP 3: Set Output Directory
Click "…" button at the bottom of the interface to set an output directory for keeping output MP3 file.

STEP 4: Remove DRM from iTunes Music and Convert M4P to MP3
Click the blue "Convert" button at the bottom to remove DRM from iTunes Music and converting M4P to MP3. And the removal and conversion process will be completed soon.

Note:If you have not authorized the computer yet, you will be required to authorize the computer for playing the iTunes video before converting.

STEP 5: Manage the Converted MP3 files
Click the "Converted" tab to enter the panel where displays all the converted files. There you can open the output MP3 file by clicking the "Open file" option at the end of the file. Alternatively, you can quick search the file with the quick searching bar at the bottom for fast locating.
Now you have got the DRM-free MP3 iTunes Music, and you can insert or add iTunes music tracks as PowerPoint background music freely and directly as you like. Additionally, if you are not familiar with how to insert music into PowerPoint from iTunes, you can follow the guide here.
Part 3: How to remove DRM and convert iTunes music to MP3 with Leawo Music Recorder
You could also use another tool from Leawo to convert iTunes M4P music to PowerPoint as background music, be it DRM protected or not. That'sLeawo Music Recorder, an easy-to-use audio recorder that could record any computer and built-in audio and then save into MP3 or WAV files. This Music Recorder could not only record and convert iTunes M4P music to MP3/WAV files, but also automatically download and add music tags like artist, album, cover, etc. You could then freely make use of your converted iTunes music with complete music info in any way you like.
Download and install Leawo Music Recorder on your computer. Then follow the below guide to learn how to convert Spotify songs to MP3 files step by step.

Leawo Music Recorder
☉ Record any sound from computer stream audio and built-in input audio.
☉ Record music from 1000+ music sites like YouTube, Facebook, Veoh, VEVO, etc.
☉ Schedule music recording via the internal recording task scheduler.
☉ Automatically/manually add and complete music tags like artist, album, cover, genre, etc.
☉ Save recorded musicfiles into either WAV or MP3 format for wide uses.
![]()
![]()
The below steps would show you how to turn your iTunes music into DRM-free music for PowerPoint files.
Step 1: Set audio source
Click the microphone icon on the main interface. Under the "Audio Source" tab on the popup window, choose "Record Computer Audio" option since you are going to record iTunes music.

Step 2: Set output directory
On the "General" tab, open the "Output" box to set output directory for saving the output music files. You could also set program UI language here.

Step 3: Set output format
Thirdly, open the "Format" tab to choose output format from MP3 audio and WAV audio. If you need, you could adjust audio bit rate and sample rate of output recording file as well.

Step 4: Start to record and convert iTunes M4P music
After above settings, return to the main interface and click the red "Start" button. Then play back iTunes music to start recording iTunes music.

Note: It's important to press the red recording button before you play back iTunes music for completeness of song recording.
Leawo Music Recorder would automatically download and add music tags to complete music, including artist, album, genre, cover, etc. However, the built-in music tag editor would let you edit these tags manually. You could right click recorded file on the “Media” tab and then choose “Edit Music Tags” option to do this.

After recording, you could import the converted music files to PowerPoint files as background. Actually, Leawo Music Recorder could also help you record and download online songs with ease. If you are using a Mac computer, you could turn to Leawo Music Recorder for Mac.
Part 4. How to add iTunes Music tracks as PowerPoint background
Since the DRM has been removed and the iTunes music has been converted to MP3 audio, you can add iTunes music to PowerPoint in just a few clicks.
STEP 1: Open PowerPoint, click "Insert" tab to choose "Audio" button.
STEP 2: Select "Audio on My PC…" option in the drop-down menu to add the converted iTunes music to PowerPoint from the output directory you saved before.

Finally, you got your PowerPoint Presentation with you beloved iTunes Music inserted, and you will never be confused about how to insert music into PowerPoint from iTunes with the help of this powerful Leawo Prof.DRM. It helps you remove the DRM of iTunes music and convert iTunes Music to the commonly accepted MP3 format so that you can simply add iTunes music tracks as PowerPoint background music. And what's more, it can also work for iTunes videos and audiobooks to remove the DRM from iTunes audiobook and video. You can freely enjoy iTunes media files yourself in daily life and work, share with your friends joyfully and more then.
Extension: How to burn PowerPoint to DVD for safekeeping
For safekeeping of your PowerPoint files, you could burn PowerPoint to DVD with the help of Leawo PowerPoint to DVD Pro, a professional PowerPoint converter combo that includes PowerPoint to video converter, PowerPoint to DVD burner, and PowerPoint to Blu-ray burner. It could convert PowerPoint to video in 180+ formats, burn PPT to DVD with music and menu, and convert PowerPoint to Blu-ray disc/ISO image file. The below guide would show you how to convert PowerPoint to video and how to burn PowerPoint to DVD/Blu-ray.
Step 1: Add source PowerPoint files
Launch Leawo PowerPoint to DVD Pro, then on the "Import" panel, click the “Import” button to add source PowerPoint files to the program. Up to 12 PPT files could be added at one time.

After loading source PowerPoint files, you could view PPT information, play back PPT files, etc.
Step 2: Set DVD Options
Then, under the "Options" menu, check the "Create Standard DVD" button. Then, you need to carry out corresponding settings including: DVD Options and output Folder to save created standard DVD content.

Step 3: Add disc menu
After determining output DVD options, if you want to convert PPT to DVD with menu, you could click the Menu button to select a disc menu for output DVD content. You could edit selected disc menu like text, folder, logo, etc.

Step 4: Convert PowerPoint to DVD
Finally, with all settings done, click the Burn button to start to burn PowerPoint files to DVD. If you want to burn PPT to DVD disc, you need to insert a DVD disc into the DVD drive and choose "Burn to Disc" as output. If you want to create DVD image file, check "Create Blu-ray/DVD image file" button. Then finish all the settings. After that, click the bottom "Start" button to start burning PPT to DVD content.

When the burning process completes, you have successfully turned your PPT files into DVD content. It would be much safer for keeping.
 Jan. 11, 2018 by


 Prof. Media
 Blu-ray Ripper
 Blu-ray Copy
 iOS Data Recovery
 [12/29/23] MAX Downloader V15.0.0
 10,000,000 people are using Leawo!
 All Transactions are protected!
 30-Day Money Back Guarantee!