Last updated on 2024-05-14, by
How to Use iTunes Music in iPhoto Slideshow?
Q: “Help! I am trying to add music from my iTunes to a photo slideshow presentation on iPhoto. I cannot get any music to load. Got a message about my system not being able to uncompress the files. This is for a slideshow for my friends’ wedding ceremony. Then, how do I drag my music to iPhoto to make my slide show? Can anyone help me add music to iPhoto slideshow from iTunes?”
Included with Mac PC, iPhoto is a discontinued digital photograph management software application developed by Apple Inc. Though it was replaced with Apple’s Photos application, it is still popular for old Mac users since iPhoto can help you make stunning slideshow by importing, organizing, editing, printing and sharing digital photos with music track added. Actually, iPhoto included a selection of theme music, or you can use iTunes songs or playlists to import to your iPhoto slideshow when you have DRM-free iTunes music. To add iPhoto slideshow music from iTunes, some useful software will be needed. Let’s figure out how to add music from iTunes to iPhoto slideshow in this post.
Part 1: How to add local music to slideshow with the common way
It is obvious that it is easy to add local music to your slideshow. You can follow these simple steps to make use of iPhoto to create a slideshow from your own photographs and any local MP3 music available to use. And you can add local music to slideshow with the way.
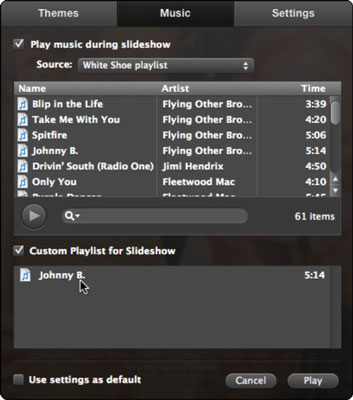
After you create a slideshow on iPhoto, you can select the slideshow in the Source list and click the “Music” button in the toolbar to enter the Music Settings window. Make sure the “Play music during slideshow” checkbox is selected. If you want to add one song for the whole slideshow, you can choose an option from the Source menu by selecting a song. When you want to create a playlist of several songs for the slideshow, you can choose “Custom Playlist for Slideshow” and drag the listed songs to the area below.
Obviously, it is simple and easy to add local music to the iPhoto slideshow. However, iTunes music you purchased and downloaded is protected by DRM, you may find iPhoto slideshow not showing iTunes music and you fail to add iPhoto slideshow music from iTunes. Definitely, the DRM of iTunes music restricts you from exporting to any platform or devices or adding it to the slideshow directly. To add music to iPhoto slideshow from iTunes, you should remove DRM from iTunes music beforehand. And there are effective DRM removal programs that can copy with this problem.
Part 2: How to convert iTunes music to DRM-free MP3 format with Prof. DRM
To figure out how to use iTunes music in iPhoto slideshow, Leawo Prof. DRM is the most popular and powerful DRM removal program will offer you great help. Prof. DRM can break the DRM limits of entertaining on specified devices only, removing the DRM protection from iTunes video, iTunes music, iTunes audiobook and convert iTunes files to DRM-free MP4, MP3 format. Besides, it can also work for eBooks, Audiobook, Spotify music, etc. To add music to iPhoto slideshow from iTunes in DRM-protected M4B format, you can use Prof. DRM easily to convert M4B to MP3 with DRM removed and original quality preserved. After you download and install the program, you can follow the steps to remove DRM from iTunes and convert the music file to DRM-free MP3 for iPhoto slideshow.
Step 1. Add iTunes M4P Music files
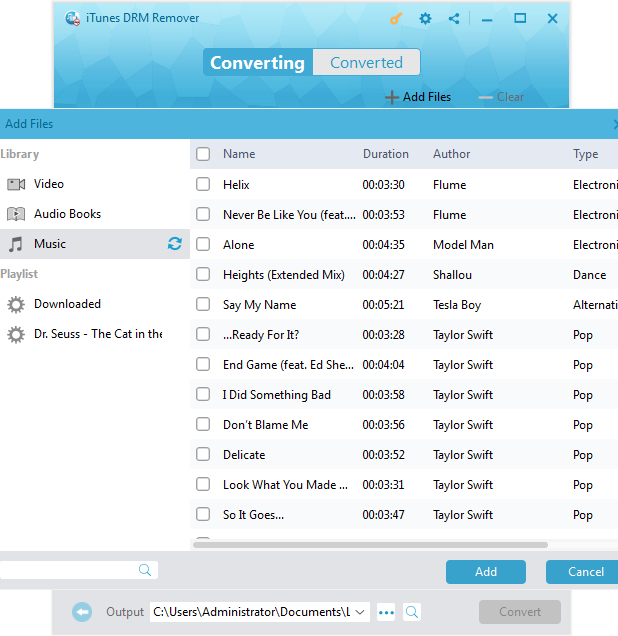
After launching the Prof. DRM, click on “Add Files” button on the sub-menu bar to enter pop-up “Add File” panel to add one or more iTunes DRM M4P music files for importing. Alternatively, you can directly drag the target iTunes music files to the middle of program interface.
Step 2. Set output format and audio quality
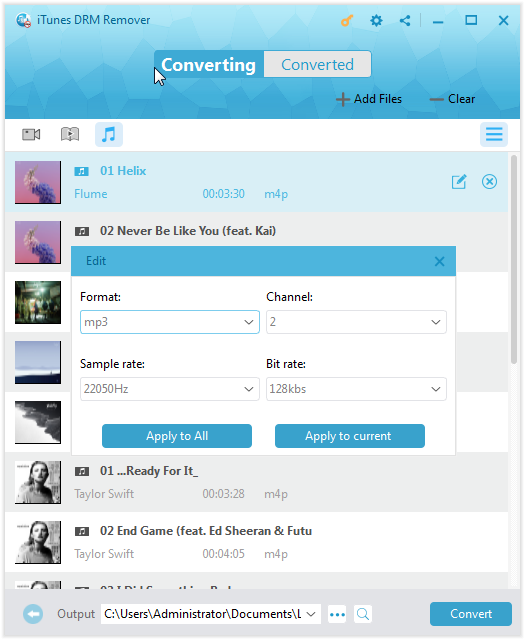
After importing the iTunes music files, the files will be listed under the “music” category. And then choose an iTunes M4P music file,click the “edit” icon to enter the Edit panel where you can find the format is MP3 by default and the Channels, Sampling Rates and Bit Rates for the output MP3 file can be adjustable. You can also choose “Apply to all” or “Apply to current” to apply the settings.
Note: after you confirm the output and audio quality settings, you can change the destination path by clicking “…” button at the button to save the converted files.
Step 3. Remove DRM and Convert M4P to MP3
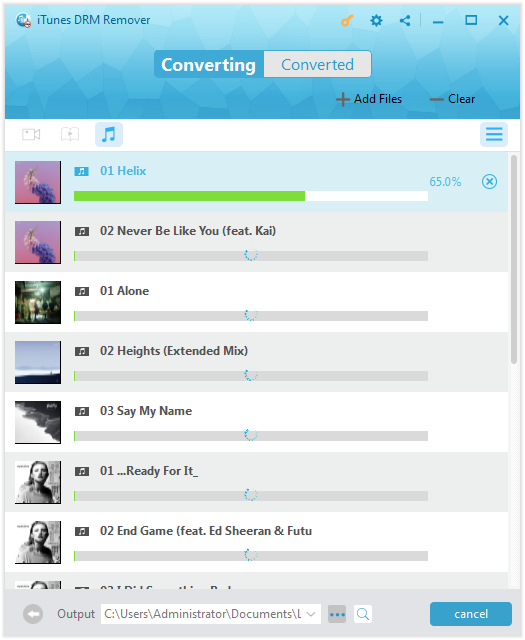
When you finish all the settings, click the blue “Convert” button to start removing DRM from the imported iTunes music files and converting M4P to MP3. When the conversion progress is completed in a while, you will get the DRM-free MP3 iTunes music for free use.
Now you may be skilled at managing iPhoto slideshow music from iTunes with the guide mentioned above, you may have a blind spot with the manipulation and the powerful features of best DRM removal software. You can find another software that can remove DRM and convert iTunes music to DRM-free MP3.
Part 3: How to convert iTunes music with TunesKit
Actually, apart from Prof. DRM, there is other effective DRM removal software free to add iTunes music to iPhoto slideshow. One of the most popular software is TunesKitDRM Audio Converter that is a one-stop DRM audio tool specialized in removing DRM encryption from all protected audio resources, including Apple music, iTunes M4P and audiobooks. With TunesKit, you can convert iTunes M4P music to DRM-free MP3, AAC, WAV, M4A, FLAC, M4B for entertaining on different platforms, such as for applying iPhoto slideshow music from iTunes. Besides, it keeps 100% lossless quality while converting with high speed and supports the latest iTunes with updating.
There is free trial version of TunesKit DRM Audio Converter that you can simply download and install it on your computer. And then you can follow the steps to remove iTunes music DRM protection and convert M4P to MP3 so that you could easily add music to iPhoto slideshow from iTunes after the conversion.
Before you run the program, make sure the DRM-protected iTunes music you are going to import for converting could play smoothly on iTunes. Otherwise you are required to authorize your iTunes in advance. Then the solution to how to use iTunes music in iPhoto slideshow is coming.
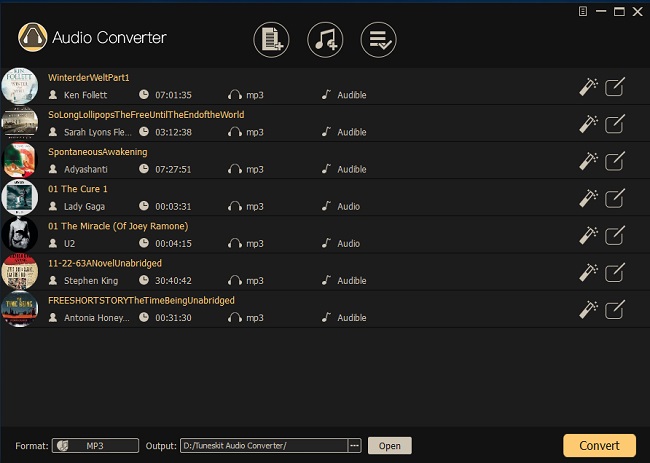
Step 1: Import iTunes music to Audio Converter
Launch TunesKit Audio Converter, and then click the second “Add” button at the top center to add the DRM-protected iTunes songs. It also allows you to add the common DRM-free audio files fro converting by simply clicking the first add file button.
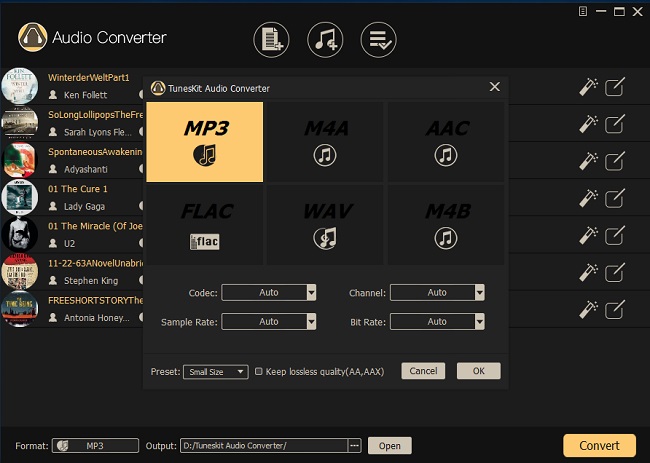
Step 2: Set Output Format
Simply click the “editing” icon to prompt to audio output format selecting window where you can select MP3 as the output audio format. Also, the audio quality parameters including audio codec, channel, bit rate, etc. can be adjusted according to your own needs.
Note: after setting the output format and audio quality, you can change the output folder by clicking “…” button at the bottom of the interface for saving the converted files.
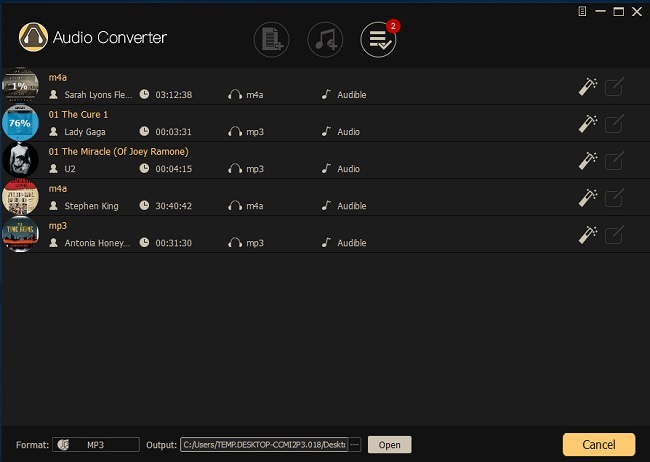
Step 3. Convert iTunes music to DRM-free MP3
Press the yellow “Convert” button to start removing DRM and converting the iTunes music files to common MP3. When the conversion process completes, the converted files can be listed on the converted tab and you can locate the DRM-free MP3 files.
Now you have got iTunes music in MP3 without encryption. Thus, you can freely play them on different devices and share them for iPhoto slideshow music from iTunes.
Part 4: Make a comparison of above solutions
The solutions mentioned here figure out how to add music from iTunes to iPhoto slideshow in this post. Both Leawo Prof. DRM and TunesKit DRM audio converter are both designed to remove DRM from iTunes M4P music and convert the music files to other common formats like MP3 for sharing on popular platforms and devices. However, they both have similar and different features. Let’s make a comparison to help you make a proper choice.
|
Features |
Leawo Prof. DRM |
TunesKit DRM audio converter |
|
Supported Operating System |
Win 10/8.1/8/7 |
Win 10/ 8/7/Vista/XP |
|
Supported input audio formats |
DRM-protected audios and DRM-free popular audios. |
DRM-protected audios and DRM-free popular audios. |
|
Supported output audio formats |
MP3, M4A, AAC, WAV, FLAC, WMA, OGG, MKA, AC3. |
MP3, AAC, M4A, M4B, WAV, FLAC. |
|
Supported input video formats |
iTunes rental or purchased videos from iTunes in encrypted video format. |
No |
|
Supported output video formats |
MP4 (DRM-free) |
No |
|
‘Supported the latest iTunes version |
Yes |
Yes |
|
Remove DRM from iTunes M4P music |
Yes |
Yes |
|
Channel, Sampling Rate, Bit Rate adjustable |
Yes |
Yes |
|
Keep lossless quality |
Yes |
Yes |
|
Keep the ID tags and chapter info |
Yes |
Yes |
|
Supported batch removal and conversion |
Yes |
Yes |
|
Drag-n-drop music files for importing |
Yes |
Yes |
|
Fast working speed |
Yes |
Yes |
|
Supported language |
English, German, Japanese, Simplified Chinese, Traditional Chinese, Russian, Spanish, French, Portuguese, Dutch, Italian, and Danish. |
English, German, Japanese, French |
|
Cost |
Free Trial, $29.95 /lifetime |
Free Trial, $39.95 /lifetime |
Anyhow, when you are intended to add music to iPhoto slideshow from iTunes, you can fall back on both of the two solutions mentioned here. According to the comparison table and the user guide listed in this post, you will notice that though the two software is easy-to-use with user-friendly interface, they also have some differences in cost, UI language, and supported input formats, etc. You can choose the one that suits you best in accordance with your own situation.


 Try for Free
 Try for Free

