AVCHD is a file-based format for the digital recording and playback of high-definition video that is mostly from camcorders and digital cameras. You may know that these AVCHD camcorders produce footages in MTS/M2TS format with really high-quality image. However, AVCHD videos in MTS or M2TS format are not supported by video-sharing sites like YouTube. Therefore, if you want to share AVCHD (MTS/M2TS) videos on YouTube, you are required to convert AVCHD to YouTube compatible video formats. In order to convert AVCHD (MTS/M2TS) to YouTube videos in supported formats and then upload videos to YouTube for sharing, powerful video conversion tools would be helpful. In this post, several powerful and professional tools will be recommended to help you convert AVCHD (MTS/M2TS) to YouTube videos for uploading to YouTube.
- Part 1: Basic Knowledge about AVCHD and YouTube Supported Video Formats
- Part 2: Convert AVCHD to YouTube Video with Leawo Video Converter
- Part 3: Convert AVCHD to YouTube Video with Clone2Go Free Video Converter
- Part 4: Convert AVCHD to YouTube Video with iWisoft Free Video Converter
- Part 5: Convert AVCHD to YouTube Video with Windows Live Movie Maker
- Part 6: Upload AVCHD to YouTube after Converting
Part 1: Basic Knowledge about AVCHD and YouTube Supported Video Formats
What is AVCHD?
AVCHD, short for Advanced Video Coding High Definition, is developed by Sony and Panasonic collectively, which is originally designed for HD camcorders use for digital recording and HD video playback. This format records video at a resolution, ranging from 720p to 1080p or higher. Videos in AVCHD format can be burnt to a standard DVD disc that can be playable on an HDTV and Blu-ray Disc player.
What is YouTube supported video formats?
If you want to upload videos onto YouTube, it is necessary for you to figure out what video formats are supported by YouTube. Actually, YouTube supports a variety of video formats.
- MP4 (a multimedia container format standard specified as a part of MPEG-4)
- FLV (Flash Video, an FLV file uses Adobe Flash Player or Adobe Air to transmit video or audio over the internet.)
- AVI (Audio Video Interleaved, a commonly used file format developed by Microsoft for storing both video and audio data in a single file.)
- MOV (the QuickTime multimedia file format)
- 3GP (a multimedia container format defined by the Third Generation Partnership Project for 3G UMTS multimedia services)
- MKV (a free container format that holds an unlimited number of video/audio/picture/subtitle tracks in one file)
- MPEG (the Moving Picture Experts Group, a kind of video format)
- WMV (Windows Media Video)
- SWF (Shockwave Flash)
Note: Almost these video formats are acceptable and widely used as YouTube video formats. If your videos aren’t supported by YouTube, a powerful video converter will help you convert videos to any of those YouTube supported video formats.
Part 2: Convert AVCHD to YouTube Video with Leawo Video Converter
When talking about powerful video converters that are helpful to convert AVCHD to YouTube video, Leawo Video Converter would be strongly recommended at the first place. It is a professional video converter that helps you convert video and audio between more than 180 formats. It can be applied to convert AVCHD to YouTube video formats such as MP4, FLV, AVI, WMV, SWF, etc. It is easy to use and converts video without any quality loss. With a built-in video editor, you can customize the video by trimming, cropping, adjusting effect, adding watermark or converting 2D to 3D.
Leawo Video Converter, as an AVCHD to YouTube converter, could act as a M2TS to YouTube converter and MTS to YouTube converter to convert M2TS/MTS to YouTube videos with lossless quality. Also, this AVCHD to YouTube converter could convert videos between various common/HD video formats like MP4 to MPEG, AVI to FLV, MOV to MKV, WMV to 3GP, etc. With this AVCHD to YouTube converter program, you could easily convert your AVCHD camcorder videos to YouTube videos for uploading to YouTube or other video sharing sites by following the below step-to-step guide on how to convert AVCHD videos to YouTube video. Besides, if you are Mac user, you can apply Leawo Video Converter for Macto convert AVCHD to YouTube supported video formats.
Step 1. Import Source AVCHD Video Files
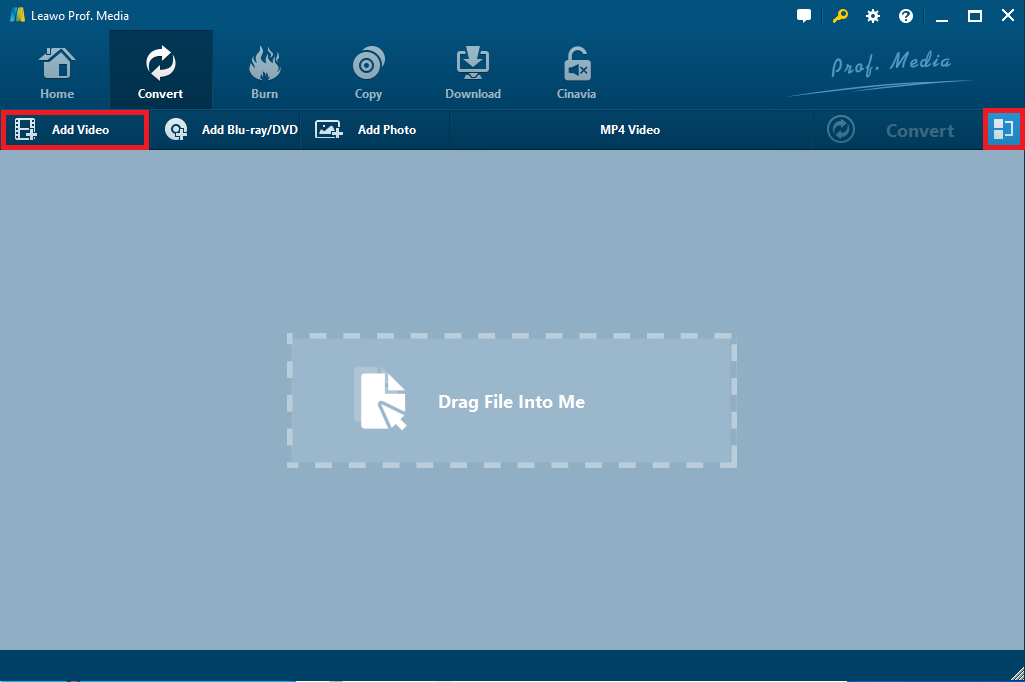
Launch Leawo Video Converter. Go to the “Convert” tab, and click the “Add Video” button on the sub-menu to import your AVCHD video files. After importing, you could play AVCHD videos with its internal media player, select subtitles and audio tracks from source AVCHD videos, add external subtitles to loaded videos, combine all imported files into one, edit loaded videos, etc.
Step 2. Select Output Profile
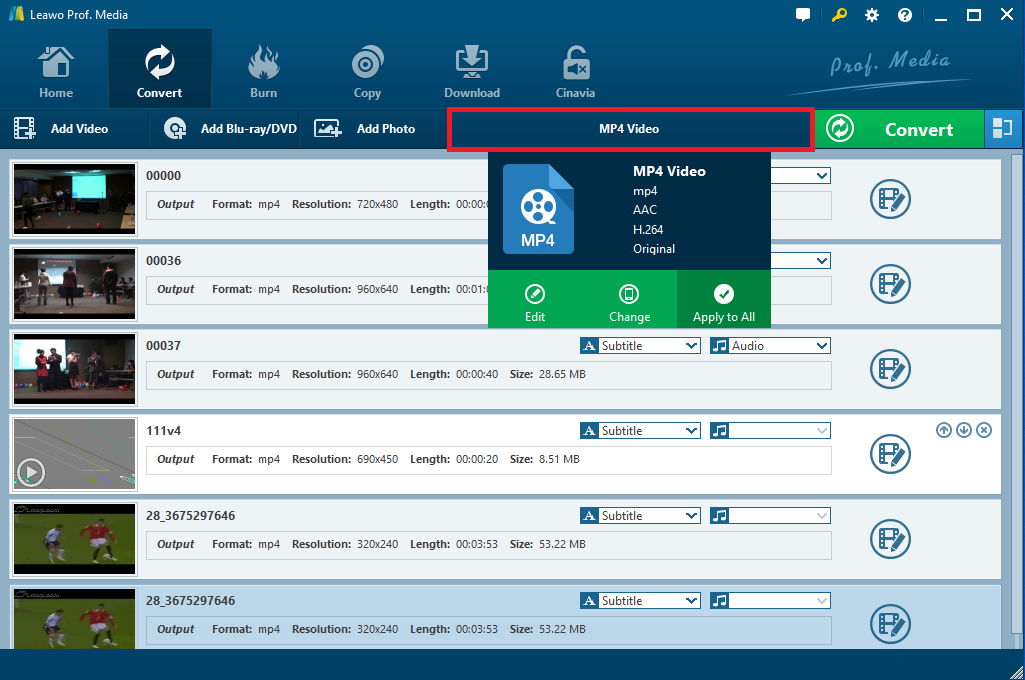
Click the format button next to the “Add Photo” button to open the drop-down box where you can select “Change” option to enter the Profile window and select YouTube compatible video from “Format” group, such as FLV, SWF, MP4, etc.
Note: If you need, you could choose the “Edit” option on the drop-down box to enter profile setting interface to adjust video and audio parameters including video codec, aspect ratio, frame rate, resolution, audio codec, bit rate, channel, sample rate, etc.
Step 3: Convert AVCHD to YouTube
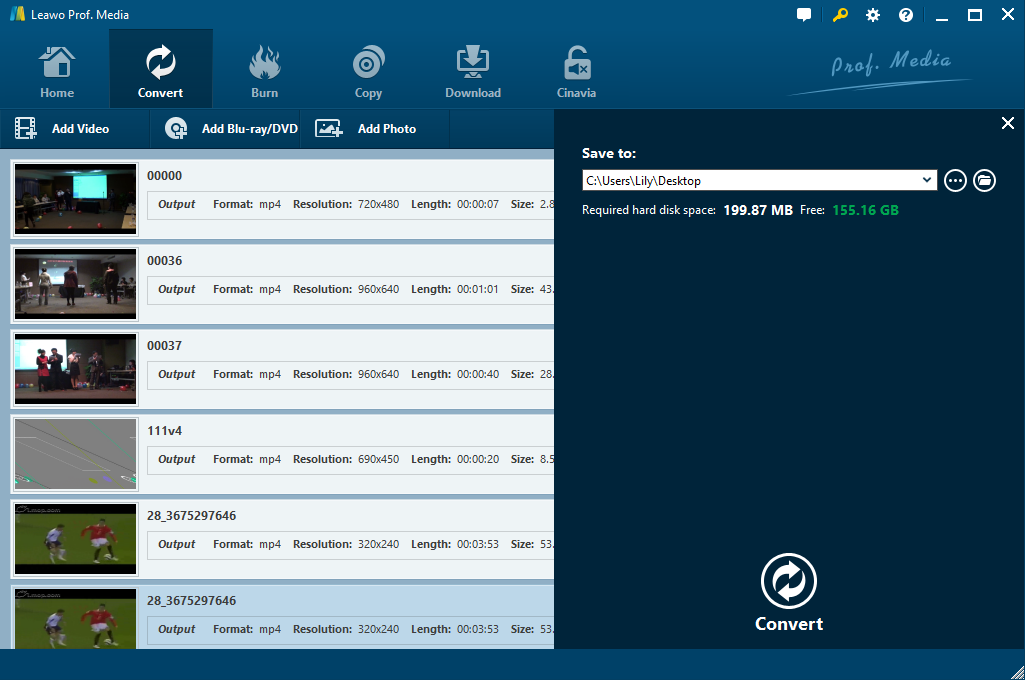
Click the big green “Convert” button on the sub-menu bar to open a popup sidebar where you could set output directory to contain the converted YouTube video. And then you can click the “Convert” button right below to start converting AVCHD to YouTube on your PC immediately. After a while, you will get the converted YouTube video files for free uploading.
Part 3: Convert AVCHD to YouTube Video with Clone2Go Free Video Converter
Except for Leawo Video Converter, you could also use other video converters to convert AVCHD to YouTube video. And Clone2Go Free Video Converter, a powerful video converter designed for popular video conversion, is worth a try. With Clone2Go Free Video Converter installed, you can convert video files between almost all common video formats such as MOV to AVI, WMV to MP4, M2TS to FLV, MTS to 3GP,etc. Besides, you can also convert any videos to mobile devices including iPad, PSP, smart phones and other portable devices to be the output profile. Surely, it can work as a free AVCHD to YouTube video converter that runs on Windows OS including Windows XP/Vista/7/8/10 as well as on Mac OS. Clone2Go Free Video Converter is quite easy-to-use while converting AVCHD to YouTube video.
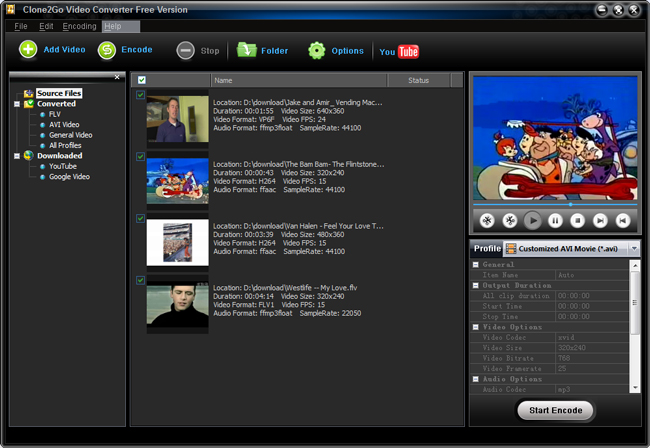
Step 1. Download and install Clone2Go Free Video Converter on your PC, and then run the program to convert AVCHD to YouTube video.
Step 2. Click the “Add Video” button on the sub-menu bar to import the source video files.
Step 3. Extend the drop-down Profile list to choose YouTube supported video format to be output format. If necessary, you can customize the output video by clicking the “Video Options” and “Audio Options” buttons below the “Profile” category to set video and audio parameters.
Step 4. Click the “Options” button on the main interface to open a new window where you can specify an output folder in the “General” tab.
Step 5. Click the “Start Encode” button right below to start the conversion process. And you will get the converted YouTube supported video in a while.
Part 4: Convert AVCHD to YouTube Video with iWisoft Free Video Converter
iWisoft Free Video Converter is a totally free and powerful multi-functions video converter that converts between any video & audio files. It supports a number of video formats including AVI, WMV, FLV, MP4, MTS, M2TS, etc. and a variety of audio formats such as MP3, WMA, WAV, OGG, FLAC and more formats. Besides, it can also convert video to picture files in GIF, BMP, PNG, JPG, Animated GIF formats as well as those playable on all popular digital multimedia devices such as Apple devices, PSP devices, smart phones, etc. iWisoft Free Video Converter can work as a video converter so that you can not only convert AVCHD videos to YouTube supported video. What’s more, it has an internal video editor that can customize the video by easily cropping, trimming, merging videos into one and so on. With user-friendly interface, it is very easy to use. After installing the program, you can convert AVCHD to YouTube video in simple steps.
Step 1: Download and install iWisoft Free Video Converter on your computer.
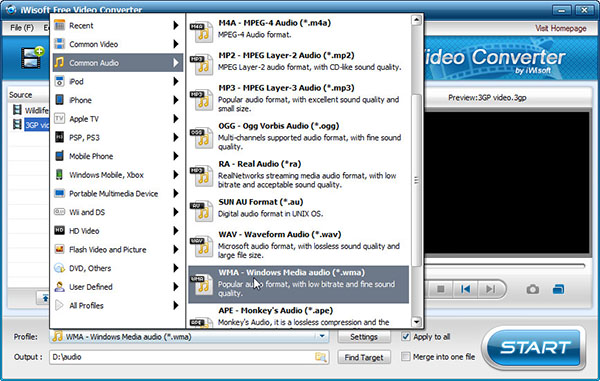
Step 2: Click add file button to import multiple source AVCHD video files into this program. And you can merge the imported videos into one if needed.
Step 3: Set YouTube supported video format from its video formats like AVI, FLV, MP4, MPEG, WMV and so on.
Step 4: Change video parameters by clicking “Settings” button if necessary, and then choose output folder to save the converted videos.
Step 5. Tap the “Start” button to convert AVCHD to YouTube videos automatically. And the conversion process will complete very soon.
Part 5: Convert AVCHD to YouTube Video with Windows Live Movie Maker
Apart from the video converters mentioned above, you can also use Windows Live Movie Maker to get AVCHD to YouTube video converted if you are a Windows user. As one of the best short video creators, Windows Live Movie Maker is a stripped-down movie-editing program that came with XP and Vista to create, edit, and view digital movies on Windows. You can download Movie Maker from Microsoft’s Live Essentials Web page and then follow the guide below to convert AVCHD to YouTube video for uploading.
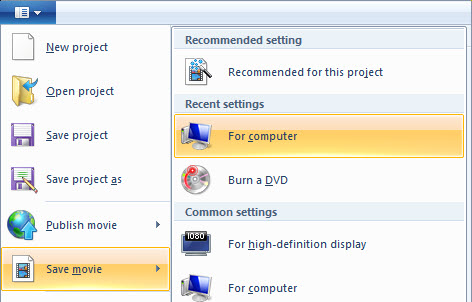
Step 1. Run Windows Live Movie Maker on your computer. And then go to “File” option, choose “Open Project” to import the source AVCHD video files.
Step 2. Go to “File” option again and select “Save Movie” option this time to export the file as WMV video. Now the saved video files would be used for uploading.
Part 6: Upload AVCHD to YouTube after Converting
Since you have converted AVCHD to YouTube videos, to upload AVCHD in YouTube compatible video formats to YouTube would be a piece of cake right now. You can check the guide below to easily understand how to upload AVCHD to YouTube.
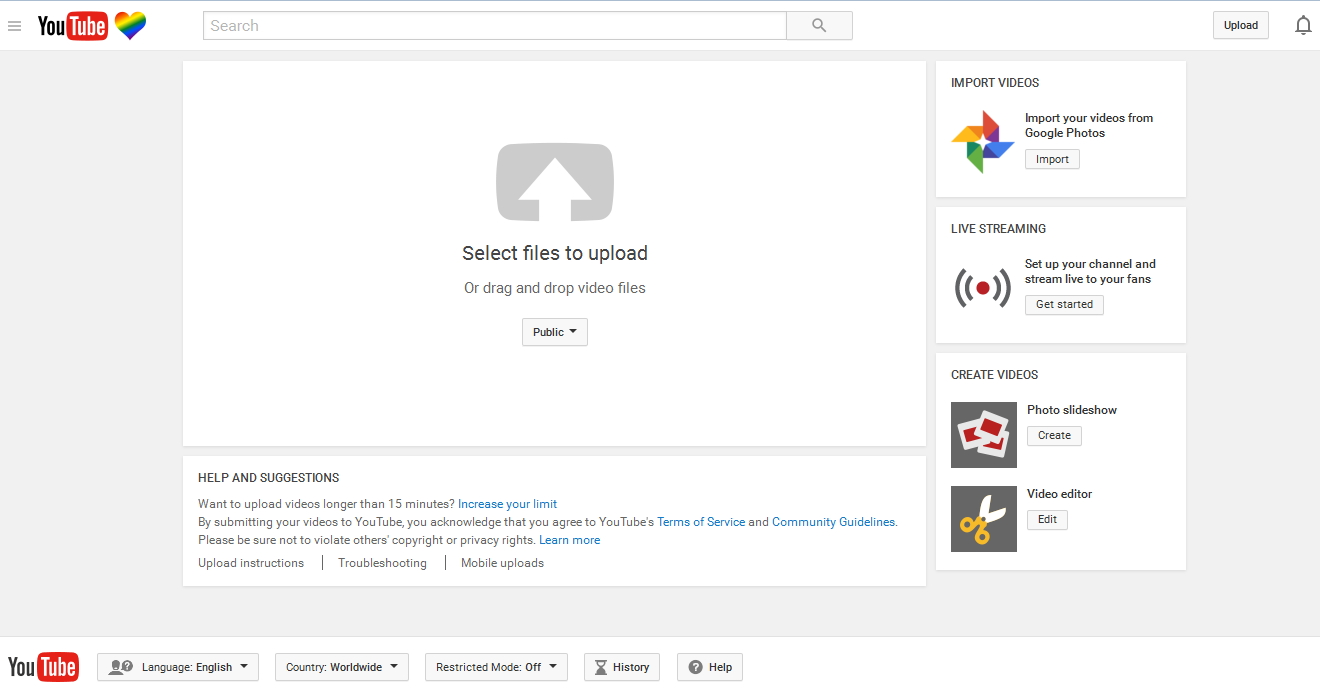
Make sure you’ve signed up for a free YouTube membership to upload videos. And then just click “Upload Videos” in the upper-right-hand corner of any YouTube page. Enter as much information about your video as possible, including Title, Description, Tags, and Category. If you’re still a little bit confused about the video uploading process, you can follow the detailed instructions below excerpting from YouTube official website:
- Sign into your YouTube account.
- Click on “Upload” at the top of the page.
- Before you start uploading the video you can choose the video privacy settings.
- Select the video you’d like to upload from your computer. You can also create a video slideshow or import a video from Google Photos.
- As the video is uploading you can edit both the basic information and the advanced settings of the video, and decide if you want to notify subscribers (if you uncheck this option no communication will be shared with your subscribers). Partners will also be able to adjust their Monetization settings.
- Click “Publish” to finish uploading a public video to YouTube. If you set the video privacy setting to “Private” or “Unlisted”, just click “Done” to finish the upload or click “Share” to privately share your video.
- If you haven’t clicked Publish, your video won’t be viewable by other people. You can always publish your video at a later time in your Video Manager.
Once you have successfully uploaded the videos you want to share to YouTube, it will send you an email to notify you and then you can forward that email to friends or family for easy sharing. Anyway, when you have any AVCHD or other video files you want to share with others on YouTube, you can make use of the video converters recommended here to convert to YouTube compatible video files in easy steps with the quality reserved. Just choose one you like best and get what you want for free.

 Oct. 23, 2013 by