
How to Make and Burn Photo Slideshow with Leawo Prof. Media 13
This page provides detailed steps on how to convert photo to video, and how to burn photo to Blu-ray/DVD with the built-in photo slideshow maker/burner. You also learn how to edit generated photo slideshow here.
- Home
- /
- Leawo Prof. Media 13
- /
- User Guide
How to Create and Burn Photo Slideshow
With photo slideshow maker and photo slideshow burner, Leawo Prof. Media 13 helps you easily create photo slideshows from various photos, and burn photos to DVD/Blu-ray photo slideshow. The internal photo slideshow editor even allows you to edit photo slideshow effect like adding transitions, background music, etc. This part of Leawo Prof. Media 13 user guide would show you how to create photo slideshow, how to burn photos to DVD/Blu-ray, and how to edit photo slideshow.
Section 1: How to Create Photo Slideshow
Step 1: Import source photos
Under the "Convert" module, click the "Add Photo" button  to import photos. You could then choose to add either Photo or Photo Folder
  . Imported photos would be automatically generated into slideshow.

You could play back generated photo slideshow by clicking the play button  on the thumbnail, edit photo slideshow by clicking the edit icon
  , merge several photo slideshows generated into one by clicking the
  , or right click generated photo slideshow for more options, etc.
Step 2: Choose output profile
The generated photo slideshow could be converted into 180+ formats for multiple uses. Click the drop-down box next to the "Add Photo" button and then you could see a drop-down panel that lists 3 options: Edit, Change and Apply to All.

Click "Change" option  to enter the Profile panel, and then select desired profile as output format from Favorite, Custom, Format or Device group.

Step 3: Edit parameters of profiles
If you need, you could click the "Edit" option  on the drop-down box, or click the "Edit profile" button
  on profiles from Format and Device groups on Profile panel to enter the Profile Settings panel, where you could edit the video and audio parameters of selected profiles.

On the Profile Settings panel, you can reset Video Codec, Quality, Resolution (choose from provided options, or manually input the resolution you desire into the box according to your devices or players), Bit Rate, Frame Rate, Aspect ratio, Audio Codec, Audio Quality, Sample rate, Channels, etc. After editing parameters, you could click the "Save to Custom" button  to save edited profile to Custom group for future use. On the bottom right corner, click OK button to save changes and return, click Cancel button to abandon changes and return, or click Default button to restore to default settings.
Step 4: Set output directory
Click the big green "Convert" button  to call out a sidebar, where you need to set an output directory to save the output files.

On the popup sidebar, you could click the  button to browse and set output directory, and open target folder by clicking
  button.
Step 5: Start converting
Click the bottom "Convert" button  on the output directory setting sidebar to start converting video/DVD/Blu-ray/audio files. You could then view all converting progresses on the converting panel, and do after-done settings if you need.

On the converting panel, you could cancel converting task by clicking the big green Cancel button  , pause any converting task by clicking Pause button
  or resume a converting task by clicking Resume button
  . On the bottom right corner, you could click the When All Tasks End drop-down box
  to determine what Leawo Prof. Media 13 should do after converting: Do nothing, Exit program or Shut down computer.
Section 2: How to Burn Photos to DVD/Blu-ray
Step 1: Import source photos
Under the "Burn" module  , click "Add Photo" button to import photos for slideshow creating. You can add either photo or photo folder on the drop-down panel: . Browse source photo and add to Leawo Prof. Media 13. The imported photos would be generated into slideshow automatically.

You could choose to display generated photo slideshow in thumbnail by clicking Thumbnail button  , or in a list with details by clicking Detail button
  next to the big green Burn button
  . At the bottom, you need to set the output disc type, quality and aspect ratio.
Also, generated photo slideshow could be played back via clicking the  button on the thumbnail, and edited by clicking the Edit button for detail display or
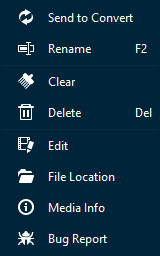
  button for thumbnail display on thumbnail. If you need, you could right click generated photo slideshow for more options, including: Send to Convert, Rename, Clear, Delete, Edit, File Location, Media Info and Bug Report.
If you generate more than one photo slideshows, you could directly drag and drop to reorder them.
Step 2: Set output disc menu
After loading photos, on the right sidebar, you could select a disc menu for output DVD/Blu-ray photo slideshow. There are various disc menu themes: Standard, Business, Childhood, Education, Holiday, Nature, Sports and Wedding. (Note: Click the "No Menu" option on the top of right sidebar if you don't want to add disc menu.)
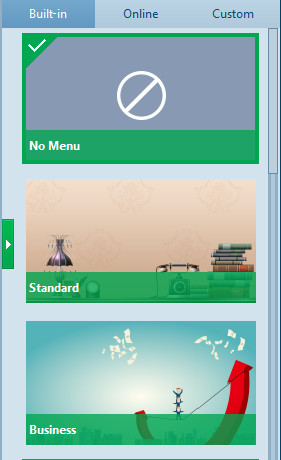
Under the Built-in menu tab, you could select any disc menu theme for output. Or, if you want more, you could open the Online tab and then download more disc menu templates from Leawo's disc menu online database. The Custom tab would collect all disc menu templates you've customized with the internal disc menu designer.
Keeping mouse on any disc menu theme template on the right sidebar would call out an eye-shape icon ![]() , by clicking which you could enter the disc menu preview panel.
, by clicking which you could enter the disc menu preview panel.

On the disc menu preview interface, you could move mouse to the Play button  and then click it for playback, or move mouse to the Scene button
  and then click it to view the disc menu displayed for scenes, as showed below:

On the scene menu preview panel, you could play back scene via direct-click, click the Previous button  or Next button
  to view more scenes (if you’ve generated multiple photo slideshows), click Back button
  to go back to the main menu preview panel.
Step 3: Edit disc menu (optional)
On the disc menu preview interface, click the Pencil icon ![]() to enter the disc menu editing panel.
to enter the disc menu editing panel.

On the top of disc menu editing panel, you could see a home icon followed by several serial numbers  , which is a catalogue of main disc menu and scenes. You could directly click one icon to enter corresponding part for editing. Any title (including My DVD, Play and Scene, and the thumbnail of video) could be repositioned via direct drag-and-drop. You could double click titles (My DVD, Play and Scene) to change the title content. After double-clicking a title, you could then right click the title to call out the text editing panel
 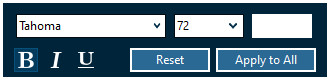 to edit text, including: text font, size, color, type, etc. You could apply the text changes to all by clicking the Apply to All button.
At the bottom, you could click the  button to add background music. After clicking it, you will see the Background Music interface as below:

Slide the Background Music to green and then open the Source from box to browse and load local music as background music. You could also set the Duration and other audio effects like Fade in, Fade out and Loop Play.
Also, you could add background image by clicking  at the bottom. Then you will see:

Slide the Background Image box to green and then load either Image File or Video File as background.
After editing disc menu, click the Save template icon ![]() at the bottom to save edited template into Custom group for future use.
at the bottom to save edited template into Custom group for future use.
Step 4. Burning settings
After setting the disc menu, click the big green "Burn" button to invoke the burning settings sidebar. On the invoked sidebar, you need to set the Burn to, Disc Label and Save to boxes.

The Burn to option allows multiple choices. If you want to burn photos to DVD/Blu-ray disc, insert a blank writable disc into the disc recorder drive and then select it as target under the Burn to option.
Required hard disk space is listed as well to indicate you whether your computer hard drive gets enough space to save output file.
Step 5. Burn photo to DVD/Blu-ray
After burning settings, on the burning setting panel, click the bottom right "Burn" button  to start burning photo to Blu-ray/DVD.

On the Burning interface, you could stop burning by clicking the Cancel button  anytime, and click the When All Tasks End button for after-done settings.
Section 3: How to Edit Photo Slideshow
1. Edit slideshow video
After importing photos from hard drive, this program would automatically generate these photos into a photo slideshow. Click the "Edit" icon if you display generated photo slideshow in Detail or click the "Edit" icon if you display generated photo slideshow in Thumbnail to edit generated photo slideshow.
Under the "Video" tab, you could adjust photo order via direct drag-and-drop, remove existing photo by clicking the remove icon  on it, rotate a photo by clicking the rotation icon
  on it, insert extra photos by clicking the add icon
  on the photo timeline, set the output video effect like Photo Duration, Transition Duration and Transition Effect, etc.

2. Edit slideshow audio
Under the "Audio" tab, you could firstly click the Add Music button  to add background music, and then set the output audio effect. On the music timeline, you could move mouse to loaded music and then click the button to remove loaded music, click the add icon to add extra music, set the output audio effect like Fade in, Fade out and Loop play.

Note: Leawo Prof. Media 13 currently only accepts photos or images saved in png, jpg, jpeg or bmp format for making photo slideshow and burning to DVD/Blu-ray.