Being active in the market for almost 7 seven years, Microsoft Surface has won a dove of users across the globe. The Surface Pro is a first-generation 2-in-1 detachable of the Microsoft Surface series, designed and manufactured by Microsoft. From a technical point of view, the device ran a 64-bit version of Windows 8 Pro operating system with a free upgrade possibility to Windows 8.1 Pro, and eventually also Windows 10.
This device is popular and looks extremely high-tech design. In terms of usage, it is easy to operate and it includes a bunch of practical applications. In this article, we will share three practical ways to take a screenshot on Surface Pro with ease. Read on!
Outline
Part 1: Capture a screenshot using Print Screen button
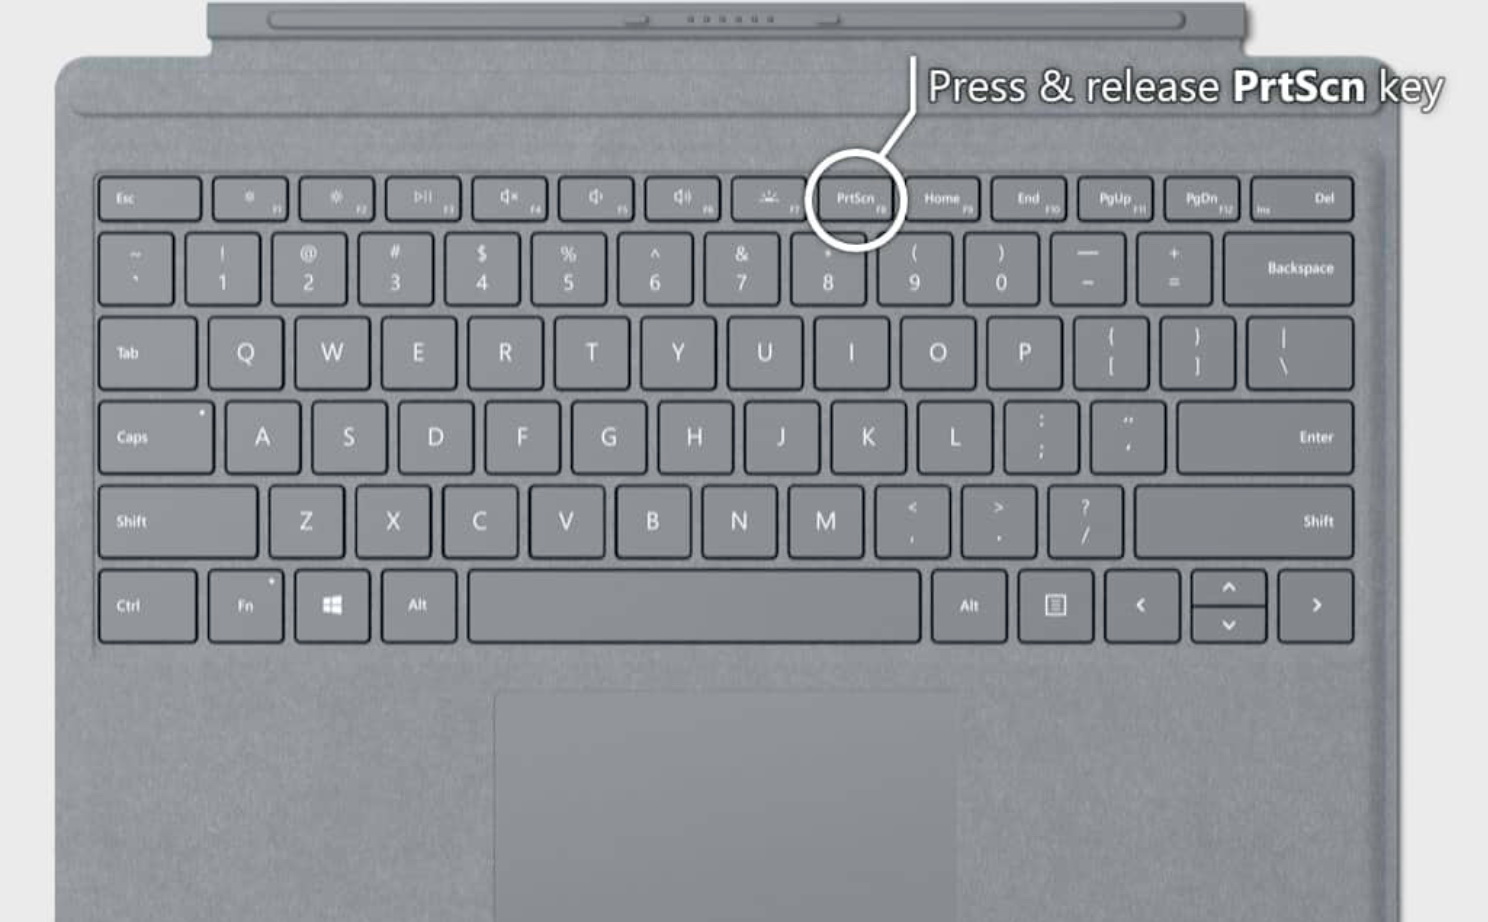
If you’ve just switched from other laptops, you might experience some difficulties to take a screenshot on Surface Pro especially while in the tablet mode. However, there should be no worries at all. In scenarios where you have already got a Surface type cover attached, it is recommended to use the traditional way by using the dedicated PrtSn key on the keyboard to take a screenshot on Surface Pro. Like any other laptops, users may have easy access to take a screenshot using the PrtSn (Print Screen) button.
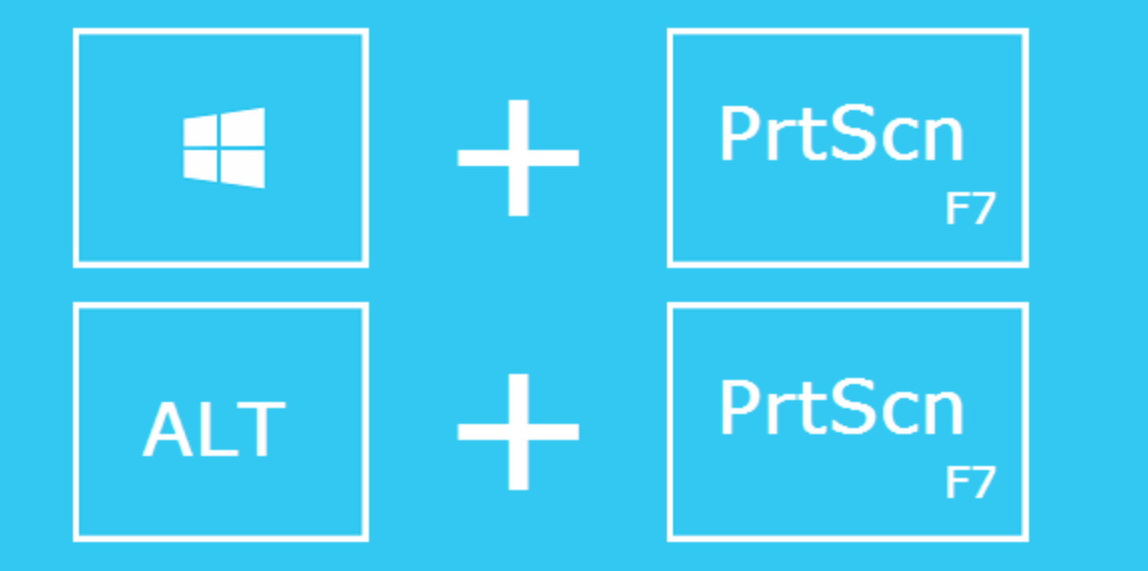
There will be two normal modes to allow you taking a screenshot on Surface Pro with the PrtSn button. One is to take a screenshot of the entire screen and the other is to take a screenshot of the active window only. To do so, follow our tutorial guide below.
Option 1: Take a screenshot of the entire screen
Step 1: Press the PrtSn button.
Step 2: Paste the screenshot to your usual programs like Paint or Office documents.
Option 2: Take a screenshot of your active window
Step 1: Press the Alt button and PrtSn button in the meantime to take a screenshot of the active window.
Step 2: It works the same way with option 1. Paste the screenshot to your preferred program for use.
That’s it! With the attachable Surface type cover, you will be able to take the advantage of the most convenient key to take a screenshot on Surface Pro. This way will be suitable for everybody. It is just a click.
Part 2: Capture a screenshot using Snipping Tool
Of course, not everybody has an attachable Surface type cover for their Surface Pro. Some users prefer to use the Surface Pro as a tablet without a cover. Fine, in this case, they still have ways to take a screenshot nicely on Surface Pro. You might probably have thought of this way already if you are an office worker. Snipping tool is a great choice and convenient tool among office workers. To be honest, taking a screenshot on Surface Pro is not a hassle at all with Snipping tool like what you do on your computers. What’s more, in Windows, this tool has already been built in and users can easily get it started. There is no need to install any third program to enable the screenshot function. To locate this tool from Windows, you may do either way below.
Option 1: Open the Start menu to locate the snipping tool under the Windows Accessories folder.
Option 2: Open Start and use the quick search box to type “Snipping Tool”, or you can type into Cortana textbox directly.
Once you locate the built-in snipping tool, it is recommended to put it as a quick start tool under the toolbar. It will improve your efficiency significantly to take a screenshot on Surface Pro without any hassle to locate the tool every time you need it.
Now you can launch the tool and start to take a screenshot on Surface Pro. There will be 4 ways such as full desktop, specific program windows, any size of a rectangle shape, and any form you draw manually to fulfill a screenshot on Surface Pro. You may directly choose the exact way you prefer to take a screenshot. How does this snipping tool work? Well, after you select an area you want to take a screenshot, it will display a new window, where you can draw or highlight on the screenshot before saving them. This tool allows you to save the screenshot in many possible formats, such as a JPEG, PNG, GIF, or HTML. Therefore, it is the most convenient tool ever on Windows!
Part 3: Capture a screenshot from a video using Leawo Blu-ray Player
In some particular cases where a physical screenshot button or snipping tool does not help much, you may consider using a third-party program that is capable of allowing you to take a screenshot easily. For example, if you want to take a screenshot on Surface Pro during video playback, it is recommended to use Leawo Free Blu-ray Player, which will be a professional media player yet a useful tool to snap a screenshot of the video. First of all, this professional media player actually acts as a 6-in-1 program suite, namely free Blu-ray disc player, free DVD disc player, free HD video player (free 4K video player), free ISO file player, and free audio player (free music player).
With a screenshot snapper built in, Leawo Free Blu-ray Player software enables you to take screenshots during movie playback anytime you like and save in either JPG, PNG or BMP format.
Let’s take a close look at how to take a screenshot on Surface Pro during video playback on Leawo Blu-ray Player.
Step 1: Make sure your Surface Pro has been installed with Leawo Blu-ray Player
Click the button below to install the windows version of Leawo Blu-ray Player on Surface Pro. Launch the player after installation completes.

-
Leawo Blu-ray Player
Region-free Blu-ray player software to play Blu-ray disc and DVD disc for free, regardless of disc protection and region restriction.
Play 4K FLV videos, 4K MKV videos, 4K MP4 videos, etc. without quality loss.
Play 1080P videos, 720P videos with lossless quality.
Step 2: Load the video files to the media player
Click the Open File button on the home interface to load the source video files.
Step 3: Set the playback options
Click the editing icon to enter the settings window, where you will be able to set the playback options, like subtitles, video and audio parameters, zoom in rate and so on.
Step 4: Snap a screenshot during video playback
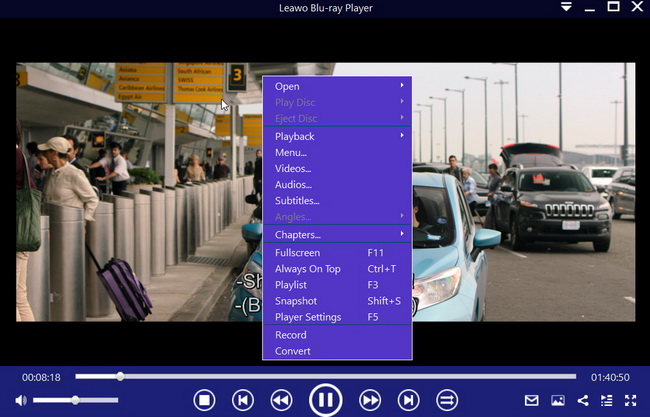
During playback, on the top-right corner, you could see an inverted drop-down triangle button, by clicking which you could call out the program operation menu to do more operations. Here you can see a Snapshot button. Click here to snap a screenshot. Or you may use the shortcut key Shift+S to fulfill the operation.
Conclusion
Windows Surface Pro is undoubtedly a popular tablet or laptop for many enthusiasts. It is a capable yet portable device for users to conduct their work at ease, especially for business people and artists. Talking about how to take a screenshot on Surface Pro, we are confident to say it is just a piece of cake and not difficult at all. We share a couple of practical ways to allow users to take a screenshot on Surface Pro easily, like using the physical button Print screen on the attachable Surface type cover, which is intuitive and extremely easy to apply whenever they want to take a screenshot. By the way, with pressing the Alt button and print screen button at the same time, they can snap the active window only instead of the entire screen, which is of course unnecessary for their daily use. Besides, using the Windows built-in snipping tool to take a screenshot on Surface Pro is definitely another great idea. With this tool, users can take a screenshot in various modes and save them in various formats. Users can place this tool on the quick start bar so that they may see and use it anytime they like. It is such a convenient tool!
Plus, for users who wish to snap a screenshot during video playback, it is always a bonus to take the advantage of the built-in snapshot function of Leawo Blu-ray Player. It is not only a powerful media player capable of playing back any Blu-rays, DVD discs, ISO image files, 4K HD video files, and so on, but also it can provide a number of value-added features for users to make this media player a customized program suite. I am sure you cannot wait to give it a shot. Just enjoy and have fun!

