MP4 is no doubt one of the most compatible video format, so the format is very widely used in the video editing and producing industry, as well as for beginners to make some simple video clips. The MP4 video format can be recognized and accepted by a wide range of video editing programs, and can have a great video editing performance when being edited by these programs. If you want to edit one or more MP4 videos but not sure what the best MP4 editing programs are, then keep reading today’s article because we are going to discuss the best MP4 editing programs as well as how to edit MP4 videos with these programs to make a nice MP4 video clip.
Part 1: How to Edit MP4 Video with Leawo Video Converter
Speaking of video processing programs, Leawo Video Converter is a product that cannot be ignored. As an all inclusive video converter as well as editor tool. Leawo Video Converter supports not only MP4, but also more than 180 kinds of other video and audio as the input source. For each of these media materials, Leawo Video Converter provides various editing options for you to fully customize your video or audio. After editing, you can also convert the MP4 video to whatever format you want, and have a great output result in 6 times higher speed.
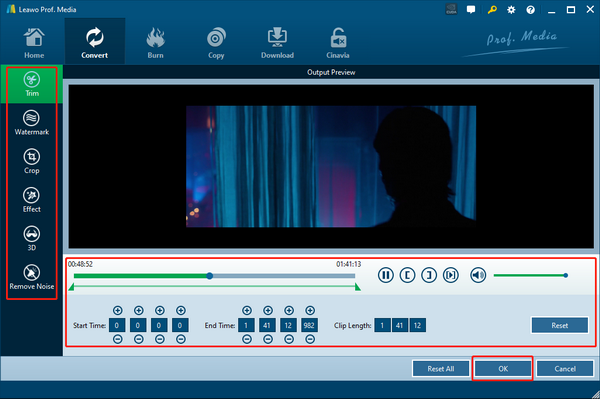
As for the video editing functions, Leawo Video Converter does not only provide the basic options like cropping and trimming, but also provide advanced video processing options like adding watermark, adjusting parameters, converting 2D video to 3D and removing background noise. All of these functions can be customized in detail so that you can have full control over the video performance.
Leawo Video Converter also features a user-friendly program interface, making the video editing process very easy. The following is a simple guide showing you how to edit MP4 with Leawo Video Converter, take a look an I believe you can edit your MP4 videos with ease.
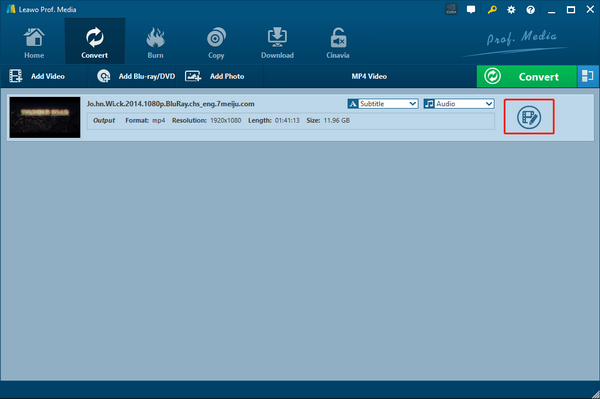
Step 1: Install and launch Leawo Video Converter. To import the source MOV video, simply click the “Add Video” button. You can also import the file by directly dragging and dropping the MP4 file into the program interface.
Step 2: After the file is imported to the program, you should be able to see an “Edit” button on the imported video. Click the “Edit” button to go to the video editor module for this video.
Step 3: Like mentioned above, Leawo Video Converter provides various video editing options for you to customize your video. On the video editing panel, all of the editing options are well listed in the left bar, and the detailed parameters, along with the preview window are laying on the right. You can click to choose any editing option from the left and change the parameters on the right while having a live preview. When you are done editing, just click “OK” to confirm and go back to the main window.
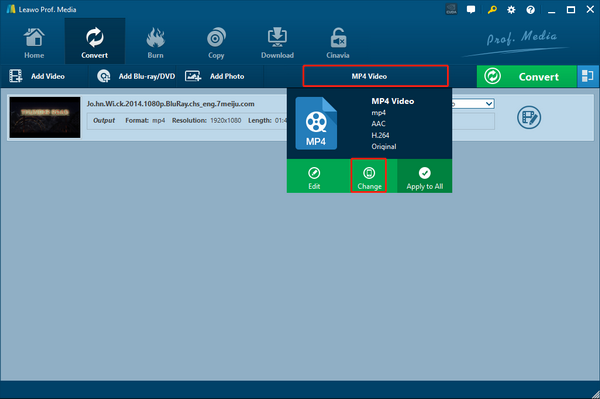
Step 4: If you want to change the output format, simply click the “MP4 Video” area, and then choose “Change” to go to the format selection window.
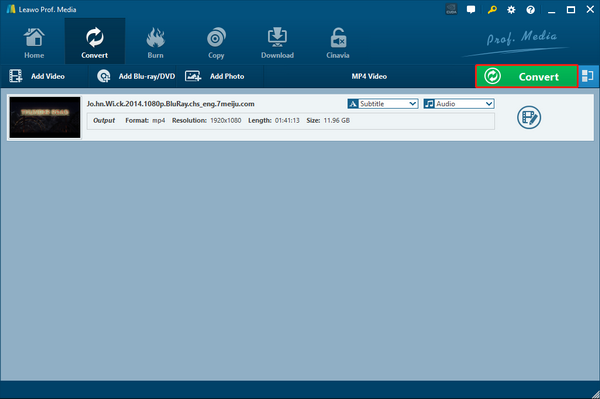
Step 5: When you think there’s no more editing needed, you can click the green “Convert” button on the main window, set an output directory and start outputting your converted MP4 video.
Part 2: How to Edit MP4 Video with Avidemux
Avidemux is a free but powerful video editor that comes with some useful video editing features. What makes it stand out from those professional video editing programs is that unlike a program video editing program, it’s simple and easy to use. It won’t take you a long time to master the skills of using the program. It’s one of the best free MP4 video editors you can find out there. With Avidemux, you can do basic video editing operations like trimming, cropping, flipping and more. In addition, you can install various plugins to make the program even more powerful. To edit an MP4 video with Avidemux, just follow the guide below.
Step 1: Import the MP4 video you want to edit into the program by dragging it to the interface of Avidemux. You can also click “File”> “Open” from the menu bar and choose from the pop-up dialog box.
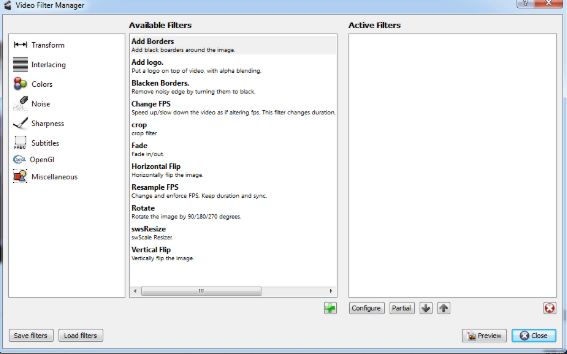
Step 2: Click “Video”>” Filters” from the menu bar at the top to open the Video Filter Manager window. On the left side of the window, you can have various video editing categories including transform, colors, subtitles and more. Click one and the detailed editing options will appear in the “Available Filters” box.
Step 3: Choose an editing option in the “Available Filters” box, and then adjust the detailed parameter in the newly popped out window. Once down, the active filter will appear in the “Active Filters”, and that means the adjust you have done are applied to the video.
Part 3: How to Edit MP4 Video with Windows Movie Maker
As the preinstalled video editing program on Windows, Windows Movie Maker is easy to use and is highly compatible with formats like MP4. Comparing to other professional video editing or converting programs, Windows Movie Maker provides high availability for Windows users, and have a very simple user interface to make any video editing or converting task easy. Windows movie maker has multiple different video editing functions for people who have different video editing needs. So it doesn’t matter if you are a video professional or a total beginner, Windows Movie Maker can give you the video effect you need. If you want to edit your MP4 video with Windows Movie Maker but don’t know how, just read the following guide and do as it instructs.
Step 1: Launch Windows Live Movie Maker, and click the “Add videos and photos” button in the toolbar to import your source MP4 video.
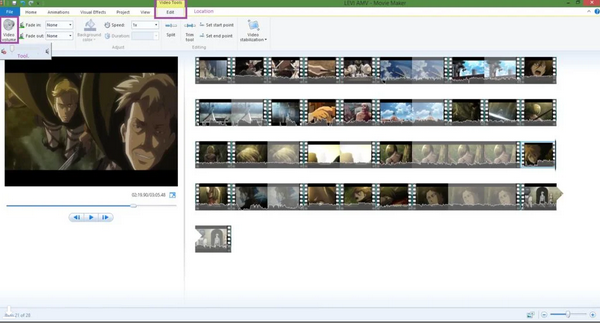
Step 2: There are many kinds of video editing options that you can choose from. For basic video editing options, click the “Edit” tab in the menu bar, and you will have basic options like flipping, trimming, splitting, volume altering and more listed in the toolbar.
Step 3: To have more editing options, click the “Animations” or “Visual Effects” to reveal the corresponding settings in the toolbar.
Step 4: When you have done the editing works, click the “Save movie” button, and you will see all of the available output format and device presets. Choose one and click on it, then you can designate the output directory and start outputting the edited video.
Part 4: How to Edit MP4 Video with DaVinci Resolve
As one of the most popular professional video editing programs and one of the best iMovie alternatives, DaVinci Resolve is the world’s first solution that combines professional offline and online editing, color correction, audio post production and now visual effects all in one software tool. There are so many tools and features to explore inside, but if you are a beginner then you may not be able to use it so interactively as the price of the program is relatively high and the interacting style is pretty complicated. If you are willing to spend some time to dig deeper and learn, then DaVinci Resolve might surprise you by giving you stunning video editing results. So for beginners, here is a brief guide on how DaVinci Resolve generally works, and I hope it can help you get started with this program.
Step 1: Download, install and launch DaVinci Resolve. You can import your MP4 files by dragging and dropping them into the program.
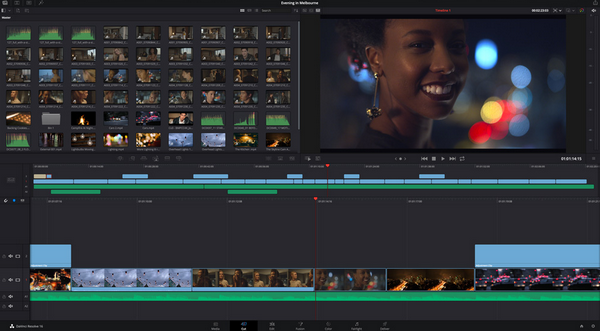
Step 2: To edit the videos that you have just imported, drag the clip and drop it into the timeline. Then you can trim the length of it by simply drag the ends of the clip bar.
Step 3: Right-click on the video in the time line and you can see various options for the clip. You can access advanced functions like film filter, color correction, special effects in the “Effects” tab of the program.
Step 4: When you are done editing, click “Export” in the main menu, and then set a video profile to start exporting your edited video clip.
Part 5: How to Edit MP4 Video with Kdenlive
If you want to experience pro video editing experience but don’t want to break a bank, then Kdenlive might be the best choice for you. As a piece of free and open-source video editing software based on the MLT Framework, KDE and Qt, Kdenlive has a professional user interface, a set of advanced video editing options and an extraordinary video processing ability, but doesn’t require you to pay a penny for editing MP4 videos. Various video editing functions make the program powerful in MP4 editing, but also makes it hard to operate on. So if you want to learn how to edit MP4 videos with Kdenlive, I believe the following guide below can help you to get started.
Step 1: Download and install Kdenlive on your computer. To import your source MP4 video file, you can click the “Add Video” button in the “Project bin” section, or you can also drag your video and drop it into the program.
Step 2: After the video is imported, drag it to the time line to do basic editing operations like merging, splitting and trimming. More advanced editing options can be accessed by right-clicking on the video clip.
Step 3: To export your video, click the “Save” button in the toolbar, and then set an output profile for your output video.


