Have you found that the songs from iTunes have become greyed out? And you have no idea what reason caused to them. Here we will let you know the possible reasons for this issue and guide you on how to fix this problem.
There is no doubt that iTunes is a powerful media player and a professional media player. But, you may encounter the issue that some songs are greyed out in iTunes and would like to know what has resulted in this problem. When you want to play the songs that you prefer, it is easily found that the target songs that you are going to play are still existing but they have become greyed out. In this article, some effective solutions have been listed for your reference and the possible reasons for some songs greyed out in iTunes are also shown to you as well.
- Possible reasons for songs greyed out in iTunes
- How to fix some songs greyed out in iTunes
- Solution 1: Sync your music with an iTunes alternative
- Solution 2: Have a check on iTunes settings
- Solution 3: Download the greyed out songs in iTunes one more time
- Solution 4: Sync iTunes greyed out songs again
- Solution 5: Authorize your computer again
- Solution 6: Fix greyed out songs from iTunes on iPhone or iPad
- Solution 7: Have a check on the format of iTunes greyed out songs
Possible reasons for songs greyed out in iTunes
Why are some songs greyed out in iTunes? There are some possible reasons which cause this problem as below:
1. The synchronization problem. Due to the synchronization problem between different devices, iTunes songs become greyed out. This problem can be solved by syncing the target songs again.
2. The original file has been corrupted. If the particular files have been removed or got lost from the system, these changes haven’t been synced with iTunes yet.
3. The format of the target songs are not supported by iTunes or the DRM protection of the songs also will lead to iTunes songs greyed out.
4. The licensing issue may also cause the songs greyed out in iTunes. Some songs you have purchased from iTunes store cannot be played via Apple music player. That means these songs can be listened to on the primary device, while it cannot be streamed via another device.
How to fix some songs greyed out in iTunes
Now, you have known the possible reasons which cause some songs greyed out in iTunes. There are some effective solutions shown below to help you fix this issue, you can have a try on them one by one.
Solution 1: Sync your music with an iTunes alternative - Leawo iTransfer
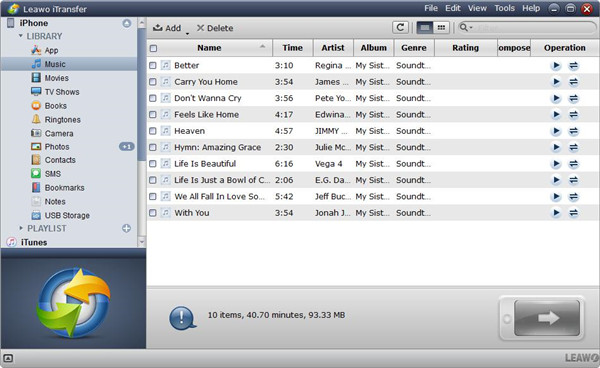
To sync your music with iTunes, a powerful and effective transfer program - Leawo iTransfer is able to offer a great solution to the transfer issue between iOS devices and iTunes. Up to 12 kinds of data files are supported by iTransfer, such as music, apps, photos and more. It means you can transfer apps from iPhone to computer with ease. Furthermore, the files from iPhone, iPad or iPod also can be backed up to computer with iTransfer. In addition, Leawo iTransfer does well in managing the transferred music, users are allowed to get the playlists of iOS devices and iTunes managed well without any limit. Because of the advanced technology of scanning and transferring, transfer task can be completed in a rapid and safe way with the help of Leawo iTransfer. 100% safety and reliability are guaranteed to ensure no data loss and overwriting to occur during the transfer process. Most of the great importance is that the clear and intuitive interface of this software is able to direct the users to proceed with the steps without any trouble. Here we will guide you on how to transfer music from your iPhone to iTunes to make your music with iTunes as below:
1. Install Leawo iTransfer on your computer and launch it. Then connect your iPhone to the computer via supported USB cable. Your iPhone will be recognized and detected by this software, then the library of your iPhone will be displayed in the left sidebar of Leawo iTransfer.
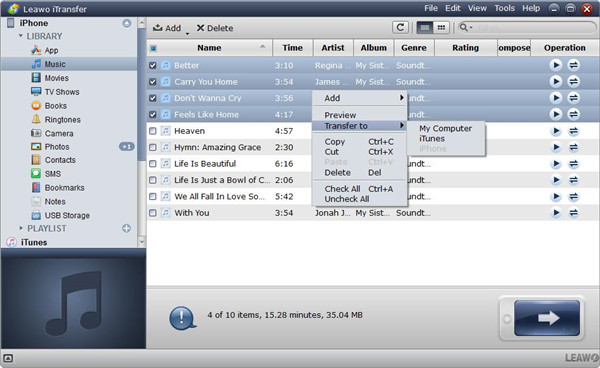
2. Click on the item “Music” below library in the left column, then the specific music file name will be listed on the right part of the window. You can choose the music files that you would like to transfer by holding the option key Ctrl/Shift, then right-click on the files that you have chosen and select the option Transfer to > iTunes.
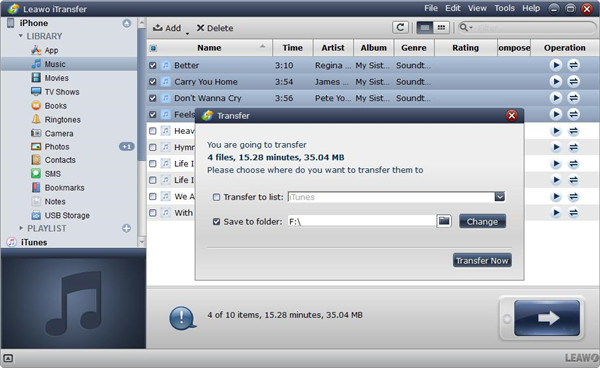
3. Once you have chosen the files that you want to transfer to iTunes, you are required to check the option Transfer to list: iTunes, then click on the button Transfer Now. After that, the music files will begin transferring from your iPhone to iTunes. It may take a while to complete the transfer process, a dialog of transfer percentage will let you know the specific transfer progress in the files number and files name.
Solution 2: Have a check on iTunes settings
There may be a setting that has been switched on from iTunes and cause the issue of some songs greyed out to occur. Therefore, having a check on your iTunes is one of the simplest solutions to fix this issue. You can follow the steps below:
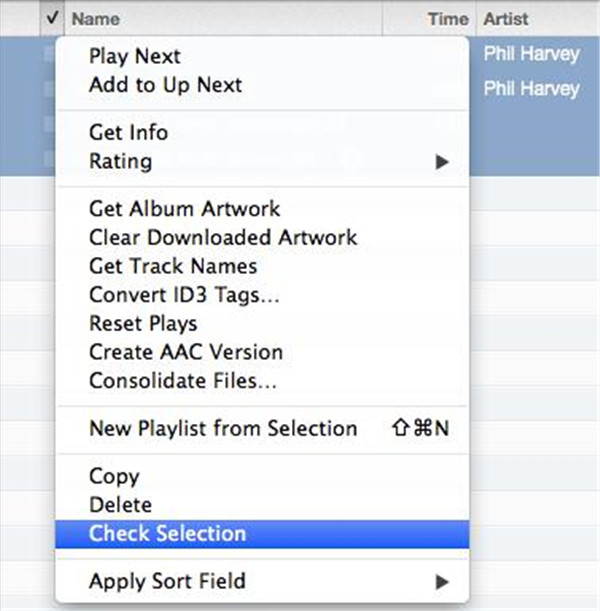
1. Enter iTunes library via your system, then have a right-click on the song which becomes greyed out.
2. Afterwards, select the option “Check Selection”. Then after this operation, the songs may be able to play as normal.
Solution 3: Download the greyed out songs in iTunes one more time
You can download the songs which are greyed out in your iTunes again and then play it one more time. Therefore, remove the songs and then re-download it via your iTunes. The following steps will direct you how to do.
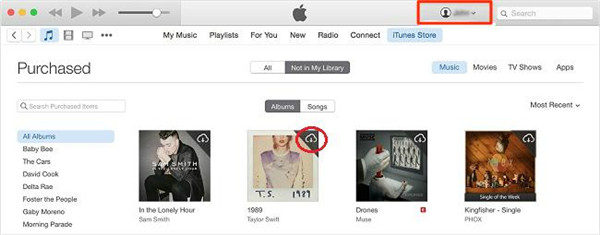
1. Launch iTunes via your system, then navigate to the iTunes store which locates on the upper right of iTunes window as the picture shown below.
2. Then choose your account by tapping on it and go the purchased option. All songs that you have purchased will be listed here.
3. After that, choose a song which becomes greyed out and then download it one more time from iTunes.
Solution 4: Sync iTunes greyed out songs again
If the songs have been deleted from iTunes previously, the songs might become greyed out. The guidance as below will show you how to re-sync iTunes greyed out songs in the specific steps.
1. You should get rid of the iTunes greyed out songs via iTunes.
2. Get the iTunes library refreshed as well as the playlists.
3. Associate your device with the computer with USB cable, then sync your device with iTunes again in a simple way.
Solution 5: Authorize your computer again
If you still face the songs greyed out issue in iTunes once you have tried out the above mentioned solutions. You can have a try on another solution that is to delete the authorization of your computer and then get it authorized one more time. You can refer to the following guidance about how to authorize your computer one more time.
1. Enter iTunes library on your system, then choose Store tab in the menu bar as the picture shown below.
2. Choose the option Deauthorize This Computer in the drop-down menu, then log out your account from iTunes.
3. Reboot your system and launch iTunes library again.
4. After that, enter the Store tab and choose the option “Authorize This Computer”.
Solution 6: Fix greyed out songs from iTunes on iPhone or iPad
If you have met the issue of songs greyed out in iTunes on your Apple device like iPhone or iPad, you can get rid of the greyed out songs from your device, then sync these songs with iTunes again.
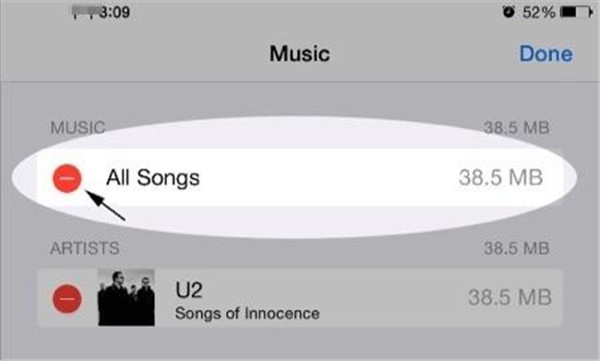
1. Enter Settings app on your device, then turn on General settings. Afterwards, choose “Storage” or “Storage & iCloud Usage”.
2. Choose Manage Storage, then press on the option “Music”. Next, choose the option “Edit”.
3. Press on the icon button “Red” as the picture shown below to get rid of the songs.
4. Associate your device with the computer by a supported USB cable, then sync your device with iTunes to retrieve the songs.
Solution 7: Have a check on the format of iTunes greyed out songs
If certain songs from iTunes cannot be played in iTunes, it might be that the greyed out songs are existing in the unsupported formats or have the DRM protection.
1. To check whether the specific song is DRM protected, you can find the song in iTunes.
2. Right click on it, then select the option Get Info.
3. After that, find the option Kind below the File tab.
4. You can view whether it displays “Protected”, if yes, that means this song has DRM protection.
As we know, the purpose of DRM-added is to get the copyright of songs protected. Therefore, to remove DRM protection from the song is the greatest solution to fix iTunes songs greyed out issue. DRM protection can be got rid of via a third-party tool.
All possible solutions to fix iTunes songs greyed out issue have been listed above, you can have a try on them one by one. And there will be one which helps you to solve the problem in high efficiency. Hope our guide will do a good favor to someone who is facing the same issue. Don’t forget to share this article with your friends, when they get frustrated in discovering that many songs cannot be played via Apple music. This article will be a great help in offering effective solutions to fix this issue.

