Windows Media Player is a professional program with the function of listening to, categorizing and managing the music collection. Whatever the compatibility with various kinds of audio files or the wide range of library interfaces, you will find it easy to control the way to store, display and list music in Windows Media Player. But, sometimes when you add different music files from the folders or CDs, the duplicate items are inevitably created and easily cause unnecessary files to exist in your music library. Even though the situation of duplicated files are commonly seen in this software, a powerful function included in it will enable you to find and get rid of those extra items and make your library clean up thoroughly.
- Method 1: How to remove duplicate songs in Windows Media Player 12/11 directly
- Method 2: How to remove duplicate songs in Windows Media Player 12/11 with Tunes Cleaner
- Method 3: How to remove duplicate songs in Windows Media Player 12/11 using Similarity
- Extension: How to import music to Windows Media Player 12/11
Method 1: Remove duplicate songs in Windows Media Player 12/11 directly
1. You can run Windows Media Player via choosing it in the “Programs” menu which locates in the “Start” menu or you can go through the shortcut on the computer’s desktop by double click on it. If both of the two options cannot be found on your computer, the Windows Media Player can found via the folder “Program Files” in the hard drive.
2. Press on the key F3 to turn on the option “Add to Library via searching computer”. Or you can choose this option in the “File” menu. Then a new window will pop up in Windows Media Player.
3. Click on “Browse” and then choose the folder which includes your music from the computer. If you cannot find your music in a single folder, repeat this step in the different folders, your music will finally be found in this repeated method.
4. The location of folder will now be listed in the dialog “Look In”. Then click on the button “Search”.
5. The specified folders will be scanned by Windows Media Player and the duplicates which are connected with the same files in your library will be deleted.
6. When the scanning process is finished, the remaining duplicates can be found in the library. These duplicates are actually connected to two respective folders, one can be removed and the other one will remain without any damaged by the deleted one.
Method 2: Remove duplicate songs in Windows Media Player with Tunes Cleaner
UsingLeawo Tunes Cleaner to remove duplicate songs in Window Media Player is an effective way to complete the cleanup task. Tunes Cleaner is a smart and integrative software with the multiple functions of cleaning up iTunes library, detecting and deleting the duplicates from iTunes, getting album work from iTunes, downloading and adding music tags such as album, title, artist and year and so on.
It also allows you to edit the music tags and store the incomplete music files for fixing in the future. Moreover, it is not limited in cleaning up iTunes library, the local music folders can also be cleaned up with Tunes Cleaner. After the cleaning up process is finished in iTunes Music Library or in the local music folders, the fixed music files can be applied to iTunes or the original location of music folders. You just need one simple click, then iTunes library and other music libraries can get well managed and organized.
Due to the powerful and enormous database for online music, getting album artwork from iTunes, downloading and adding music tags could be done by Leawo Tunes Cleaner automatically to make the music information completed in an easy way. With the help of the built-in music tag editor in Tunes Cleaner, the music tags with no definition and incomplete information can be edited manually in iTunes music library along with other music folders. Below we will show you the details of how to remove duplicate songs in windows media player via Tunes Cleaner.
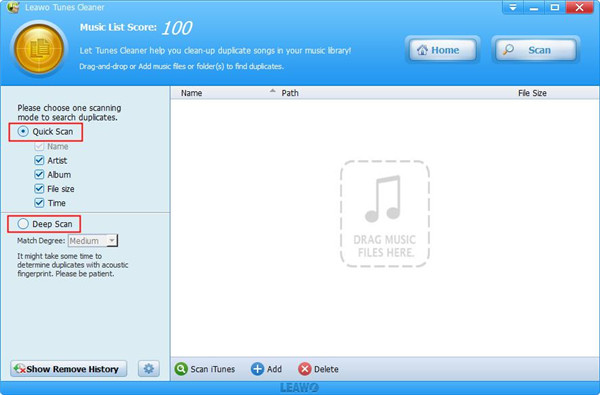
1. Launch Leawo Tunes Cleaner on your computer and choose the entry “Clean-up Duplicates”. Two effective scanning modes are offered by this program, one is Quick Scan mode, the other is Deep Scan mode. You can choose the scanning mode optionally to get the duplicate songs scanned.
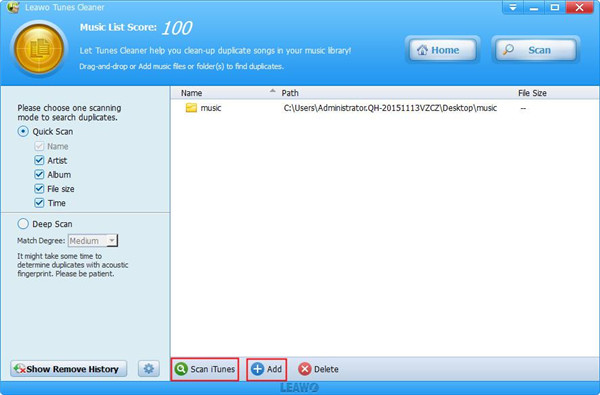
2. Because we need to remove the duplicate songs in Windows Media Player, we should click on the “Add” button on the middle bottom of the Tunes Cleaner window to import the music files in Window Media Player with the purpose of getting rid of the duplicates. Or you also can drag and drop the WMP music files directly to the window from the local folder.
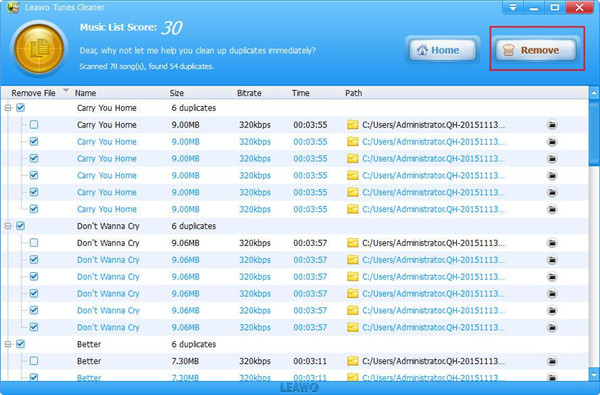
3. After the music files source has added, click on the button “Scan” on the right top corner to begin to scan the duplicates. The all the duplicates will be listed clearly in the window and a prompt will be given to you what duplicate music files should be removed. Which duplicate music files need to be deleted depends on your decision by enabling the check box beside them, then click on the “Remove” button to get the duplicate songs you choose to remove as you require.
Note: The auto music tag adding feature of Leawo Tunes Cleaner has been discontinued. You could use it to add or edit music tags manually.
Method 3: Remove duplicate songs in Windows Media Player using Similarity
How to remove duplicates in windows media player is a tough task for a music lover. The more audio files you own, the more time you must spend on cleaning up the duplicates and the low-quality files as well as purifying the garbage in the music collection. In this case, Similarity is an easy-to-use software to help you perform the cleanup task in windows media player. Additionally, this software can be used to deal with image as well.
Similarity is able to scan the duplicate music in windows media player in a quick way and all the duplicate music can be displayed for your viewing. The scanning is based on the technology of “acoustic fingerprint”, the files names, tags and the specific contents of the music files are taken into consideration in the scanning process so that the accuracy can be ensured extremely. What’s more, almost all kinds of files formats are supported by this program. Apart from the duplicates removing functions, advanced quality controlling function is also offered by Similarity. Through files analyzing and the quality score calculating, the common problems in the audio files can be detected in an automatic way by this software and each file can be marked with different quality.
Duplicate detection in a high level analysis is provided by Similarity, the formats supported by Similarity includes MP3, M4A, OGG, AAC and more. As a matter of fact, what format supported by this software is unlimited because of the third-party codecs. Improvement and development are constantly undergoing in this program. Image comparison has been included and the unified engine has been created. No matter what powerful functions Similarity owns, its operation can be completed in a simple way.
The clear and visual interface will direct you to finish the whole process, you just need to choose a music file and click on the “Start” button, then the rest work will be done by this software effectively and automatically.
Extension: How to import music to Windows Media Player 12/11
If you have different kinds of music files in your hard drive, Windows Media Player is a great help to get them well organized. Using Windows Media Player to set up a music library will help to save you much time on looking for your targeted music or album. Below we will guide you how to import music to Windows Media Player 12/11.
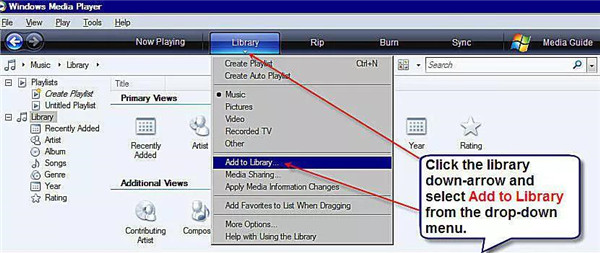
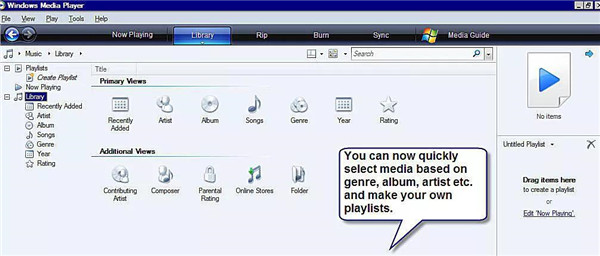
1. Click the “Library” tab to enter the library section in Windows Media Player. The playlist option in the left column along with the categories like the artist, album and songs and so on can be seen here. Click on the icon which looks like a small down arrow, this icon located below the library tab on the top of screen, this operation aims at importing music and different media files to the library. Then the various options can be seen in the drop down menu. Click on the option “Add to Library” and ensure that the type of media file is set as music.
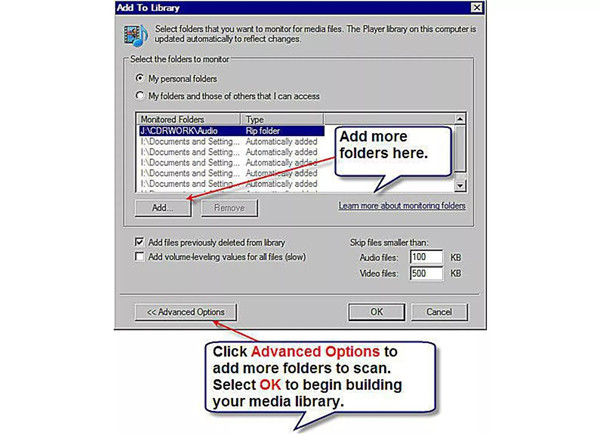
2. You are allowed to choose the folders for the media files that you would like to scan in Windows Media Player. What you need to first is to check whether it is in the mode of advanced option via searching the button “Add”. If it is not the advanced option, you can click “Advanced Options” to open the dialog. When the “Add” button can be seen, click this button to begin to import the target folders to the folder list which is under monitor. Finally, click “OK” button and the scanning process for the media files will begin on your computer.
3. The dialog can be closed once the process of searching is finished. The media library is being able to be built now and this can be checked by pressing on the certain option in the left column. For instance, if you choose artist, all artists will be listed in the media library as the order of alphabetical.


 Try for Free
 Try for Free

