Last updated on 2023-06-05, by
How to Enlarge Eyes in Portraits?
No one in the world would deny to look great, at least on the facial features. If you have a pair of large and emotion-filled eyes, then you can fall into a true beauty. You can frequently see the fantastic pages on various fashion magazines which presents the twinkle large eyes for some beauties. Actually, just as you have desired, you can also enlarge eyes, at least make your eyes look larger with the help of some programs. Actually, in recent years, various photo editors came to our life. But when we get down to the ground, some difficulties would appear, for example, some people have no idea about the detailed steps to edit photos. Today, with some best photo editing software for PC, you can truly enlarge your eyes in portraits and make your photos stand out among peers. Now let’s start our journey on how to enlarge eyes in Leawo PhotoIns, Photoshop and Lightroom.
Outline
Part 1: How to Enlarge Eyes Automatically with Leawo PhotoIns?
In order to enlarge eyes in an efficient way, choosing a proper photo facial programs is quite necessary. The first one here would be introduced is Leawo PhotoIns. Generally speaking, Leawo Photo Enhancer is able to automatically improve quality of the photos you have taken due to its Artificial Intelligence Enhancer Technology. As a powerful AI enhancer, this program can beautifies photos easily, including enlarge your eyes in the photos. Besides, you can enhance your photos on the retouching skin, removing freckles, adjusting lighting and etc. No matter how dark or bright your photos are, Leawo PhotoIns can automatically detect these areas instantly and accordingly, some adjustment would be added to make your photos look much more comfortable. Among them, if you have further requirements on the sky photos, this tool would improve these photos in a more vivid way which could optimize colors and tints easily. To put it in a simple way, Leawo PhotoIns could enhance your photos to be looked in the most nature way with the best visual effects. You don’t have to worry about the steps since its simple and easy-to-use interface, which would make everything goes smoothly and easily. Therefore, it can not only enlarge your eyes, but also deliver a clear and much more natural visual effects with the help of the photo sharpening and contrast settings. Here are the detailed steps.
Step 1: Download Leawo PhotoIns

-
Leawo Photo Enhancer
- Enhance portrait photos easily with advanced AI technology
- Fix photo exposure and white balance issues automatically
- Optimize photo colors and perfect photo tints
- Make photos perfectly clear with smart dehaze
- Boost photo lighting and color quality
- Process RAW and JPG files
Step 2: Import Source Photos
Enter the main interface of Leawo PhotoIns and you can load preferred photos into the program by clicking the option “Add Photo”. Or you can simply drag and drop your photos to this program directly. By the way, you can also right click on the loaded photos to delete them as you like. Furthermore, Leawo PhotoIns allows users to edit the photos in batch. You only need to click on “Add Files” to load other more photos.
Step 3: Enhance Photos and Enlarge Eyes
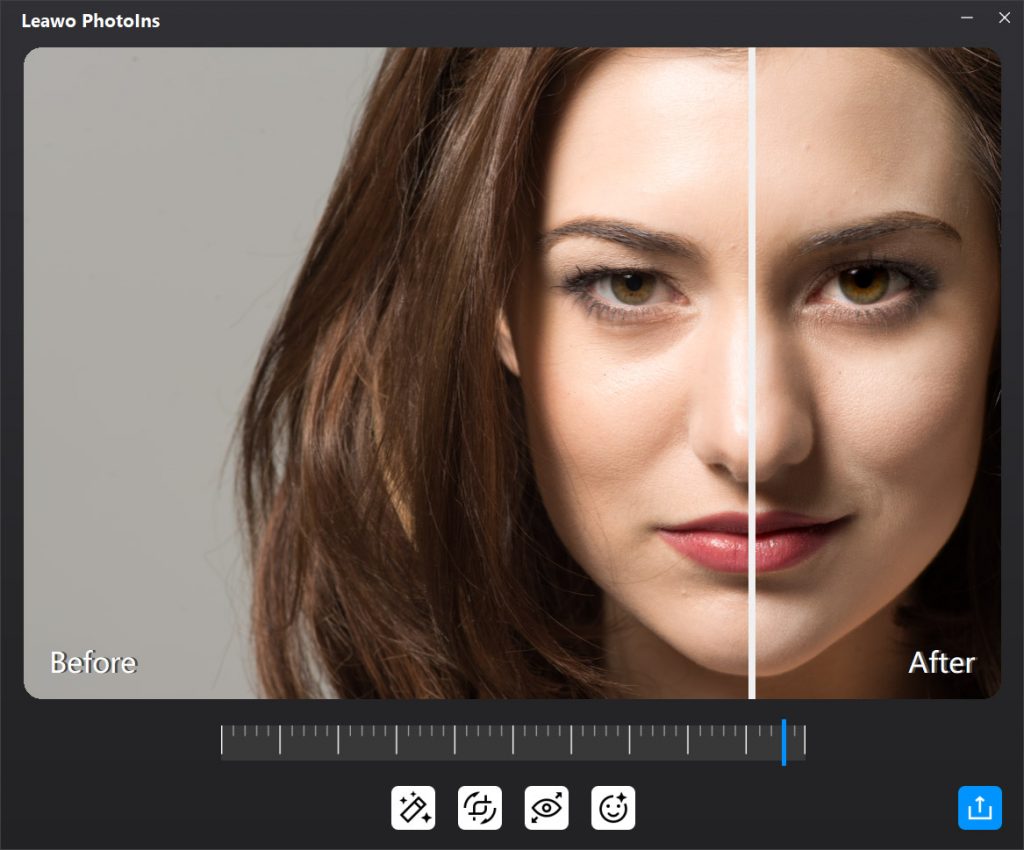
After loading your preferred photos to the tool, then you can have several options to enhance your photos, including, “AI Enhance” “Lens Correct”, “Eyes Enlarge” and “Face Enhance”.
In order to enlarge eyes, you need to choose the option “Eyes Enlarge”. Furthermore, you are allowed to adjust the enhancing degrees. You can drive the slider to the right for bigger eyes specifically.
- ◐ For “AI Enhance”, it is usually enabled by default which is set automatically for the output quality.
- ◑ For “Lens Correct”, it can be adopted while processing with RAW photos which could be used to correct the lens.
- ◒ For “Eyes Enlarge”, it is to edit the eyes in the loaded photo to make your eyes stunning. Here in order to enlarge eyes, you can click this option.
- ◓ For “Face Enhance”, you can set more parameters related to the facial features in the photos, including retouching skin, removing freckles, enhancing eyes, adjusting lighting and etc.
Step 4: Output Setting
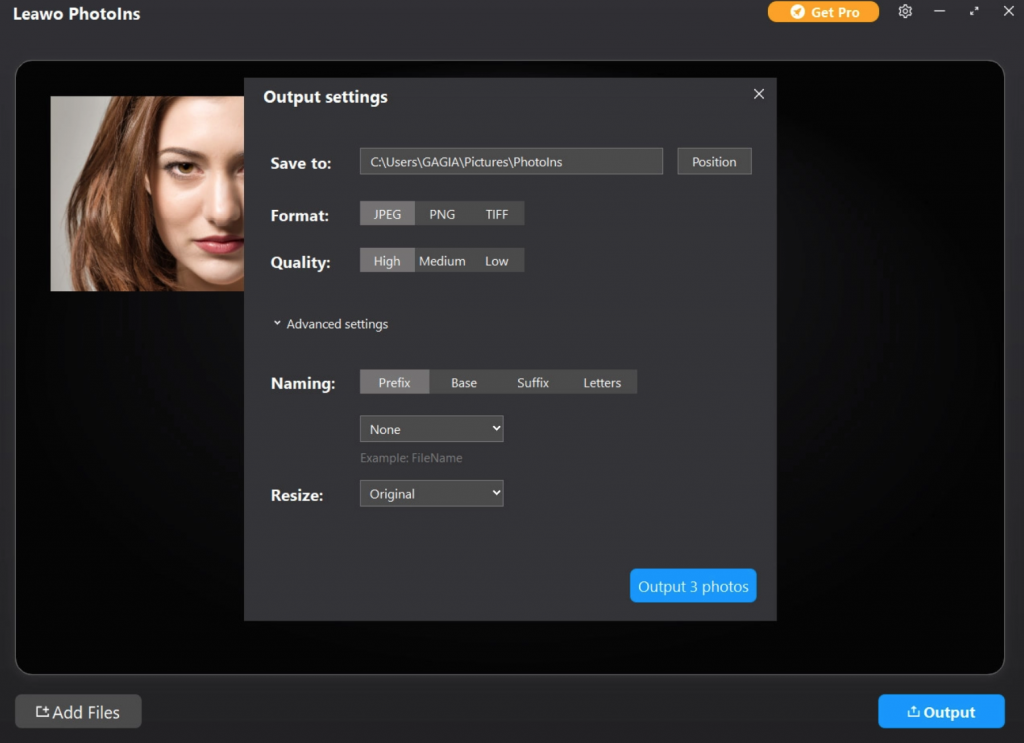
When you have chosen the “Eyes Enlarge” option and completed the related settings, finally you need to click the bottom right output icon to proceed for output settings. On the Output Setting panel, you can complete the following things: “Save to” route, “Format”, “Quality”, “Naming”, “Resizing” and so on. Finally click “Output” to export the enhanced photo to your computer.
Part 2: How to Enlarge Eyes in Photoshop?
Adobe Photoshop, referred to as "PS", is an image processing software developed and distributed by Adobe Systems. Photoshop mainly deals with digital images composed of pixels. Using its numerous editing and drawing tools, you can effectively edit pictures. Photoshop has many functions, including comprehensive processing on images, graphics, text, video, and publishing materials. Photoshop's expertise lies in image processing, not graphic creation. Image processing is the editing and processing of existing bitmap images and the use of some special effects. It is focus on image processing while graphics creation software uses vector graphics to design graphics according to their own ideas. Of course, Photoshop allows you to edit your photos as you like, including enlarging eyes in your photos. Here are the detailed steps.
Steps:
- Download and install the latest version of Photoshop on your computer.
- Load your target photos to this program. You can simply drag and drop the photos to Photoshop’s main panel directly. You can further select a layer that contains a photo of a face. Right click on the layer and choose “Convert to Smart Object”.
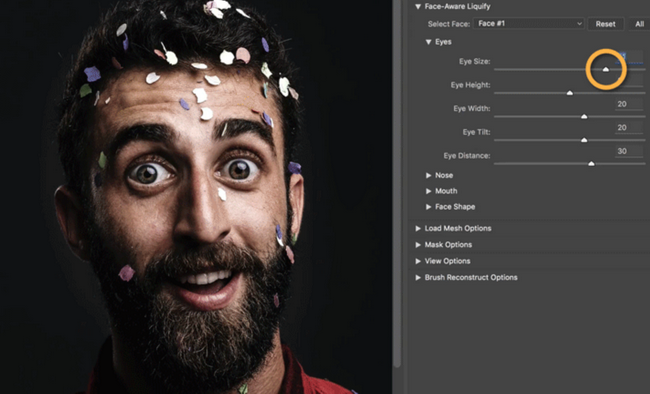
- Open Liquify. On the Liquify window, you can edit photos in a detailed way. Go to “Filter” on the main tool bar and choose “Liquify” to open the photo in the Liquify window.
- Enlarge eyes in the Liquify window. Once the photo has been opened in the Liquify window, you can click the triangle on the left of “Face-Aware Liquify”. Concerning “Eyes” settings, you can be able to set “Eye size”, “Eye height”, “Eye Tilt” and so on. Finally click “OK” option to save all the settings. By the way, you can also adopt the settings to the nose as well as other facial features.
Part 3: How to Enlarge Eyes in Lightroom?
Lightroom is an integral part of today's digital shooting workflow. Now you can quickly import, process, manage and display images with this program. Its enhanced correction tools, powerful organization features, and flexible printing options which can help you to edit your photos in an efficient way with the best output quality, including some basic photo enhancements. What’s more, Lightroom 2 can help you shorten the processing time on your computer and the processes are much more simple. For your further references, please refer to the following steps for more information.
Steps:
- Download and install Lightroom on your computer. If you prefer, you can also download the Lightroom app on your mobile devices.
- Enter the main interface of Lightroom and choose “Selective” option. Under the “Selective” panel, use the brush to draw only on eyes. When the eyes are selected, then you can start editing the eyes, including enlarging eyes.
- Complete the whole editing processes. When you have already adopted all the settings to the eyes, click the tick on the right bottom of the panel to complete all the settings. You can locate all the enhanced photos on your computer or mobile devices.
Part 4: Comparison Between PhotoIns, Photoshop & Lightroom
Referring to the above programs, enhance your own photos in an excellent way would not be a difficult task any more. In comparison, for most people, they would only have the very basic requirements on editing the photos, for example to enlarge eyes, adjust skin colors, optimize photo colors and lights and so on. Asides from the basic functions of enhancement, users may prefer a more convenient and easy-to-use tool to achieve the goals. Without doubts, Leawo PhotoIns would be the first choice users can turn aside to which is quite easy to use and no more additional usage techniques would be required. What you only need to do is to load your target photos to the panel and all the related settings or adjustments would be done automatically. For both Photoshop and Lightroom, their interfaces would be quite difficult for some beginners. Moreover, the instructions for the whole settings are not so easy to understand. Of course, if you prefer to handle with some complex photos or you may have the advanced needs of adjusting photos, they could be your option. Usually, in most occasions, Leawo PhotoIns could be fully capable of enhancing photos so as to be presented in a more comfortable and beautiful way. For the more differences among the above tools, the following comparison chart could be your referential information. You can choose the most proper tool to edit your photos according to your own preferences and needs.
| Products | Leawo PhotoIns | Photoshop | Lightroom |
| Advanced AI Enhancer | YES | NO | YES |
| Photo Editing Features | YES | YES | YES |
| Auto lens correction | YES | NO | YES |
| Auto eyes enlargement | YES | NO | NO |
| User Interface | Easy and friendly | Complex | Complex |
| Most of photo formats supported | Yes | No | Yes |
| Occupying less ROM | Yes | No | No |
| Price | $9.95/Year | $239.88/Year | $118.8/Year |


 Try for Free
 Try for Free


