Last updated on 2021-12-08, by
How to Screen Record with Audio on Windows?
Screen recording used to be a challenge. Fortunately, nowadays, with the advent of screen recorders, almost all devices including laptops and mobiles have their own methods to record screen. In terms of Windows computer, you can simply press Windows + G to bring up Xbox app. Although it was originally designed for screen recording gameplay, it can also be used as a screen recorder. These built-in screen recording features are good choices, but sometimes you may need to go beyond the basic screen recording. Plus, screen recording with audio is still a challenge, a real challenge. Most software does not allow you to record screen together with system audio because it may involve copyright issues, causing there is only images in the screen recordings. Therefore, if you are looking for more advanced features beyond screen recording, check out this post including 3 methods to screen record with audio on Windows.
Related readings:
10 Best Screen Recorder Software for Screen Recording 2022
How to Record Audio from Computer?
Menu
Part 1: How to Screen Record with Audio on Windows Using Leawo Screen Recorder?
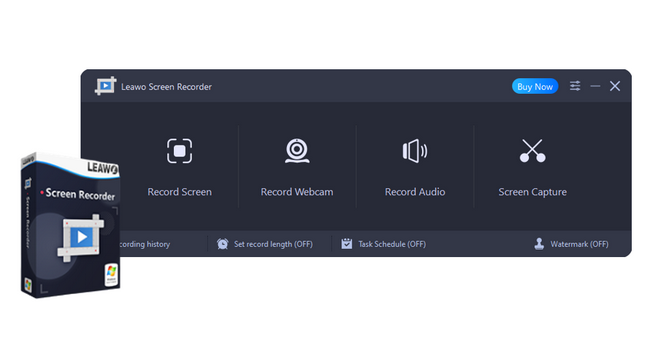
Leawo Screen Recorder, as the first recommendation, is the most cost-effective choice in this post. This software is more than a screen recorder, which can also act as a webcam recorder, audio recorder, and screen capture. Each module can be activated individually, or can be enabled as a supplement to another running module. In addition, you can freely add annotation, real-time drawing, narration, mouse click effects, cursor animation, watermark, and more to your recordings. The following will introduce the detailed steps on how to screen record with audio on Windows using Leawo Screen Recorder.
Step 1: Download Leawo Screen Recorder
Click button below according to your computer system to download and install the latest version of Leawo Screen Recorder on your computer.
-
Leawo Screen Recorder
- Record all activities on your computer screen as HD screencast.
- Record video from your webcam.
- Record any audio from your computer an/or microphone.
- Capture anything on your computer screen as screenshot.
- Add drawing, annotations, watermark, mouse animation, and BGM to recordings.
- Output in high quality with multiple formats selectable.
Step 2: Set screen recording parameters
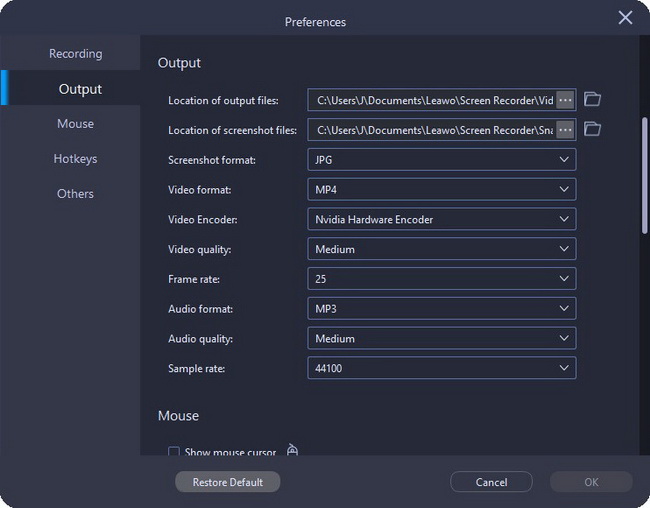
Before screen recording with audio, you can first set output parameters like output directory, format, quality, frame rate, etc. Click the three-bar icon in the top-right corner and choose Settings option to bring up the Preferences panel. Then, click Output tab to set screen recording parameters. Click OK button after settings to go back to the main interface
Step 3: Select recording region
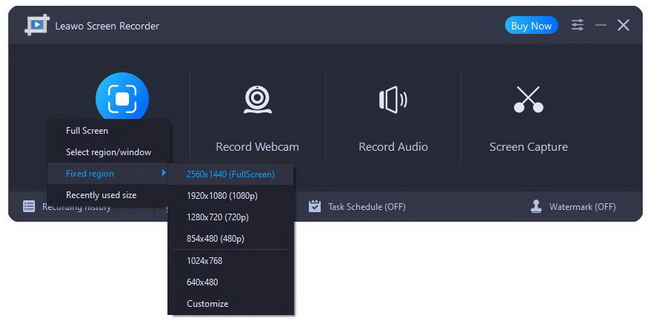
On the main interface, click the Record Screen button. Then, on the drop-down menu, freely select screen recording region, including Full Screen, Select region/window, Fixed region and Recently used size.
Step 4: Choose sound source to screen record with audio
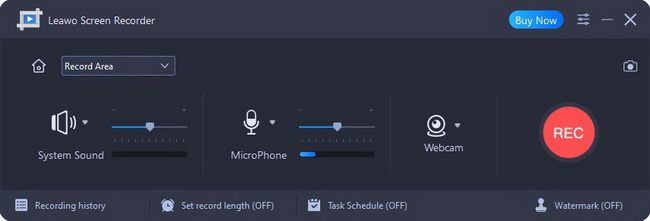
After recording region selection, you can set sound source to screen record with audio. By default, it will record screen with audio. You can click the System Sound button to disable it. Also, if you want to add narration or voiceover to recording, click the Microphone button to screen record with audio.
Step 5: Start to screen record with audio
Click the REC button at the right to start screen recording with audio. Alternatively, you can press the default hotkeys to start recording – Ctrl + Alt + S.
Step 6: Add annotation and real-time drawing during screen recording
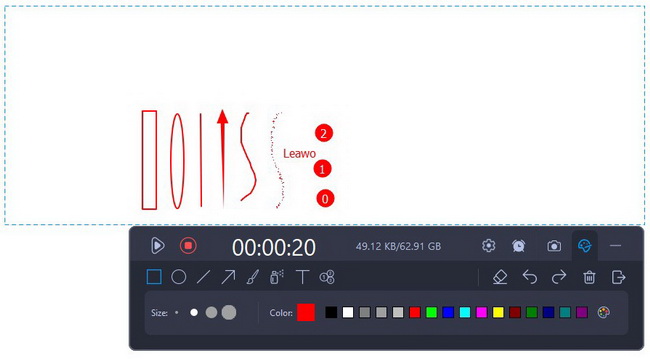
After the screen recording starts, you can use the widget attached to the recording frame to take full control of the screen recording.
- Click the Settings button to enable/disable system sound, microphone or webcam.
- Click the Clock button to schedule recording time.
- Click the Camera button to take screenshot during screen recording.
- Click the Palette button to enter Paint board, which provides various tools for you to annotate and draw on the recording.
Once the screen recording is complete, click the Stop button to stop recording. Then, on the Record History panel, you can manage all your recordings without efforts.
Part 2: How to Screen Record with Audio on Windows Using Xbox Game Bar?
Xbox Game Bar is a built-in feature on Windows 10. It was originally designed for gamers to record game that is played on PC or streamed from Xbox console. Apart from basic screen recording feature, it can also help you access and control all kinds of useful things during gameplay like sound controls, performance statistics, or frame rate. However, it can be used to record screen with audio from other open desktop software. To use this feature, first you need to make sure your PC supports one of the following encoders – Hardware Requirements for Capturing on Windows 10.
Step 1: Open Gaming in Settings
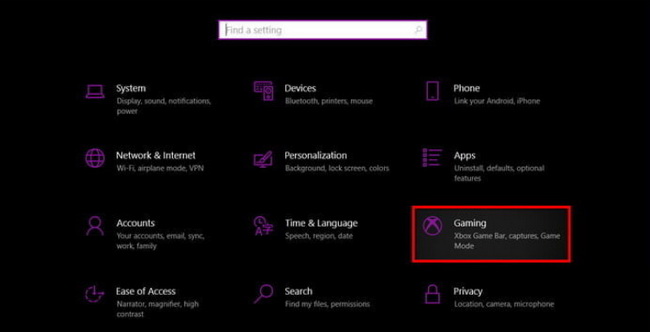
To open Settings panel, you can click the Windows button in the bottom-left corner and click the Settings button, or click the Notifications button in the bottom-right corner and click All Settings button. Then, select Gaming tab.
Step 2: Enable Xbox Game Bar
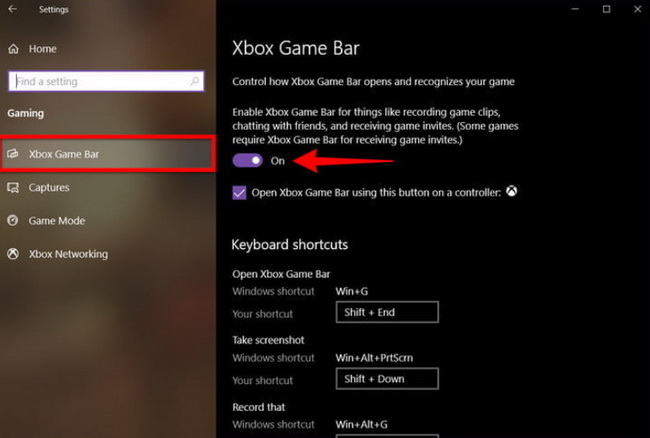
In the Xbox Game Bar panel, toggle on the first button to enable Xbox Game Bar feature. Then, click the Captures tab in the left column, where you can set output directory and audio recording source.
Step 3: Start to screen record with audio using Xbox Game Bar
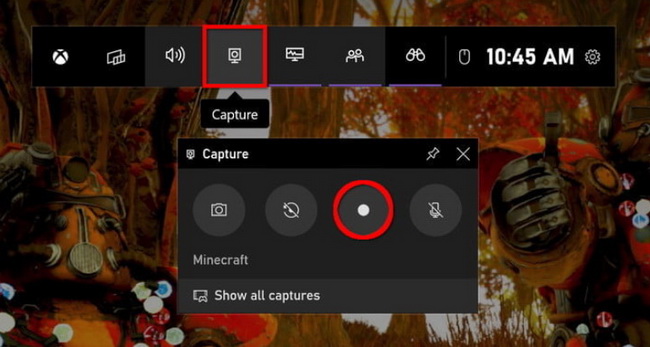
Press Windows key and G on your keyboard to open Xbox Game Bar. It will appear on the top-center of your screen. To get started, click the Start Recording button. Alternatively, you can press Windows key + Alt + R to start or stop recording when Xbox Game Bar is enabled.
Part 3: How to Screen Record with Audio on Windows Using Camtasia?
Produced by TechSmith, Camtasia is one of the most influential screen recorder. It is actually a software suite that allows you to record any screen activity as screencast, and then edit the record by adding notes and annotations to draw attention to areas of the screen. Nevertheless, Camtasia is not free. For beginners, once the 30-day free trial period ends, it may be expensive - the latest version of this software costs $299.99. But if you are a regular user to make instructional videos, the price may be reasonable. Because it allows you to create tutorials and presentations with various powerful tools and features, including animated backgrounds, graphics, and so on.
Step 1: Download and install Camtasia
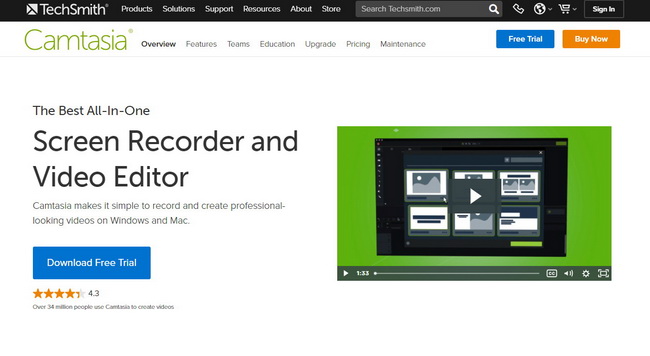
Go to the official website of Camtasia, then download and install this software on your computer.
Step 2: Create a new screen recording project
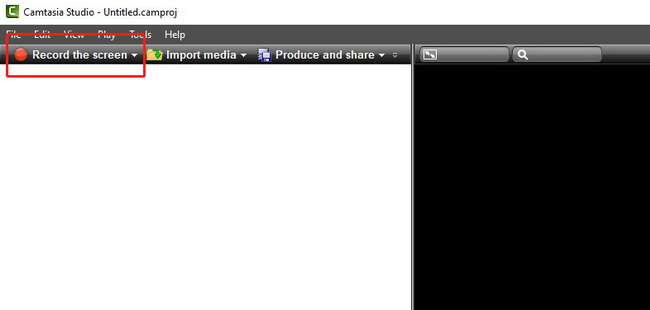
Launch Camtasia after installation, and you will be led to its Editor window. Click the Record the screen button in the top-left corner to create a new screen recording project.
Step 3: Choose recording area
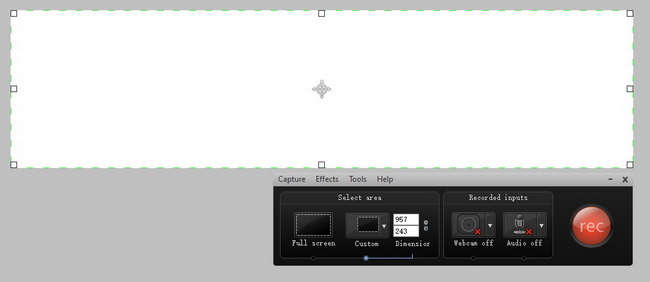
A screen recording frame will automatically pop up with a control widget. By default, it will record the full screen. You can drag the white squares on each edge, or enter specific dimension to adjust the recording frame. Furthermore, to screen record with audio, you can click the triangle button next to Audio off option to choose audio source.
Step 4: Start to screen record with audio using Camtasia
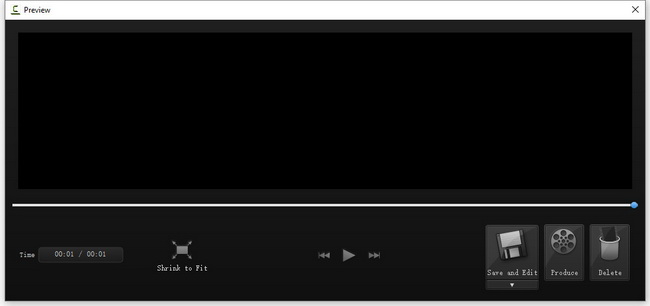
Click the rec button to start recording. Once the countdown appear on the screen, you will not be able to perform any operations on your computer. Finally, click the Stop button or press F10 on keyboard to stop recording screen. A previewer will pop up and you can view the recording. If everything looks satisfied, click the Save and Edit button, and you can then edit the recording with Camtasia video editor.
Part 4: Comparison of 3 Methods to Screen Record with Audio
The above three methods can all record screen with audio particularly well. If you only have the most basic needs, then you can totally rely on Xbox Game Bar. But if you have more advanced needs, such as adding annotations, real-time drawing and voiceover to the recording, then Leawo Screen Recorder and Camtasia will be better choices. Compared to Camtasia, Leawo Screen Recorder has almost the same functions as Camtasia while the price is only one-tenth that of Camtasia. Therefore, we believe that Leawo Screen Recorder is the most cost-effective option among all screen recorders. Below is a comparison table between 3 methods to screen record with audio. You can pick an ideal fit according to your personal needs.
| Features | Leawo Screen Recorder | Xbox Game Bar | Camtasia |
|---|---|---|---|
| Record screen with audio | Yes | Yes | Yes |
| Freely define recording area | Yes | No | Yes |
| Record audio separately | Yes | No | No |
| Make tutorial video | Yes | No | Yes |
| Record PowerPoint presentation | Yes | Yes | Yes |
| Record gameplay | Yes | Yes | Yes |
| Record online class | Yes | No | Yes |
| Mouse click effect | Yes | No | No |
| Cursor movement animation | Yes | No | No |
| Add watermark | Yes | No | After recording |
| Real-time drawing | Yes | No | After recording |
| Real-time annotation | Yes | No | Yes |
| Schedule recording | Yes | No | Yes |
| Snap screenshot during screen recording | Yes | Yes | No |
| Webcam overlay | Yes | No | Yes |
| Output in high quality | Yes | Yes | Yes |
| Price | $29.95/year, $39.95/lifetime | Free | $299.99/year |


 Try for Free
 Try for Free

