Syncing iPhone over Wi-Fi allows you to sync content, data, pictures, music, whatever, to and from an iPhone, iPad, or iPod touch and a computer running iTunes, without ever connecting the device with a USB cable. Most iOS users have known about how to sync iPhone to iTunes with USB cable, but don't know how to sync iPhone to iTunes over Wi-Fi. Actually, iPhone sync over Wi-Fi is easy to be done. This tutorial will show you how to finish the task.
Part 1. How to Sync iPhone with iTunes over Wi-Fi
What You'll Need:
Steps to Sync iPhone with iTunes over Wi-Fi:
Step 1. Connect your iPhone or other iOS devices to computer via the Apple matched USB cable.(Before enabling iTunes wireless sync, you still have to connect your iPhone to your computer for the first time.)
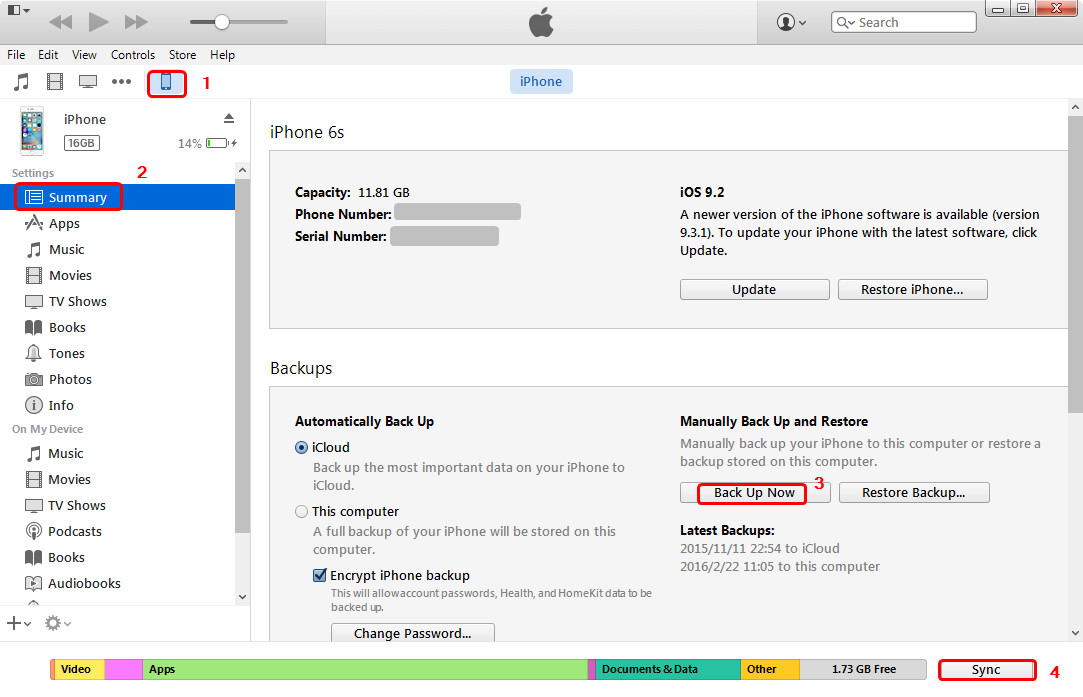
Step 2. Open iTunes, click on the "iPhone" icon. On the left sidebar, click on "Summary".
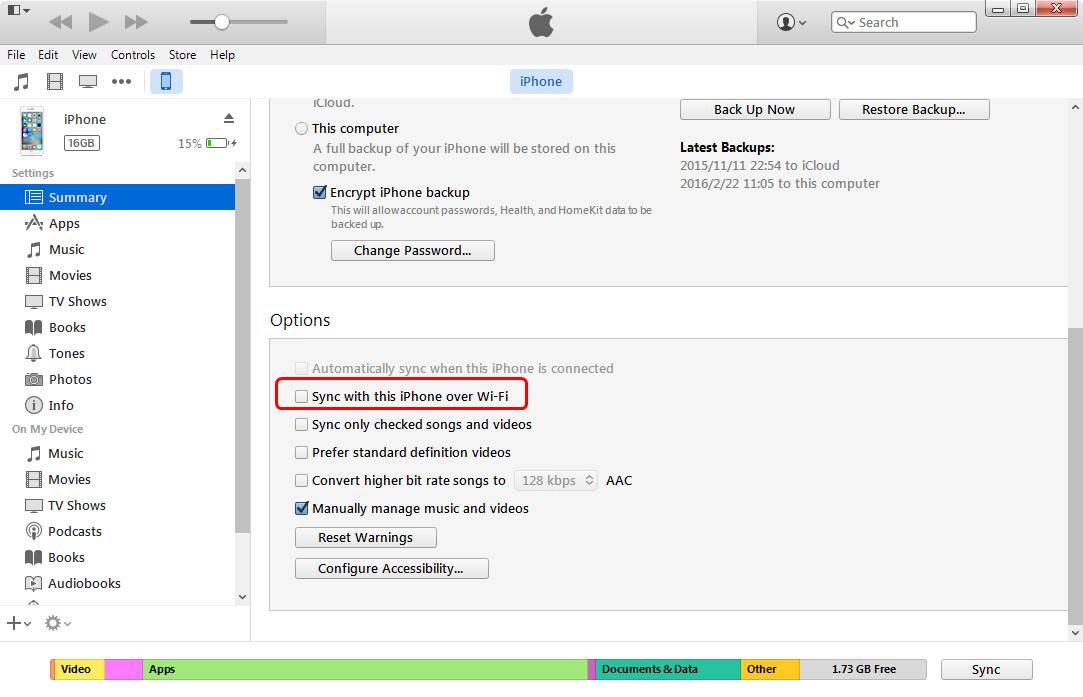
Step 3. On the Summary tab, select "Sync with this iPhone over Wi-Fi". Click "Apply", and then disconnect the USB cable.
Step 4. Now on your iPhone, launch the Settings app. Then tap on "General" > "iTunes Wi-Fi Sync".
Step 5. You should now see your PC or Mac name on the list. Tap the name of your PC or Mac and then tap on "Sync Now" to begin syncing iPhone over Wi-Fi.

That’s all! You have now successfully setup the sync process over Wi-Fi. From now on, you'll have no need to worry about tangled USB connection to sync your iPhone or iPad with iTunes.
Tips for Syncing iPhone Over Wi-Fi:
1. Syncing your iPhone wirelessly is slower than doing it via USB. So, if you have a ton of content to sync, you may want to use the traditional method.
2. You don't have to manually sync. When your iPhone is connected to a power source and is on the same Wi-Fi network as your computer, it syncs automatically.
3. Using Wi-Fi sync, you can sync your iPhone to more than one computer—as long as those computers are authorized with the same Apple ID.
4. You can't change your sync settings on your iPhone, which can only be done in iTunes.
5. If you want to restore your iPhone from a backup in iTunes, it can only be performed via a USB cable.
Part 2. How to Fix iTunes Wi-Fi Sync not Working?
When syncing iPhone over Wi-Fi, a wide variety of users are encountering an issue where Wi-Fi syncing just stops working. Either the device refuses to show up iTunes, or it disappears immediately when attempting to sync content to it. The solution below will resolve either of those problems and is quite simple.
Solution 1. Update iTunes and iOS.
To make sure you're running the most current versions for iTunes and iOS, follow the steps below:
For iOS: Launch the Settings app on your iPhone or iPad. Tap on General > Software Update. Perform an update if one appears.
For iTunes:Go to https://www.apple.com/itunes/download/, if you have no the newest iTunes version, you will be able to install it here.
Solution 2. Restart iTunes and iPhone:
Restarting your iPhone and your Mac sometimes may help get iTunes syncing back on track. Rebooting your iPhone or iPad as well by holding down the Home and Power buttons simultaneously.
Solution 3. Forget and Rejoin Wi-Fi network:
If Wi-Fi sync does not happen as it should you may need to forget and rejoin the network fresh. Sometimes forgetting all your wireless settings across all your devices can boot out any bad connection you may have.
Solution 4. Disable handoff on iPhone:
Until Apple comes out with an actual fix for wifi sync issues, disabling Handoff in iOS seems to do something that allows wifi sync to start functioning normally again, which makes it worth a try.
Solution 5. Resetting Network Settings:
If nothing seems to work to restore the syncing of your iPhone with Mac, you need to restore the network settings once again. However, remember all your Wi-Fi passwords and Bluetooth settings will be reset.
Part 3. Related Tip for Syncing iPhone to iTunes with USB Cable
Of course, you can always use the traditional way to sync iPhone to iTunes with USB cable. This ways is old-fashioned but useful. The following steps show you how to do that.
1. Open iTunes. Make sure that you have the latest version. Then connect your iPhone with USB cable to your computer.
2. Click on your device. After clicking on your device, tabs appear on the left side of the iTunes window under Settings.
3. Turn on syncing. You can turn on syncing for Music, Movies, TV Shows, Podcasts, Books, Audiobooks, Tones, Photos, and Info.
4. Sync your content. Click the Sync button in the lower-right corner of the screen to sync your content.

Note: If you still have some non-purchased files in your iPhone that is impossible to sync them from iPhone to iTunes, you will need the third-party software to sync non-purchased files from iPhone to iTunes. Leawo iTransfer, one of the best iPhone, iPad and iPod transfer software, which enables users to transfer various of files among iOS devices, iTunes and computers, like apps, music, movies, TV shows, ringtones, ebooks, photos, Camera Roll, contacts and text messages, etc.


