If you have once tried to solve the problem of how to recover deleted photos from Photo Vault for iPhone, you may know that it is not easy to get this work done. However, the solutions that I would show you in this guidance will do you help in dealing with this issue properly. All these ways are quite simple, so even a novice user can take advantage of them. Besides, this tutorial will recommend you a professional tool for the aim to recover Photo Vault images. You can also know one powerful program to back up iPhone pictures.
Part 1: Introduction to Photo Vault App
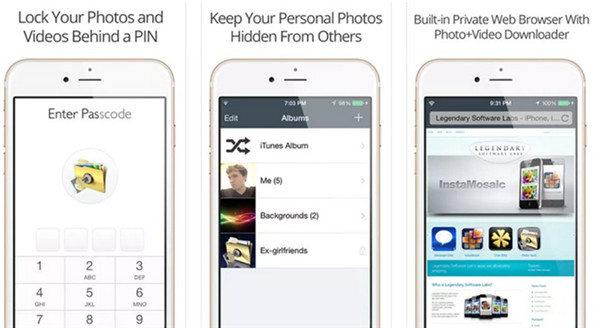
Photo Vault app has been updated for several times, which can be applied on iPhone, iPod Touch, iPad, iPad Mini and Android devices. It is secure to protect your image and video privacy on your devices. You can use one password to protect your pictures and videos. Thus, no one can open them. It also allows users to take pictures directly into this app. If there is someone who wants to break-in to this app, it will take a snapshot of the perpetrator in secret. It can also record the perpetrator’s GPS location so that you can see the place that the break-in occurs in. The Decoy Password that you set for this app can open up to a totally different set of images.
Part 2: How to Recover Photos from Photo Vault for iPhone with Backups
If you are wondering how to recover photos from Photo Vault in iPhone for free, you can refer to the contents in this part. iTunes and iCloud are two great tools for you to make use of to achieve this aim well.
2.1 Recover Photos from Photo Vault for iPhone with iTunes
iTunes is the first tool that may come to your mind when you encounter the issue of how to recover images from Photo Vault for iPhone. This software is handy and free to use. It can back up your iPhone data, and you can also take advantage of the iTunes backup to restore data easily. Now let’s begin to take a look at how to use iTunes to complete this task.
1. Connect your iPhone with computer with proper USB cable and then run iTunes on computer. Make sure you have installed the latest version of iTunes on your computer.
2. On iTunes main interface, you need to hit on “Preferences > Devices” to check the option of “Prevent iPods, iPhones, and iPads from syncing automatically”.
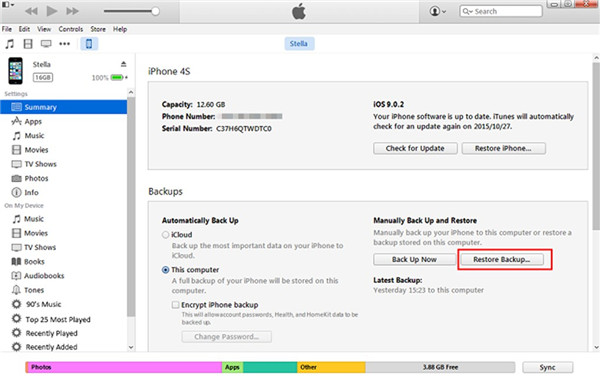
3. Click on your iPhone icon and then tap on the menu of “Settings> Summary” from the left sidebar.
4. In the right part of the window, you need to click on the button of “Restore Backup…” under the menu of “Backups> Manually Back up and Restore”.
5. In the pop-up panel, you need to choose the most recent backup and click on the “Recover” button. When a dialogue shows up, you need to confirm the recovery. Thus, the recovering process will begin and you just need to wait patiently.
2.2 Recover Photos from Photo Vault for iPhone with iCloud
To deal with how to recover deleted photos from Photo Vault app for iPhone, iCloud is also a convenient tool for you to resort to. Each iDevice is equipped with this feature. You can now take a quick tour on the steps shown below to assist you to make it.
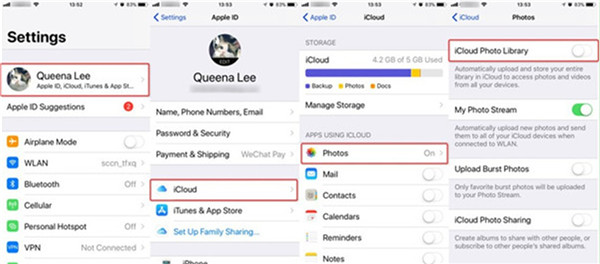
1. On your iPhone device, you need to connect to good Wi-Fi network and then go to the Settings app on home screen.
2. Hit on the tab of “Name/Apple ID > iCloud” successively.
3. Under the area of “APPS USING ICLOUD”, you need to click on the tab of “Photos” to turn it on.
4. In the next interface, you need to enable the feature of “iCloud Photo Library” to allow the iCloud photos to sync to your iPhone.
It will only take you a while to get the photos of Photo Vault app from iCloud to your iPhone device. You can try this method to help you to resolve the matter of how to recover photos from Photo Vault for iPhone.
Part 3: How to Recover Photos from Photo Vault for iPhone Directly with iOS Data Recovery
If you desire to settle the issue of how to recover photos from Photo Vault for iPhone with a professional tool, Leawo iOS Data Recovery will be the best choice for you. This software can perform with high efficiency to help you to get over various data recovery issues. Its features are quite powerful, which will meet your demands perfectly. Now you can check out the following steps to assist you to work out this problem with the assistance of Leawo iOS Data Recovery.

iOS Data Recovery
☉ Extract and export 14 types of files from previous iTunes&iCloud backup
☉ Back up 14 kinds of data on iOS devices to computer
☉ Recover data lost due to jailbreak, iOS upgrade, deletion, etc.
☉ Support iPhone SE/6/7/8/X, iOS 12, iTunes 12.9 & Win10
Step 1. Choose Data Source
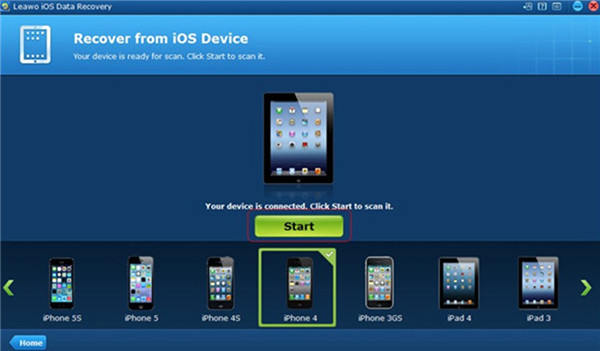
Insert your iPhone into computer with matched USB cord and then launch the program. The software will begin to detect your device automatically. You can choose the proper backup source from the main interface. Here I would like to show you how to recover photos from Photo Vault for iPhone by making use of the option of “Recover from iOS Device”.
Step 2. Scan iPhone Device
Afterwards, you need to choose the button of “Start” to click on. Thus, the program will start scanning your iPhone data right away.
Step 3. Select iPhone Photos
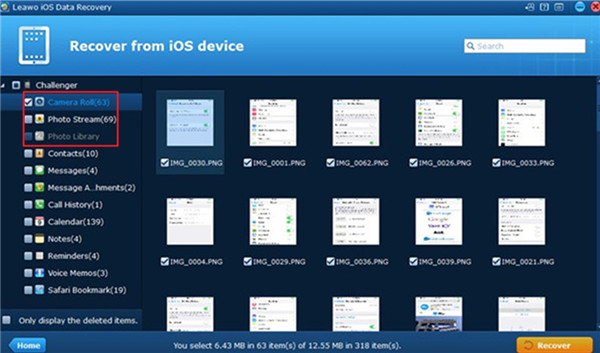
When the scanning process terminates, you can check the option of “Camera Roll”, “Photo Stream” and “Photo Library” to view the Photo Vault images in the right part of the window. Thus, you can select the Photo Vault pictures that you desire to recover to check. Click on the “Recover” button at the bottom right corner of the interface to continue.
Step 4. Set Output Folder
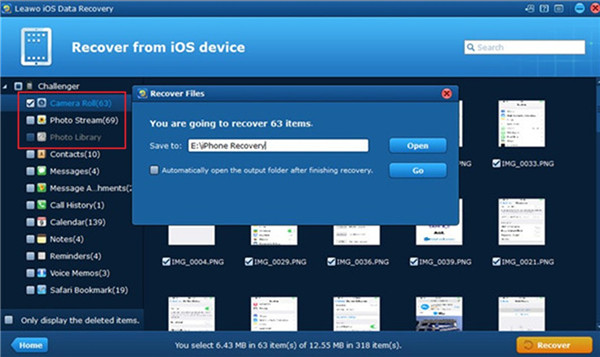
A panel will show up and you can hit on the button of “Open” to select one proper place to save the recovered Photo Vault images. After that, you can hit on the “Go” button to start recovering photos from iPhone. The process will take you a while. When this procedure comes to an end, you will be able to view your Photo Vault images on iPhone directly.
This solution is quite easy to deal with the issue of how to recover photos from Photo Vault for iPhone. You can give it a go to see whether it can work so perfectly for you.
Extension: How to Backup Photos from Photo Vault App via iTransfer
After you get to know several methods to settle how to recover photos from Photo Vault for iPhone, you can continue to look at this part to learn how to backup photos from Photo Vault app to your computer in case you need. Here I would like to recommend you to take advantage of Leawo iTransfer to make it. This tool is very excellent, which can solve a variety of transfer issues quickly and accurately. The detailed steps shown below will direct you to transfer photos from Photo Vault app to your computer successively.
Step 1. Run Leawo iTransfer and Connect iPhone
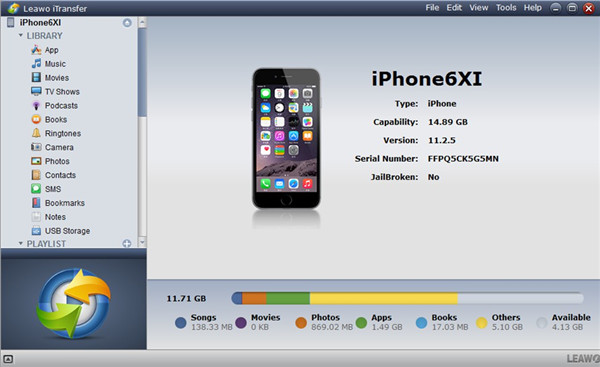
Find a proper USB cable to connect your iPhone with computer. Launch Leawo iTransfer on your computer and it will recognize your iPhone. Your iPhone info will be shown in the right part of the interface.
Step 2. Choose Photos to Transfer
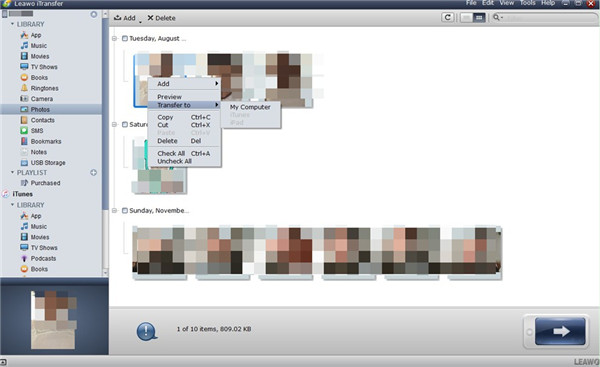
Hit on the iPhone icon in the left part of the window. Thus, you will be able to see the iPhone data categories under the menu of “LIBRARY”. In order to backup photos from Photo Vault app to computer, you need to click on the tab of “Photos”. Thus, your iPhone photos will display in the right part of the screen for you to choose. Select the Photo Vault app images and then hit on the transfer button at the bottom right corner of the window. In the panel that pops up, you need to click on “Transfer to >My Computer”.
Step 3. Set Output Folder and Transfer Photos
Check the option of “Save to Folder” in the next pop-up panel and then hit on the “Change” button to select one directory on your computer to save the exported iPhone Photo Vault app pictures. Finally, you can click on the button of “Transfer Now” to initiate the transfer process.
A percentage bar will show you the transfer process. When this process is over, your iPhone Photos Vault app images will be accessible on your computer.
As you can see in the contents discussed in the above, the methods to recover photos from Photo Vault app are various and it is not hard to back up your pictures from Photo Vault app to your computer as well. You can rely on professional tools to deal with this kind of issues or just make use of iCloud/iTunes to help you. However, the former is much simpler for you to handle.



 Sep. 07, 2021 by


