
iTunes is not strange to any of us. Developed as a manager focusing on music at its first debut to a full-functional software as a media player, media library and internet radio broadcaster, nowadays iTunes is used to purchase, play, download and organize digital multimedia. It is able to perform on both macOS and Windows operating systems. However, it is not working perfectly all the time. Users might encounter error codes like iTunes error 50 when trying to download from the iTunes store or connect your personal device to iTunes. This article intends to solve the problematic occasions while using the iTunes.
Outline
What Causes iTunes Error -50?
The iTunes error code 50 occurs when you can't connect to the database server to synchronize the data or have access to the download store. It is an indication that the iTunes can't function correctly and your computer might have a number of problems with its settings and options. When it occurs, data synchronizing and files downloading with the iTunes would fail making you feel annoyed.
The reasons for the iTunes error code 50 can be categorized as a few aspects, including network drop, firewall settings, anti-virus protection, or Windows registry errors. Due to the uncertainty of the error, you might have to try a few solutions before figuring out the corresponding measure.
How to Fix iTunes Error -50?
Responding to the possible causes for the error 50, a few solutions are sorted out in the following sections. The steps are not necessarily followed according to the sequence. You can do what step 2 indicates before step 1 or any other step as you might prioritize.
Solution 1: Ensure that the Firewall / Antivirus doesn't block the iTunes
To do this, you need to enter firewall setting panel of your device and check whether the iTunes is on the blocked list of the firewall and manually adjust the setting. Make sure that the system allows the following domains:
itunes.apple.com
ax.itunes.apple.com
albert.apple.com
gs.apple.com
Solution 2: Re-install the iTunes
If the iTunes you have installed is not the latest version, it might lead to the error code for the previous faulty network settings. In this case, you must get rid of the former installation and re-install the latest version. Meanwhile, re-installation of the new version can replace all the problematic files on your pc.
The re-installation step is as simple as getting rid of an unwanted app on your device and turn to the app store to download a latest one.
Solution 3: Clean out the registry of your pc
The registry can be taken as a database on your pc. For each application installed or uninstalled on your pc, the application preferences and settings will still remain in your pc as the registry. The registry will cause error messages and faulty operations of the pc. Therefore, it is the major cause of iTunes 50 error that prevent the iTunes to run correctly. The effective solution to resolve this problem is to download and run a registry cleaner tool which you can find from the app store.
Solution 4: Check if the USB cable is well connected to both ends
The error is possibly caused by disconnection of the iOs device and the computer. Make sure that both sides are well connected with cable line. You can try to unplug the cable line and plug it again in a few seconds.
Solution 5: Fix the internet connection of your computer
Poor internet connection could be another cause of the error. Furthermore, poor internet connection could be the source for all the network problems. So try to fix the internet sometimes would be the most effective way to resolve the problem.
Other Similar Codes Like iTunes Error -50
If you keep using the iTunes for downloading and managing your database, you will find that error code 50 is only one of the iTunes error codes. So grasping the solutions to resolve the error 50 is far from enough. This section will specially focus on other similar codes like iTunes error 50.
No 1. iTunes error 52
The iTunes error 52 is mainly caused by the USB driver on your computer. the iTunes error 52 might occur due to the problem with the verification of digital drivers that are required to restore iPhone, iPod Touch and iPad.
The following solutions can help with the error 52:
- > Scan the full computer to filter any malwares
- > Re-install the iTunes which suffers from the error 52
- > Update the device drivers in your computer to the latest version
- > Clean out the registry entries
No 2. iTunes error 54
The iTunes error 54 is a common error happening when you want to syncing your iPhone, iPod or iPad. The main reason for this error could be lacking of space in your iPhone, outdated iTunes on your computer and security hardware on your computer which might prevent the iTunes from performing normally.
Solutions to resolve the error 54:
- > Update the iTunes to the latest version
- > Clear your iPhone for more space
- > Make sure that the iTunes is allowed to play by the security hardware on your computer
No 3. iTunes error 14
The most possibility of causing the error 14 is the USB cable. For sure the USB cable is not the unique cause of the error. It could be poor internet connection, lower storage or memory on your device and outdated version of the iTunes.

Solutions targeting on the corresponding causes could be:
- > Fix the USB cable failing problem
- > Update the iTunes to the latest version
- > Empty the storage or memory for enough space on your device
There are more iTunes error codes than what we can list out. However, the error codes of iTunes share some common features which can dealt with and removed by the aforementioned solutions such as re-installing the iTunes, updating the iTunes to the latest version, checking the internet connection status and clean out the registry of your pc.
Bonus Tip: Best iTunes DRM Removal Tool
Files on iTunes might not be played smoothly on some devices for its DRM protection. A professional DRM Removal tool is needed to tackle with the DRM issues and enable the playback of iTunes videos or audios.
Leawo Prof. DRM is designed for removing the DRM from iTunes videos (movies, TV show), iTunes music, Spotify music, Audible Audiobooks, eBooks, and convert them to popular DRM-free files. Talking about the music on Spotify, you are free to enjoy the music on it only when you have subscribed to it. In order to freely download music like happy background music from Spotify as MP3, we highly recommend to use the Spotify Remover.

-
Leawo Prof. DRM
- Convert iTunes DRM-protected M4V movie and TV show to DRM-Free MP4
- Remove DRM from M4B, AA, AAX files and convert any Audible AA, AAX file to MP3, even without iTunes authorization
- Convert iTunes DRM-Protected M4P and non-DRM iTunes M4A Music to MP3
- Remove DRM-protection on Spotify music and convert to Universal audio format for enjoying music offline on any devices
- Convert DRM-protected eBook from Kindle, Kobo, Adobe to DRM-free epub, mobi, azw3, txt, etc., format
The converted files with Leawo Prof. DRM will retain the quality of the original files up to 100% and the audio tracks and subtitles are retained completely as well. Moreover, the removal process is running at a speed of 50X faster than the averaged DRM removal tools.
The Leawo Prof. DRM consists of several modules with corresponding features to remove DRM from videos, eBooks, audible audiobooks and Spotify music. Here we take the removal of DRM from iTunes videos as an example to show how to remove the DRM from iTunes video and convert it into desired format.
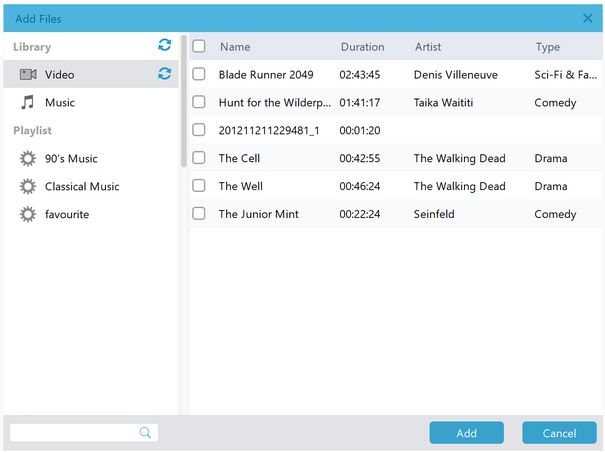
△Step 1: Add files from iTunes
After entering the main interface of Video&Music Converter, click the "Add Files" button to browse video files from iTunes and add them to the program. Or you can directly drag and drop the file into the program.
Not only can it be used as a tool for removing DRM from iTunes videos, removing DRM from iTunes music and adding iTunes music to Snapchat story are supported as well
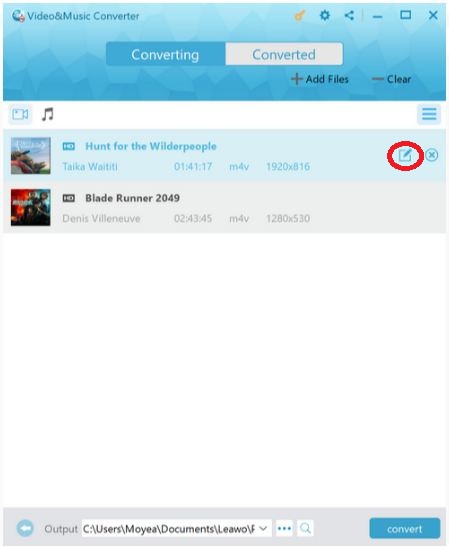
△Step 2: Edition before converting the video
After importing video files into the program, you can click the "edit" button to freely choose audio tracks and subtitles for keeping in the converted file.
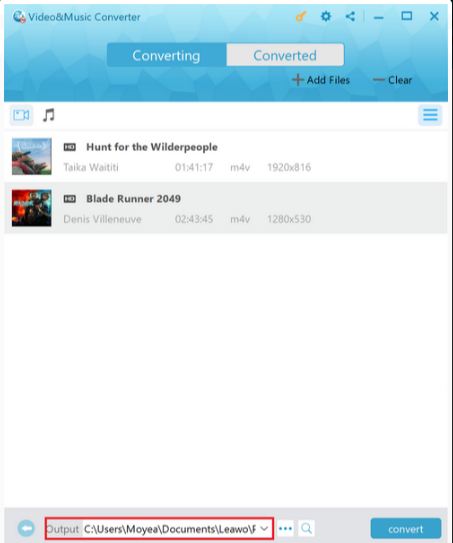
△Step 3: Set output directory
Right before the "Convert" button there is a box for setting output directory for the converted file. Click the icon with three dots to set it.
△Step 4: Start to remove DRM and convert it to MP4
After setting the output directory, click the "convert" button to start the removal process. The file being converted will be outputted as a MP4 format video which can be checked from the output directory you set in the previous step.

The Leawo Prof. DRM is a powerful DRM remover converts all the DRM-protection files in forms like video, audio, eBook, etc. With it you can freely enjoy music on Spotify which are protected with DRM, smoothly read eBooks on Kindle or Nook as well as download files from iTunes without being obstructed.
 Jul. 03, 2017 by


 Prof. Media
 Blu-ray Ripper
 Blu-ray Copy
 iOS Data Recovery
 [12/29/23] MAX Downloader V15.0.0
 10,000,000 people are using Leawo!
 All Transactions are protected!
 30-Day Money Back Guarantee!