DVD lovers always find that there are various audio tracks in the file folder. However, lots of people only need one of the audio track for watching the movie. Thus, the other audio tracks become unnecessary. When it comes to back up or compress DVD videos, many users would like to remove useless audio tracks to save space and time, which can also facilitate the streaming process to TV or portable devices quite a bit. Is there a way to remove audio tracks from DVD? Actually, the answer is “Yes”. There are various methods to get this problem solved. You can follow me to read the article to learn the detailed steps to make it.
Part 1: Remove audio tracks from DVD with HandBrake
HandBrake is a good tool for helping users to remove audio tracks from DVD, which can also convert video from nearly any format to a selection of modern, widely supported codecs. It is totally free and this open-source software is compatible with multiple platforms. It is famous in the world as one video transcoder with tremendous additional features including merging videos, extracting audio, and etc. Now let’s begin to see how it works to remove audio tracks from DVD.
- First, you need to download HandBrake and install it on your computer. Prepare your DVD files well.
- Fire up the software and then hit on the “File” or “Folder” button on the right side or directly drag and drop to import your DVD files with multiple audio tracks to HandBrake.
- Navigate to the “Format” tab to customize the output file format as MP4 or MKV according to your demand.
- Hit on the “Audio” tab in the middle menu bar to choose the audio track you desire to keep from the area of “Audio tracks”. You can also hit on the “x” icon on the right side to delete all audio tracks.
- The software also allows you to optionally transcode, convert bitrate/change quality, mixdown your DVD audio track if needed.
- Go to the box of “Save As” at the bottom of the screen to customize the output file folder for the converted files and then hit on the green button of “Start Encode” in the above for DVD remove audio track work.
Part 2: Remove audio tracks from DVD with DVD Shrink
For the issue of how to remove audio tracks from DVD, DVD Shrink is just for you to make use of. This software can be helpful in backing up DVD discs, which comes with built-in decryption algorithms. It allows users to re-author the DVD as well. The following instructions will show you how to use this free tool to tackle the problem and remove unnecessary audio tracks from DVD.
- Prepare your DVD files and DVD Shrink software on your computer for audio track remove.
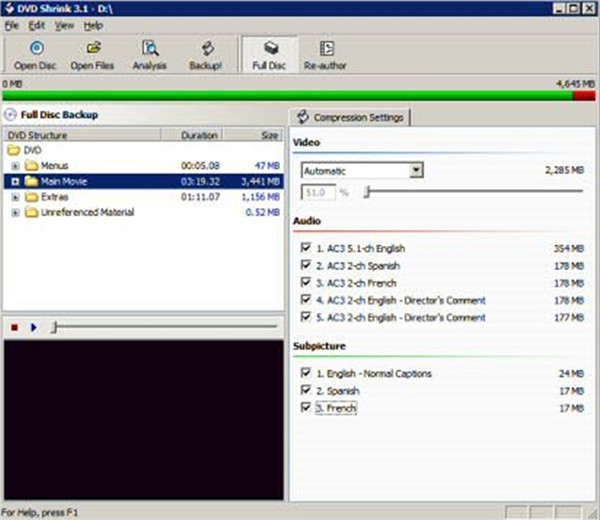
- Run DVD Shrink and click on “Open Disc” or “Open Files” button at the top to import your DVD files. The software will analyze your files automatically.
- After the analyzing is over, you need to choose the option of “Main Movie” to check.
- In the right part of the window, you can uncheck the audio tracks that you desire to remove. Make sure you have checked the one you desire to keep for your video.
- In the end, you can click on the button of “Backup” on the top and choose a directory to save the converted files. Click on “OK” button to invoke the process and wait for its completion.
Part 3: Remove audio tracks from DVD with DVD Decrypter
DVD Decrypter is also quite handy for you to deal with how to remove audio tracks from DVD. This tool can help you to rip DVDs to VOB videos and remove DVD protection as well. Follow the step by step DVD Decrypter guide below to learn how to use this program to get useless audio tracks removed easily.
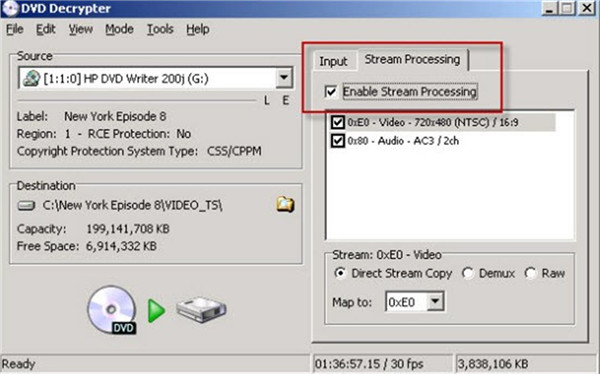
- First, download and install DVD Decrypter. Start the software and choose your DVD drive that has your DVD files from the source drop-down menu. Go to the “Destination” part to choose a place where you desire to store the ripped files by hitting on the little yellow icon. You need to select “IFO” under “Mode" menu at the top.
- Navigate to the tab of “Stream Processing” and choose “Enable Stream Processing” to check. After that, you can choose the audio and video track you desire to keep for your DVD.
- Go to the menu of “Tools > Settings> IFO Mode” to select “None” for File Splitting. Remember to hit “OK" to save your settings.
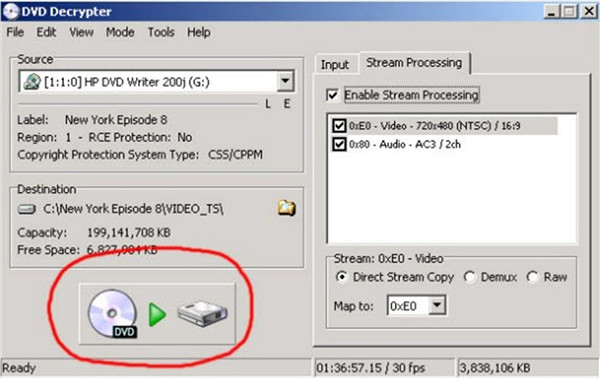
- Finally, you can click on the button of "DVD to Hard Drive" to enable the tool to do the ripping work. After the ripping is over, you can gain a converted VOB file without unwanted audio tracks.
Part 4. Remove audio tracks from DVD with Leawo DVD Ripper
Here I would like to recommend you one much more powerful and comprehensive tool to get unnecessary audio tracks removed from DVD. This tool is named “Leawo DVD Ripper”, which is known as one of the best and fastest DVD converter software tools with features to decrypt, rip and convert DVD to video and extract audio from DVD to save in all formats for any media player and device. It is able to rip and convert DVD movies to MP4, 4K MKV, HD MP4, HD AVI, MOV and many more. Qualified with advanced disc decrypting technology, Leawo DVD Ripper can decrypt, rip and convert DVD discs with AACS, BD+ and the latest MKB protection and CSS-DVD discs.
At the same time, users can take advantage of this tool to modify the output video and audio parameters like codec, bit rate, aspect ratio, frame rate, channel, and so forth. As for removing audio tracks, Leawo DVD Ripper enables you to choose which audio tracks to retain, and unchecked audio tracks will be removed simply. For unwanted subtitles, you can use Leawo DVD Ripper to get rid of as well. Download and install Leawo DVD Ripper on your computer. Then, check the steps below to see how to remove unwanted audio tracks from your DVD videos.
Note: Leawo DVD Ripper is a built-in module Leawo Prof. Media.
Step 1: Launch Leawo DV Ripper
Run Leawo Prof. Media and then click on the button of “Convert” on the sub-menu or “Blu-ray/DVD Ripper” button in the middle of the main screen to call out the interface of the “DVD Ripper” module.
Step 2: Load source DVD content
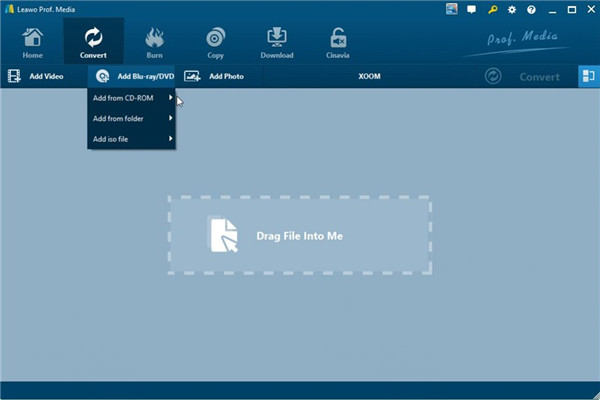
On the module of “Convert” and hit on the tab of “Add Blu-ray/DVD” to import source DVD disc, folder and/or ISO image file to the program.
Attention: Leawo DVD Ripper provides three options to import source DVD movie: Full Movie, Main Movie and Custom Mode. You can choose the mode that fits you most to load source DVD movies.
Step 3: Choose audio tracks to remove and keep
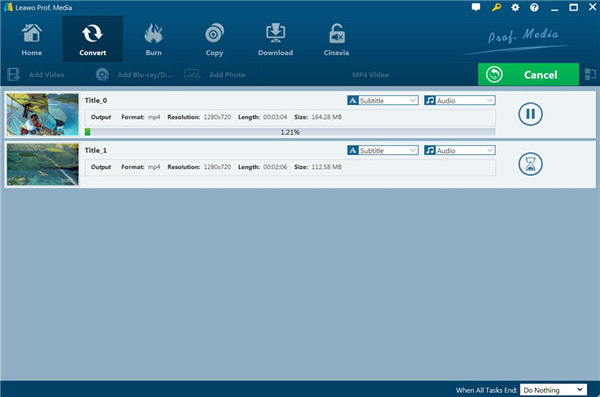
After your source DVD movies are loaded into the software, you can see the tabs of “Subtitle” and “Audio” at the right side of movie title. Hit on the drop-down box of “Audio” and then you can check the audio tracks you desire to keep and uncheck the ones you desire to delete for the output file.
Step 4: Determine output format
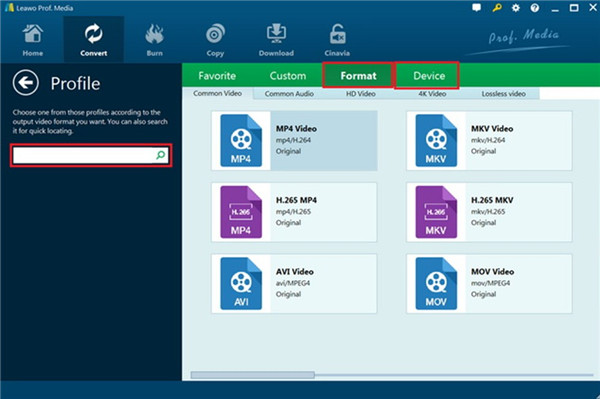
Click on the button next to the “Add Photo” button and then hit on the “Change” option to call out the “Profile” panel. Here you are able to select one output format from either “Format” or “Device” group based on your own preference.
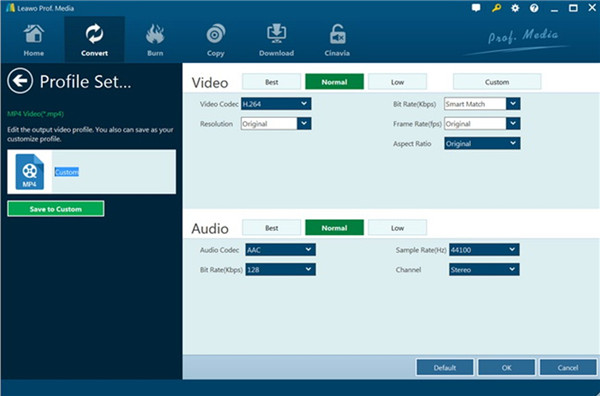
If you desire to make your output file more professional, you can adjust the output video and audio parameters like video bit rate, aspect ratio, frame rate, quality, audio codec, etc. by yourself easily. To make it, you need to hit on the “Edit” option on the drop-down box next to the button of “Add Photo”. It only takes you a few seconds to get the work done.
Step 5: Choose output directory and invoke conversion
Go back to hit on the green button of “Convert” in the main interface and then make use of the option of “Save to” to choose one place for the converting files. After that, you can click on the “Convert” option at the bottom of the side panel to begin to convert DVD files to videos without the audio tracks you desire to remove. Once the process is end, you can gain video files off DVD movies without your unwanted audio tracks.
Part 5. Comparison and Conclusion
After you learn how to use the four listed programs to remove unwanted audio tracks from DVD, you can continue to check the below comparison table to know the distinctions between these methods.
|
Features |
HandBrake |
DVD Shrink |
DVD Decrypter |
Leawo DVD Ripper |
|
Remove disc protection and region restriction |
No |
No |
No |
Yes |
|
Select angles |
No |
No |
No |
Yes |
|
Lossless output quality |
No |
No |
No |
Yes |
|
No |
No |
No |
Yes |
|
|
GPU acceleration |
No |
No |
No |
Yes |
|
1080P HD video output |
No |
No |
No |
Yes |
|
4K video output |
No |
No |
No |
Yes |
|
Take screenshots |
No |
No |
No |
Yes |
|
Conversion Speed |
Slow |
Slow |
Slow |
6X Faster |
|
Cost |
Free |
Free |
Free |
Paid |
|
Content loading modes |
Custom Mode |
Custom Mode |
Custom Mode |
3 modes: Full Movie, Main Movie and Custom Mode |
Simply you can see that Leawo DVD Ripper obviously offers more advanced features to allow you to enjoy better digital results. No matter what device or application you desire to use to watch the movies converted by Leawo DVD Ripper, you will surely be entertained to the most.


 Try for Free
 Try for Free


