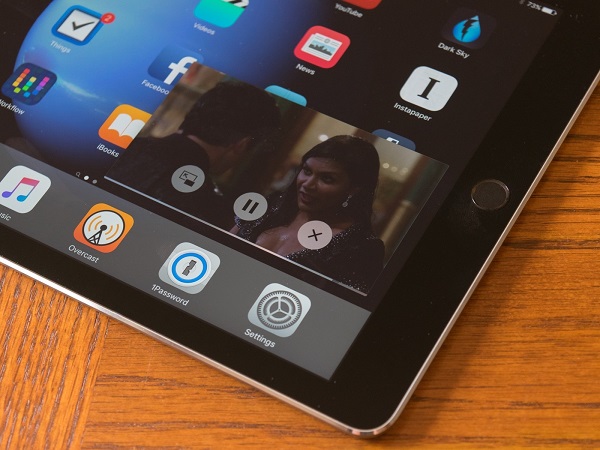
iPad Picture in Picture is a new kind of video mode on iPad which allows users to open a video player or Face Time when you are running other applications like Wechat. It's one of wonderful functions that Apple offers for its iPad users since iOS 9 was developed. Actually, People has long been looking forward to a multitasking window on iPad. Therefore, it is really a piece of good news for Apple fans to have Picture in Picture on iPad. Although Picture in Picture has been available on computers for a long time, someone still has no idea how to do Picture in Picture on iPad. For people who are not familiar with iPad Picture in Picture, please allow me to briefly introduce this guide.
Here I would like to introduce two approaches to do iPad picture in picture. Let's take a look at how to do Picture in Picture on iPad.
- Part 1: How to Enter Picture in Picture Mode from Face Time/Video Player
- Part 2: How to Enter Picture in Picture Mode from Playing Video Manually
- Part 3: How to Adjust Picture in Picture Window on iPad
- Part 4: How to Disable Picture in Picture Window on iPad
- Part 5: How to Back up iPad Pictures onto Computer with Leawo iTransfer
Part 1: How to Enter Picture in Picture Mode from Face Time/Video Player
If you don't know how to make Picture in Picture on iPad, you can try Face Time or any video player to access Picture in Picture Mode. Detailed steps on how to use iPad Picture in Picture are shown as below.
1. For how to use Picture in Picture on iPad, you first need to check if your iPad is in iOS 9 or later versions. Otherwise, your iPad doesn't support iPad Picture in Picture.
2. Open Face Time or a video player to pick up a movie to play in full size, then tap on the "Home" button to enter Picture in Picture mode. You will see your video be shrinked to the corner of the screen. Now you can fully enjoy playing games or something else.
Part 2: How to Enter Picture in Picture Mode from Playing Video Manually
As for how to use Picture in Picture on iPad, you can also resort to the method introduced below. It is quite simple and easy to operate. Let's see it step by step.
1. Open Safari or other browsers on your iPad to open and play a video.
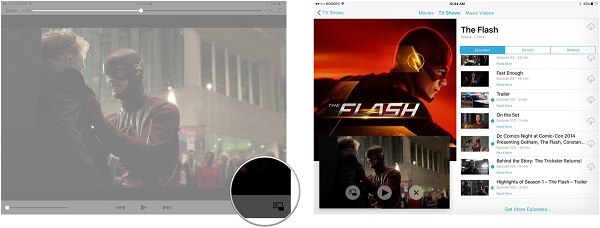
2. Tap on the screen and it will reveal the Play /Pause/ Volume controlling icons. Find the small icon that looks like a small box with an arrow inside at the bottom right corner of the video.
3. Tap on the icon, then the video will be shrinked to the corner of the screen. You learned how to Picture in Picture iPad.
Note: One thing you should pay attention to is that if you are playing a video from Safari, you must keep Safari window open.
Part 3: How to Adjust Picture in Picture Window on iPad
Now you know how to make Picture in Picture on iPad, do you know how to adjust Picture in Picture window on iPad? If not, check the following steps to learn how.
1. To reposition Picture in Picture window, you can:
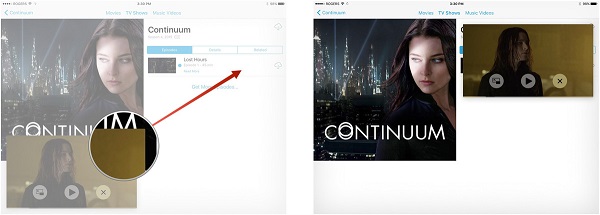
Step 1 Open a video, then use a finger to touch it.
Step 2 Drag the iPad Picture in Picture to any place you want.
2. To resize the window, you can follow these steps:
Step 1 Stretch your two fingers in the diagonal direction of the window to enlarge it.
Step 2 Pinch your fingers together to zoom out.
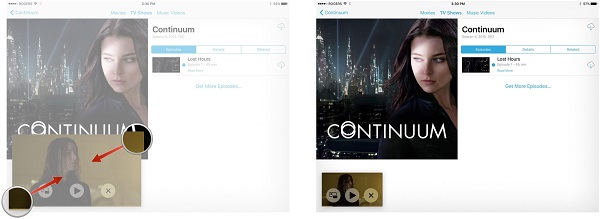
3. If you want to use the full screen on iPad for other applications but you want to hear the video voices, you can simply drag the Picture in Picture window to the edge of the screen. In this way, the Picture in Picture window will change to a small rectangle in the left side of the screen.
4. To recover it to the screen, simply drag it back to the iPad screen.
Part 4: How to Disable Picture in Picture Window on iPad
Sometimes, it is quite annoying when you want to do something else but the Picture in Picture video lingers on the screen. At this time, you need to disable Picture in Picture window on iPad. Please take a look at the following steps.
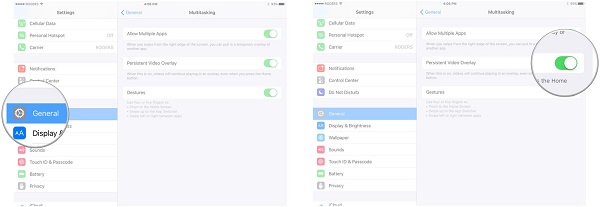
1. Run the Settings app on your iPad.
2. Tap on "General", then scroll down to locate and tap on "Multitasking".
3. Turn off "Persistent Video Overlay".
To re-enable the function, you can simply toggle "Persistent Video Overlay" on. Isn't it easy to learn how to do Picture in Picture iPad?
Part 5: How to Back up iPad Pictures onto Computer with Leawo iTransfer
The above has introduced how to use Picture in Picture on iPad, what if iPad picture lose due to some accident? Under this circumstance, we need to back up iPad pictures onto computer. Leawo iTransfer is a professional and easy-to-use transferring tool which is able to transfer iPhone/iPad/iPod data like music, video, movies, ringtones, photos and even apps between Apple electronic devices, computers and iTunes. Usually, pictures on your iPad can be divided into two kinds: picture from iPad camera and picture from websites. If you want to transfer iPad pictures to your computer, you can read detailed steps as below:

Leawo iTransfer
☉ Transfer files among iOS devices, iTunes and PCs with ease.
☉ Transfer up to 14 kinds of data and files without iTunes.
☉ Support the latest iOS devices like iPhone 7, iPhone 7 Plus, etc.
☉ Play back, view, and delete data and files on iOS devices.
1. Launch Leawo iTransfer
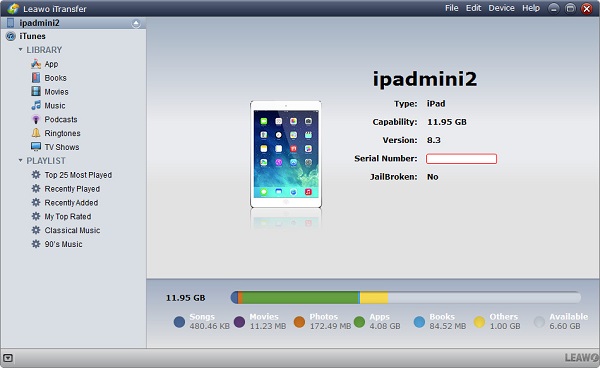
Download and install Leawo iTransfer on your computer, then launch it. Connect your iPad to computer via USB cable. The software will automatically detect your iPad and show iPhone library in the left sidebar.
2. Select pictures
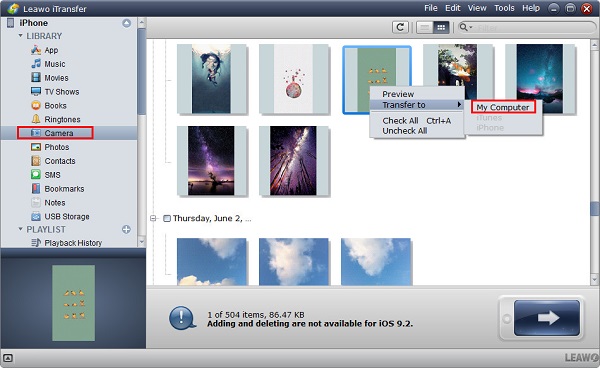
Navigate to "iPhone > LIBRARY > Camera/Photos", then pictures on iPhone will appear. Choose photos you want to transfer and click the transfer button( the blue arrow in the bottom right). Or simply right click the selected pictures to choose "Transfer to>My computer".
3. Choose a target output directory
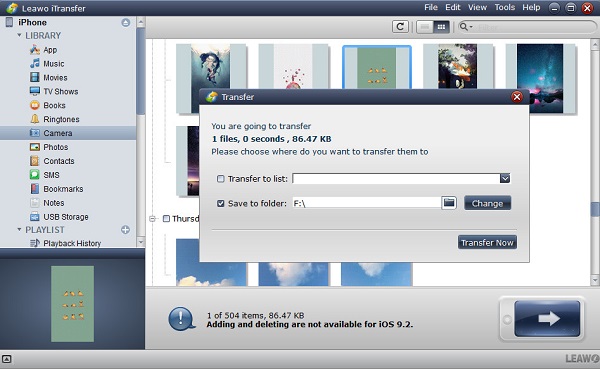
A dialog will jump out and you can choose a target folder where you want to save pictures, then click "Transfer now" to transfer pictures from iPad to computer. After a couple of seconds, the pictures could be successfully backed up onto computer.

