Last updated on 2021-09-07, by
How to Encode HEVC/H.265 with HandBrake?
“What is the best settings to encode HEVC in HandBrake? I have some files and I would like to encode HEVC with HandBrake. But there seems to be only preset ones. Can you please tell me the best settings to encode HEVC in HandBrake and how to encode HEVC/H.265 within HandBrake? Much appreciated.”
As one of the most popular and practical video encoding software tools, HandBrake has played a very important role and gained quite big market share in video encoding. It’s a little bit complicated to encode HEVC/H.265 within HandBrake. But it’s totally free and stable. The more important thing is that HandBrake offers HEVC/H.265 encoding, which ensures high quality movie encoding and enjoyment. However, quite a lot of people are wondering about how to encode HEVC/H.265 with HandBrake. Well, if you happen to have such kind of problems, this guide would be helpful to you. We will talk about HandBrake HEVC/H.265 encoding in detail for you. Just check the content below to learn more.
Part 1: Best Settings to Encode HEVC in Handbrake
Before we know how to encode HEVC in HandBrake, we may firstly need to know what are the best settings of HandBrake HEVC/H.265 encoding. Actually, this includes 2 main factors: encoding and video quality.
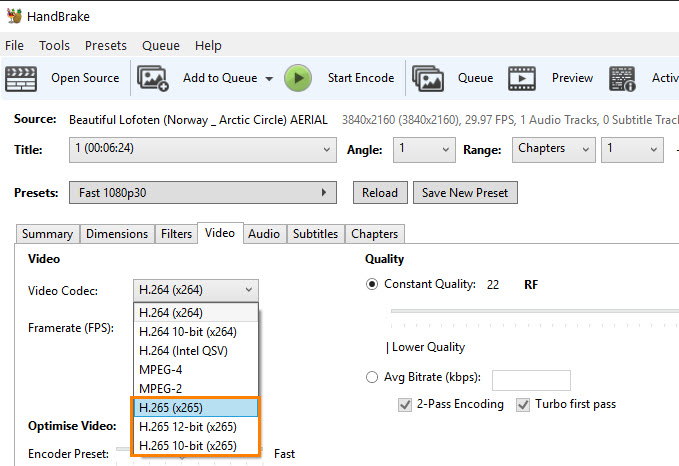
To encode HEVC within HandBrake, of course the best setting is to choose HEVC encoder. Traditionally, HandBrake adopts x265 as the HEVC encoder for HEVC and HEVC 10-bit/12-bit to achieve an efficient encoding process. In the latest 1.2.0, HandBrake adopts NVIDIA NVENC to get a faster HEVC encoding speed. Either of the encoders can be enabled. But if your computer doesn't have NVIDIA graphic cards, x265 will be the only selection.
HandBrake provides quite a few default settings and most of the official Presets use a constant quality encoding method. This makes your new video look consistent from start to finish. Always use constant quality unless you have a specific reason not to. If you want to encode HEVC within HandBrake, you could so some manual adjusting by adjusting the RF control values so as to adjust quality. HandBrake recommends some RF settings for HEVC encoders. BYW, improper RF value will cause Handbrake larger output file than original, or extremely slow video encoding. Recommended settings for x264 and x265 encoders are as follow:
- - RF 18-22 for 480p/576p Standard Definition1
- - RF 19-23 for 720p High Definition2
- - RF 20-24 for 1080p Full High Definition3
- - RF 22-28 for 2160p 4K Ultra High Definition4
You could adjust the RF values according to your own needs. Generally speaking, higher RF value leads to better quality but larger file size while lower value results in opposite result.
Part 2: How to Encode HEVC/H.265 with HandBrake?
The below steps would show you how to encode HEV/H.265 with HandBrake in detail.
- Download and install the latest HandBrake version on your computer. Then launch it. Here we would like to show you how to encode H.264 video in MP4 to H.265 in MKV so as to let you include as many subtitles as you can as an example.
- Input the file you want to be transcoded by clicking the large Source button and then File (clicking Folder allows you to easily set up batch encodes). Then set a destination by browsing to whatever folder you desire.
- Under the Picture tab, set Anamorphic mode to strict. Also check to make sure the automatic cropping feature has detected the correct settings. Sometimes it will erroneously crop out a few pixels on any side, but you can address this by switching to custom with 0 set in every location box
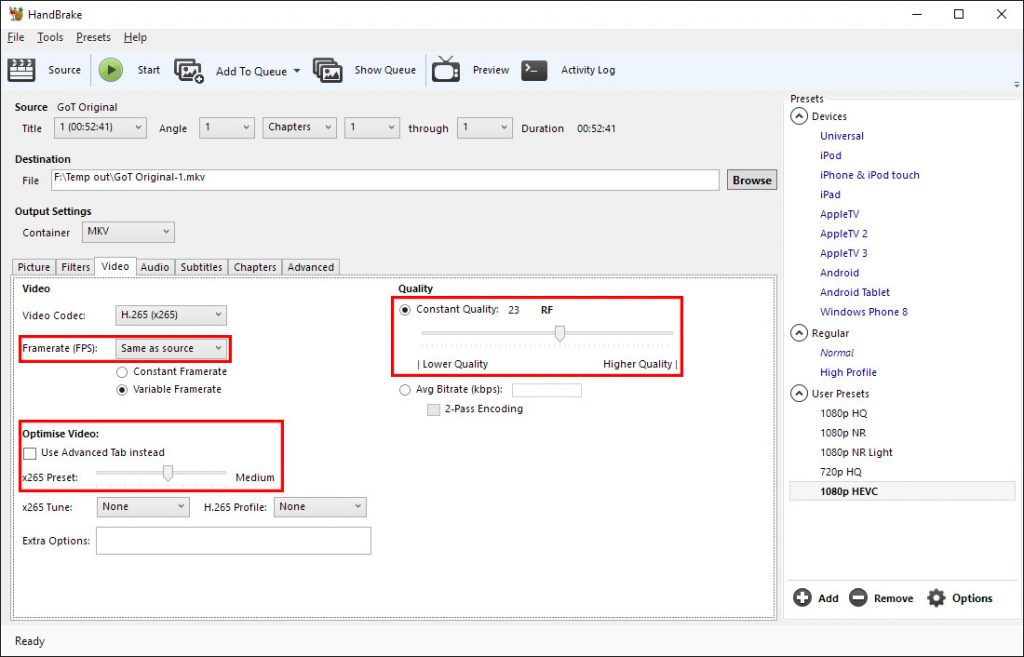
- In the Video tab you’ll want to select some specific settings. Make sure framerate is set to ‘same as source’ and that the ‘Use advanced video tab instead’ box is unchecked. Then, select an x265 preset of Medium by adjusting the slider down from the default Ultrafast setting. Setting it higher will result in a larger file and faster encodes, and setting lower will reduce the file size at the expense of significant longer encode times.
- As for quality, set this to Constant Quality with a value of 23 for 1080p videos, and slightly higher (22) for 720p videos (as mentioned above, according to your own needs). Switching this value closer to 0 gives better quality and higher bitrates, while moving it the other way has a negative effect on quality and delivers smaller files. 23 is a wonderful balance between video file size and video quality. For details, please read “How to Solve Handbrake Blu-ray to Video Output File Size Larger Than Original” .
- On the Audio tab you’ll want to change the codec to HE-AAC (FDK), the bitrate to 256, and the mixdown to 5.1 channels.
- Under the “Subtitles” tab, embed any subtitles you want. You could then save all these settings as custom for future use.
- Finally, set an output directory and then click the “Start” button to start encoding HEVC/H.265 within HandBrake.
Part 3: The Deficiencies of Handbrake HEVC Encoding
Obviously, for novices, it’s a little bit complicated to learn how to encode HEVC/H.265 within HandBrake. Even some veteran might get confused since there are too many settings to complete. As to the user experience, HandBrake is not quite user friendly.
Meanwhile, as mentioned above, HandBrake will sometimes result in larger in output file size and lower in output file quality. This happens due to the improper settings of encoding and video quality. Although HandBrake has worked to improve quality and speed for several years, problems still exist. HEVC encoding is a CPU-intensive task, which may result in jaggy performance if running on an under-powered computer. HandBrake utilizes NVIDIA NVENC to accelerate HEVC encoding and relieve CPU loads leading to a smoother performance. However, hardware-accelerated encoding sometimes possibly compromises quality.
What’s more, we know that HandBrake alone doesn’t process encrypted Blu-ray/DVD content. You have to install decrypting tools like libdvdcss for HandBrake before you can encode HEVC/H.265 within HandBrake. That’s inconvenient either.
Part 4: Best HEVC/H.265 Encoder - Leawo Prof. Media
Other than HandBrake, you still have other choices to encode HEVC/H.265 with HandBrake alternatives. Leawo Prof. Media is the best HandBrake alternative that could help you encode media files to videos and audios in 200+ formats like DVD to MP4, DVD to AAC, DVD to MOV, DVD to MP3, etc. in different codecs, like H.264, H.265, MPEG, etc. Similar to HandBrake, Leawo Prof. Media also process both Blu-ray/DVD and videos.
But stronger than HandBrake, Leawo Prof. Media also processes both Blu-ray/DVD and videos. But stronger than HandBrake, Leawo Prof. Media itself has the ability to decrypt disc protections upon Blu-ray/DVD movies and enables you handle both copy-protected and non-protected Blu-ray/DVD movies, and support more output video file formats for encoding Blu-ray/DVD/video with H.265. It even allows you to adjust the video and audio parameters of output profile like video codec, bit rate, aspect ratio, audio codec, channel, sample rate, etc. You could adjust these parameters to control the output file size and quality easily. What’s more, Leawo Prof. Media could even let you get lossless multi-track MP4/MKV files, which will keep all or desired subtitles and audio tracks.
Download and install Leawo Prof. Media and then follow the below steps to learn how to encode media files with HEVC/H.265 with this HandBrake alternative.
Step 1. Get into Leawo Prof. Media
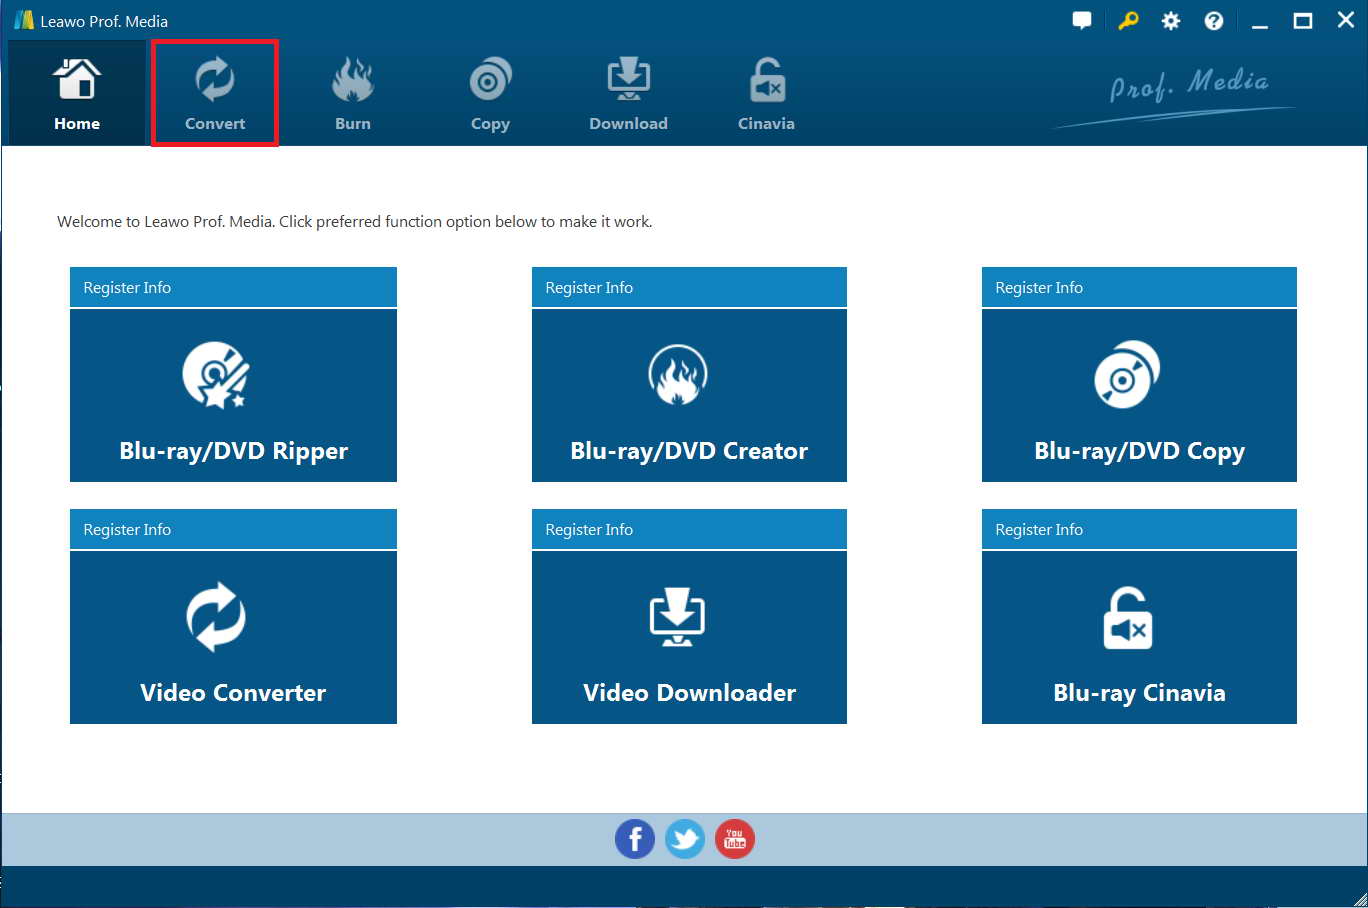
Start Leawo Prof. Media and open the “Convert” module on the menu bar.
Step 2. Add source DVD movie
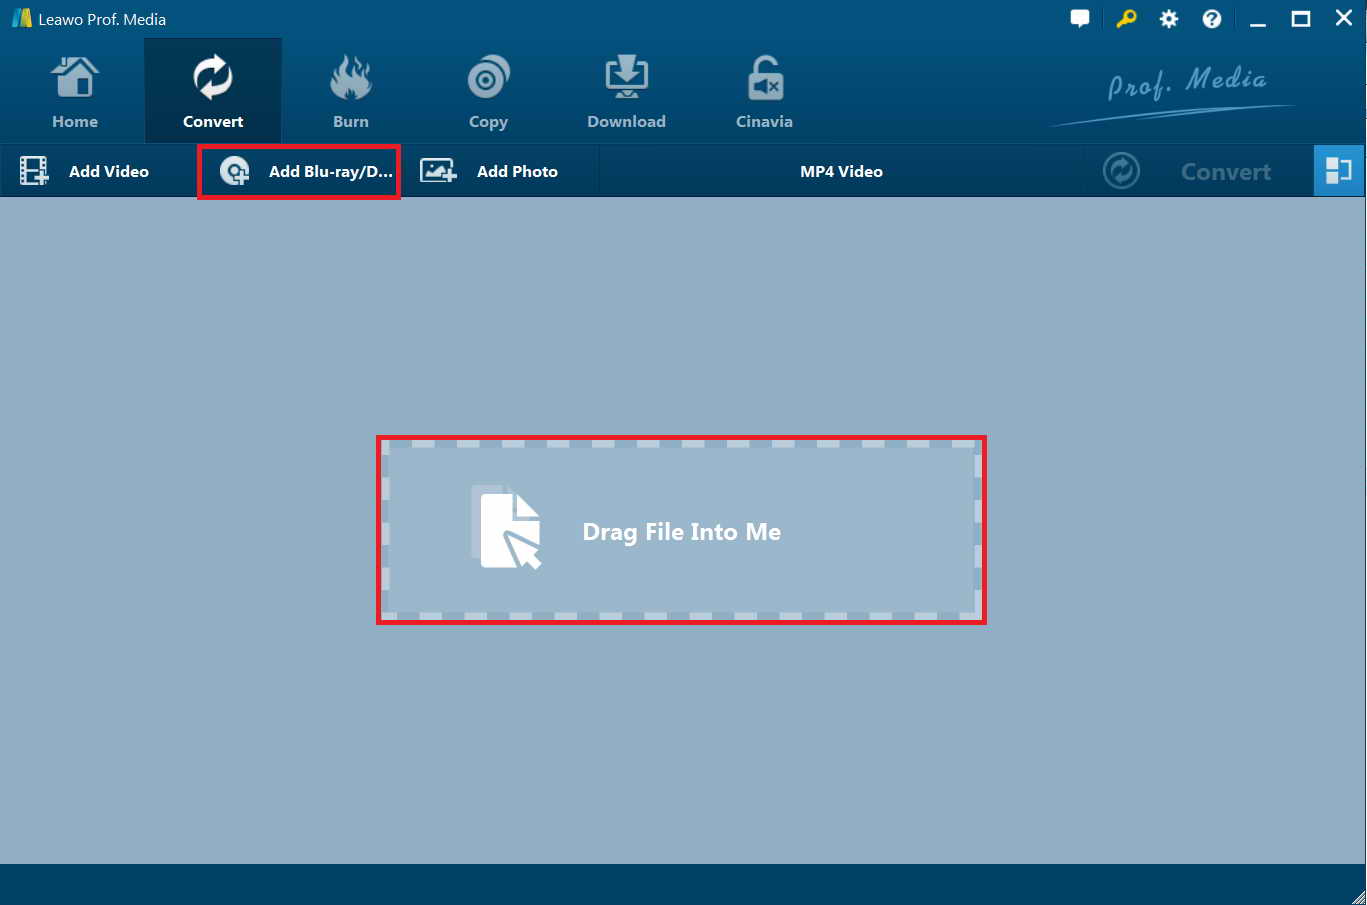
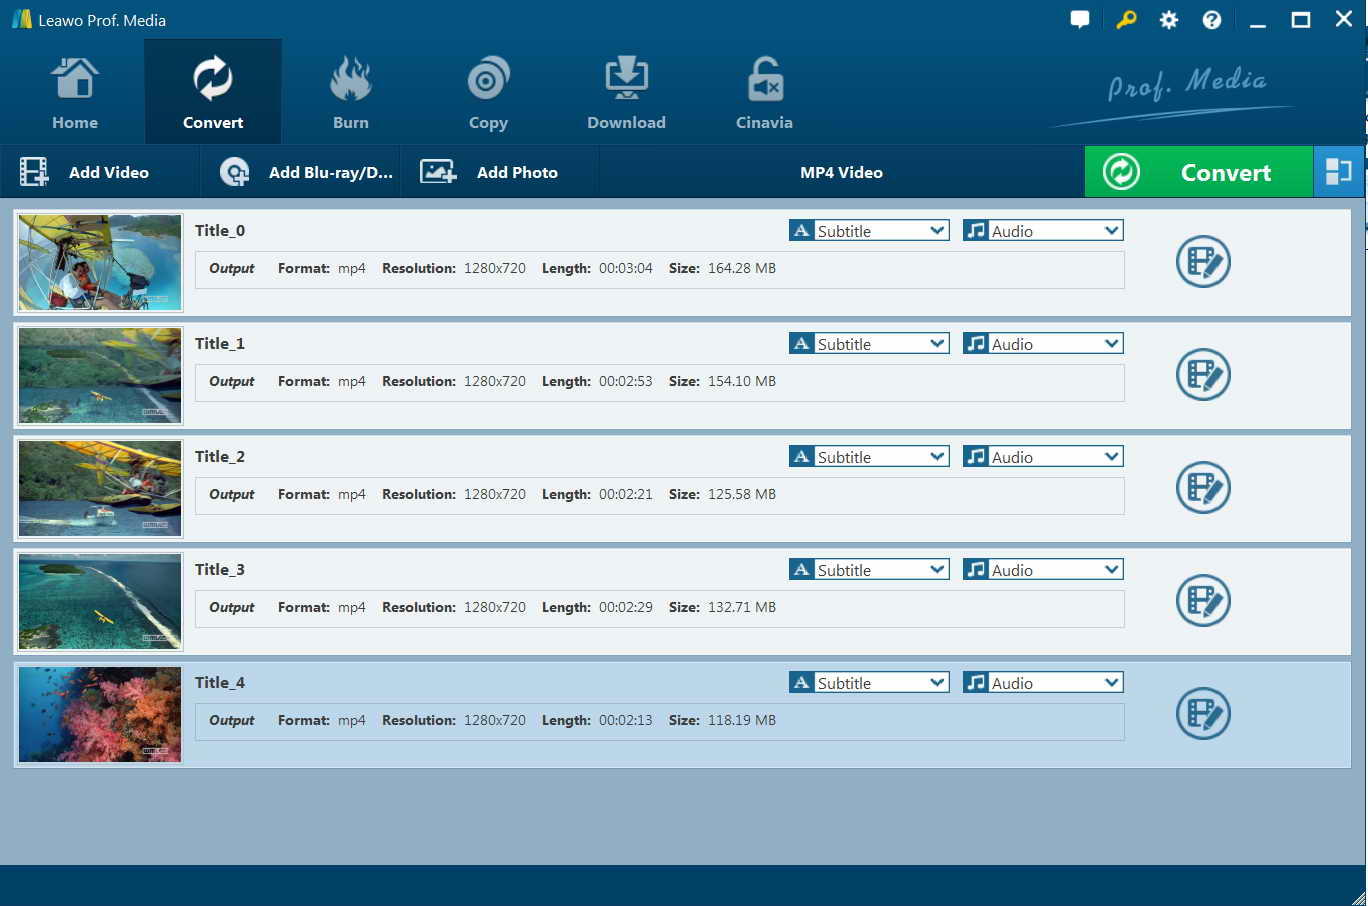
On the “Convert” module, click the “Add Blu-ray/DVD” button to add source Blu-ray/DVD movies from disc drive or computer folder, or click the “Add Video” button to add source video files for encoding with HEVC/H.265.
Note: If you are loading Blu-ray/DVD movies for output encoding with H.265/HEVC, 3 content loading modes are available: Full Movie (loading all content from source DVD), Main Movie (loading the longest title by default, which is generally the main movie, but allowing for changing) and Custom Mode (loading titles you would like to convert). Choose one according to your actual needs.
Step 3: Set output profile
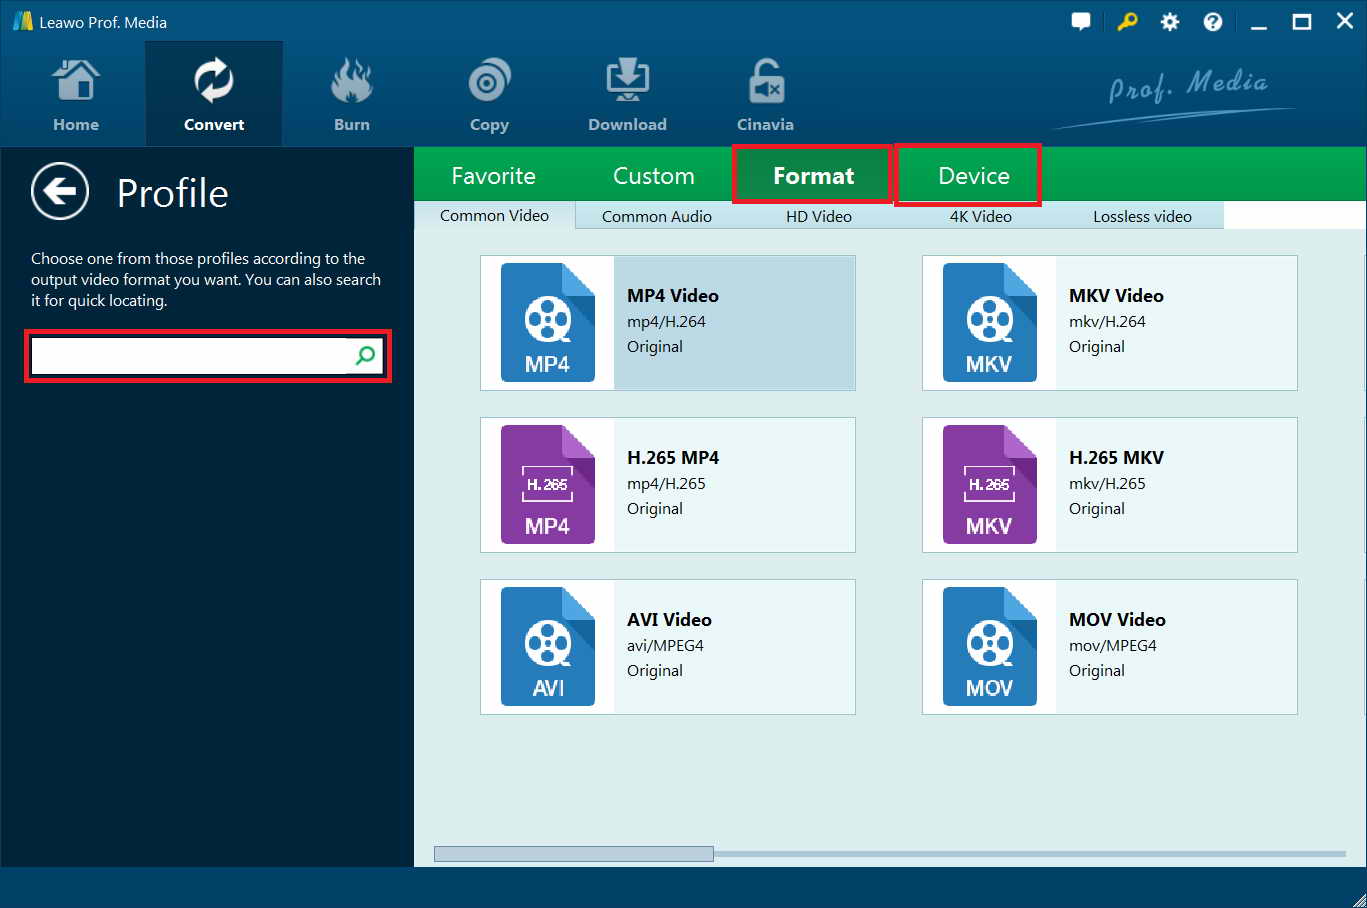
Click the box right next to the “Add Photo” button and then on the drop-down panel choose “Change” option to enter the Profile panel, where you could freely choose output profile from “Format” and “Device” groups as you like. You get more profile choices other than MP4 and MKV offered by HandBrake. We would like to recommend H. 265 MP4, or H.265 MKV from “Format > Common Video”.
Step 4: Specify bit rate and quality
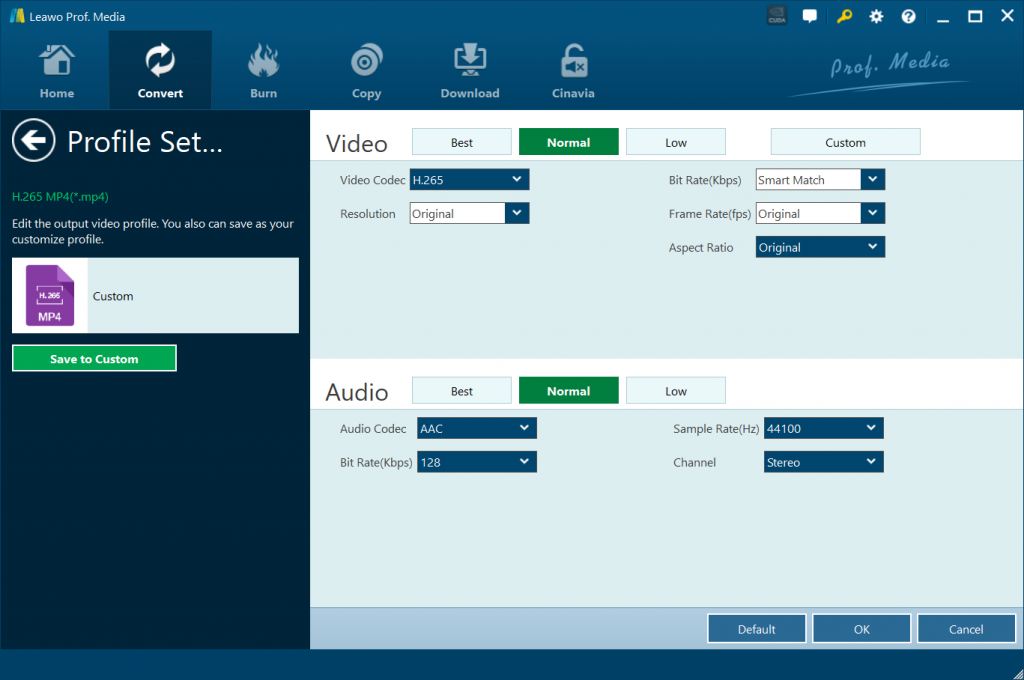
As mentioned above, Leawo Prof. Media enables you to adjust video and audio parameters of selected output format. You could choose video quality from High, Normal and Low, Video Codec, Bit Rate, Frame rate, resolution, etc. You need to click the “Edit” option on the drop-down panel next to the “Add Photo” button, and then choose “H.265” from the Video Codec and adjust output video quality from High, Media and Low.
Step 5: Set output directory
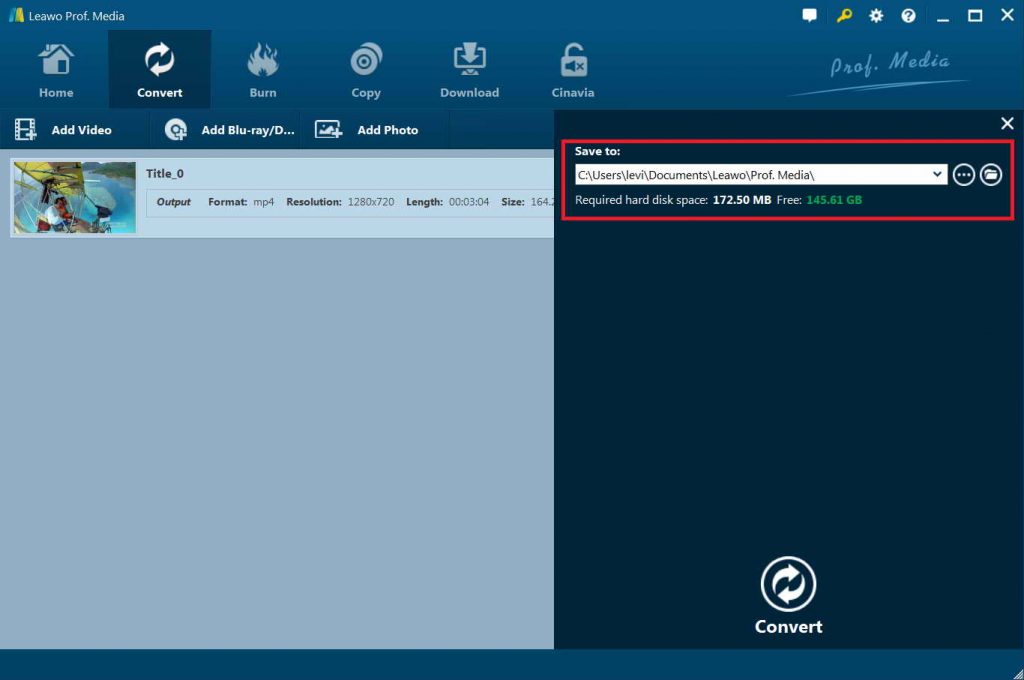
After setting output format, you could now click the big green “Convert” button. Then, on the popup sidebar on the right, set output directory in the “Save to” box. You could see required storage here.
Finally, click the grey “Convert” button to start to encode HEVC/H.265 within HandBrake alternative. Then you only need to wait for the conversion to complete.
Conclusion
HandBrake is a wonderful tool to help you encode HEVC/H.265 files without cost. But you could easily tell that it’s a little bit complicated to achieve. As an alternative to HandBrake, Leawo Prof. Media performs quite well in encoding HEVC/H.265, and provides more useful functions.


 Try for Free
 Try for Free

