Last updated on 2021-09-08, by
How to Edit MOV Video with Avidemux and Other Video Editors
As a free, open source, cross-platform video editor for Microsoft Windows, Linux, Mac OS X, and BSD, Avidemux is a powerful video editor program written in C++, and was designed for simple cutting, filtering and encoding tasks. When people need to do some simple video editing or customizing operations, Avidemux is easily one of the go-to choices for them However, the freeware nature of the video editor program means that you can’t expect a perfect and professional video processing function from Avidemux. For many users who have never used anything like Avidemux, the program could be a little bit confusing, especially when they are dealing with video formats like MOV. If you are wondering how to edit an MOV video with Avidemux, and if you are wondering whether there is any better programs you can use to edit your MOV video, then keep reading because you will get all the answers you want to know in today’s article.
Part 1: How to Edit MOV Video using Avidemux
Avidemux supports many file types, including not only MOV, but also AVI, DVD compatible MPEG files, MP4 and ASF, using a variety of codecs. Tasks can be automated using projects, job queue and powerful scripting capabilities. The lightweight and neat utility features of the program allow users to trim a video, filter it or join it with another video conveniently. The sketchy and easily-to-use interface of the program makes it more appealing to more users. Also, the supply of useful presets for the output files is another merit that really makes it stand out among the other video editors.
Now let’s have a closer look at how to edit your MOV videos with Avidemux. First off, let’s see how to cut MOV video using Avidemux.
Cut MOV video with Avidemux
Step 1. Launch the Avidemux on your computer, and click on File->Open on the left side of the menu bar in the interface of the program.
Step 2. Choose the MOV video that you want to cut to add it to the program.
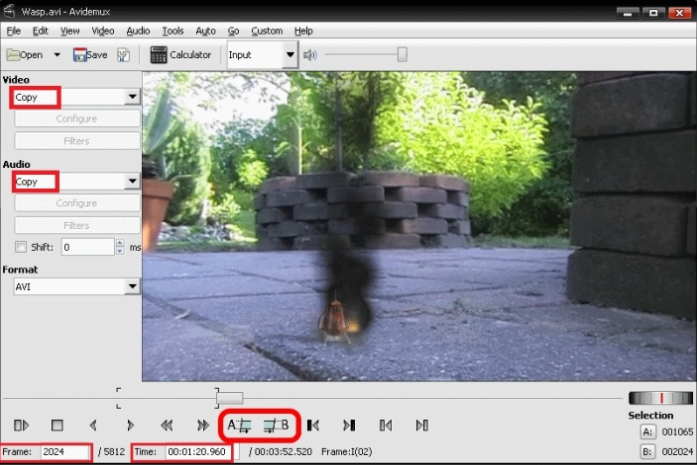
Step 3. Set the video and audio codec in the Copy drop-down menu.
Step 4. Drag the slide bar on the bottom of the interface to navigate through the video, and click on A and B buttons to determine the start point and the end point of the output file respectively. Also, you can enter the exact frame number or millisecond to determine the start point and the end point of the video.
Step 5. Click on Output in the middle of the sub-menu bar to preview the MOV file in Avidemux. Then, Click on File->Save->Save video on the menu bar and save the MOV video in Avidemux with a file name appended with an extension .MOV.
Crop MOV video with Avidemux
Step 1. Launch the Avidemux on your computer, and click on File->Open on the left side of the menu bar in the interface of the program, then choose the MOV file you need to add to the program.
Step 2. Choose the video and audio codec you need by clicking the Copy label under video and audio labels.
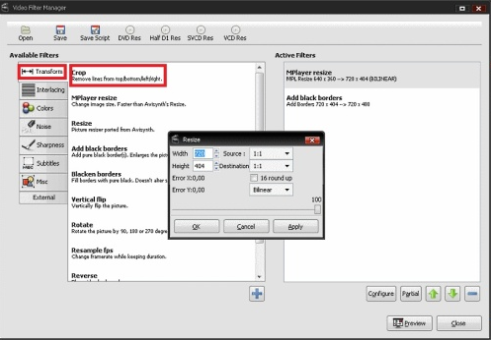
Step 3. Click on the Filter button below the video codec, and a Video Filter Manager will pop up automatically with a menu of the available filters. Click on Transform tab and click on the Crop option.
Step 4. Determine the border of area to be cropped by dragging the slider or entering values in Crop right, Crop left, Crop top and Crop bottom respectively, and the cropped area will be indicated in light green in a video previewer.
Step 5. Click on File->Save->Save video on the menu bar to save the Avidemux MOV with an extension .MOV.
Join MOV video with Avidemux
Step 1. Launch the Avidemux on your computer, and click on File->Open on the left side of the menu bar in the interface of the program to import the first MOV video to be joined.
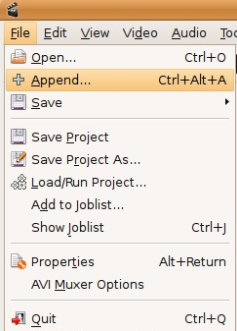
Step 2. Click on File->Append on the left side of the menu bar to choose the second MOV video to be joined.
Step 3. Repeat Step 2 again and again for any other MOV videos to be merged.
Step 4. Click on File->Save->Save video on the menu bar to save the Avidemux MOV, and don’t forget about the extension .MOV when entering the file name.
Rotate MOV video with Avidemux
Step 1. Launch the Avidemux on your PC, and click on File->Open on the left side of the menu bar in the interface of the program to import the first MOV video to be rotated.
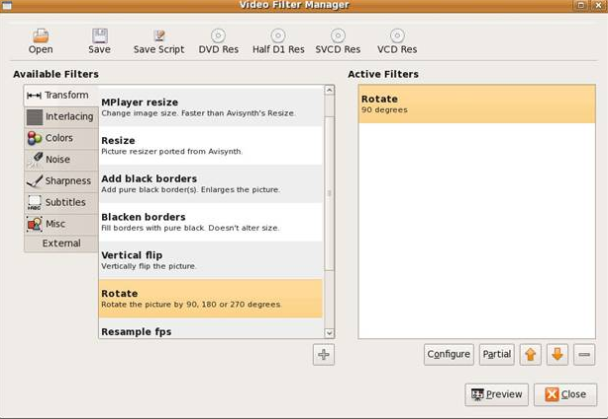
Step 2. Click on the Filter button below the video codec, and a Video Filter Manager will pop up automatically with a menu of the available filters. Click on Transform tab and double click on the Rotation option.
Step 3. Open the Rotate pull-down list and select the appropriate angle (90 Degrees, 180 Degrees, or 270 Degrees) for your video.
Step 4. Click on File->Save->Save video on the menu bar to save the Avidemux video, and don’t forget about the extension .MOV when entering the file name.
Part 2: How to Edit MOV Video using Leawo Video Converter
As you can see, Avidemux can provide a lot of simple functions for you to edit your MOV video. However, although it can edit your MOV videos with ease, it’s not the best choice for editing your MOV videos. If you are looking for a promising solution to edit your video, then Leawo Video Converter is definitely a better idea than Avidemux. As a professional video converter and editor program, Leawo Video Converter provides not only all the basic video editing functions that Avidemux can provide, it also comes with advanced video and audio processing abilities like removing background noise and converting 2D videos to 3D. In addition, Leawo Video Converter also allows you to convert MOV to iPad or any other devices so that you can freely enjoy your videos no matter where you are. Now let’s see how to edit MOV using Leawo Video Converter.
Step 1: Download Leawo Video Converter and install it on your computer.
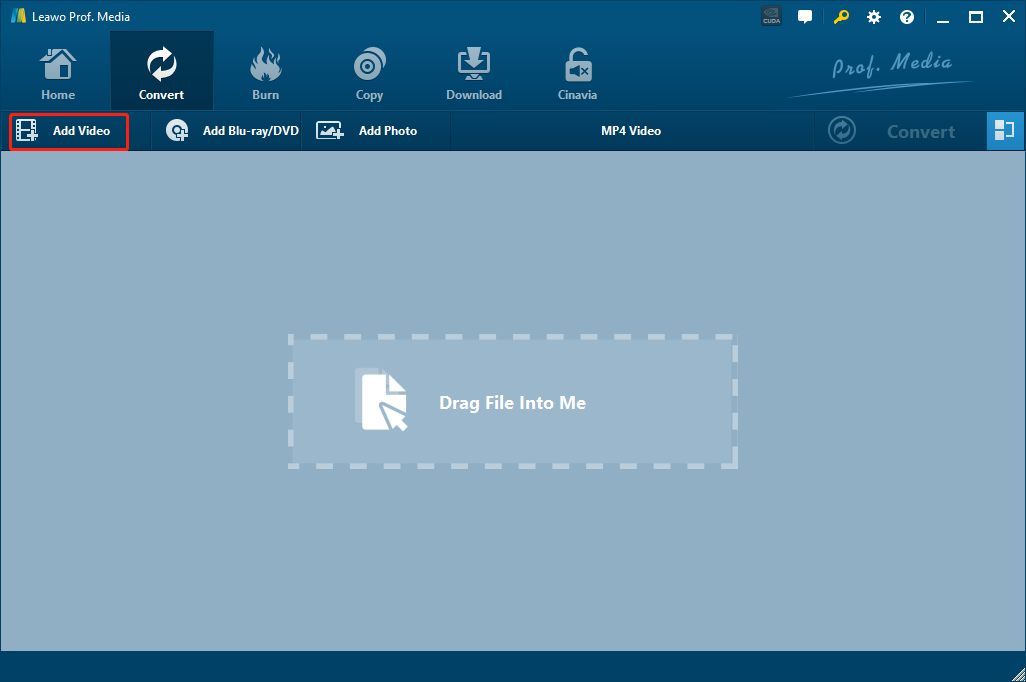
Step 2: Launch the program, and click “Add Video” to import your MOV video into the program.
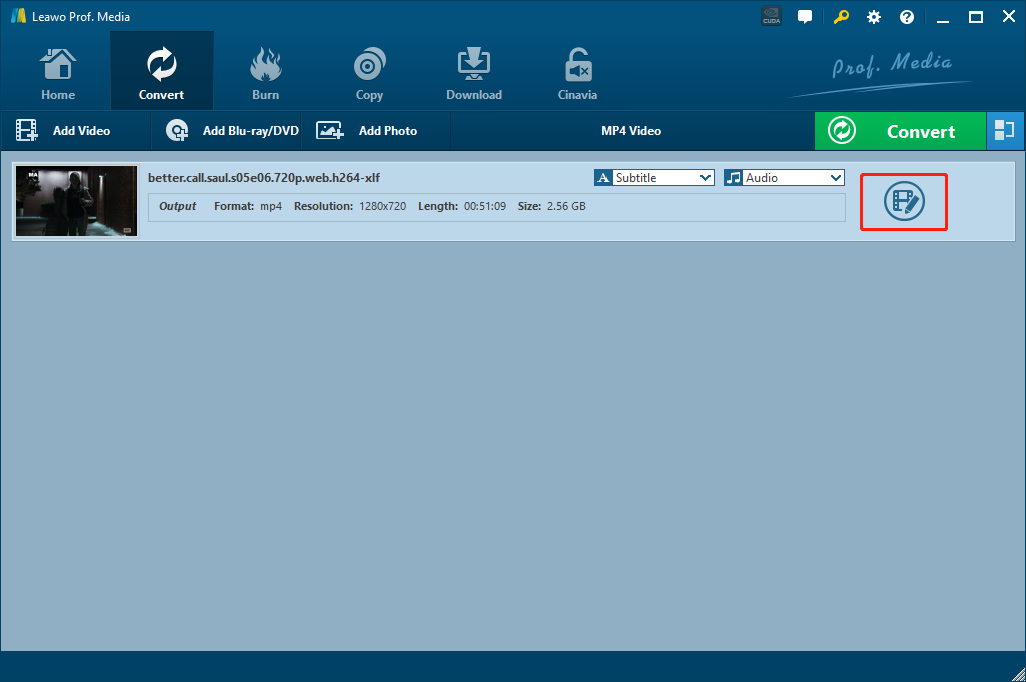
Step 3: Once your MOV video has been imported, you can click the “Edit” icon on the video to enter the video editor module.
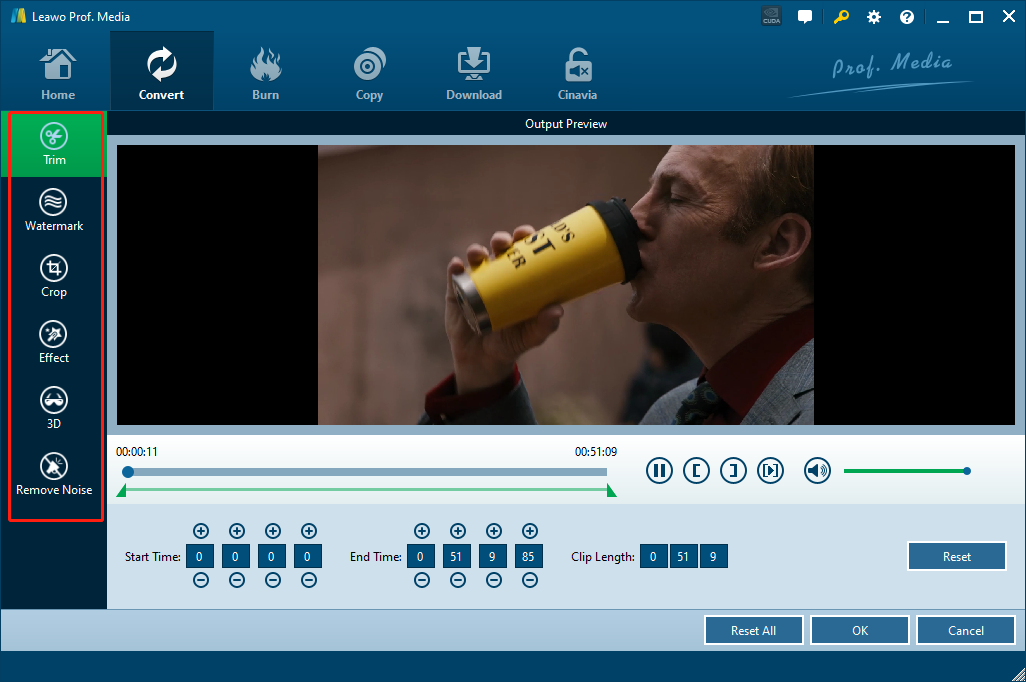
Step 4: On the video editor module, you can see all the available video editing options are listed on the left. You can click on any of the options and adjust the parameters from the window on the right. You can preview the adjusted vide in real time from the preview window.
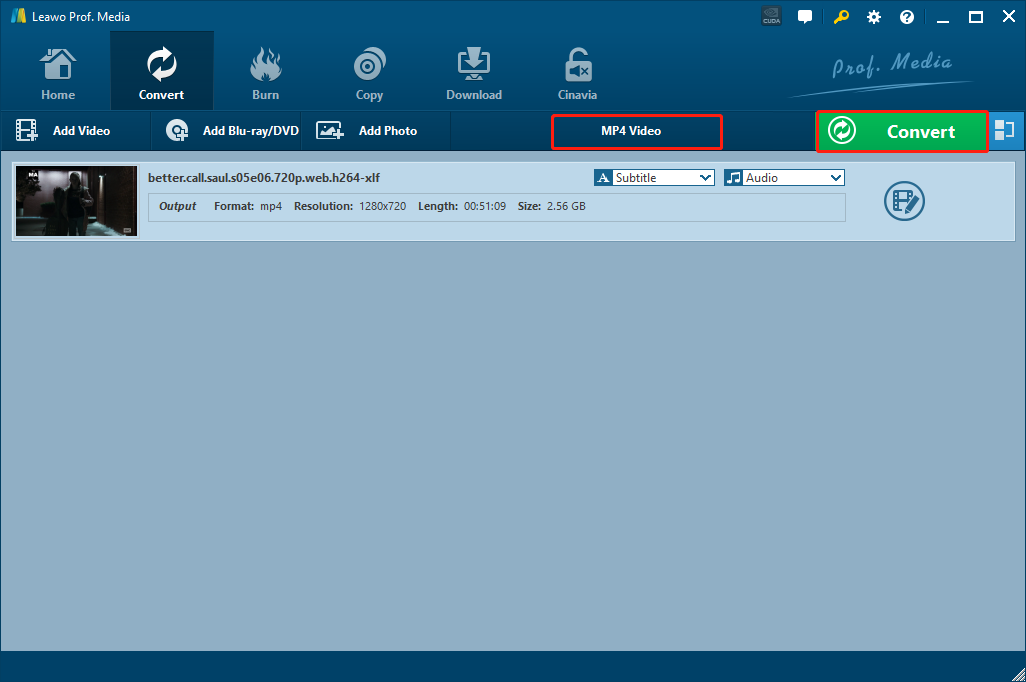
Step 5: After editing the video, click “OK” to confirm, and you will be brought back to the main interface. Now you can click on the “MP4 video” area to change an output format, or directly click the “Convert” button to start outputting your edited video.
Part 3: How to Edit MOV Video using Windows Movie Maker
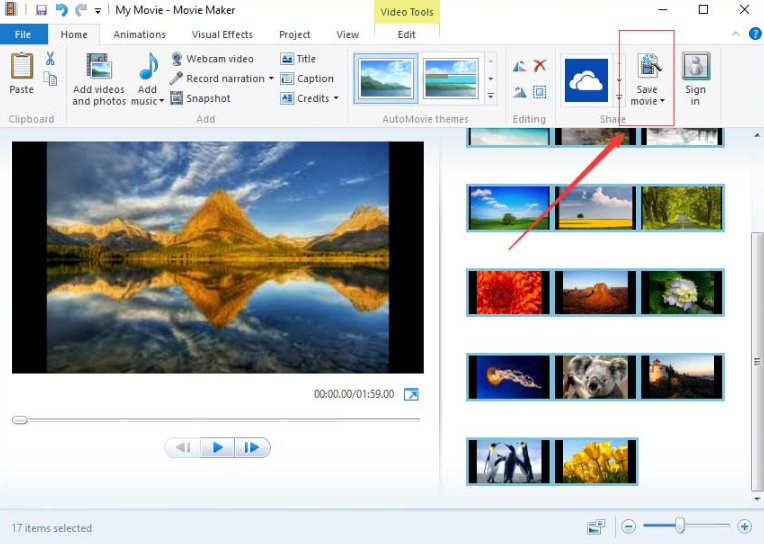
Windows Movie Maker is a pre-installed video editor on Windows system. With Windows Movie Maker, you can easily do some simple editing tasks to your MOV video file without having to download another third-party video editing tool. If you want to use Windows Movie Maker to edit your MOV video, here is what you need to do:
Step 1: Launch Windows Movie Maker then drag and drop your MOV video into the program interface.
Step 2: After importing the video, you can see there are different tabs like “Animations”, “Visual Effects” and “Edit” at the top of the program. Click a tab and you will see detailed options below.
Step 3: Once you have done editing the video, click the “Save movie” button, choose an output format and output your final work.
Part 4: How to Edit MOV Video using OpenShot
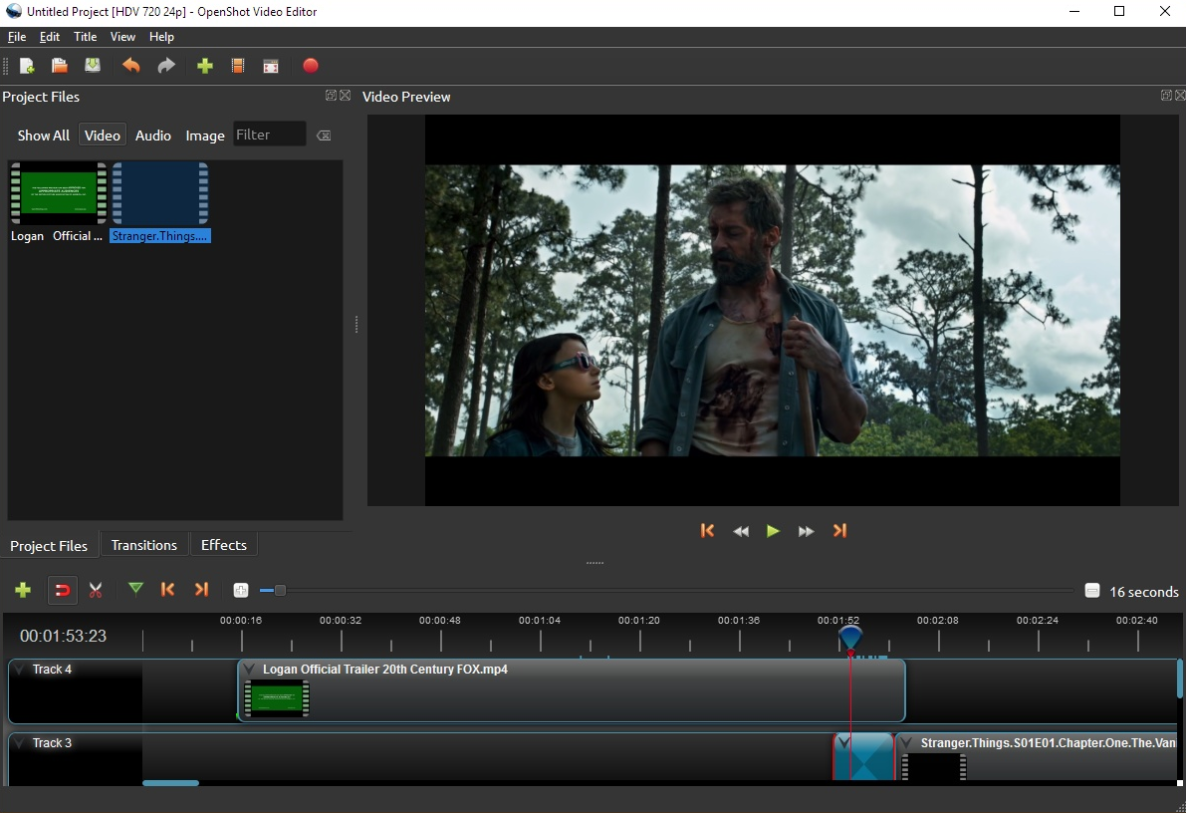
Comparing to Windows Movie Maker, OpenShot is much more professional and much more complicated. In Openshot, you can have a video timeline so that you can easily merge, cut or overlay your video clips. Of course, there are also advanced functions like transitions and special effects provided in the program, but for basic video editing operations, you can easily get a satisfying result by following the guide below:
Step 1: Launch OpenShot. To import your source MOV, you can directly drag and drop the video into the “Project Files” section.
Step 2: Drag your imported MOV into one track in the timeline, and then you can adjust the length of the video by dragging any end of the clip. You can also apply adjustments on the clip when it’s in the timeline section.
Step 3: After finishing editing, click “File”, then “Output” to save your edited MOV video.
Part 5: How to Edit MOV Video using Kdenlive
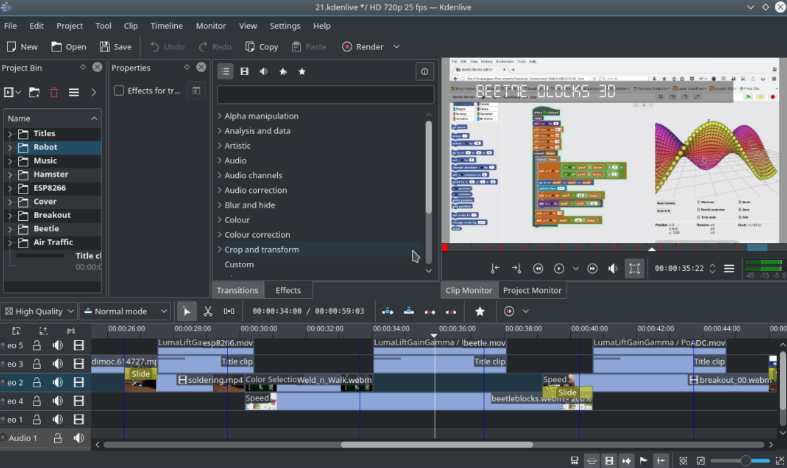
If you are looking for a professional video editor program, Kdenlive is also a good choice. Kdenlive has a similar interacting style with OpenShot, but more modern and flatter. Although you might be overwhelmed by the professional parameters of the program at first, it’s actually quite easy to edit a MOV video with this program once you get familiar with it. Take a look at the following guide and you should have a general idea of how to edit MOV video using Kdenlive.
Step 1: Launch Kdenlive and import your MOV video by dragging it into the program interface.
Step 2: Drag the imported MOV file to the timeline section, and then you can adjust the length, position and overlay of the clip. To access more options, just right click on the clip in the timeline and you will see other editing functions.
Step 3: To output the edited video, just click “File”, then choose “Export”.


 Try for Free
 Try for Free

