You rarely heard that a powerful iPhone XR would encounter a performance issue in the earlier stage. As a matter of fact, the performance issue is easy to happen due to kinds of factors, even though it is a new device, this issue is still no exception. Internal storage is the primary cause of performance issues, that means when the internal storage is out of use, this issue easily occurs. Besides, terrible updates, system bugs and rogue apps also can lead to the performance issue. But the worst situation is that your iPhone XR is freezing up because of the hardware damage. Why is my iPhone XR frozen and won't turn off? No worry, here you can find some great solutions to the freezing up issue, go on reading and see how to fix iPhone XR screen freezing up in an effective way.
Solution 1: Clear all background Apps
Damaged files and rogue apps can be the main factor to lead to a performance issue in smartphones. If some app has a problem on your phone, the functions of the overall system will be affected. Usually, background apps are the biggest killers to ruin your whole iPhone functions. How to get this issue fixed? You can clear all background apps to make your iPhone XR unfreeze.
1. Slide up from the bottom of your iPhone screen with your finger, then have a pause in the middle location of the screen.
2. Slide to right side or left side to browse through different apps cards and previews. Then, slide up on the preview of the apps to make it closed.
Once you have cleared all the backgroud apps, try to get the apps loaded and then use your iPhone one more time to see whether the problem is still existing. If it goes on freezing, try to exclude other causes.
Solution 2: Force restart a stuck iPhone XR
Having a force restart on your iPhone XR can help to get the junk files cleared out from the internal storage which includes the corrupted temporary files. The mistaken cached files will also lead to adverse symptoms from internal storage and influence the whole performance of your iPhone. You can clear the cached files from your iPhone with a force restart as below:
1. Press and have a quick-release on the Volume Up button.
2. Press and have a quick-release on the Volume Down button.
3. Press and hold on the Power button from the side of your iPhone, then have a release until your iPhone boots up. After that, try to use it as normal.
If your iPhone still freezes, that means you may need to deal with the more complicated problem and should have a further troubleshooting.
Solution 3: Reset all settings on iPhone XR
If the freezing symptoms appear after the modification and customization on the settings of your iPhone. That may be caused by the incorrect settings and you need to rectify the settings on your device. However, the actual error is not that easy to trace and identify, using the feature reset all settings on your device is crucial to solving the problem. The action Reset All Settings on your iPhone XR will get your all customized settings erased and then will get back to the original options by default. The incorrect settings will be eliminated simultaneously. You can follow the guidance as below:
1. Hit on the Settings app on the home screen of your iPhone.
2. Choose General tab.
3. Slide down and then tap on the option Reset.
4. Choose the option Reset All Settings.
5. A prompt will require you to enter your password to proceed.
6. Confirm what you have reset.
Once the reset is completed, your iPhone will reboot automatically. Wait until it restarts. Then use your iPhone again and get the individual features enabled, which includes Wi-Fi and Bluetooth.
Solution 4: Fix iPhone screen freezing up without Data Loss
To unfreeze your iPhone screen easily causes the important data to get lost from your device, in this case, preventing against data loss on your iPhone has become a vital task for you. How do I completely backup my iPhone when encountering the iPhone screen freezing up? Here we will show you some great methods to handle this problem. With the help of the third-party tool Leawo iOS Data Recovery, you will get your data back in a simple way.
Leawo iOS Data Recovery is a comprehensive data recovery program for iOS devices. It not only can recover the data from the iPhone, but also it is a great program to retrieve photos from iPad. It is widely applicable to all models of iOS devices and can retrieve data from all models of iOS devices. No matter what causes the data lost, iOS update, mistaken deleting, the system crashed or other occasions, Leawo iOS data recovery can help you to get back your data without any limit.
The advantage of Leawo iOS data recovery:
* It is an all-inclusive software tool for iPhone, iPad and iPod recovery.
* It also can act as a great data backup tool for iOS devices.
* More than 14 kinds of data are supported to be recovered with ease.
* Data can be recovered due to all different causes.
* 100% safety and accuracy are guaranteed for data recovery in a fast way.
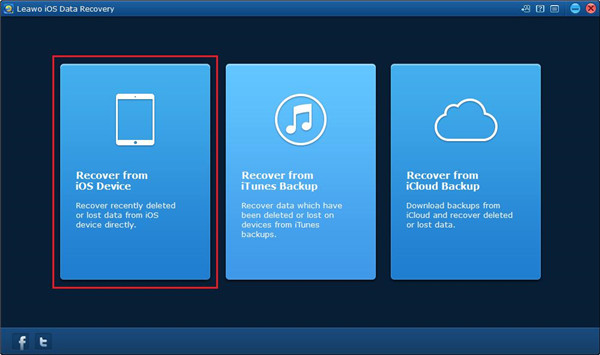
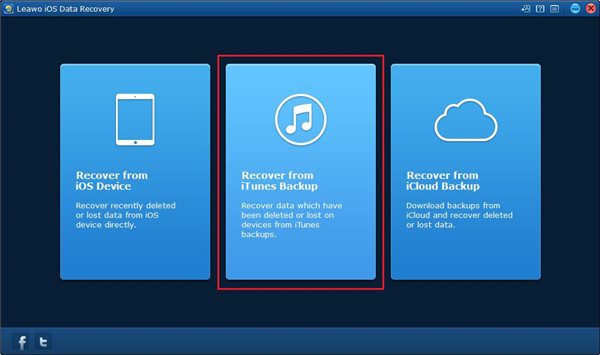
There are three recovery modes included in Leawo iOS data recovery, they are iOS device data recovery mode, iTunes data recovery mode and iCloud data recovery mode. Below we will guide how to recover the data from your iPhone by using such three modes step by step.
Recover data from iOS devices
Recovering your data from iOS devices can be done under two modes including Normal mode and DFU mode. Normal mode can recover the data like Contacts, Note and Messages and more. While DFU mode not only can recover what Normal mode do, but also the data like Camera roll, Voice memos, Photo library and others can be recovered as well. But only iPhone 4 and iPod touch 4 can be compatible with DFU mode. Normal mode can support all models of iOS devices with no limit.
Recover data from your iPhone XR under iOS device data recovery mode
1. Launch Leawo iOS data recovery on your computer and then click on the first tab to go into the main interface of the software.
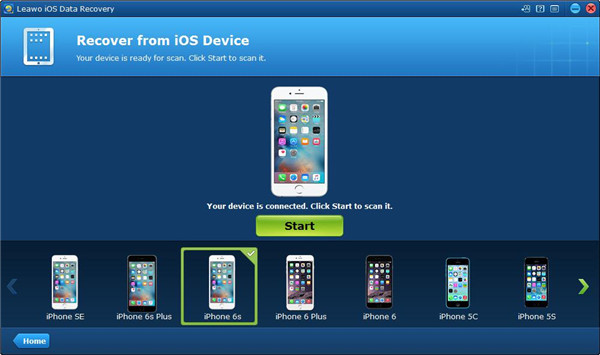
2. Connect your iPhone to the computer and choose your iPhone model in the bottom device list, then click on the “Start” button to get your device scanned.
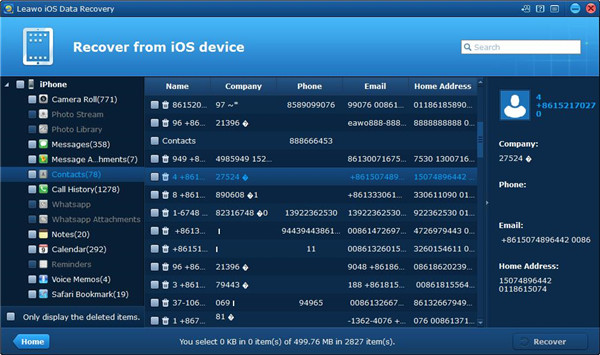
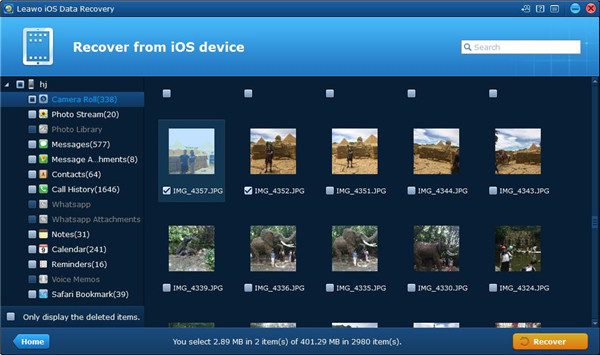
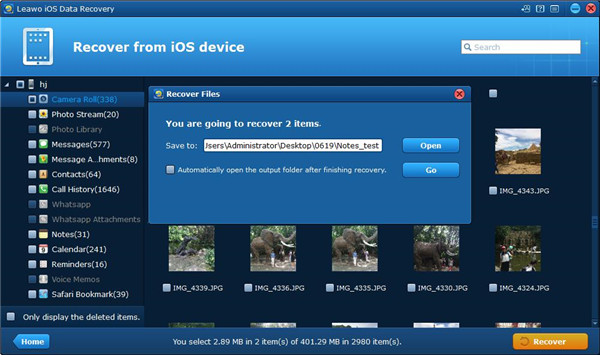
3. After the scanning process has been completed, a list of the data from your device will be displayed in the left sidebar. And the specific data file will be shown on the right part of the window.
4. Choose the files that you need to recover and then click on the “Recover” button.
5. A small panel will pop up and you will be asked to choose an output directory for saving the recovered files. Click on the “Open” button to select the output directory to save the files and then enable the option “Automatically open the output folder after finishing recovery” below “Save to” option to let the output folder open by itself once the recovery is completed. Then click on the “Go” button to begin recovering data from your iPhone to the computer.
iTunes data recovery mode
If you have backed up your data from iPhone to iTunes previously, this mode will help you retrieve your data from iTunes back up easily.
1. Choose the second tab from the main interface of Leawo iOS data recovery.
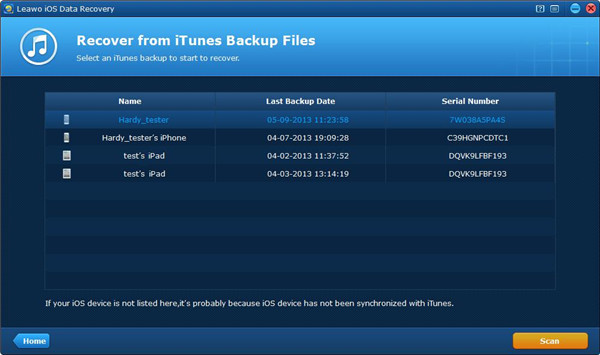
2. Once you have chosen “Recover from iTunes Backup”, a list of backups from your iOS devices which you have backed up to iTunes previously will be displayed. If the backup of your iPhone cannot be seen, the possible reason is that you haven’t got your data backed up via iTunes yet. Choose your iPhone backup and then click on the “Scan” button.
3. Once the scanning process is finished, a list of recoverable data can be seen on the left sidebar. You can see the specific file on the right part by clicking into the data file from the left column. Choose the files that you want for recovery and then click on the “Recover” button on the right corner bottom. After that, a window will pop up and requires you to choose a target folder for the recovered files. You can designate a location for the recovered data by clicking on the “Open” button. If necessary, you can enable the option below “Save to” to make the output folder open automatically once the recovery is completed. Finally, click on the “Go” button to begin recovering the data from iTunes backup.
iCloud data recovery mode
If you have backed up the data from your iPhone XR to iCloud before, then this recovery mode will suit you well.
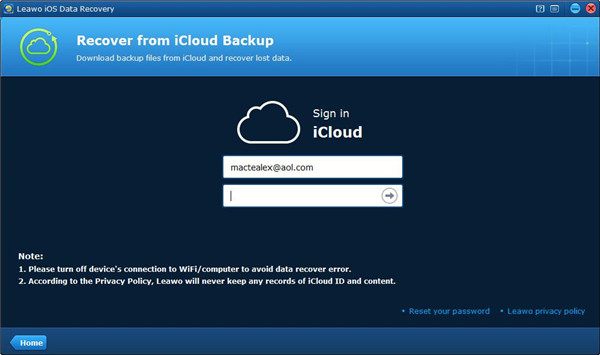
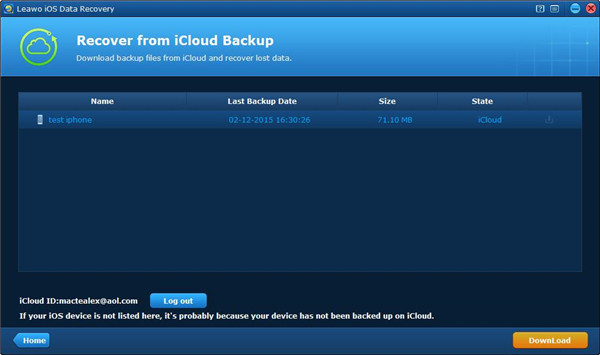
1. Click on the third tab “Recover from iCloud Backup” from the main interface of Leawo iOS data recovery.
2. You will be navigated to the page which requires you to log in your iCloud by entering your Apple ID.
3. Once you have logged in iCloud, your iCloud backup will be scanned by the program. Then your backup will be listed after the scanning process is completed. Have a double click on the backup or press on the button “Download” on the left corner bottom to get your backup downloaded.
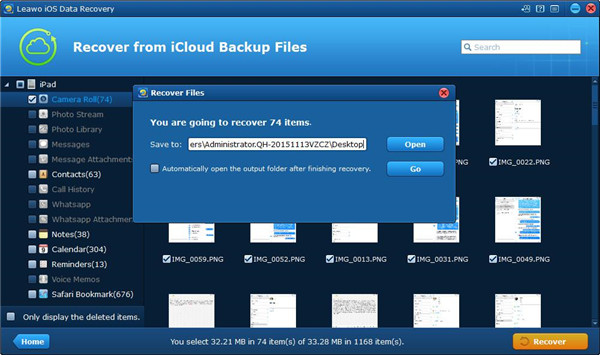
4. When the backup downloading has been finished, the program will scan the backup files automatically. After that, all your iCloud backup will be listed on the left column. Choose the files you want to recover.
5. After you have chosen the files for recovery. Click on the “Recover” button and then a window pops up to ask you to specify a location for the recovered files. Click on the “Open” button to choose a target folder for saving the files. And you can let the target folder open by itself once the recovery is finished by enabling the option “Automatically open the output folder after finishing recovery”. Finally, click on the “Go” button to begin recovering files from iCloud backup.

