As the default media support on Mac computers, QuickTime video formats have very high compatibility with Apple’s devices. However, when you move your QuickTime videos to other platforms or systems, the video might not have that compatibility advantage any more. Many people have suffered from not being able to play QuickTime videos on non-Apple’s devices and systems. In fact, the solution to the problem is actually hot complicated. In order to play your QuickTime videos on other platforms without the compatibility problem, all you need to do is converting the video from the QuickTime format to another format like MKV. As a widely used video format, MKV should be compatible with most of the media player devices or platforms on the market right now. If you want to do the QuickTime to MKV conversion but still don’t know how, keep reading and I’m sure this article will help.
Part 1. Convert QuickTime to MKV with Leawo Video Converter
In order to convert QuickTime to MKV, you need to install a good video converter program with QuickTime and MKV support on your computer. According to my personal experience and opinions of millions of users around the world, Leawo Video Converter is definitely one of the best choices for the task. I’ll explain why.
Leawo Video Converter is a professional video converter program. That means it has the most advanced video converting engine, allowing the program to deal with videos and audios in almost any format and convert them freely, including QuickTime and MKV of course. The converting speed of Leawo Video Converter is high and stable. Having a leading media converting technology, Leawo Video Converter can boost the converting speed up to 6 times higher than the average level in the industry, and still have the best original quality retained in the output file so that even an HD video in 1080P or 4K resolution can have the most details reserved after converting. In addition, Leawo Video Converter also has a helpful video editor built in, allowing you to do a lot of video editing operations before the conversion.
Leawo Video Converter is also very easy to use. With a beautiful and straightforward interface design in Leawo Video Converter, you can convert your QuickTime video to MKV with only a few minutes. The following is what you need to do in order to convert a QuickTime video to MKV with Leawo Video Converter.
Step 1: Import the source QuickTime file
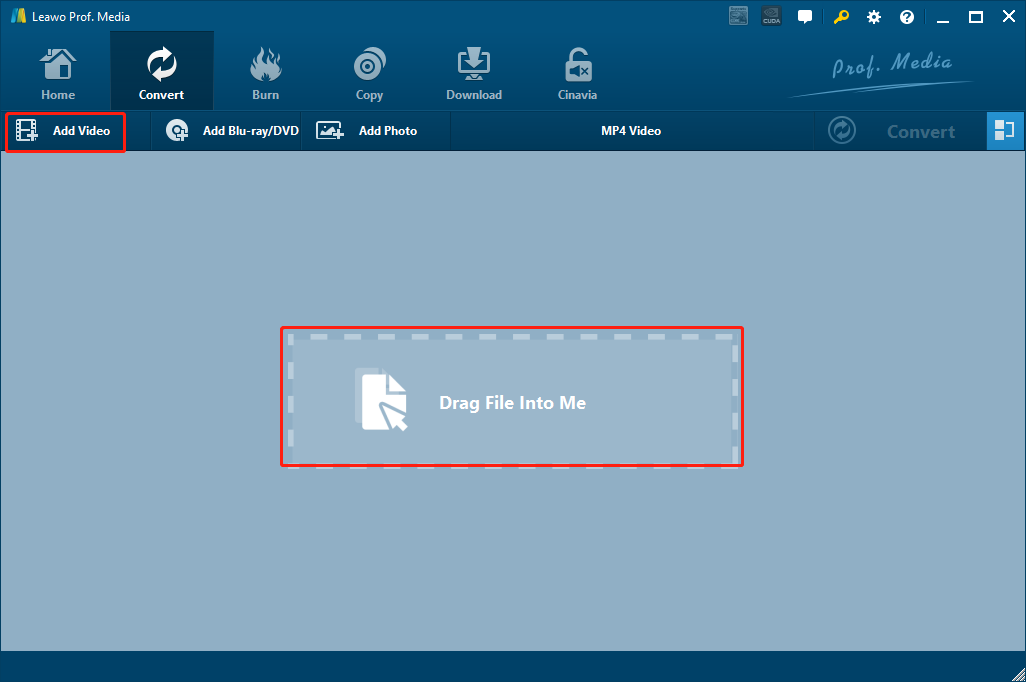
After launching Leawo Video Converter, click “Video Converter” on the homepage to enter the video converter function. There are two ways for you to import the source QuickTime video into the converter. One is to click the “Add Video” button, then browse and locate your video file. The other is to directly drag the file and drop it into the center of the program.
Step 2: Edit the video (optional)
To use the video editor module and edit your video before converting, simply click the edit button on the right of your imported video. On click, a new window will be brought up, where you can see all the available editing options listed at the left bar. Those options include trimming, dropping, adjusting video parameters, adding watermark to video, converting 2D to 3D and removing noise. Click on one editing option and you will see detailed parameters on the right. When you are done editing, click the “OK” button to confirm and apply the changes.
Step 3: Set output format
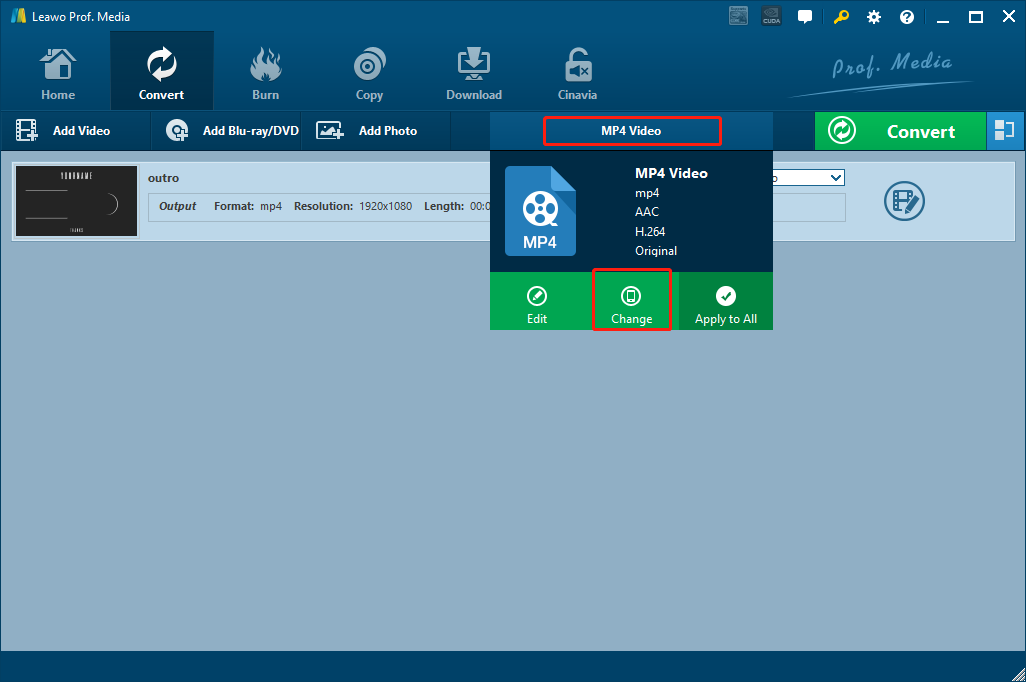
Leawo Video Converter has set the “MP4 Video” as the output video format by default. To change the output format to MKV, you need to click on the “MP4 Video” area, then click on the “Change” to go to the format selection window, where you can find and select “MKV Video”.
Step 4: Start converting
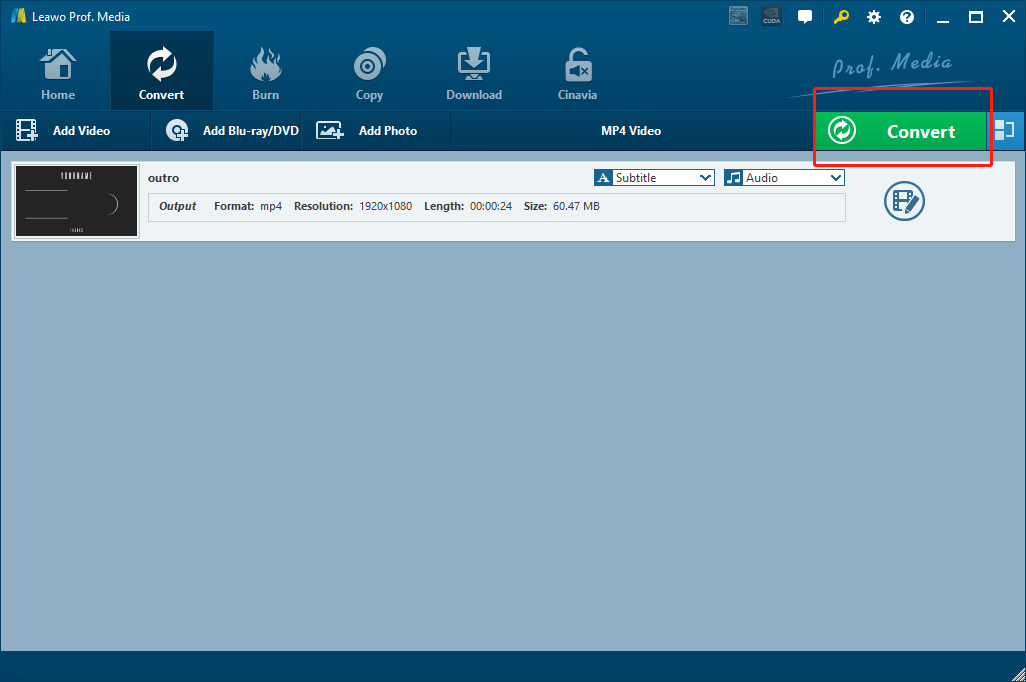
For the last step, click the big green “Convert” button. On the popup sidebar, set output directory in the “Save to” box. Then click the “Convert” icon below to start the QuickTime to MKV conversion task immediately.
Part 2. Convert QuickTime to MKV with Internet Video Converter
Besides Leawo Video Converter, there are also some other excellent choices for you to convert QuickTime to MKV. Internet Video Converter is one of the great video converter tools with various media processing functions. With Internet Video Converter, you can not only convert videos from one format to another easily, but also directly download videos from online streaming websites and then convert the video file to other formats in the same program. Although the program was developed many years ago and hasn’t been updated for a while, you can still try to use it if you need a free program to do a whole series for media downloading and converting works for you. The following is a simple guide for your reference if you’d like to convert your QuickTime to MKV with Internet Video Converter
Step 1: Download Internet Video Converter and install it.
Step 2: Launch the program, then select the “Transcoder” tab, and click the “Select a video” button to import your source QuickTime video.
Step 3: After the video is imported, click the “Save as” button to select an output folder, and then choose an output format in the “Format” box below.
Step 4: The you can click the “Start conversion” button to start converting the QuickTime video right away.
Part 3. Convert QuickTime to MKV with Oxelon Media Converter
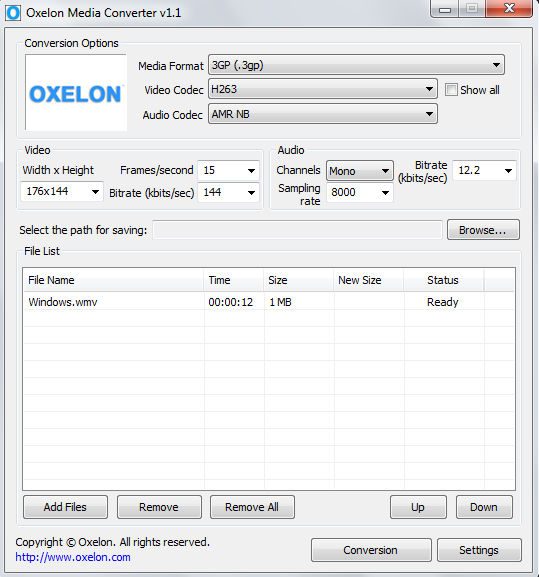
Oxelon Media Converter is a simple and light-weighted video converter program that you can download for free. It features a user-friendly interface design, and can provide an incredibly high conversion speed. Like most of other video converter programs, Oxelon Media Converter can convert multiple files simultaneously, and it supports loads of media formats. What’s different about Oxelon Media Converter is that, with the high Windows Explorer compatibility, you can directly right click on a media file and choose a format to convert, without even launching the program in advance. However, there are also drawbacks in this converter tool. For example, you need to install extra plug-ins separately for some formats, and the program opens up the developer website upon exit, although the feature can be disabled manually. If you want to convert your QuickTime videos to MKV with Oxelon Media Converter, here is what you need to do.
Step 1: Download, install and launch Oxelon Media Converter.
Step 2: Drag your source QuickTime video file from its original folder to the program interface to import it. You can also click the “Add Files” button to add your QuickTime video.
Step 3: Set an output format in the “Media Format” drop down box. You can also specify the video and audio codec with the corresponding dropdown buttons. Detailed video and audio settings are in the sections below.
Step 4: Set a target output folder by clicking the “Browse” next to the “Select the path for saving” box. And then click the “Conversion” button to start the converting process.
Part 4: Convert QuickTime to MKV with FreeFileConvert
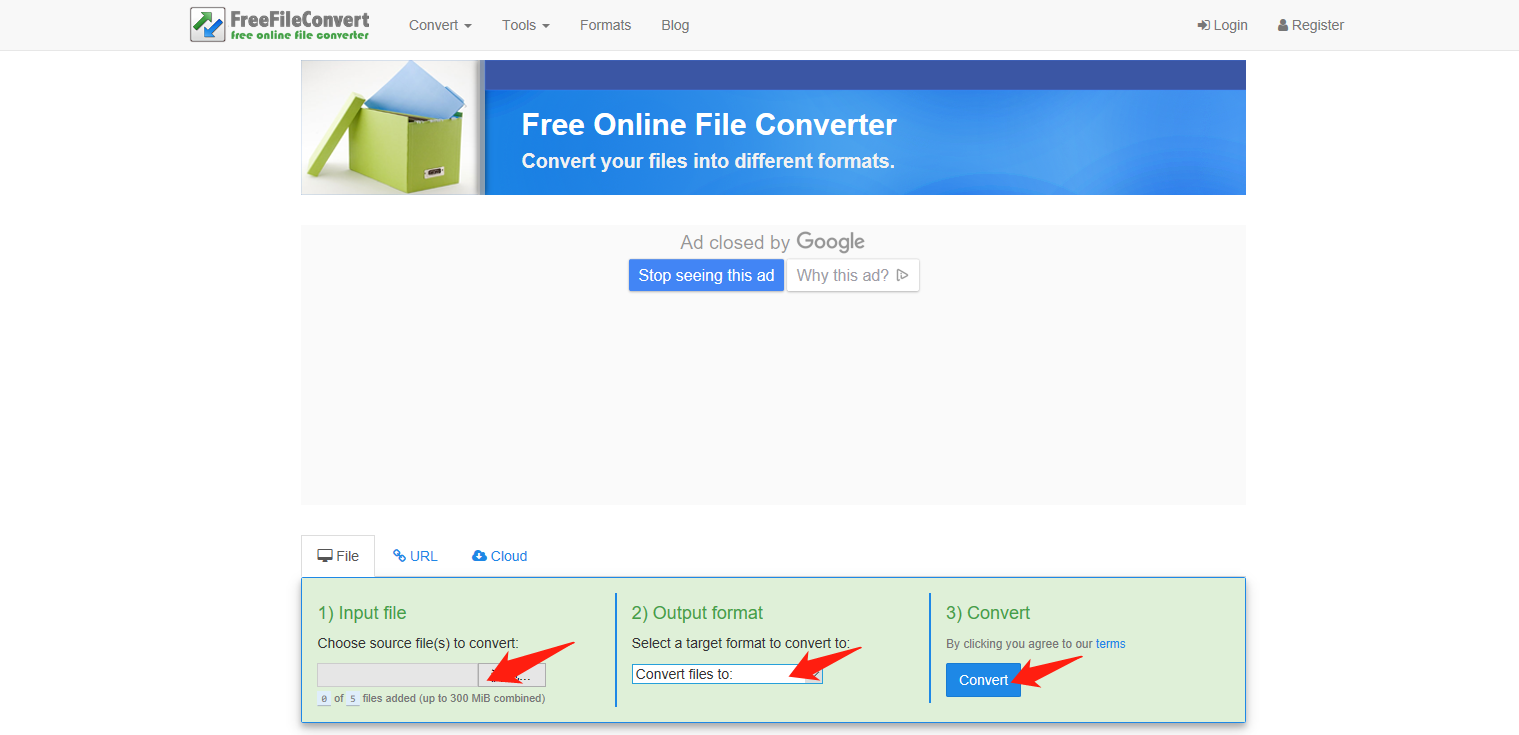
Unlike the professional video converter programs introduced above, FreeFileConvert is an online video converter tool. Because of that, FreeFileConvert has a good availability by no having no system requirement. As long as you have a device connected to the Internet and is able to upload and download files, you can use FreeFileConvert to convert your QuickTime file to MKV. However, like most of other online video converters, FreeFileConvert has its own disadvantages as well. With FreeFileConvert, you can only convert less than 5 files at a time, and for each video you are about to convert, the size must be under 300MB. So, the online converter tool is especially useful when you need to convert a small and short QuickTime video. Here is a simple guide showing you how to convert a QuickTime video using FreeFileConvert.
Step 1: Go to the official website of FreeFileConvert
Step 2: Once you have landed on the webpage, click the “Browse” button to find your source QuickTime video and upload it to the website.
Step 3: In the “Convert files to” dropdown menu, choose “MKV” as your output format.
Step 4: Finally, click the “Convert” button to start converting your QuickTime video to MKV.
Part 5: Convert QuickTime to MKV with ClipConverter
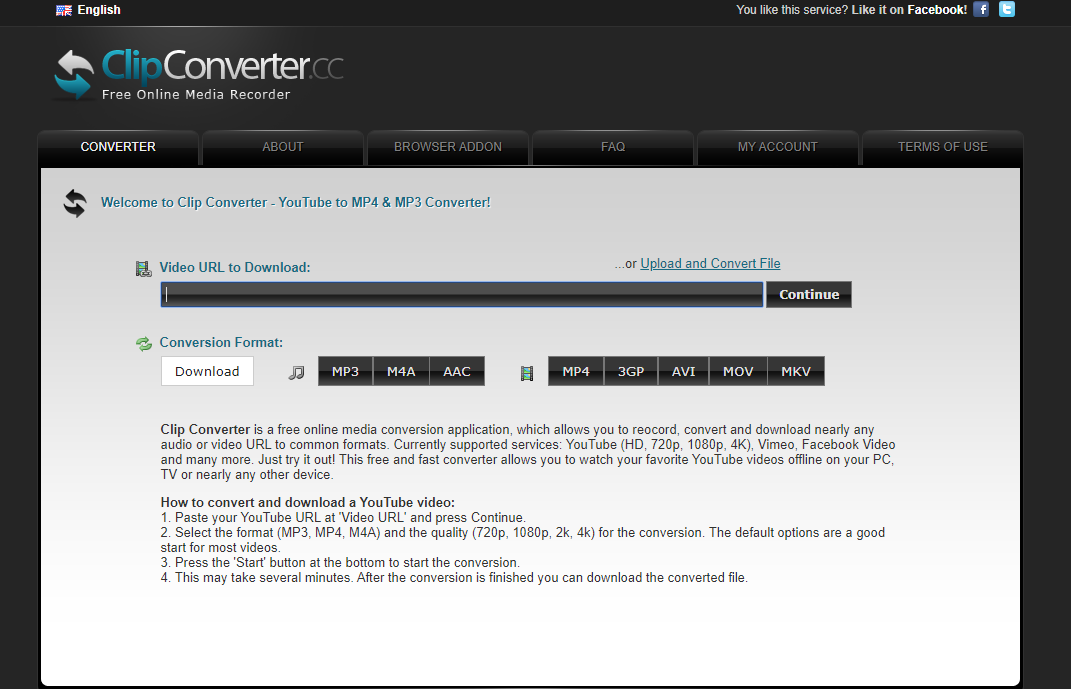
ClipConverter is another great online video converter tool. With a smart interface design, you would be feeling like using a stand-alone video converter program when you are converting a video with ClipConverter. Although the online converter tool only supports limited number of formats, the great user interface and the high online availability still make ClipConverter one of the best online QuickTime to MKV video converting solutions that you can have. As long as you have a stable internet connection, converting a video from QuickTime to MKV shouldn’t be a problem for ClipConverter. To have a better understanding of ClipConverter, just take a look at the following guide.
Step 1: Visit ClipConverter at its website.
Step 2: Under the “CONVERTER” tab, click the “Upload and Convert File” text to upload your local QuickTime video for conversion.
Step 3: To convert the video to MKV, just click “MKV” to select it as the output video format. After the output format has been chosen, a pop-out window will appear, allowing you to do more detailed settings. Then you can click the “Start” button at the bottom to start the QuickTime to MKV conversion.

