


 Try for Free
 Try for Free

iCloud has been a built-in cloud service ever since iOS 5, and it keeps adding new features to help people manage data on their iPhone, iPad and iPod touch wirelessly. Nowadays, people can do a lot of things with their iCloud, such as backing up their files, uploading music to the cloud and so on. However, many people are still confused when they use iCloud. So the following post will introduce several helpful tips on how to backup iPhone to iCloud.
Part 1. Update & Restore iPhone Backup with iCloud
The primary use of iCloud is to use it as a method of updating and restoring iPhone backup. The iCloud saves the latest three backups of your iPhone, and it enables users to manually and automatically back up their iPhone data. To use iCloud, people need Apple IDs to enable iCloud on their devices and log in iCloud.com on their computers. If people don’t have Apple IDs, they are able to create one easily. After that, they can turn on iCloud to update and restore their iPhone backups. The following guidance will introduce in detail.
1.1 Backup iPhone to iCloud
Manually Backup iPhone to iCloud


Please note that you’ll keep Wi-Fi connected while iCloud backing up your iPhone data. The time of updating an iPhone backup depends on how much data you have saved in your iPhone.
Automatically Backup iPhone to iCloud

After turning automatic backup in iCloud, you will automatically upload your iPhone data to the cloud when your iPhone screen is locked and plugged in, and connected to Wi-Fi.
1.2 Restore iPhone from iCloud Backup
Restore iPhone from iCloud Backup


When you want to restore iPhone from iCloud backup, you will need to erase all data on iPhone, but restoring from iCloud backup won’t bring back the files you purchased in iTunes Store or the files you synced from computer. So if you only want to restore certain files from your iPhone, you can use an iPhone data recovery program without erasing all contents on your iPhone. Leawo iOS Data Recovery is an easy-to-use iPhone data recovery program, and the following guidance will show you how to recover files from iCloud backup with it.
Recover iPhone Data from iCloud Backup


With Leawo iOS Data Recovery, people can recover 6 kinds of deleted files from iPhone, iPad and iPod touch.
Part 2. Backup iPhone Photos to iCloud
Before backing up photos to iCloud, iPhone, iPad or iPod touch users should be aware of the differences between iCloud Photo Library and My Photo Stream. iCloud Photo Library was introduced to iPhone, iPad and iPod touch in iOS 8.3, and it enables users to save photos and videos they take to the cloud; while Photo Stream has been in Apple products ever since iOS 7, and it saves the photos people take for 30 days.
When people want to backup iPhone photos to iCloud, they can both take advantage of iCloud Photo Library and My Photo Stream. In case that users may get confused when using the two iCloud services, the following guidance will introduce how to use them separately.
2.1 Backup iPhone Photos to iCloud with Photo Stream


After turning on Photo Stream, your iPhone will automatically save the photos of latest 30 days in the cloud, and users are able to view the photos on all your iOS devices.
2.2 Backup Photos to iCloud with iCloud Photo Library


With Photo Stream and iCloud Photo Library, iPhone, iPad and iPod touch users are able to backup iPhone photos to iCloud easily. The photos will be saved with original resolutions and qualities.
Part 3. Backup iPhone Music to iCloud
Music fans will save tons of songs in their iPhone for an enjoyment on the go. The songs can be ripped from CDs, purchased in iTunes Store, or downloaded from elsewhere. These songs are hard to keep safe in iPhone, iPad or iPod touch because people wouldn’t know when they’ll lose the songs by accident.
At this moment, iPhone users can backup music to iCloud to keep them safe. What? Backing up music to iCloud? Many people think that isn’t an option of iCloud. In fact, people can take advantage of iTunes Match to upload music to the cloud so that they won’t worry about losing songs on their devices. The following guidance will introduce how to backup music to iCloud in detail.
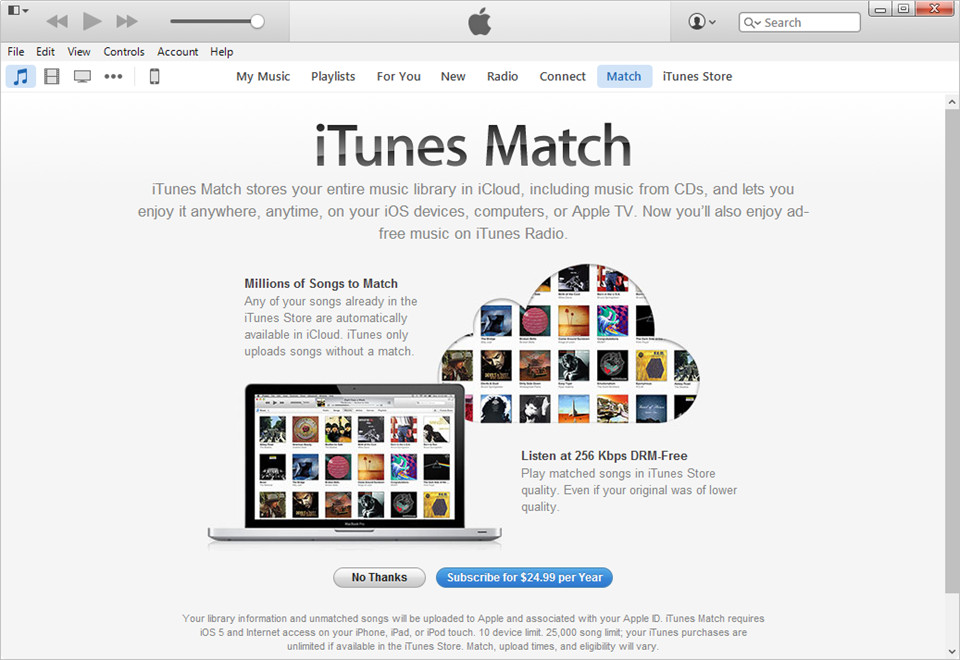
- Run iTunes on computer, and click Account > iTunes Match and subscribe to the service.
- iTunes Match will scan your whole iTunes Music Library and upload the songs to the cloud.
- Enable iTunes Match on your iOS devices, and you will see the music in your Music app. You can listen to the songs directly, or download them to your device.
This is the way to backup music to iCloud. Ever since Apple Music was released at the end of June, millions and millions people are subscribing it to have a try. This Apple streaming music service provides three-month trial period, and all users can check it out to see whether Apple Music is useful for backing up music. The post Everything We Know About Apple Music introduces all details we have known about Apple Music.
Part 4. Related Tips
When people use iCloud to back up their important iPhone data, they are able to finish the task easily with several simple taps on their iPhone. But people may still get confused when they use iCloud. The following post will introduce several tips to help users handle their iCloud better.
Tip 1. Toggle Data ON or OFF
As is known, iCloud only provides 5GB for free use. If you are using iCloud to back up your iPhone data, you’ll find that if you have many photos and videos in your Camera Roll, you are probably running out of storage space on iCloud. At this moment, you’ll need to turn off certain kinds of data to keep them out of your iCloud backup. For example, you can tap Settings > iCloud, and you will find what you have turned to back up. Toggle certain categories to Off, and you will reduce the size of your iCloud backup. The following picture takes shutting down App documents in iCloud as an example, because in most situation, App data takes much of the storage space of the backup.

Tip 2. Turn on Find My iPhone
Turn on Find My iPhone when you back up iPhone with iCloud, so that you are able to locate your iPhone when it is stolen or lost. To turn this option on, you only need to tap Settings > iCloud, and tap Find My iPhone to ON. With Find My iPhone option, you can go to iCloud.com and locate your iPhone, or remotely wipe or lock data on your iPhone.

Tip 3. How Much You Need to Pay
Needlessly to say, iCloud is attractive to the users who don’t want to always connect their iPhone to computer with USB cables. If users have many files on their iPhone, they will have a very large backup in the cloud. Despite of the methods mentioned above to reduce the size of an iCloud backup, sometimes users will want to buy more storage. To do that, people can tap "Settings > Your Name > iCloud > Manage Storage > Change Storage Plan" option, and then choose a subscription. The latest plan for subscription is charging per month, including $0.99 for 20GB, $3.99 for 200GB, $9.99 for 500GB and $19.99 for 1TB.

-

How to Cancel Your YouTube TV SubscriptionSunny Wen/2026-03-27
-
YouTube TV vs Fubo for Sports Fans: Which One Wins?Sunny Wen/2026-03-27
-
Is Movavi Screen Recorder Worth It? Full Review and AlternativesSunny Wen/2026-03-26
-
Netflix vs HBO Max: Which Should You Choose?Cassie J./2026-03-11
-
How to DVR on YouTube TV and Fix Recording IssuesSunny Wen/2026-03-11
-
Loom Screen Recorder Guide: How It Works + Free Alternative ToolsSunny Wen/2026-03-26
-
Locoloader OnlyFans Downloader Review: Is It Really Working?Patrick Murray/2026-03-26
-
How to Download YouTube 8K Video Without Quality LossCassie J./2026-03-09
-
Disney Plus 8-Digit Code: How to Activate Your Account on Any DeviceLeia Liu/2026-03-06
-
Wondershare DVD Creator Review: Features, Test & PriceCassie J./2026-03-06


-
12 Best Sites Like BestGore for Shocking VideosAugust/2025-03-17
-
12 Best Sites Like BestGore for Shocking VideosAugust/2024-02-22
-
12 Best Free Web Series Download Websites 2026August/2025-02-05
-
Top 10 Sites to Download Anime FreeAugust/2024-12-27
-
Top 5 OnlyFans Viewer Tools to View OnlyFans FreeAugust/2024-04-29
-
Top 10 Websites to Watch Uncensored AnimeAugust/2024-02-21
-
[2026] AudioBookBay Proxy Sites & Alternatives for Free AudiobooksCassie J./2026-01-06
-
How to download videos from MissAV? – Ways to download MissAV JavPatrick Murray/2025-02-08
-
Top 10 OnlyFans Search to Find Someone on OnlyFansAugust/2024-02-29
-
7 Best Free Sites for Pinoy Movies Download in 2026August/2024-10-31


Leave a Reply
You must be logged in to post a comment.