When you try to import AVI to iTunes, you must have encounter format incompatibility issues. It’s because iTunes does not support AVI video format as input. As everyone knows, iTunes only works with several video formats – MP4, MOV and M4V. If you get some AVI files, you can’t import AVI to iTunes directly or transfer AVI to an iPhone, iPad and iPod Touch via iTunes. To do that, we need to make good use of an AVI to iTunes converter to convert AVI to iTunes compatible MP4, MOV, or M4V video format before we can import AVI to iTunes. If you want to upload your AVI files into YouTube, you can convert AVI to FLV.
Part 1. Convert AVI to iTunes with Leawo Video Converter
As is mentioned at the very beginning, if you try to add AVI to iTunes, you will absolutely run into video format incompatibility. Under such circumstances, you need to convert AVI to iTunes video MP4, MOV and M4V. To do so, an AVI to iTunes converter is a must-have. It is very important for us to pick up a professional AVI to iTunes converter. If an inappropriate video converter is chosen, it is highly possible that you will get an output file of lousy quality, which will ruin your day. A professional AVI to iTunes converter means it can convert AVI to iTunes video at a high speed yet with original quality preserved. Leawo Video Converter is such a qualified AVI to iTunes converter. As a powerful AVI to iTunes converter, it could help you convert AVI to iTunes supported video files without compressing the video quality. Apart from that, you can touch up all AVI files with the embedded editor. You are allowed to trim video length, crop video size, rotate video angle, apply special effects to get better visual enjoyment, add watermark, etc. More features like subtitle selection and addition, 2D to 3D video creation are also in the offer list. Therefore, it has been regarded as the best AVI to iTunes converter.
Not limited to the Windows version, the Leawo software team also develops the Mac counterpart of Leawo Video Converter for operating on Mac system. Download and install the right version of Leawo Video Converter based on the operating system on your computer. As the conversion process is nearly the same regardless of version of Leawo Video Converter, here we take the Windows version of Leawo Video Converter is an example to convert AVI to iTunes MP4/MOV/M4V.
Step 1. Import Source AVI Video File
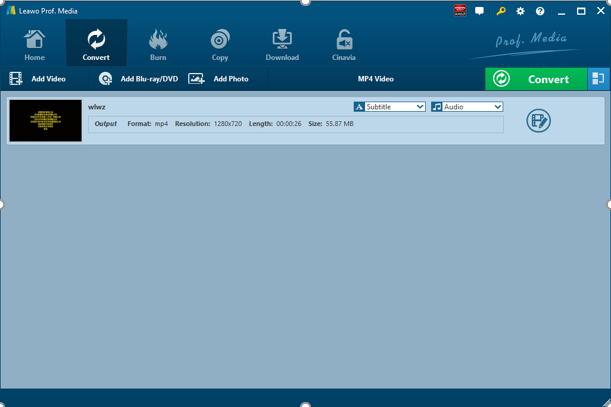
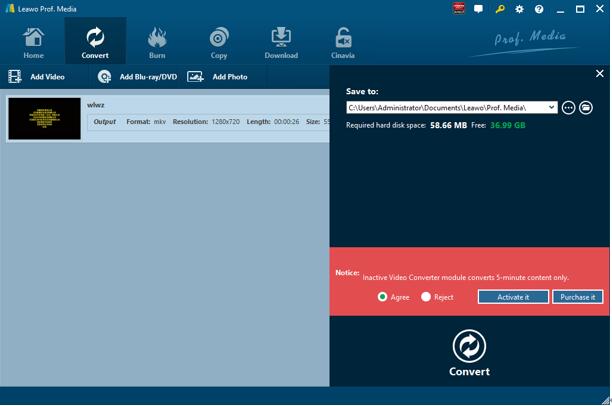
Launch Leawo Video Converter, go to the “Convert” tab, and click “Add Video” button on the sub-menu to load your source AVI video file. Alternatively, you can directly drag and drop AVI video files into the program interface. After AVI video file is imported, you could playback AVI video file, select subtitles and audio tracks from source AVI video file, add external subtitles to loaded AVI video file, edit loaded AVI video file, etc.
Step 2. Choose iTunes MP4/MOV/M4V as Output Format
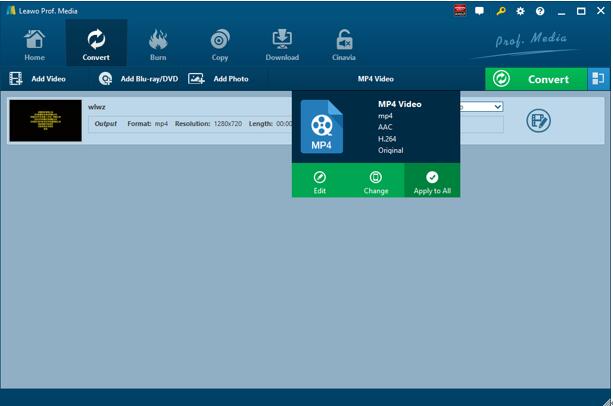
Click the drop-down box named “MP4 Video” by default next to the “Add Photo” button. On the drop-down list, select “Change” option.
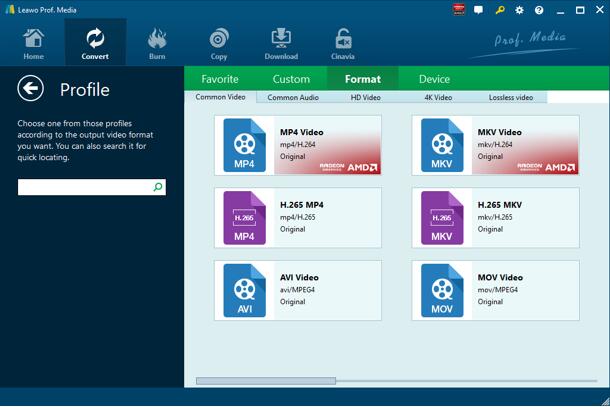
Then on the popup Profile window, select “MP4”, “MOV”, or “M4V” that is well compatible with iTunes from “Format” column as output format. Please note that once you change the output format, the name of the drop-down box will change as well.
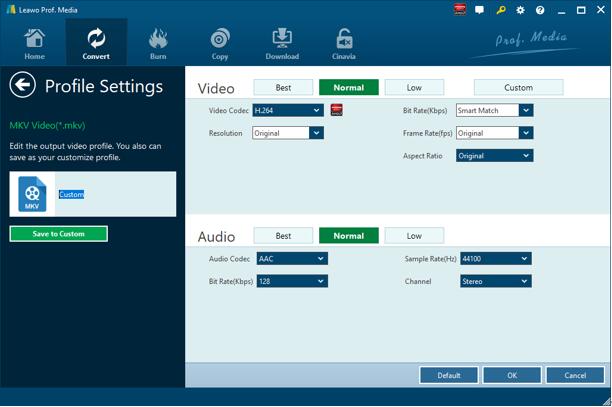
Note: If you need, you could click the “Edit” button on the drop-down profile setting box to adjust video and audio parameters like video codec, aspect ratio, frame rate, resolution, audio codec, bit rate, channel, sample rate, etc. After editing job is done, click “OK” to return to the main interface.
Step 3. Convert AVI to iTunes MP4/MOV/M4V
Click the big green “Convert” button on the sub-menu bar next to the format setting drop-down box. Then, on the popup sidebar, set output directory. After setting output directory, click the “Convert” button right below. Leawo Video Converter would start to convert AVI to iTunes MP4/MOV/M4V. After the conversion process is finished, you can find the converted file in the output folder you just set.
Note: Leawo Video Converter is equipped with an internal video editor, which means you can edit video after you import source video files.
Part 2. Convert AVI to iTunes with Totally Free Converter
The second method to convert AVI to iTunes is to use Totally Free Converter, which supports a wide range of video and audio formats. It can convert AVI to iTunes MP4/MOV/M4V. Check out the detailed steps.
Step 1. Add Source AVI Video
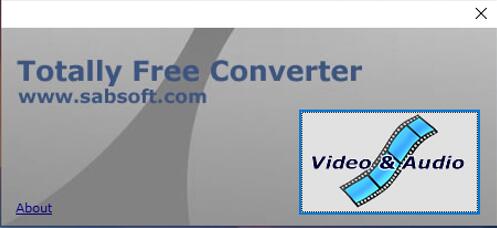
On the interface of Totally Free Converter, click “Video & Audio” to choose and add source AVI video.
Step 2. Choose Output Video Format
Once source AVI video is imported, you will be prompted with a small window panel, where you can choose output video format, rename output video name, and choose output folder. To convert to iTunes, you can choose MP4, MOV or M4V as the output video format.
Step 3. Start to Convert AVI to iTunes
After you set the output video format, name and folder, click “Save” to start to convert AVI to iTunes. After a while, the converted result will be saved in the folder you just set.
Part 3. Convert AVI to iTunes with Convertilla
Convertilla is a simple and convenient program for converting video and music files between various formats. It supports MP4, FLV, MKV, MPG, AVI, MOV, WMV, M4V, 3GP, MP3, WEBM, OPUS, AAC, FLAC, APE, WAV, ASF. Check out the guide below to convert AVI to iTunes with Convertilla.
Step 1. Add Source AVI Video File
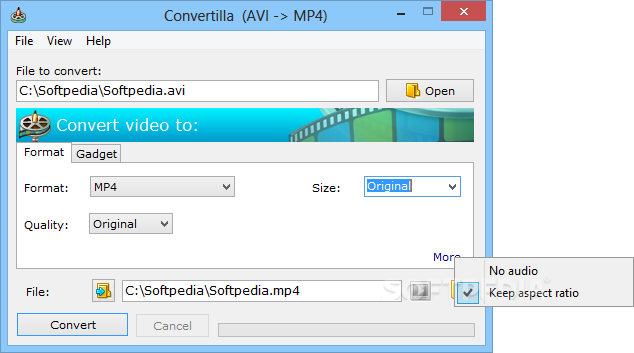
On the main interface of Convertilla, you need to click “Open” to add source AVI video file into the program. Please note that this converter does not support batch conversion.
Step 2. Choose Output Video Format
To convert to iTunes, you can choose MP4 as the output video format, and then you can choose video size, video quality as original. Before conversion process takes place, choose the output folder under “File” box.
Step 3. Start to Convert AVI to iTunes
Click “Convert” button at the bottom to start to convert AVI to iTunes.
Part 4. Convert AVI to iTunes with CloudConvert
The fourth converter I will use is CloudConvert. Unlike these three previous converters, CloudConvert is an online video converter, and it claims that it can convert anything to anything on its official website. Of course, we can use it to convert AVI to iTunes. Most importantly, this service is totally free of charge.
Step 1. Choose “Select Files”
On the official website of CloudConvert, choose “Select Files” to choose and import target AVI file into the converter interface.
Step 2. Choose MP4/MOV/M4V as Output Video Format
Choose Video, and then MP4/MOV/M4V as output video format for converting to iTunes video.
Step 3. Start Conversion
You need to click “Start Conversion” at the bottom right to start the conversion process, at the same time you can tick “Notify me when it is finished” and choose to “Save file to my Dropbox/Google Drive, etc.” After that, you can download and get converted result on your computer.
Part 5. Convert AVI to iTunes with FileZigZag
The fifth one is also an online solution with the help of FileZigZag, which supports thousands of types of unit conversions, making it easy for users to reach a one-stop shop without having to jump from one location to another. Here we convert AVI to iTunes with FileZigZag.
Step 1. Import Source AVI Video File into FileZigZag
The interface of the web page is very simple. The first bar is for you to import file. Here, we choose to import the pre-prepared AVI video file.
Step 2. Choose iTunes MP4/MOV/M4V as Output Video Format
Click the drop-down box under “Convert to”, and you need to select MP4, MOV, or M4V as the output video format in order to convert AVI to iTunes.
Step 3. Input Your Email Address and Start to Convert
In the third bar, you need to input your email address, and then click “Convert” in the fourth bar. After a while, the converted result will be sent to your email box. That’s it, and you will get converted result in your email box.
Part 6. How to Import/Add AVI to iTunes
Adding AVI to iTunes is an easy job after you convert AVI to iTunes video. Check out the following guide on how to add AVI to iTunes.
- Open iTunes to enter the main interface;
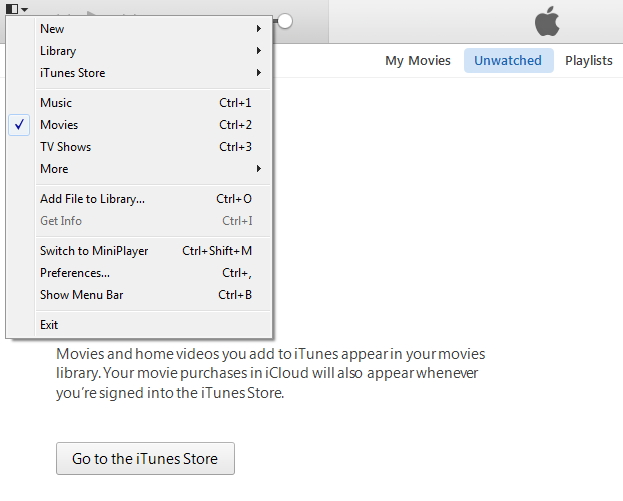
- Click the drop-down list on the top left corner, and choose “Add File to Library” to pop up a file selecting panel;
- On the panel, you need to go to the output directory that you set to contain the converted file, and choose the file for importing;
- Once you select your file you should now see your newly imported file in your iTunes library.
After adding AVI to iTunes library, you can start to play AVI files on iTunes in a smooth way without format incompatibility issue caused.

