Last updated on 2020-02-18, by
How to Edit Blu-ray Video with Blu-Ray Converter and Editor Software?
Question:
“Dear editor, I have some Blu-ray collections in discs and would like to edit Blu-ray movies to better meet my personal need. Can you recommend a Blu-ray editor, a piece of Blu-ray editing software, or a piece of Blu-ray video editing software for me to edit Blu-ray?”
Dear reader, I am glad that you ask me the question because I happen to know of a professional Blu-ray editor, or we can say a piece of professional Blu-ray editing software or Blu-ray video editing software. In addition to ripping Blu-ray discs/folders to various popular video and audio formats, Leawo Blu-ray Ripper is designed with an internal Blu-ray editor, offering four ways for you to edit Blu-ray videos (trimming, cropping, adding effects and adding watermarks). You can choose one or several editing features you want.
Part 1: How to Edit Blu-Ray with Leawo Blu-Ray Ripper?
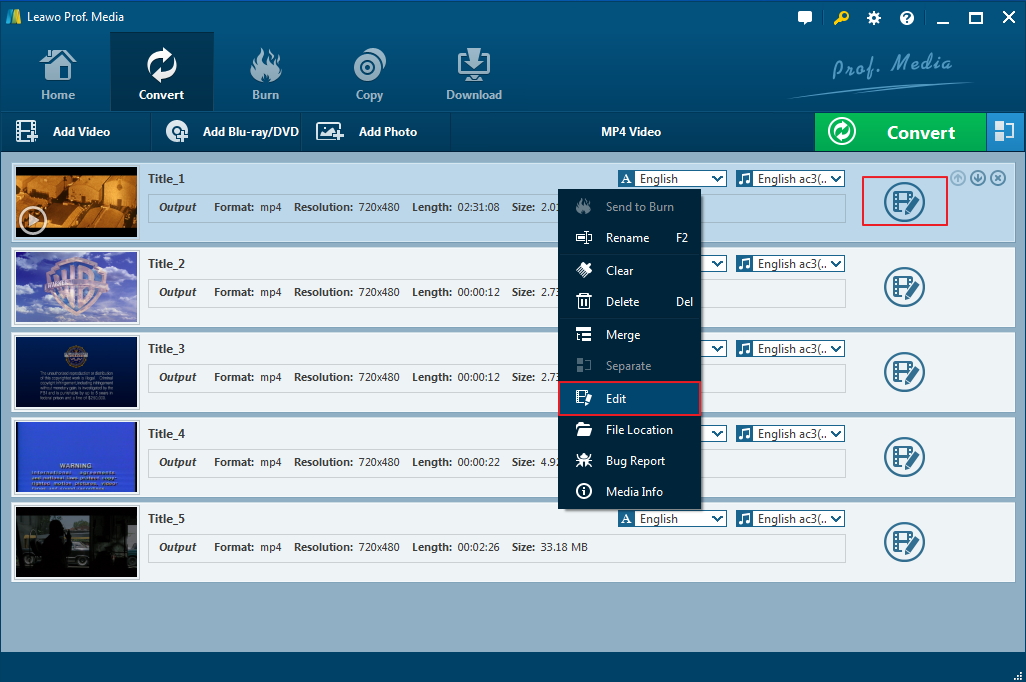
On the main interface of Leawo Blu-Ray Ripper, click “Add Blu-ray/DVD” button to load Blu-ray disc file into the program. After loading, you can see a list of Blu-ray chapters/titles on the UI. By clicking “Edit” button at the end of a loaded Blu-ray movie title, or right-clicking loaded Blu-ray/DVD title and then selecting “Edit” option on the right-click menu, you will be guided into the internal Blu-ray editor.
Trim video length:
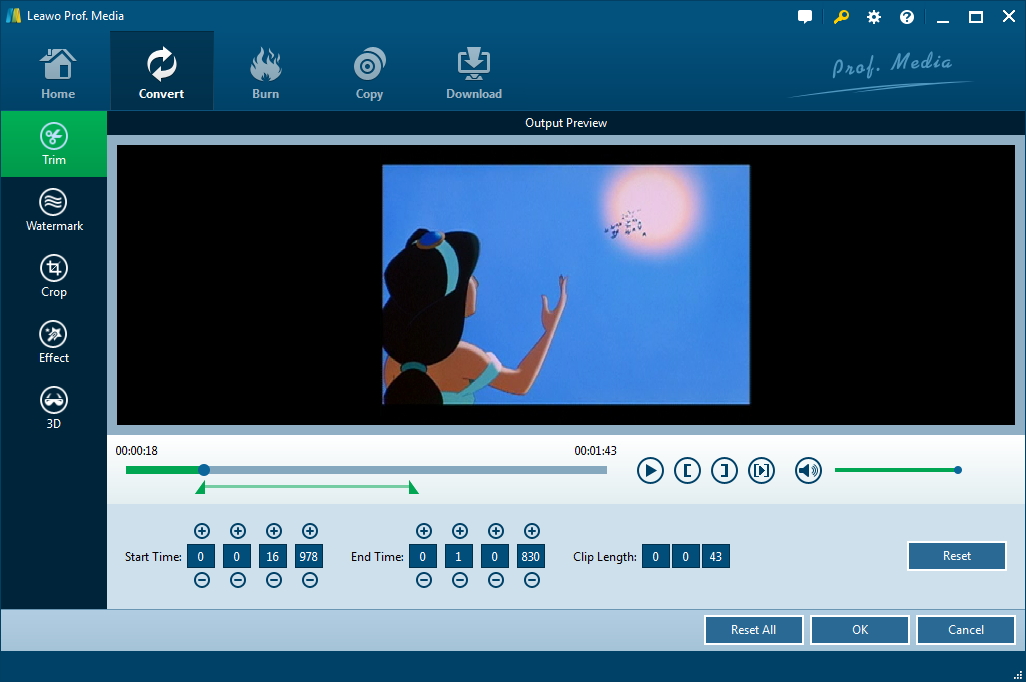
Under “Trim” section, you can directly drag the slide bar to trim video length, or manually input values in "Start Time" and "End Time" box. The clip length can be viewed instantly. Reset it or click "OK" to confirm it.
Add video watermark:
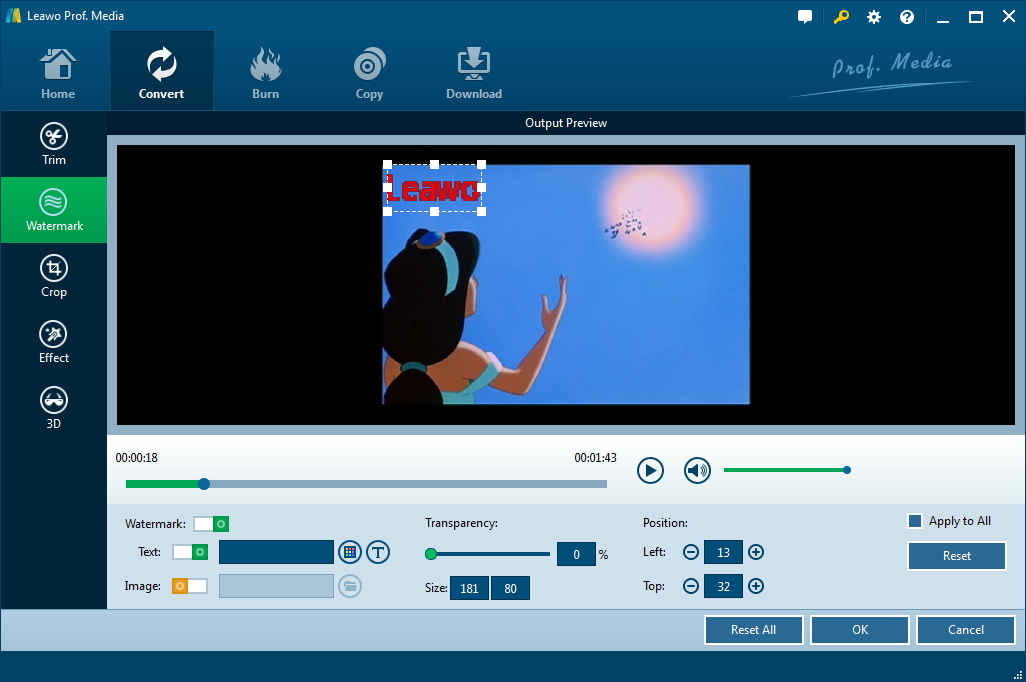
Switch to “Watermark” section, enable the Watermark button to green, and then you are allowed to add either Text or Image as video watermark. Watermark Transparency, Left Margin, Top Margin, Image Size are adjustable. Check "Apply to all" to add watermark to all videos. Press "OK" to confirm it.
Crop video size:
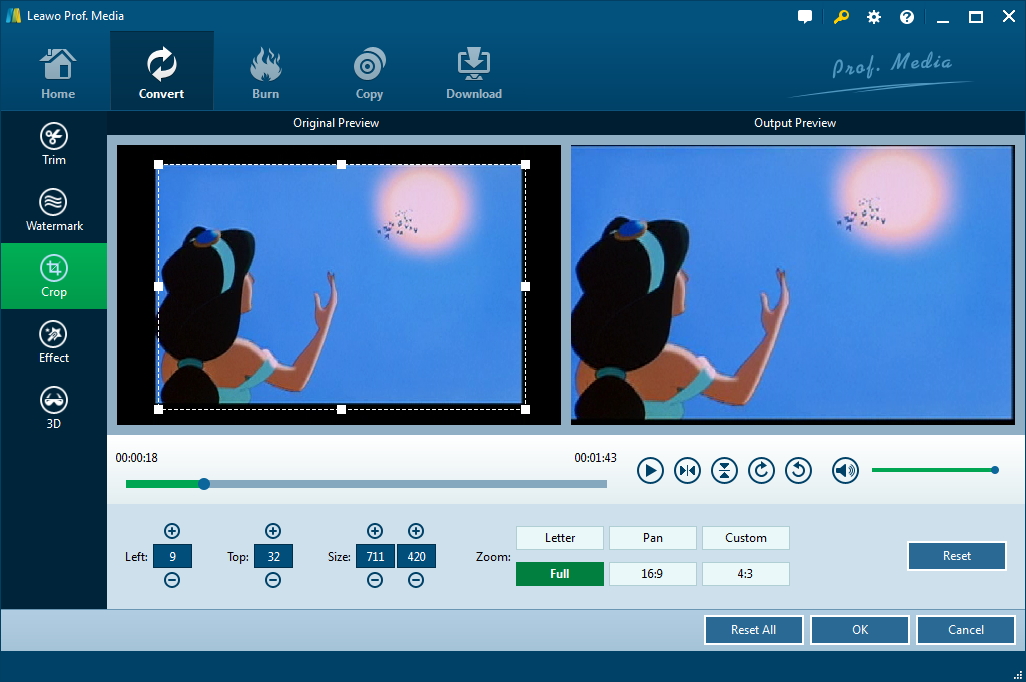
Under “Crop” button, directly drag the dot frame to crop video, or select Letter/Pan/Custom/Full/16:9/4:3 in "Zoom", and adjust values in "Left"/"Top"/"Size" to get your desired video size. Press "OK" to confirm it.
Adjust video effect:
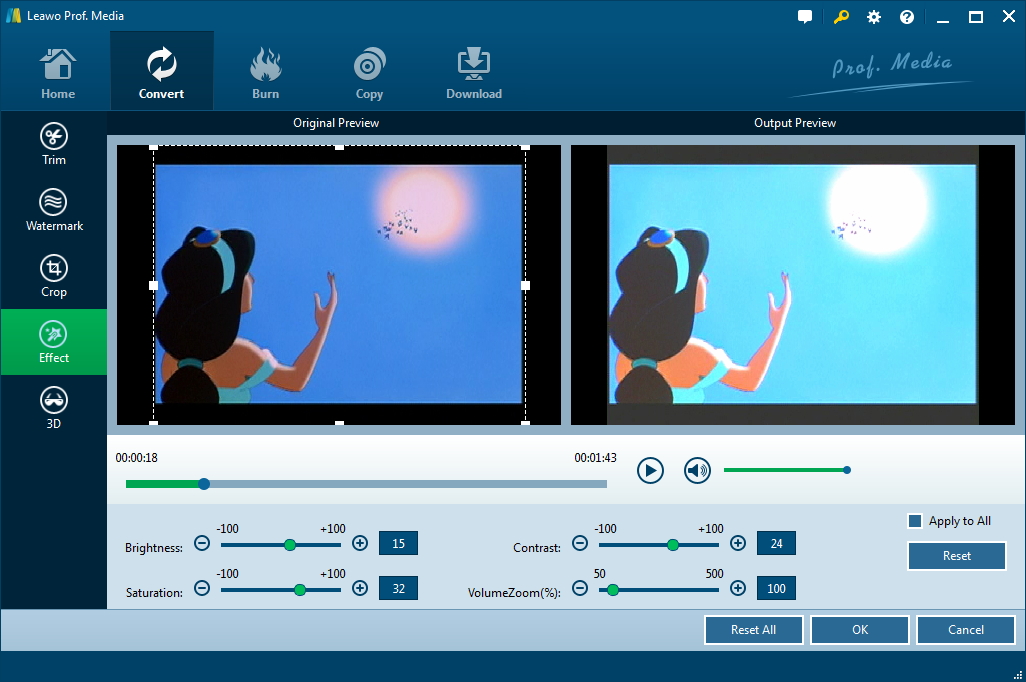
Go to “Effect” section, directly drag the slides of "Brightness", "Contrast", "Saturation", and "VolumeZoom(%)" for special video effect. Check "Apply to all" to apply the effect settings to any of your loaded files. Press "OK" to confirm it.
Therefore, for your convenience, we will also introduce two other programs, which you can easily edit the Blu-Ray, for instance, you can employ to create videos in Blu-ray formats.
Part 2: How to Edit Blu-Ray using BDedit?
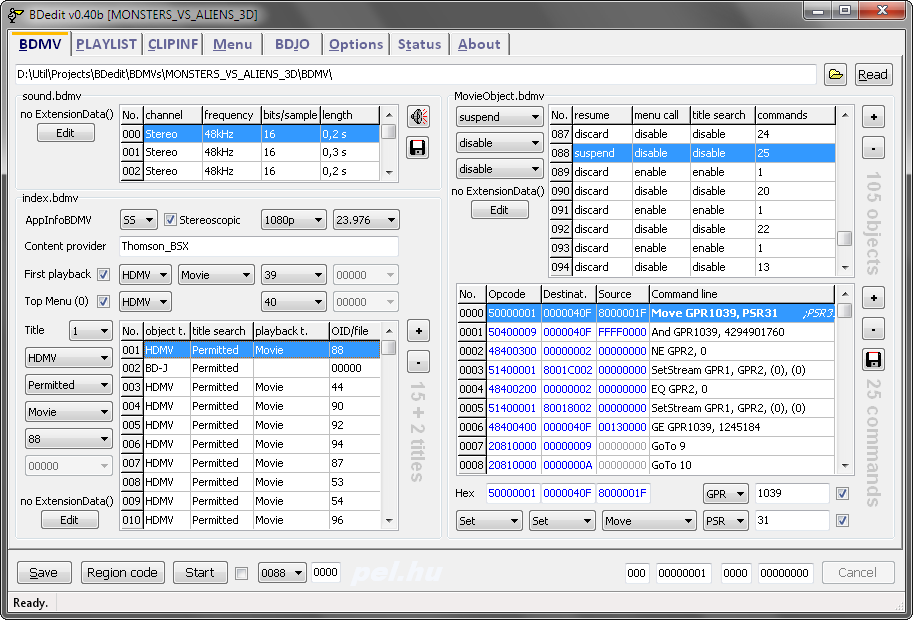
BDedit is a Blu-ray structure editor, which is a small application with a straightforward approach which enables you to modify the contents of a Blu-ray disc's BDMV file. With BDedit, you find it easy to edit the files which contain data about the directory of the movies, their objects, and audio data. The application displays a tabbed structure which allows you to quickly navigate to any section of the file that you are interested in. BDedit is composed of multiple sections, "BDMV", "PLAYLIST", "CLIPINF", "Menu", "BDJO", "Options" and "Status" which grant you access to all the application's features and of course, all the information you can change.
The interface of BDMV can be divided into 3 parts, sound.bdmv, index.bdmv and MovieObject.bdmv.
sound.bdmv
Select Ins to load a new sound entry after the selected line (Note: the wav format is strictly 16 bit, 48 kHz, RAW PCM.).
Select Shift-Del to delete a sound entry.
In general, if sound.bdmv doesn't exist, the window above is invisible. If you want, you are able to create a new sound.bdmv on the Option page with “Create sound.bdmv” option.
index.bdmv
First playback: it is a special title.
As for the object type, there is HDMV and BD-J. (HDMV means this title is related to a movie object from the MovieObject.bdmv, while BD-J means this title is related to a BDJO file.)
Title playback type: Movie or Interactive.
Movie object id: an object from the Movie objects.
BDJO filename: a filename (without extension) from the BDJO folder.
As for title search, there is permitted and prohibited1, prohibited2. (permitted means title search (UO) into this title is permitted, while prohibited1, prohibited2: Title Search (UO) into this title is prohibited)
MovieObject.bdmv
As for the resume, there is discard, suspend and commands available. (discard means that the Movie Object is discarded when Menu Call (UO) is executed. Suspend indicates that the Movie Object is suspended and maintains its instance when Menu Call (UO) is executed. While commands show the number of navigation commands in the Movie Object)
GPR: General Purpose Register (The player has 4096 GPRs in total)
PSR: Player Status Register (The player has 128 PSRs in total)
Generally, you can see the register values and the purpose of the PSRs on the Status page and change the values in the register box at the bottom
BDedit provides a direct method in which you are able to view, modify, and export the new BDMV file. The above only offers a small amount of information about what BDedit is actually capable of so if you want to discover more, log in the website to learn more about the powerful function of BDedit. (https://pel.hu/BDedit/)
Part 3: How to Edit Blu-ray via BD Rebuilder?
BD Rebuilder is a software to shrink a Blu-ray with all menus and extras. With BD Rebuilder, you can feel free to remove unwanted audio tracks, extra material or just keep the main movie. Besides, you are able to modify GOP size, add customized encoder quantizer matrices, set DC precision. The first thing you should be aware of is the fact that BD Rebuilder does not decrypt any type of media. You must decrypt commercial DVD or Blu-ray movies before importing them into this program. For instance, you can do it with the help of Leawo Blu-ray Ripper. This post will show you how to back up Blu-ray with BD Rebuilder.
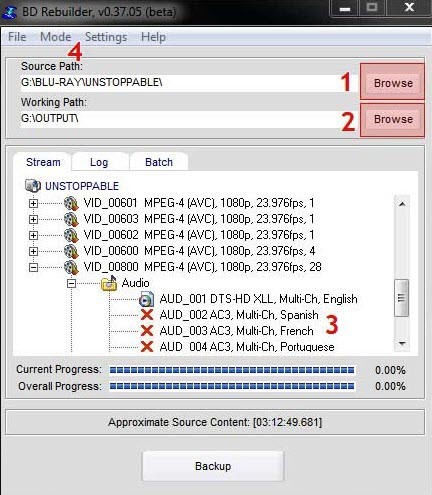
1. Once you’ve downloaded BD Rebuilder and installed the auxiliary programs, open BD Rebuilder and click "Browser" under "Source Path" to target the Blu-ray disc that you want to rip and back up.
2. Select "Browse" under "Working Path". If you like, you can remove the audio tracks you don't need to reduce size.
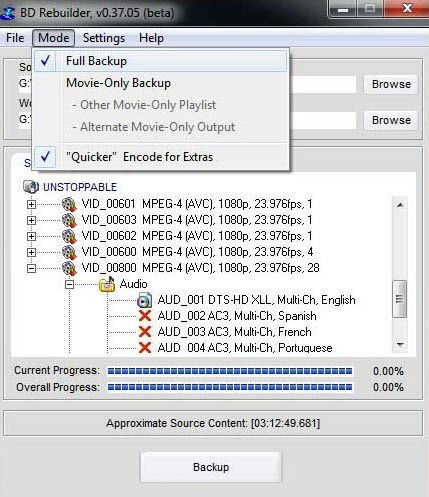
3. Then click "Mode", there are "Full Backup", "Movie-Only Backup" or "Quicker" Encode for Extras. Select the mode you like.
Note:
Full Backup is to keep all the video titles and Blu-ray menu.
Movie-Only Backup is to retain the movie part.
Quicker Encode for Extras means you prefer a faster encoding setting for the extras.
4. Usually, the default settings will work well for most projects. In the Audio Encoding Options, select the settings you want to keep the maximum audio quality and hit "Save Changes" to save the settings.
5. In "Settings" on the main menu, there are also some other options. For example, you can choose the output size between BD-5, BD-9, and BD-25, etc.
6. After all the settings, click “Backup” to start the encoding process. Finally, you can get the file you like.
Part 4: How to Edit Blu-ray through Clown_BD?
Clown_BD is capable of extracting the Blu-ray main movie and language streams of your choice, resulting in either transport streams (m2ts/ts), an ISO image or even a burned BD disk. As a lightweight and easy to use application, it has the possibility to change the language of a certain audio stream. Comes with an intuitive and friendly interface, Clown_BD offers fast access to all the program's features, which is suitable for both advanced and less experienced users.
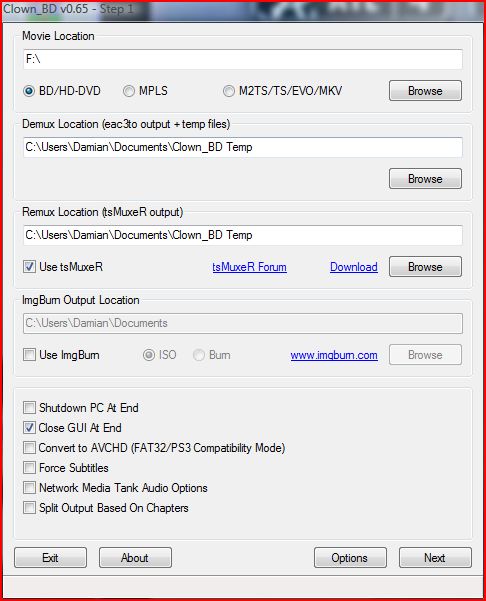
When you launch Clown_BD, the interface (Step 1) that appears will let you choose the video source and the directory to save your output files.
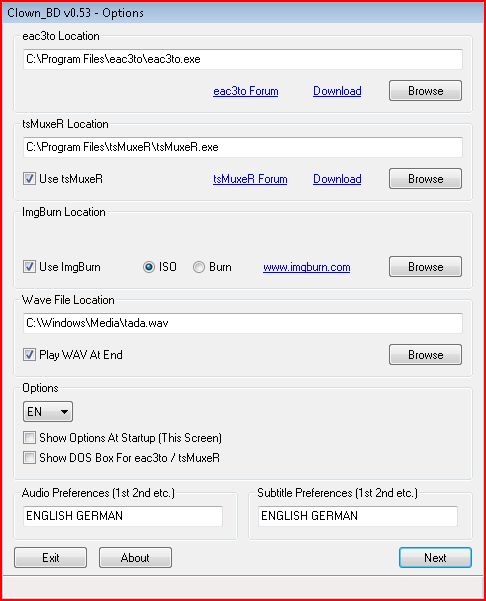
Select the "Options" button, you can notice the place where eac3to and tsMuxeR are located.
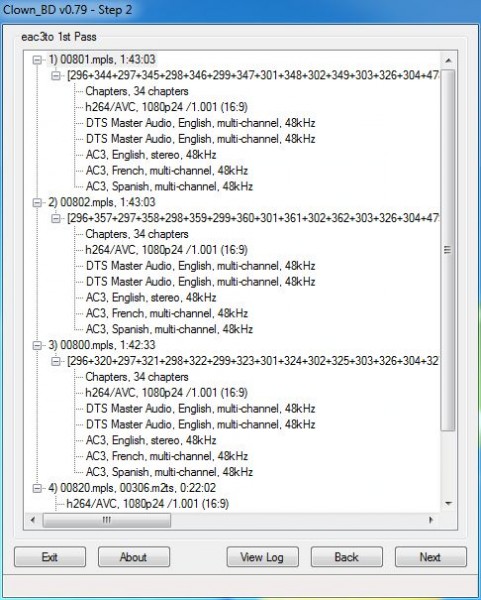
Step 2 of Clown_BD will present all available playlists. As you can see below there are multiple playlists available, with three of them appearing to be the main movie (00801.mpls, 00802.mpls, and 00800.mpls).
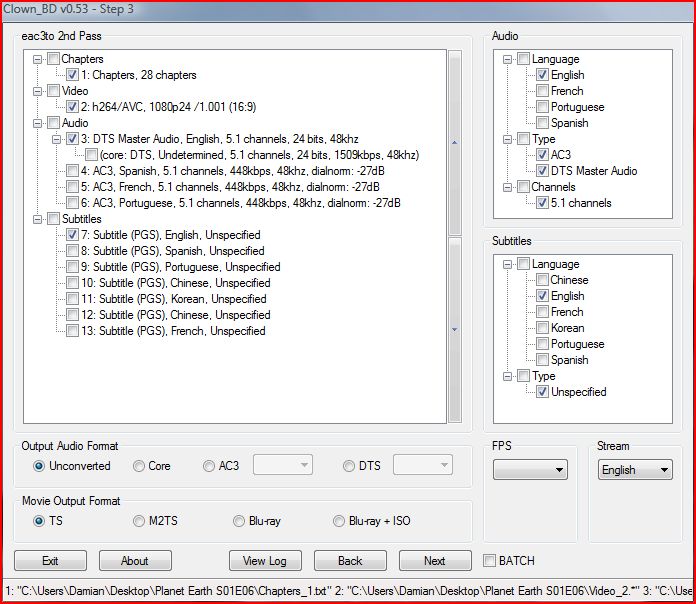
With the playlist has been selected, you can select all the specific outputs. In step 3, the "Audio" box will offer the "Output Audio Format" with the following options:
Unconverted - keep the audio selected as is;
Core - if you wish to extract the DTS core from master audio or high definition stream (or AC3 core from a TrueHD/AC3 stream)
AC3 - when you want to convert the selected audio stream(s) to AC3
DTS - if you prefer to convert the selected audio stream(s) to DTS
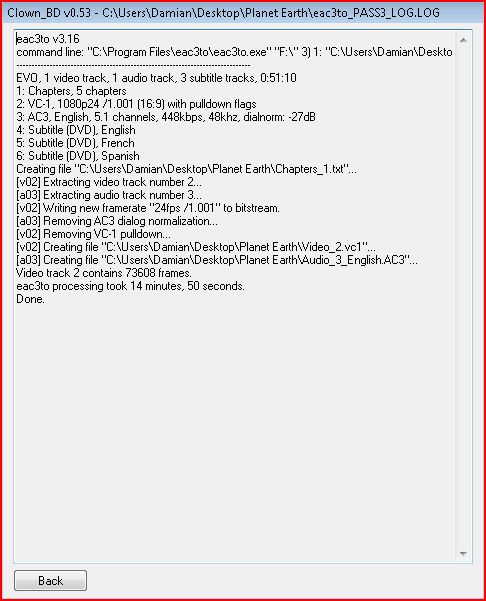
After you have completed all the setting you need, the main UI will disappear, and instead, it will be replaced with a small status bar, presenting the progress.
The above outlined Blu-ray editor programs are the best options you can get if you are looking to create a Blu-ray ISO image, disc, and/or folder from camcorders, cameras, webcams, online videos and so on. By adopting any of the aforementioned software, you can find it a piece of cake to create/burn/convert and back up your favorite movies in Blu-ray format(s), without stress.


 Try for Free
 Try for Free

