Last updated on 2021-09-06, by
How to Fix Audio Delay in VLC
The VLC Media Player is a popular player program for many users for a long time. However, a number of users have been going through some unpleasant situations from the VLC audio delay problems. How to fix desynchronized video and audio with VLC on my computer? Please follow the next content.
Part 1: How to Fix Audio Delay in VLC
In most cases, VLC should be able to automatically do the job of VLC audio sync. However, when the real issue happens like hearing the sound before the movie scenes move, you should know that the audio is out of sync. This common issue could be found similar to the VLC subtitle delay problem. But actually, VLC could be a great tool for how to fix audio delay in VLC itself. There are mainly two ways to fix desynchronized video and audio with VLC Media Player. The first one is using the keyboard shortcuts while the alternative way will show how to sync audio in VLC via menu step by step.
The method by hotkeys:
Step 1. Check the playback.
Examine the playback to see if the audio does have issues syncing with the video.
Step 2. The hotkeys are designed differently for Mac users and Windows users.
If you are running VLC with a Windows computer, remember the “J” and “K” keys. When you are sure that the audio is running behind the video, you can press the “J” on the keyboard to speed up. On the contrary, hit the “K” to slow down the audio playback.
If you are a Mac user, the default keys to adjust VLC audio delay are "F" and “G". Use the “F” key whereas the sound is delayed. The opposite is to press “G” to have the audio go backward.
Step 3. Keep pressing the shortcut keys until the audio syncs with the image.
Every time when you press the keys, 50 milliseconds of the soundtrack will be put forward or backward. So the whole augmentation of each adjustment will be confirmed and displayed on the upper right corner of the interface. But the popping up confirmation will disappear soon.
The method by accessing menu settings:
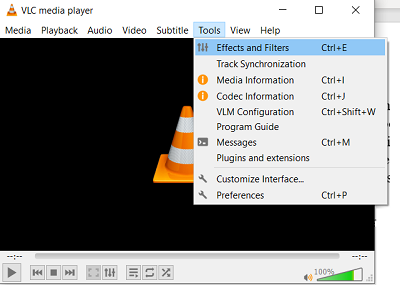
Step 1. During the playback, navigate to the “Effect and Filters” through the “Tools” menu option. Or you can also use the shortcut keys “Ctrl + E” to open the panel.
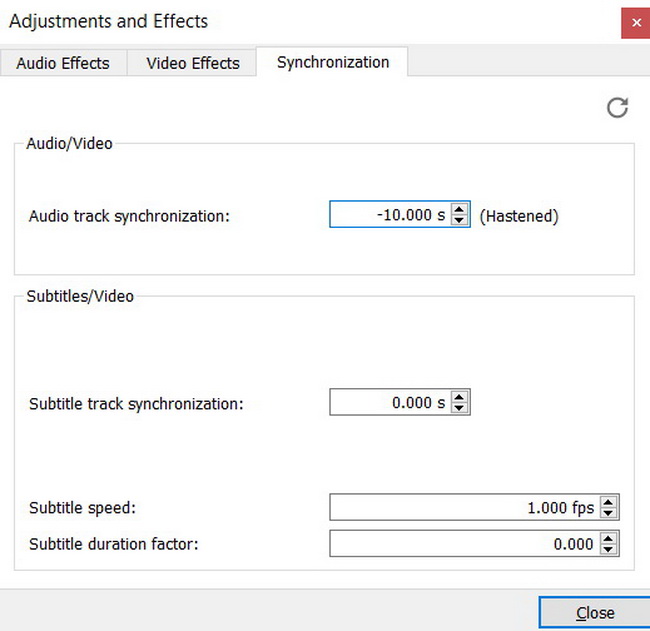
Step 2. There will be three labels on the top, choose the “Synchronization” tab. You can see two sections of “Audio/Video” and “Subtitles/Video” respectively. Under the “Audio/Video” box, there is an option for setting the “audio track synchronization”. Input the numerical value to reach the desired state so as to fix desynchronized video and audio with VLC.
Step 3. Just hit the “Done” button to save the settings. Notice that the above methods for how to sync audio in VLC are only working temporarily.
Part 2: Another Way to Sync Audio Permanently
Besides knowing how to fix desynchronized video and audio with VLC, here you can have another option to fix the VLC audio delay permanently. This solution is using the Avidemux tool to synchronize both audio and video files then save as a whole.
Step 1. Download and install.
Go to the official website of Avidemux. Download and install it on the computer.
Step 2. Run Avidemux on Windows and load VLC audio delay source files.
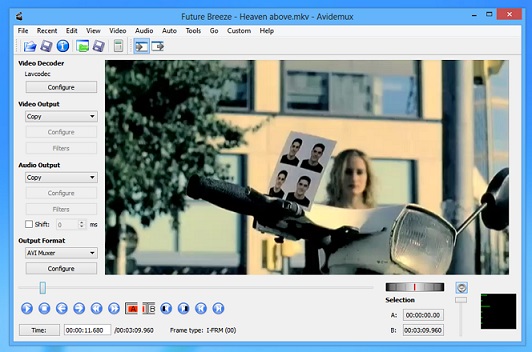
When you see the interface, you can load up video files by clicking the “File” option from the menu then choose “open file”. There is also an icon meaning open the folder to import new video files. Click either of them to input VLC audio sync files.
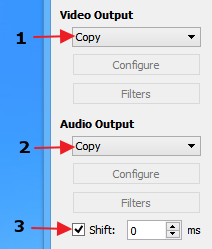
Step 3. Make sure the “Shift” is enabled.
On the left panel, there are four sections. In the “Video Output” and “Audio Output” sections, be sure that both options are in the “Copy” mode. The most essential thing is to check the box in front of the “Shift”. Usually, this option is set as disabled by default. However, this critical function plays a pivotal role in the process to fix desynchronized video and audio with VLC.
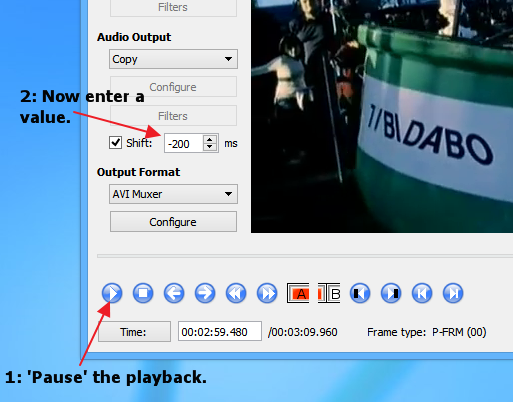
Step 4. Stop the playback and set the shift value.
Use the preview function to play audio and video at the same time. Pause it when you figure out there would be an audio delay or hastened. The pause button is over the time indicator. The in the box of the shift, you can input a new value to make the audio match up the image. If you need the audio to catch up, you should enter a negative sync value to the box. On the backward, a positive value should be inserted to delay the soundtrack coming out.
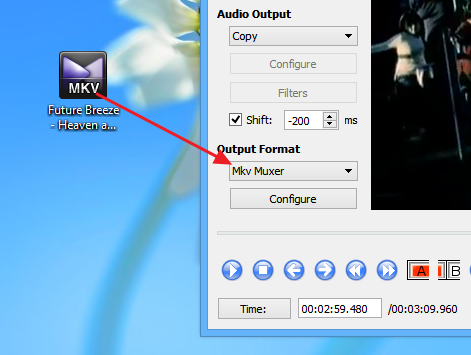
Step 5. Check with the output format.
When you think everything is all set for repairing VLC audio sync problems, you are one more step away from saving the modifications. That is to make a decision for the “Output Format” option. Click on the first option to pick up one format from AVI, FLV, MP4, MPEG-TS, MKV, etc. Notice that Avidemux does not support a huge variety of format codecs, so you may want some proper formats like MP4 or MKV Muxer.
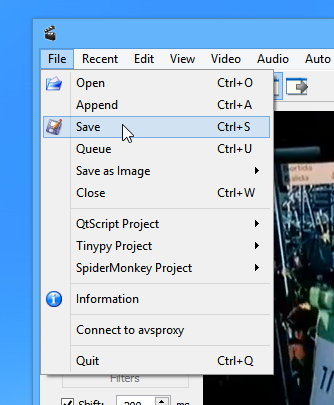
Step 6. Save the fixed VLC audio delay files.
Navigate to the “Save” option from the “File” drop-down menu. Or you can press “Ctrl” and “S” keys at the same time to process saving.
Part 3: Try Another Player - Leawo Blu-ray Player
From time to time, it may not always be the right choice to fix desynchronized video and audio with VLC. There are many player programs available on the market to help resolve the VLC audio delay problem. For further potential VLC audio sync issues, it seems necessary to switch to a more powerful player.
Leawo Blu-ray Player would be the best recommendation to tackle such audio sync trouble. It is a formidable player program to support all the audio and video codecs, including AVI, MPEG, WMV, ASF, FLV, MKV, MP4, RMVB, NSV, and more. Meanwhile, you can easily avoid any VLC audio delay problems while using this best VLC alternative application. With this software, you will find it is more effective to sync the audio with images. Apart from matching up audio and videos, it delivers the unbeaten picture quality as it originally looks. The advanced audio processing technology allows it to output soundtrack in Dolby, DTS, AAC, TrueHD, DTS-HD (including 5.1, 7.1 channels), etc. Moreover, users are capable of doing more personalization settings, such as skins and themes. Other features like the virtual remote controller, snap screenshots, and power manager will ensure the best watching experience for any media sources.
Part 4: How to Sync Audio in Leawo Blu-ray Player
Step 1. Download and install the software.
Click on the images below to download and install Leawo Blu-ray Player for free on the computer. It supports operating systems of Mac OS and Windows, including Windows 7, 7, 8, 8.1, and 10. Be aware of the version to be downloaded.
Step 2. Launch the software and load video files
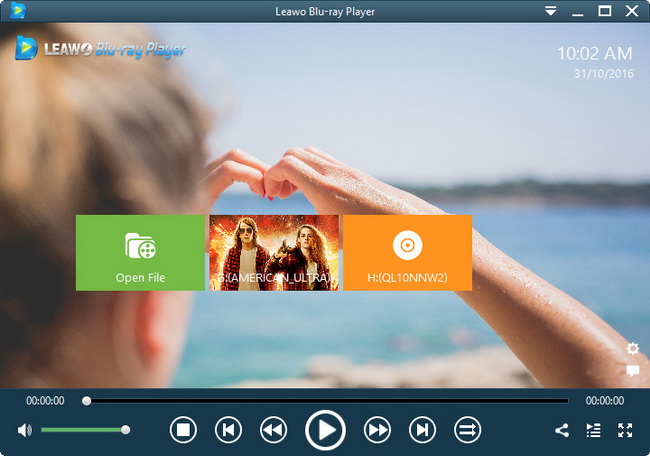
Tab the big green box with the “Open File” on and browse videos from folders. Select the video and it will start to play directly.
Step 3. You can do some audio setting.
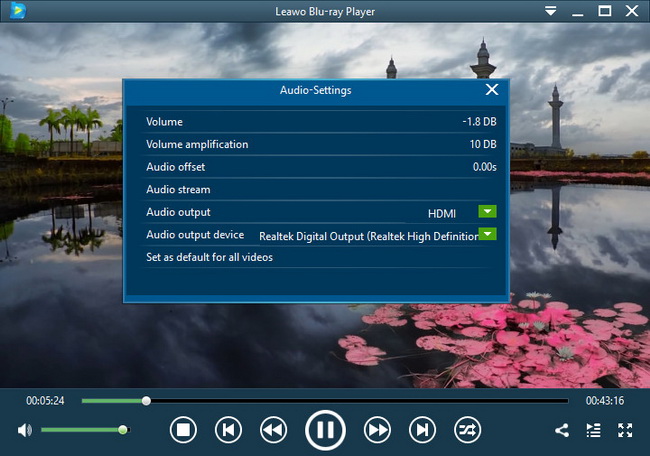
Move your mouse to the top left of the interface, and four icons will come out. Press the third icon which means the “Audio” to enter the audio settings. In this panel, you will be free to change any audio adjustment. At the third option, the “Audio offset” is set for fixing the VLC audio delay trouble. If the audio is late, it is easy to just put a positive value to this option. For the opposite, you need to type a minus symbol in front of the number.
Step 4. Utilize the playback setting.
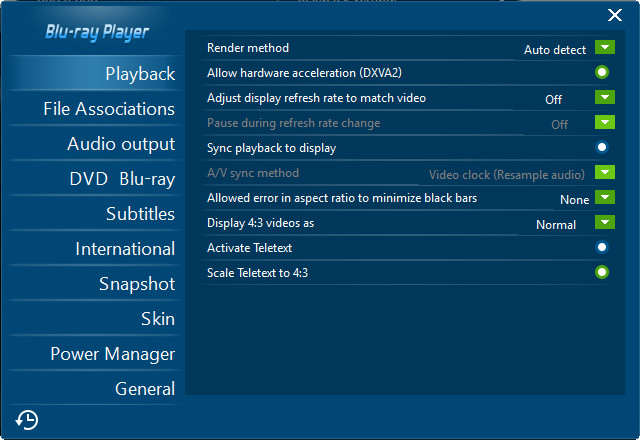
If you are in need of changing more parameters to optimize your video playback, it is totally reasonable to take advantage of the playback settings. To access this parameter board, you can click on the wheel icon that is located at the bottom of the play area. There is a shortcut key for getting this panel, press F5 and the program setting panel will show up. You may want to check the “Sync playback to display” option.
Part 5: Comparison Chart between VLC and Leawo Blu-ray Player
| Leawo Blu-ray Player | VLC Media Player | |
|---|---|---|
| Supported OS | Windows XP, Vista, 7, 8, 10, macOS | Windows XP, Vista, 7, 8, 10, macOS |
| Blu-ray support | Yes | Supported with plug-ins |
| Video effects | Yes | No |
| Supported video and audio formats | Over 180 | Unclear, because plug-ins can be added |
| Premium audio | Dolby, DTS, AAC, TrueHD, DTS-HD (including 5.1, 7.1 channels) supported | Limited |
| Power manager | Yes | No |
| Virtual controller panel | Yes | No |
| Ability to watch videos at visual angles | Yes | No |
| Changeable skins | Yes | No |


 Try for Free
 Try for Free

