Last updated on 2021-09-07, by
How Do You Turn Off Shuffle on iTunes
As a tech veteran, especially in Apple related issues, I was frequently asked questions on digital issues covering iTunes eBook, music, movie, and others. Recently, I have received quite a few emails and messages on how to turn off shuffle on iTunes, just like below:
“How to turn off shuffle in iTunes 12.x? I am presently looking at a view of iTunes where I can see at least FIVE different kinds of "shuffle" icon, and yet none of them do what I expect them to do. Clicking on icons #1, 4 or 5 seem to just advance to the next song, but keep the shuffle turned on. #3 is like a jump into hyperspace, taking me to a random song elsewhere in my library. When I click on #2, it gets a highlight (what does that mean?) and clicking on it again gives me a little "1" next to it. This one, I can guess, means repeat the current song. I've been randomly clicking on these five different icons and none of them seem to cancel the shuffle entirely. A little help here!”
Therefore, in this guide, I would like to make a summary on how to turn off iTunes shuffle on Mac and Windows computers. Of course, it’s quite easy to turn off shuffle on your iOS devices (iPhone, iPad, and iPod), which is why we won’t discuss this here.
Part 1: How to turn off iTunes shuffle on Mac and Windows through iTunes menu
Shuffle within iTunes is a feature that enables music to shuffle between songs in a library. By turning this feature on, you are going to play back music files in a shuffle mode. If you turn this feature off, songs within iTunes won’t be played in a shuffle mode, but in order or other modes. Sometimes, users might have selected to enable the shuffle option intentionally but forgot to turn off it, or shuffle mode might have been turned on accidentally or inadvertently. In such cases, iTunes would automatically shuffle songs in a music library. You could turn off shuffle in iTunes on Mac and Windows computers easily.
There are a few methods for you to do this. You could directly click the little shuffle button to turn shuffle feature off or on directly in iTunes. Also, you could turn off shuffle on iTunes via the iTunes menu options. The below steps would show you how to turn off Shuffle on iTunes on Mac and Windows computer via iTunes menu options.
1. On your Windows or Mac computer, open iTunes program. You could start playing any music as you like now.
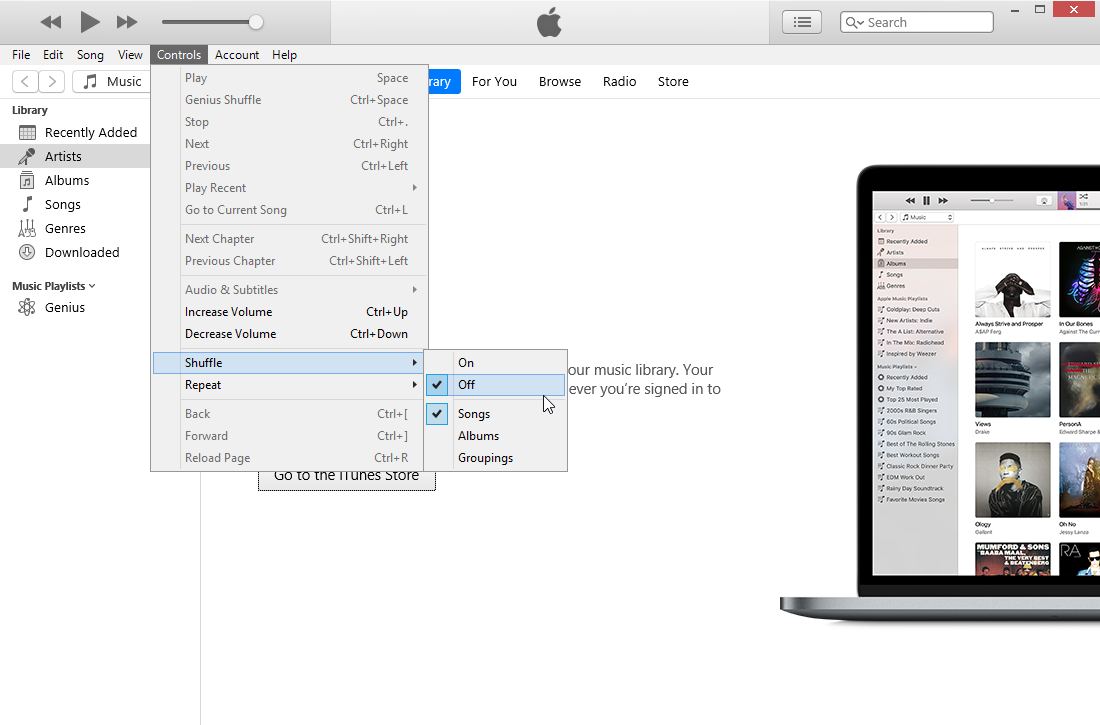
2. On the menu bar of iTunes, go to the “Control” menu option and open it.
3. Scroll down to the “Shuffle” option on the drop-down panel and click it.
4. You could then see options including On and Off on the upper side and Songs, Album and Groupings options on the down side. To turn off shuffle on iTunes, choose Off option. You could decide to apply the shuffle setting to Songs, Album or Groupings here as you like.
This should help you completely stop shuffling in iTunes on Mac OS or Windows. The operations on Mac OS and Windows are the same. If you find that your iTunes still shuffles songs after finishing the above settings, you could relaunch iTunes to make sure every setting is activated.
Part 2: How to turn off shuffle on iTunes via Shuffle Toggle
As mentioned above, you could also toggle the shuffle button switch to stop shuffling of music in iTunes. The shuffle button in iTunes looks the same as it does on iPhone and iPad, so if you’re familiar with shuffling music in iOS devices, or disabling shuffling in iOS devices, you likely know what button to look for. The below steps would show you how to turn off shuffle on iTunes via shuffle toggling in detail.
1. On your computer, fire up iTunes program and navigate to the Music tab as you usually do. Play back any song in your iTunes music library as you like.
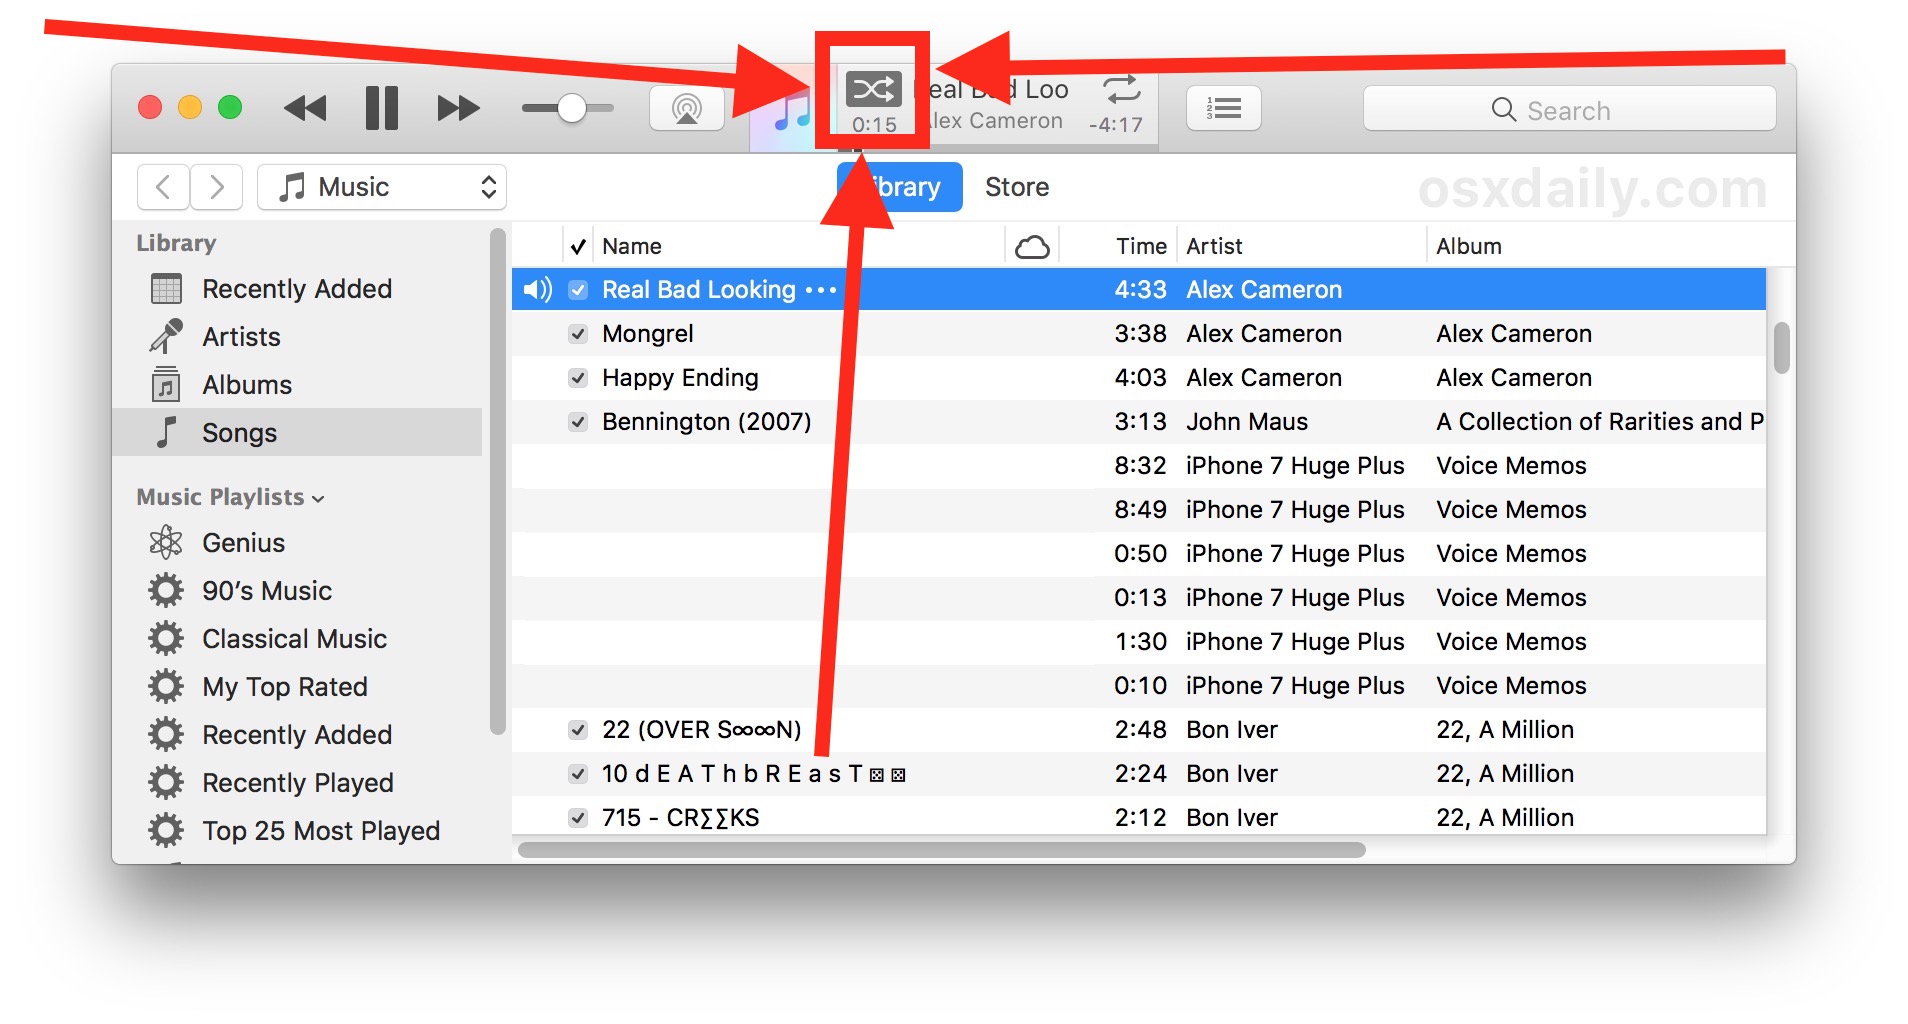
2. Then, at the top of iTunes, you could see the track information including artist, song name, and song length. Also, you could see the shuffle icon that looks like two intersecting arrows. Click it so that it’s not highlighted.
If shuffle is enabled, it will look like it does above and below, with a darkened highlight around the button. If shuffle is disabled, it will look like two intersecting arrows without a border or highlight on them.
Turning off shuffle on iTunes is actually an easy task as selecting the “Off” option in the Shuffle menu, or by clicking on the shuffle button and leaving it not highlighted.
Part 3: How to turn off shuffle on Apple Music
Besides questions on turning off shuffle on iTunes, some iPhone users have problems in turning off shuffle on Apple Music on their iPhone devices, like this one:
“How to turn off shuffle in Apple Music on iPhone iOS 10.1.1? When I play any album in Apple Music on my iPhone 6 Plus, iOS 10.1.1, the tracks are shuffled. i.e. when I press the >> button some track other than the next one is played. The only icon related to shuffling that I can see anywhere in the app is 'Shuffle all'. When I play an album I want to hear the tracks in the original order. How do I achieve this?”
On Apple Music, you could shuffle or repeat a song for listening. However, these 2 options have been hidden. You could follow the below steps to learn how to turn off shuffle on Apple Music:
1. On your iPhone, open Music app. And then play back any song in Apple Music app.
2. Tap the bar at the bottom where you see the album art, currently playing song and play/pause and next song controls.
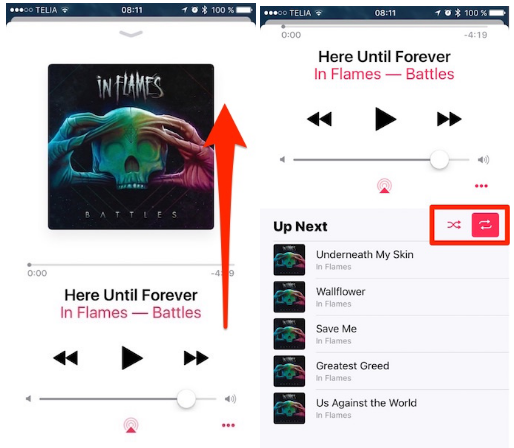
3. You get a sheet overlay which seems to end at the bottom of the screen, but if you scroll this down (drag up on the screen) you find the controls for shuffle and repeat.
4. Click on the shuffle button to turn on shuffle mode, or click the repeat button to play songs in repeat mode.
5. Now you have successfully turned off shuffle on Apple Music on your iPhone. You could turn off shuffle on Apple Music on other iOS devices like iPad and iPod in the same way mentioned above.
It should be noted that with the update of iOS, the shuffle and repeat panel might be switched to other places. However, the basic operation would stay the same.
Bonus: How to transfer iTunes music to iPhone for listening on the go
We all know that the songs purchased from iTunes music store will be automatically synced to our iPhone, iPad and iPod devices without extra cost. And also, with iTunes, we are able to import external songs from computer and then sync these songs from iTunes to iPhone, iPad and iPod for unlimited on-the-go listening. However, syncing iTunes music to iPhone, iPad and iPod through iTunes has a big disadvantage: iTunes will erase existing music library on iPhone, iPad and iPod, and then replace with iTunes music library. This is not user friendly at all. Is there any way in which we could transfer iTunes music files to iPhone without erasing? Take a try of Leawo iTransfer.
Exclusively designed for iOS data transfer and backup, Leawo iTransfer could help you easily transfer data and files between iOS devices (iPhone, iPad and iPod), iTunes and computer. It could transfer up to 14 types of data and files including notes, contacts, reminders, music, videos, photos, messages, etc. Better than iTunes, Leawo iTransfer not only doesn’t erase existing data and files in target devices, but also breaks Apple’s limitation on transferring data from iOS devices backwards to iTunes and computer.
Check the below steps to learn how to transfer music from iTunes to iPhone for on the go music listening with this iPhone data transfer program.
1. Download and install Leawo iTransfer on your computer.
2. Connect your iPhone to computer via the USB cable provided by Apple. And then launch Leawo iTransfer.
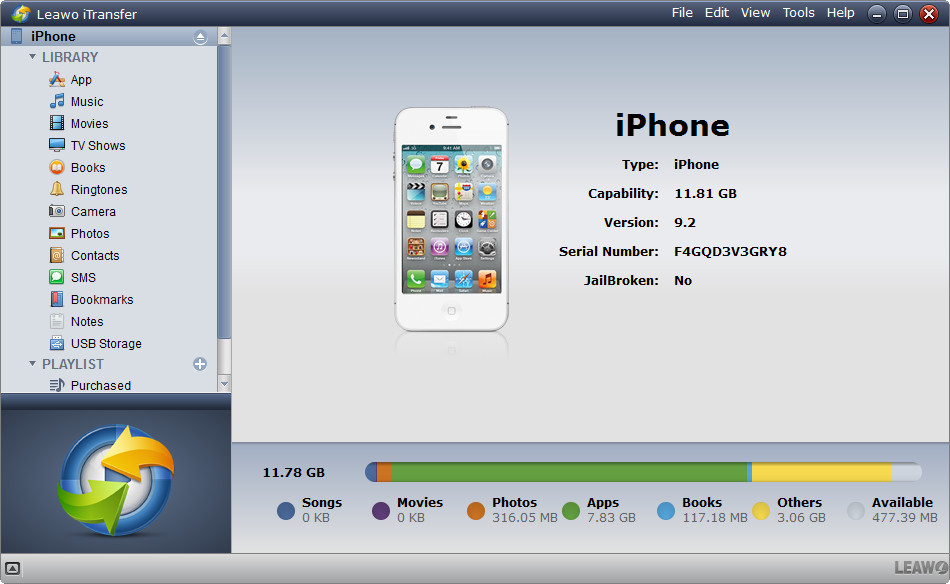
3. Leawo iTransfer would automatically scan your iPhone device and then list the device information on the main interface.
4. On the left side bar, you could see your iPhone, iTunes libraries.
5. Open “iTunes > LIBRARY > Music” tab. You will then see all music files in your iTunes music library on the right panel.
6. Select any music file you want to transfer to iPhone.
7. Right click to call out the right-click menu and then choose “Transfer to” option.
8. Choose “My iPhone” as target device. Leawo iTransfer would then start to transfer iTunes music to iPhone immediately. If there pops up a dialog, choose your iPhone as target in the “Transfer to list” box and then click the “Transfer Now” button to start transferring iTunes music to iPhone.
Leawo iTransfer provides quite easy solutions for you to transfer and back up iOS data and files. If you are using a Mac computer, you could turn to Leawo iTransfer for Mac.


 Try for Free
 Try for Free


