Location service is a service that allows apps or websites to distinguish users’ location. With cellular data, Wi-Fi or GPS, these apps or websites (including map, camera, Safari or Chrome, or other third-party apps) can quickly find users’ location.
For example, if you want to use an app to find a restaurant nearby, you can turn on location service for the app, so that you can easily find the restaurant you want to go.
- Part 1: Why Disable Geographic Location Services on an iPhone or iPad?
- Part 2: How to turn off location on iPhone completely?
- Part 3: How to turn off location on iPhone for specific apps?
- Part 4: How to keep your iPhone from remembering parking location
- Part 5: How to turn off website location tracking in Safari
- Extra: How to recover data when your phone was stolen and turned off location?
Part 1: Why Disable Geographic Location Services on an iPhone or iPad?
To disable geographic location services on iPhone or iPad probably has many reasons to cause us to do so, but considering for security and privacy is the most common reasons to make us disable location information on our iPhone or iPad.
Once your device is used in the environment with high security, disabling location services may be needed to protect your location. As a matter of fact, disabling your location services on your iPhone or iPad may be a requirement due to your job and your living place, which seems that lots of personnel hired by the government and the military.
Sometimes, if your devices are used in a location which you would like to keep private, the location may be your home address or your office or your shelter or other beautiful places that you don’t want to be discovered or ruined. In this case, disabling geographic location and geographic mark can be disabled on your device camera. You also can disable location services from all the apps related to social media, remove the location mark and its related metadata from your photos, this would be a good idea to keep your geographic location in privacy.
Another reason that a lot of users select the disabling on the location services is to enhance the battery life of their devices, though this is only based on each app they use. More power is required when you use GPS and location services, therefore, if lots of location information is used in one app, the battery life of your devices will be largely reduced.
Part 3: How to turn off location on iPhone for specific apps?
Sometimes, you may just prefer Google Maps rather than the location services for Instagram, then you can turn off the location services for specific apps according to your preference. Below we will guide you on how to disable location service on your iPhone for specific apps.
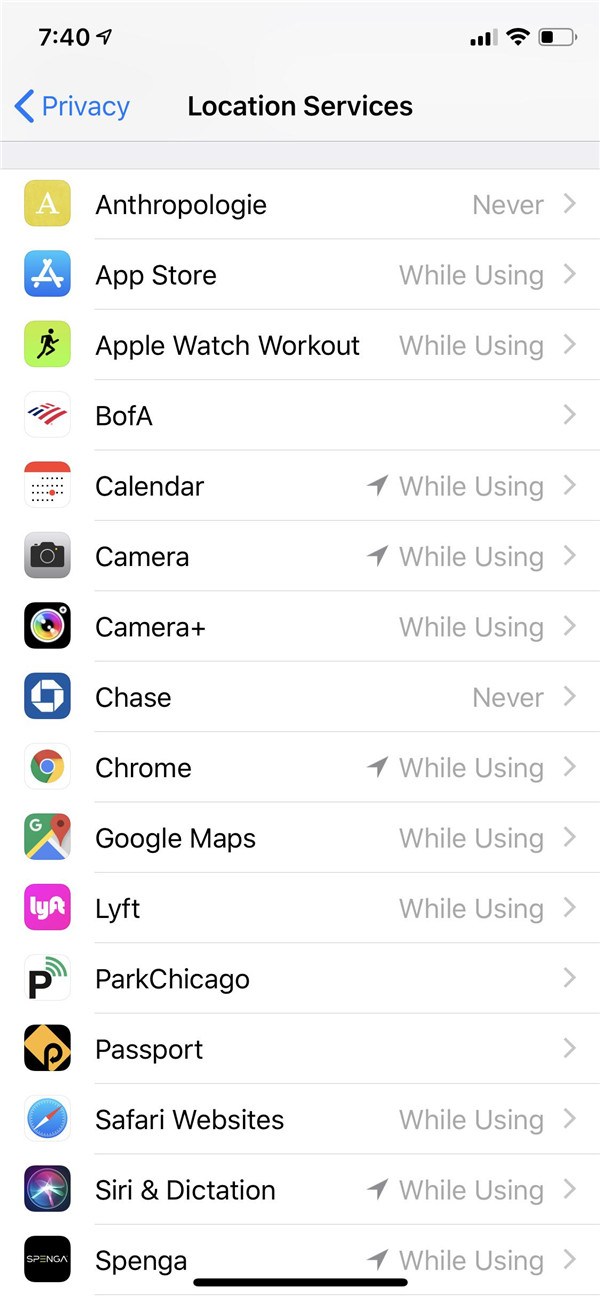
1. Navigate to Settings on your iPhone, then click on the tab “Privacy”.
2. Tap on the option “Location Services” on the top of your iPhone screen.
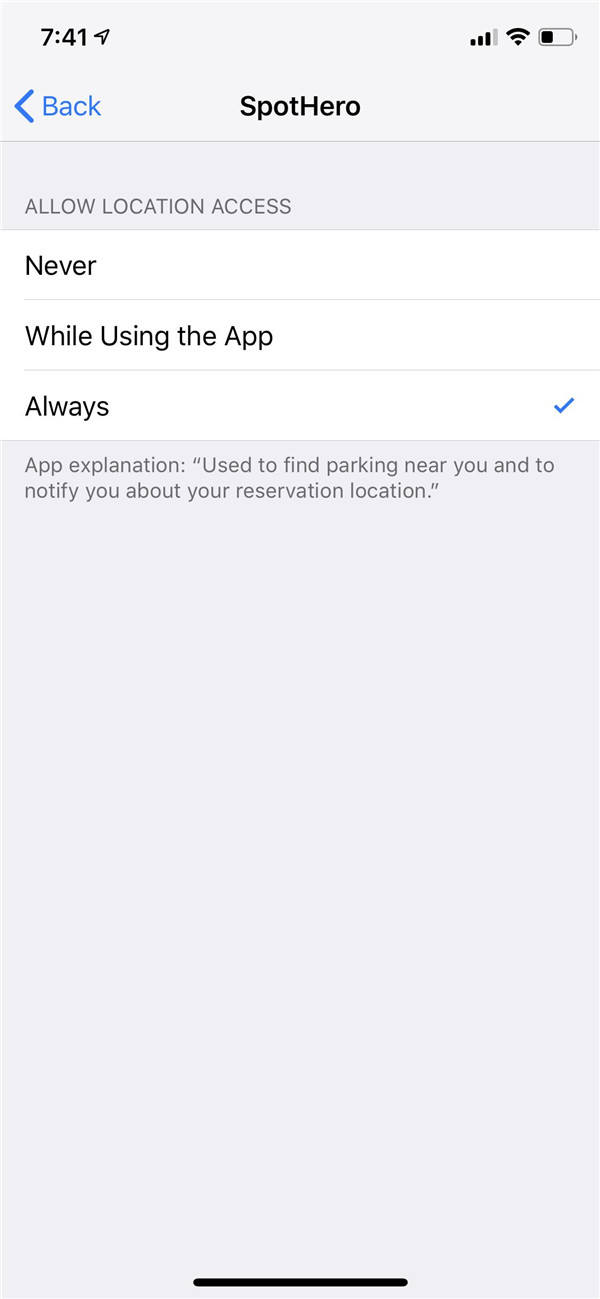
3. Scroll down till a list of apps on your iPhone using location services. There are three available options like “Never”, “Always” and “While Using” for your apps.
4. To make change on the selection of your location services for the specific apps, you can choose the app by clicking on the name of it. Then you will go to a new screen.
5. You can select the option you prefer and then the location services can be set to your needs.
Part 4: How to keep your iPhone from remembering parking location
One of the best features for Apple Maps is that your parking location can be remembered as long as you connect your iPhone to the Bluetooth or CarPlay of your car. But sometimes you may want to turn off this feature when it is not used. The following instruction will guide you on how to do step by step.
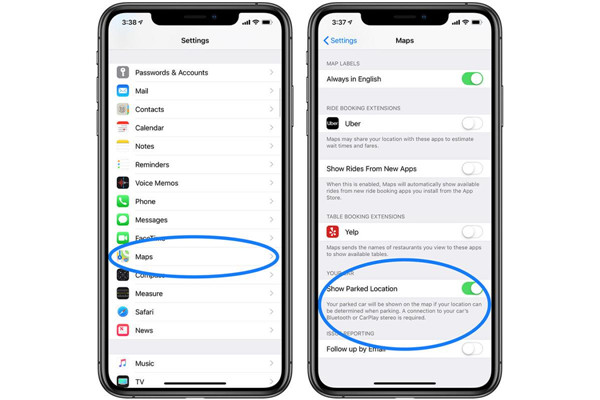
1. Launch Settings app on your iPhone.
2. Scroll down your iPhone screen until you find the Maps tab, then tap on it.
3. Scroll down when you are in the Maps section, you will see “Your Car heading”.
4. Toggle the button of “Show Parked Location” to off position.
Part 5: How to turn off website location tracking in Safari
To have better understanding on visitor or user, and create much better experience for them, some data are tracked by website all the time. But, sometimes we may get annoyed with the website tracking and want to disable the website tracking. Of course, website tracking can be turned off in Safari or other web browsers. Here we will guide you on how to turn off website location tracking in Safari step by step as below.
1. Launch Settings app on your iPhone.
2. Tap on the tab “Safari”.
3. Enable the option “Do Not Track” in the Privacy & Security section.
4. Moreover, all cookies can be disabled, you just need to tap the option “Block Cookies” and then choose “Always Block”. However, this also causes another issue you should consider, what if you would like the website to remember the information like username or session data?
Extra: How to recover data when your phone was stolen and turned off location?
Have you ever met a terrible situation like that? Your phone was stolen and the location service of your phone has been disabled that you cannot find your phone back by using the feature “Find My Phone”. But you have a lot of important data and files kept on your iPhone and want to get it back. If you encounter this occasion, what would you do to recover the data from your phone?
Here we will recommend you an outstanding third-party tool - Leawo iOS Data Recovery to help you recover the data from your stolen phone. Leawo iOS data recovery is a comprehensive software app for recovering data from iOS devices. No matter what reasons have caused the data loss, Leawo iOS data recovery is able to recover the lost data from different models of iOS devices. More than 14 kinds of data can be recovered in an easy and effective way with the help Leawo iOS data recovery.
Furthermore, this software also acts as a backup tool for iPhone, iPad and iPod Touch. 100% safety, accuracy and speediness are guaranteed in this software, you even are allowed to preview the data and then choose the data that you want to recover from iOS devices. The following instructions will guide you on how to recover data from a stolen iPhone with disabled location services.
Here is an introduction of recovering data from iTunes Backup via Leawo iOS data recovery. Before recovering data from iTunes backup, you should note that you have got your data from your stolen phone backed up in iTunes previously.
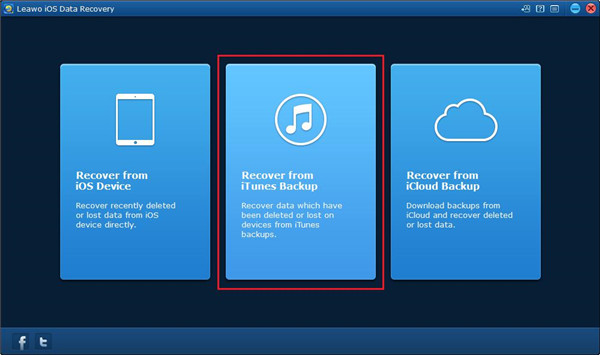
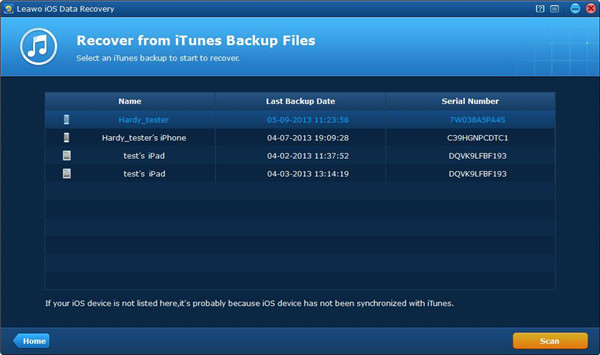
1. Launch iOS data recovery on your computer and then choose the second tab “Recover from iTunes backup” on the main interface of the software window.
2. Once you have chosen the tab “Recover from iTunes backup”, all backups from multiple kinds of iOS devices via iTunes will be displayed in the list. If the backup from your stolen phone cannot be found, the most possible reason is that your stolen phone hasn’t been backed up on this computer. Once you have found your backups, select it and click on the button “Scan” to begin scanning.
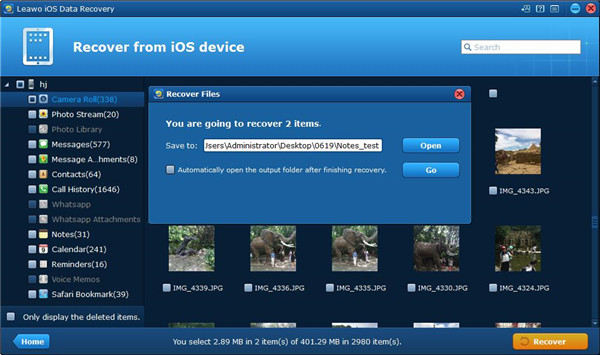
3. Once the scanning process is completed, up to 14 kinds of data that can be recovered from iTunes backup are shown on the left sidebar of the software window. Click on each kind of data and view the related single file on the right part of the window, then select the data you would like to recover.
4. After you have selected the files for recovering, click on the button “Recover” on the right bottom corner, then a dialog will pop up and you are required to choose a destination folder to save the recovered data. You can click on the button “Open” to select the output directory. If necessary, the option “Automatically open the output folder after finishing recover” can be checked to have the output folder opened by the software after the data recovery is completed. Finally, click on the button “Go” to begin recovering data.

