
Animation gives you the ability to give power, life, and feeling to inanimate objects, people, or pictures that would otherwise be lifeless. But how to make animated videos becomes a big question mark. Making an animated movie can even sound like a challenging task. Whether you do-it-yourself or have access to an in-house team, without a clearly defined process, creating even a simple animated video can still be a daunting task.
The production pipeline of a typical animated short or a movie can be divided into three stages: pre-production, production and post-production. So if you're thinking about trying it yourself and want to know how it's done, or even if you're just curious about the process, this article is one you don't want to miss.
Part 1: Pre-Production: Making an Animatic
The first process in the animation pipeline, and also one of the most important, is pre-production. It begins with the main concepts which are initially turned into a full story, and then, once the story has been finalized, other things such as the script, shot sequence and camera angles are worked on.
1. Write out a script. You need to write down your ideas clearly and give them structure before you start working. Your script doesn't need dialog, but it does need a theme, the characters, visuals, and of course a beginning, middle, and end.
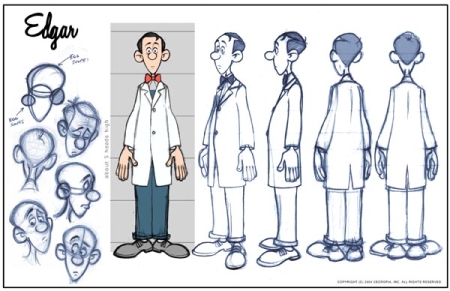
2. Sketch character models. Before starting to animate, you need to know what your characters are going to look like. Sketch them in a variety of poses, costumes, and expressions to get a feel for what they will look like. Remember that a character can be anything in an animated film, from a bear to a pair of salt & pepper shakers. Still, you want to develop your characters ahead of time so that they look consistent when you animate them.
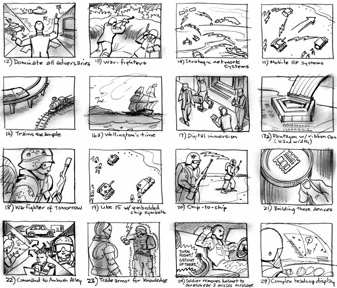
3. Draw up a storyboard. Storyboards are individual drawings for every bit of action in the script and are used in the production of almost every film -- animated or otherwise. They are both simple and comprehensive, as you need one for every change you want in the film. They do not, however, need background detail or color, unless it is essential to the story. You can find and print a variety of free storyboard templates online, or draw your own. Each frame of the storyboard has two parts: the image and the dialogue.
4. Import your storyboard into a filmmaking program, saving each frame individually. Once you have your shots planned out, import them into your computer. Make sure to name them appropriately (Act1.Scene1.Shot1.jpg, for example). When you're done, import them all into your film editing software (iMovie, Windows Movie Maker, Adobe After Effects, Leawo DVD Creator, etc.) and put them in the correct order.

5. Use your storyboard to make a timed slideshow, or animatic. Animatics are the rough cuts of animation -- they get the pace and rhythm of the short together and allow you to get the timing right for your final short. This sounds complicated, however, they are really just slideshows with proper timing. Put the images of the storyboard in order on your editing software and extend, cut, and play with them until you have a "rough" cut of the final film.
6. Add the dialog and sound effects and adjust the timing of the animatic as needed. Once you have your rough timing down, it's time to pre-record the dialog. This doesn't have to be perfect, and you can even fake the sound effects with your mouth and hands if you want. What matters is the timing. Do you have enough time in the "shot" to get all the words out? Extend or shorten the length of your slides as necessary.
7. Review your animatic as if it were the final film. The final animatic should tell the full story of your film, minus the trappings of color, backgrounds, and details.
Part 2: Production: Animating your Film
Now that the storyboard has been approved the project enters the production phase. It's here that the actual work can start, based on the guidelines established during pre-production.
1. Determine your animating medium. This usually depends on your expertise and hardware. For example, it is very difficult, if not impossible, for a beginner with an older computer to make 3D animations like Pixar. There are many, many animating software and styles, and all of them have intricacies and techniques unique to the software.
● 2D Animation: This is the classic cartoon, hand-drawn look.
● 3D Animation: 3D animation is much harder to master. You make models of the characters and code movement into them, making 3D animation a sort of artistic/coding hybrid. You also need to add lighting and textures. Most 3D animation is the result of large teams working together.
● Stop-Motion: So simple anyone can do it, stop-motion is when you use real-life figures or drawings and take a picture after every small movement. It is incredibly time-consuming, however, as you often need upwards of 12 photos per-second of footage to make it look smooth.
● Rotoscoping: Rotoscoping is animating on top of conventionally shot films. You will need a tablet, and you go through the footage frame by frame, using the live video as a guide for drawing the characters. The result is a realistic, but still animated, look.
2. Draw out your backgrounds, sketch, model, or design your "key poses" and then draw out the "in-between" frames.
3 Composite the footage. Composting is just a fancy way to describe stringing the movie together. This can be as simple as ordering all the frames for stop-motion or as complicated as rendering a 3D model with accurate lighting.
Part 3: Post-Production: Finishing Your Film
Post-production is the third and final step in film creation, and it refers to the tasks that must be completed or executed after the filming or shooting ends. These include the editing of raw footage to cut scenes together, inserting transitional effects, working with voice and sound actors and dubbing to name just a few of the many post-production tasks.
Sound effects and polishing
1. Record any dialog for the final movie. It's time to get the vocals just right. Your voice actors can see the final scene, their characters' expressions, and the timing you want in your final shot. This allows them (or you) to deliver the best vocal performance.
2. Add in sound-effects where appropriate. Sound effects should come after the voice actors, and tuned to the appropriate volume where they don't overpower the dialog. There are some exceptions to this rule, of course. For example, if there is an explosion the characters need to react to, it may be best to put it in first, before recording dialog. This helps the actors out with reactions.
3. Add your polishing touches, like effects, transitions, and color correction. For example, if you want an old-time, sepia tint to your movie, add it last. These sorts of small changes are unnecessary while you are trimming, cutting, and building your movie. Moreover, they will be useless if you cut the scene or change the color scheme. All these minute touches need to come last, once you're sure the "meat" of the movie is done.
Final cut and sharing
After making animated videos, you can't wait to see if it works well on discs so that you can save them! Then here is the solution to burn your animated videos to discs using Leawo DVD Creator and play it with Leawo Blu-ray Player. Hereby, I'd like to recommend this wonderful software - Leawo DVD Creator - and show you how to make animated videos and burn animated videos to 3D DVD in an easy and effective way.
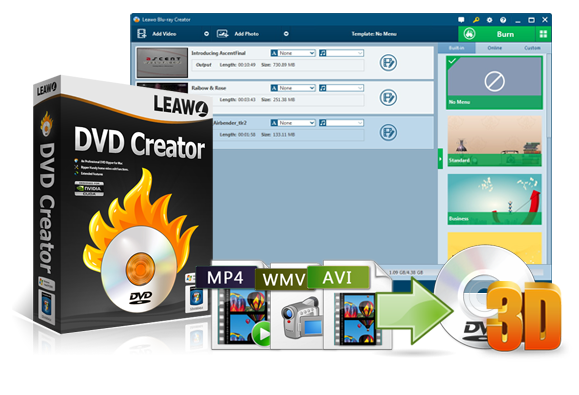
DVD Creator
☉ Convert videos like MP4, AVI, MKV to DVD format fast.
☉ Create DVD-5, DVD-9 disc, folder or ISO image without quality loss.
☉ 1-click operation to create photo slideshows and burn to DVD.
☉ Easily editable effects, 2D to 3D conversion support.
☉ Built-in menu templates and edit disc menu with personal preferences.
![]()
![]()
Step 1. Add videos to DVD creator.
You can import videos to the DVD creating software in three ways:
a. Click the "Add Video" button to load videos and images.
b. Click the invert triangle buttons next to the "Add Video" button. You could then select to import photo folder, video folder or ISO files for burning to DVD.
c. Directly drag and drop files to the program.

Step 2. Set disc menu (optional)
If you want to add disc menu to output DVD movie, you could choose from the right sidebar. Leawo DVD Creator offers you multiple preset disc menu templates in different themes like Standard, Business, Education, Childhood, Holiday, etc. Also, it allows you to DIY disc menu with your own images and audios. You could get instant preview of the menu you've selected. If you want no menu, just select "No Menu" option on the right sidebar after you load source videos.

Step 3. DVD burning settings.
After setting disc menu, click the big green "Burn" button to call out the burning settings panel, on which you need to figure out Burn to, Disc Label, and Save to options.

Step 4 Burn video to DVD.
After the burning settings, click the "Burn" button on the popup burning settings panel to start burning videos to DVD. This DVD Creator would immediately start its work and finish it in a few minutes.

Conclusion
Just like any other film, animation takes time, patience, and a lot of planning to get right, but anyone with a computer can make an animated short film. With Leawo DVD Creator, you will not have less questions about how to make animated videos as it provides templates and themes, even lots of perfect editing tools! Sophisticated program settings are displayed in a novice friendly way. Leawo Free Blu-ray Player software has done all program settings for you automatically, but, not against any of your willing of changes.
 Aug. 21, 2018 by


 Prof. Media
 Blu-ray Ripper
 Blu-ray Copy
 iOS Data Recovery
 [12/29/23] MAX Downloader V15.0.0
 10,000,000 people are using Leawo!
 All Transactions are protected!
 30-Day Money Back Guarantee!