
Although Twitch is known as the biggest live streaming website, you can also upload prerecorded videos to Twitch if you have great content to share. Twitch has made it easy for anyone to upload a prerecorded video clip, and has provided a very detailed and clear guide for anyone who may have problems or questions when uploading a video to Twitch. According to the official guide, Twitch accepts videos in MP4, MOV, AVI and FLV file formats To be uploaded. However, many users have encountered some problems when uploading a video in the FLV format. If you happen to have the FLV won't upload to Twitch problem, then you are in the right place. Because in this article, we're going to talk about how to upload FLV to Twitch successfully by converting the FLV to a better compatible format with some professional video converter programs. Now let's get started.
Outline
- Part 1: Upload FLV to Twitch with Leawo Video Converter
- Part 2: Upload FLV to Twitch with Koyote Free Video Converter
- Part 3: Upload FLV to Twitch with Syncios iPod Video Converter
- Part 4: Upload FLV to Twitch with fConvert
- Part 5: Upload FLV to Twitch with SUPER
- Extension: How to Download Twitch Videos?
Part 1. Upload FLV to Twitch with Leawo Video Converter
To begin with, I want to introduce my personal favorite video converter program for you to convert your FLV video to a better compatible format with Twitch, and this video converter program is called Leawo Video Converter
Leawo Video Converter is an all-inclusive video converter program with a variety of powerful video processing abilities. Leawo Video Converter features a leading video converting technology, allowing the program to be able to convert video or audio files between more than 180 formats and still have the best quality retained in the final converted result. When it comes to the converting speed, Leawo Video Converter can also have a great performance. By comparison to the industrial average level, Leawo Video Converter can have a 6 times higher speed when converting a same video file, saving a lot of times for you in each converting task. Also, Leawo Video Converter has a built-in video editor module, allowing you to not only trim, crop your video, but also remove background noise, adjust video parameters, add watermark and turn 2D video to 3D.
Besides the powerful media professing ability, another reason why Leawo Video Converter is so popular is its great ease of use. With the excellent software design, Leawo Video Converter makes it easy for anyone to convert an FLV video for uploading to Twitch effortlessly. If you want to use Leawo Video Converter to convert your FLV video but don’t know how, just take a look at the following guide and do as it says.
Note
-
Leawo Video Converter is built into Leawo Prof. Media as a module.
△ Step 1: Download Leawo Prof. Media

-
Leawo Video Converter
- Support video and audio conversion between 180+ formats
- Support iPhone, iPad, and all portable devices video and audio conversion
- Convert videos & audios in 6X higher speed without quality loss
- Create photo slideshow on Mac for keeping precious memory
- Personalizing video output with internal video editor and set video and audio parameters freely
- 2D to 3D conversion
△ Step 2: Import source FLV video
Launch Leawo Prof. Media and open "Convert" module. In Leawo Video Converter, you have two different ways to import the source FLV video file. One is by clicking on the “Add Video” button at the upper left corner of the interface, and the other is by directly dragging and dropping the source FLV video file onto the main interface.

△ Step 3: Set output format
As you can see from the area before the green “Convert” button, Leawo Video Converter has the “MP4 Video” set as the default output video format, which is a great format for Twitch so it’s suggested that you keep that format for output. If you want to change the output format, simply click on the “MP4 Video” area, choose “Change”, and find your desired output video format in the format selection window.

△ Step 4: Further editing
As mentioned in the above, Leawo Video Converter provides various video customization potions for you to freely edit your output video. You can call out the video editing panel by clicking the “Edit” icon next to your imported video. On the panel, you can do various kind of editing to the video.

△ Step 5: Start converting
As the final step, click the green “Convert” button to call out the convert settings panel. On the panel, designate an output directory, and then click the “Convert” icon to start converting FLV video for Twitch immediately. After the conversion, you can then easily upload the video to Twitch.

Part 2. Upload FLV to Twitch with Koyote Free Video Converter
Koyote Free Video Converter is another easy-to-use video converter tool that can help you convert the FLV video for uploading to Twitch. This video converter supports a wide range of video format and has a pretty decent output result. The program has a traditional yet intuitive user interface, allowing you to easily import your FLV videos and convert them to most of the popular video formats in a short time. However, this converter is developed mainly based on Windows 7, so it might have some compatibility problems on other operating systems. But in all, it’s still a great choice to use Koyote Free Video Converter to convert your FLV videos and upload them to Twitch. Here is how to do that.

Steps:
Step 1: Download and install Koyote Free Video Converter on your Windows computer.
Step 2: Click “Add files” to import your source FLV videos into the program.
Step 3: Then choose an output format, preferably MP4, in the “Output format” section, and then click the “Convert Video” button to start converting the video right away. After the conversion, simply go to Twitch and upload the converted video.
Part 3. Upload FLV to Twitch with Syncios iPod Video Converter
Don't let the name of the program mislead you. Syncios iPod Video Converter can not only convert videos for iPod, but also convert various videos to most popular formats that you could possibly need for all kinds of devices, programs, or platforms like Twitch. Syncios iPod Video Converter features a simple and beautiful user interface and is really easy to convert and FLV video for Twitch. Besides that, Syncios iPod Video Converter also features other useful tools to let you use your Apple devices in a more productive way. You can use it to manage your device, make a ringtone, backup your iTunes items, and do more operations about your Apple device, as well as you are Apple account. But if you only need to convert an FLV video for Twitch, this video converter can also do a great job. Now let me show you how to use Syncios iPod Video Converter to convert FLV before you can upload it to Twitch.

Steps:
Step 1: Download, install and launch Syncios iPod Video Converter.
Step 2: Click “Toolkit” in the ribbon, then open “Video Converter”.
Step 3: On the popped-out window, click “Add” to import your source FLV video file, and then choose “MP4” on the right and set it as the output format.
Step 4: Finally, click “Convert” to start converting your FLV video for Twitch.
Part 4: Upload FLV to Twitch with fConvert
Unlike the video converter tools introduced above, fConvert is one of the online video converter tools that can help you convert your FLV video for Twitch without downloading or installing any additional program on your computer. Online video converter tools like fConvert may not as powerful as professional video converter programs, but they win for their availability and simplicity. As one of the most famous online media converter services, fConvert can convert various video files, as well as other files like documents, E-books, audios, archive files, images and more. Now here is how to use fConvert to convert your FLV video for Twitch online.
Steps:
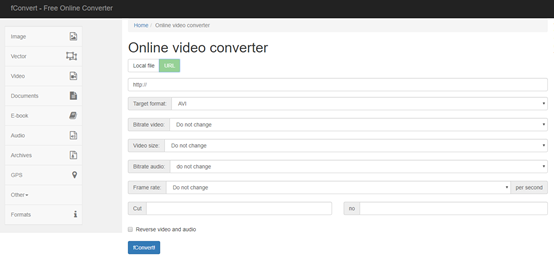
Step 1: Visit the official website of fConvert.
Step 2: Click “Video” in the left bar. You have two ways to upload your source video. You can click the “Local file” button and upload a file from your computer, or click the “URL” button to upload an online video from a URL address.
Step 3: After uploading the source file, you can set target format, video size, frame rate and more parameters below. When all the settings are done, click the “fConvert!” button to start converting your FLV video for Twitch.
Part 5: Upload FLV to Twitch with SUPER
The last FLV to Twitch converter program in today’s recommendation is called SUPER (Simplified Universal Player Encoder & Recorder) Video Converter, or SUPER ©. SUPER Video Converter is a video converter program developed by eRightSoft. As a free, professional and efficient video converter program, SUPER provides many advanced video and audio encoding options, so it may not look user friendly or attractive at first glance. but once you get used to the user interface, you will realize that it does a great job in various video or audio processing tasks and converting FLV to Twitch is only one of them. If you are confused by the user interface of SUPER, here is a simple guide for your reference so you can get started with it faster.

Steps:
Step 1: Download and install SUPER Video Converter on your computer.
Step 2: Launch the program. To import your source FLV video file, just drag and drop the file into the program.
Step 3: At the top of the program interface, there is a dropdown button under the “Select Output Container” text. Click on the button and choose “MP4”, or other Twitch supported format as the output container format.
Step 4: You can also change the settings for video and audio encoding method. When you are ready. Click the “Encode” button at the bottom to start converting your FLV video. Once it’s done, you can then upload the converted video to Twitch easily.
Extension: How to Download Twitch Videos?
In addition to upload FLV to Twitch, if you also want to download videos from Twitch, you can use CleverGet Twitch Downloader. It is an excellent tool for avid Twitch users who want to download their favorite game live streams, VODs, or other content for offline viewing. By using CleverGet Twitch Downloader, you can download both live streaming videos and VODs (Video-On-Demand) without any restrictions. You can download these videos in various video qualities, ranging from 360p to 4K. With an intuitive and easy-to-use interface, you can quickly download Twitch videos in just a few clicks.
Step 1: Download CleverGet Twitch Downloader
Click the button below to download and install CleverGet Twitch Downloader on your computer.

-
CleverGet Twitch Downloader
- Download Live Videos And Past Broadcasts from Twitch Conveniently
- Download VODs from Twitch Conveniently, be It Highlights or Clips.
- Up to 1080P HD 60fps Video Downloading with 320kbps Audio Quality
- Smarter Downloading Settings
- Provide Precise Video Info
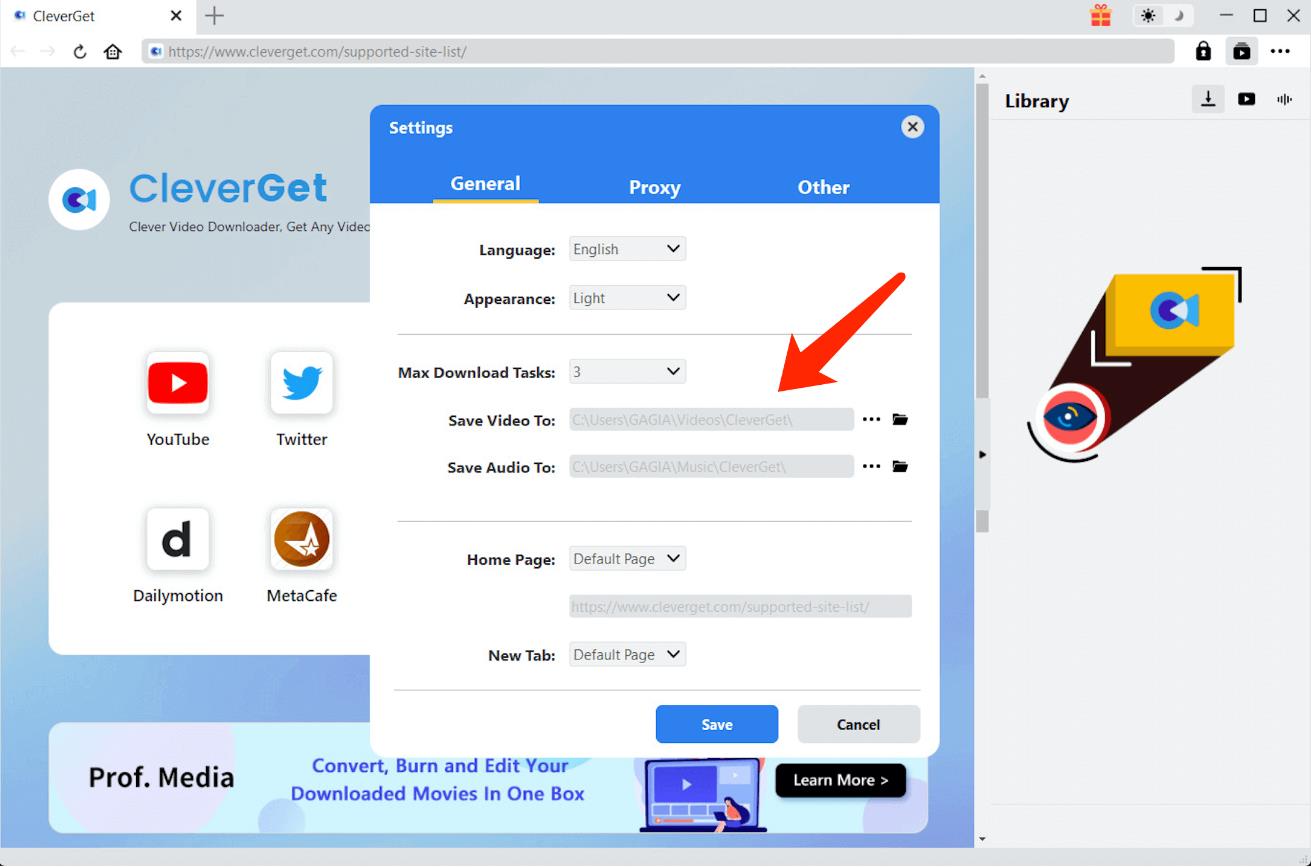
Step 2: Change output directory
Open "Setting" panel from the top-right three-dot icon, and click the "Save Video To" box to change output directory.
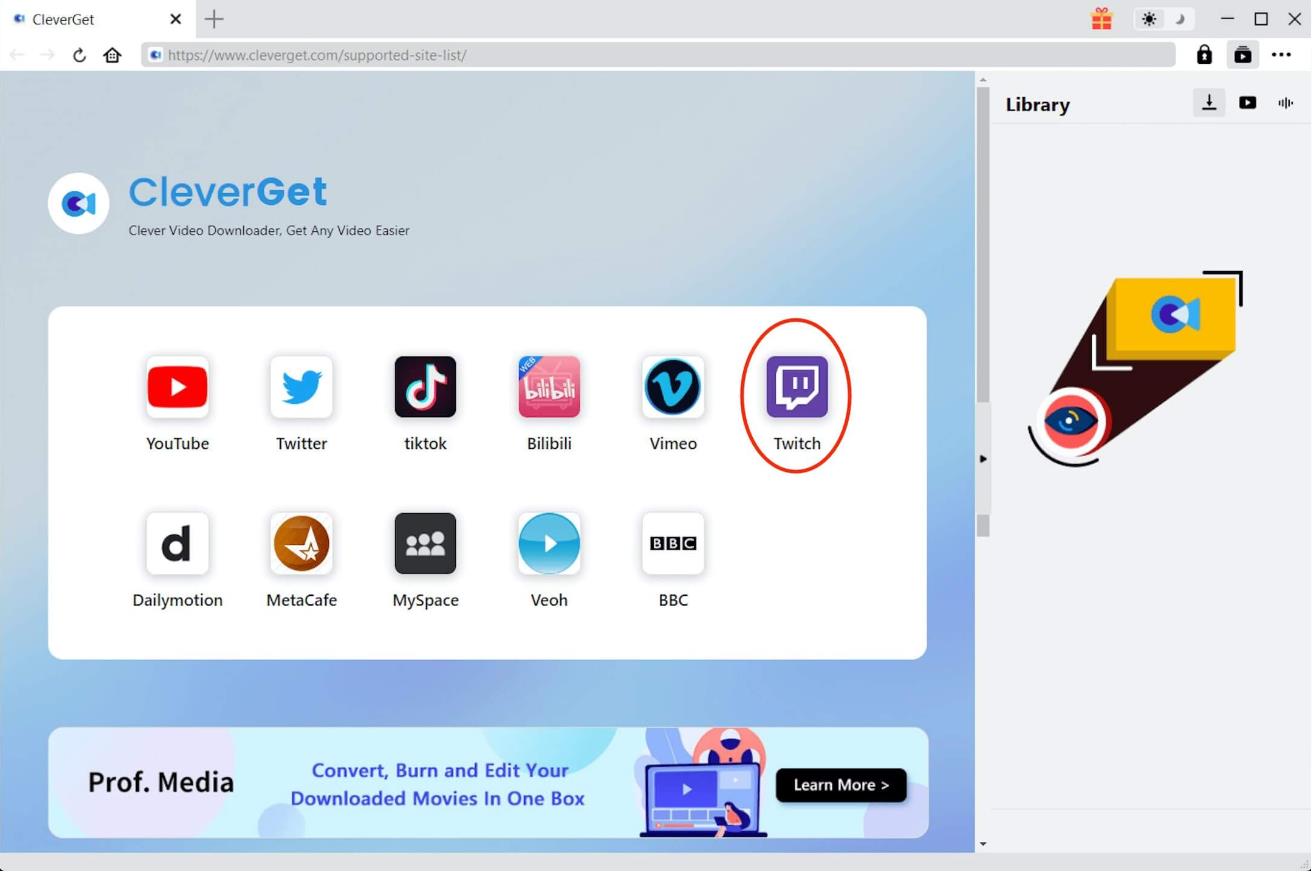
Step 3: Find target Twitch video
You can easily find the target Twitch video with the built-in browser. Once the video is played, CleverGet will start to parse automatically.
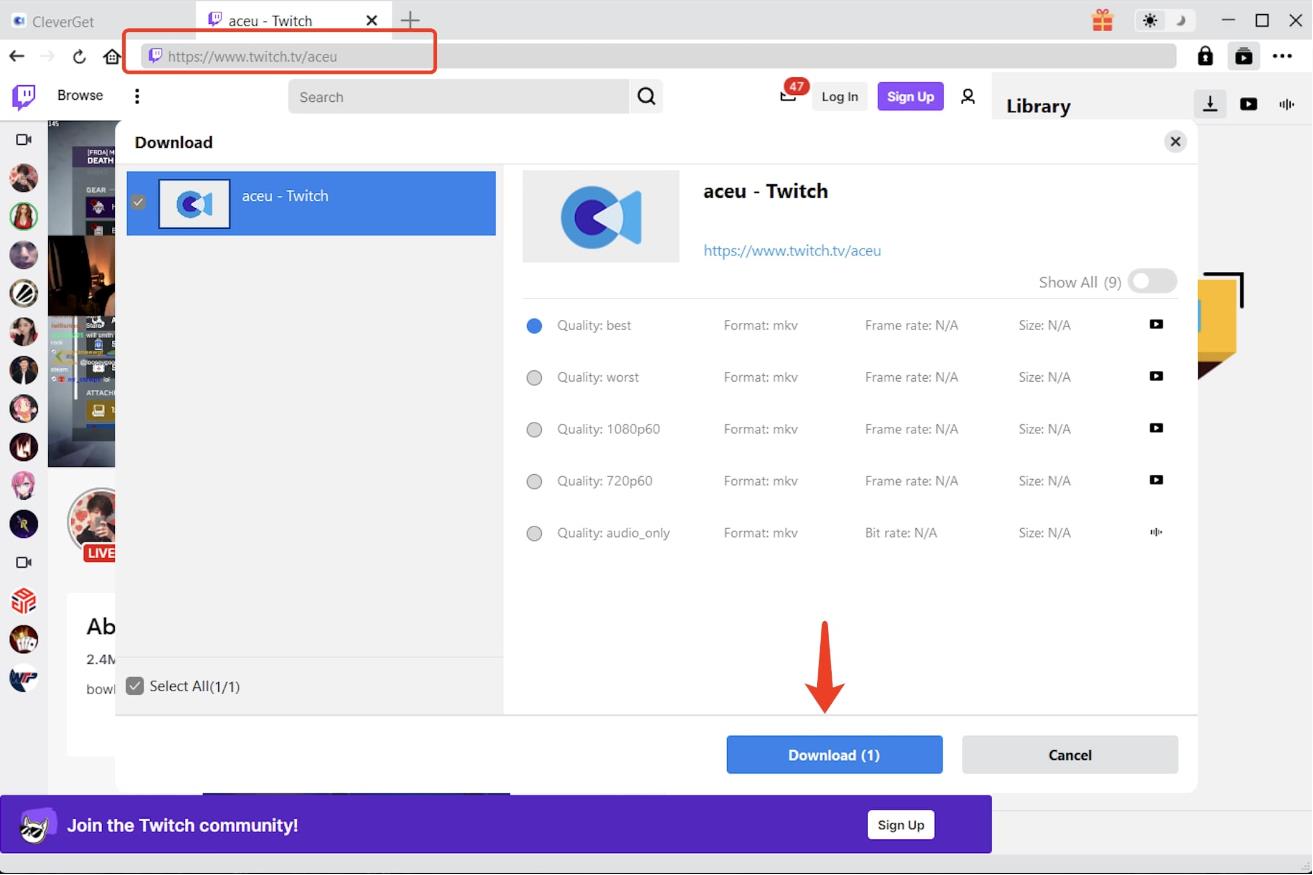
Step 4: Download Twitch video
Choose the quality and format you want to download from the pop-up window, and click the "Download" button to start downloading Twitch video.
 Nov. 03, 2020 by


 Prof. Media
 Blu-ray Ripper
 Blu-ray Copy
 iOS Data Recovery
 [12/29/23] MAX Downloader V15.0.0
 10,000,000 people are using Leawo!
 All Transactions are protected!
 30-Day Money Back Guarantee!