Whenever a new iPhone is launched, a new feature of iPhone camera will be introduced by Apple. Live Photos is a new camera feature which can be used on iPhone 6s or the newer version. A live photo is consisted of a video in 1.5 seconds, the photo and the additional video in another 1.5 seconds. The ultimate photo effect is that there will show a standard photo at your first glance, then the entire clip in 3 seconds will be shown when you touch the photo. The feature of Live Photo has been enabled by default, but it can be turned off in a simple way.
Part 1: What is live photo?
Live Photo is an iPhone camera feature which is able to capture movements and sounds before and after the taken photo, so the photo effect is similar to video creating. But Live Photo is not video file, it looks like the animated GIF. Live Photo has the capability of stitching together all the photos which are taken before and after, and then the photos will be formed into a fluent animation which works about 3 seconds. Live Photos can be saved with the audio simultaneously.
Live Photo can be viewed on all iOS devices, however it is not available on the devices which are not running on iOS system. That means Live Photo is viewable for any Apple users, no matter which iOS version their Apple devices are running on. To view the Live Photo with movements, users just need to tap on the photo. Live Photo can also be set as a background on the device’s home or the locked screen. In the iOS 9.1 version system, when users stop recording, this operation can be detected by Live Photos according to the lowering of the camera. Therefore, Live Photo would not capture anything unexpected which is not users’ need.
Part 2: How to take a live photo
A live photo can be taken in a simple way, you just need to follow the steps as below:
1. Launch Camera app on your iPhone.
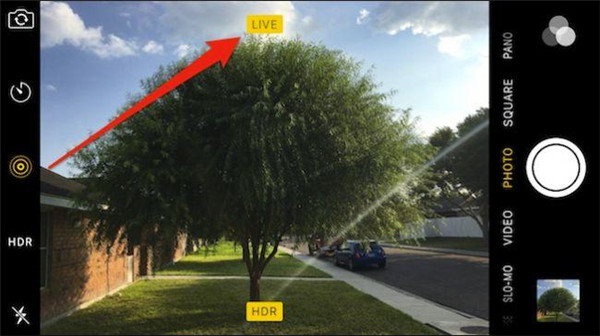
2. Find the three-dot icon from the top center of the screen and confirm that it has been enabled, note that it will be lighted up when it is enabled.
3. Your photos can be taken in a normal way.
Part 3: How to turn off live photos permanently on iPhone X/8/7/6
If you have made a decision in turning off Live Photo permanently and want this Live Photo feature to be disable by default, you may need to learn some tricks to perform this task. Live Photo is turned on by Camera app by default whenever you enter the app, although this option has been disabled in the last time when the Camera app is used. However, a way of preventing the Camera app from the feature of turning on Live Photo is provided by Apple. The following tutorial will guide you on how to turn off live photo on iPhone in specific ways.
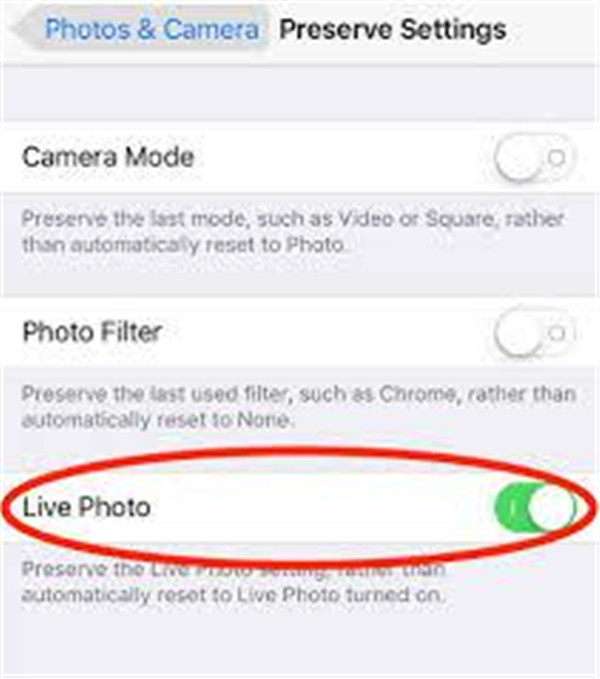
1. Tap on Settings on your iPhone.
2. Tap on Camera.
3. Choose Preserve Settings.
4. Toggle Live Photo switch button to off or white position.
5. Enter Camera app and then disable the Live Photo feature by tapping on the three-dot icon, then the icon will not be lighted up.
6. As the off option has been chosen to preserve in the above steps, Live Photo now is disabled permanently by default.
Part 4: How to disable live photo features in a photo you’ve already taken
To turn off live photos iPhone will be a great help for the photos you have already taken and found some embarrassing sound or movement with it. Once the turning off feature has been done, live photos will be similar to the regular photos for sharing.
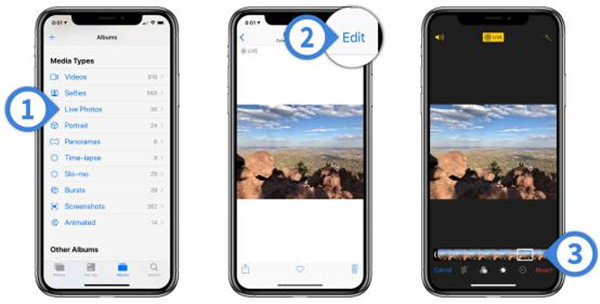
Here is the guidance of how to turn off live photos on iPhone.
1. Go to the Photos app to open the photos that you need to edit, or you can go through the Camera app to finish this operation. Tap on “Edit” on the right upper corner.
2. If you just want to disable the sound and preserve the animation of Live Photos, tap on icon which looks like yellow speaker on the left top corner. Then this icon will be turned White and display a white slash across on it.
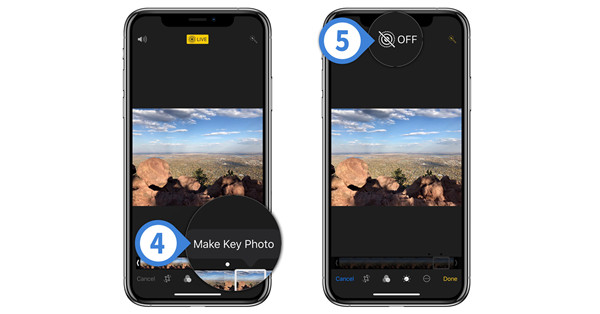
3. If you want to disable all the Live Photos features, tap on the yellow icon button “LIVE” on the top. After that, all the photos will act as the same as the regular photo every time you send them for sharing with your friends.
But unluckily, the information of Live Photo has not been deleted yet, Live Photos still are existing and take up much space of your iPhone. That means reactivating animations is fairly easy to be done on the Live Photo if you want to reuse the Live Photos in the later days, you just need to repeat the steps mentioned above and tap on Live button again.
Extra: How to back up live photos to computer’ve already taken
To back up live photos to your computer, here we will introduce you two simple methods to perform this task, one is to back up live photos via Leawo iTransfer, and the other is to go through iTunes.
Back up live photos via Leawo iTransfer
Leawo iTransfer is a useful tool providing great solution to the transfer issue between iOS devices and computer. 12 types of files are supported by iTransfer, such as photos, music, apps, and more. Moreover, it is a perfect backup tool for iOS devices to computer. iTransfer is also an excellent software in managing music, playlists, notes, contacts and more can be well-managed. Due to its advanced technology of scanning and transferring, transfer task can be finished in a safe and rapid way with no data loss. Here we will guide you on how to back up live photos to computer via Leawo iTransfer.
Leawo iTransfer
☉ Transfer up to 14 kinds of data and files without iTunes.
☉ Support the latest iOS devices like iPhone X, iPhone XR, etc.
☉ Play back, view, and delete data and files on iOS devices.
1. Run Leawo iTransfer on your computer and then connect your iPhone to computer with USB cable. Your iPhone will be recognized and detected by this software and the library of iPhone will be displayed in the left sidebar of iTransfer window.
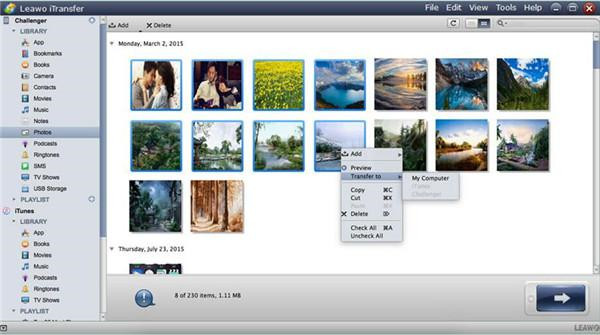
2. Click on library> Photos, then all photos from your iPhone will be shown in the right part of the window. You can select the photos you want to back up and then click on the transfer button on the right bottom.
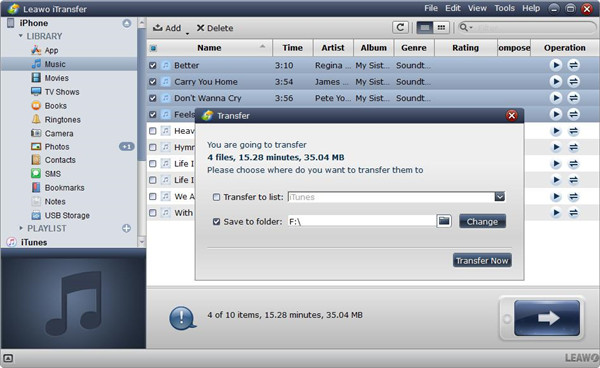
3. Once you have selected the photos you need to back up, a dialog will pop up and ask you to choose the output directory for the backed up photos. Then you need to check the option “Save to Folder” in this dialog and tap on the button “Change” to select the location to save the target photos on your computer. After that, click on the button Transfer Now to begin backing up your live photos to computer.
Back up live photos to computer via iTunes
Using iTunes to back up live photos from your iPhone to computer is also a great solution to get your live photos backed up to prevent any data loss. Photos can be synced with iTunes between iPhone and the computer. Many users are wondering what they should do to back up live photos to computer from iPhone via iTunes, here you can follow the tutorial as below to back up live photos to computer in iTunes. Note that when you decide to use iTunes to back up live photos to your computer from your iPhone, make sure that the followings have been done by you before backing up live photos to computer with iTunes.
* Get your iPhone updated to the latest iOS system version.
* Get your Windows computer to the latest Windows 10 version.
* Make sure that same Apple ID is used in your all iOS devices.
* Get your iTunes updated on your Windows computer.
1. Connect your iPhone to the computer via USB cable and then run iTunes on computer as well.
2. Choose your iPhone device icon on the top of the iTunes window.
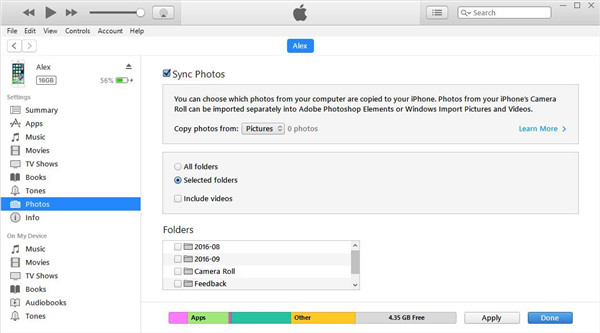
3. Click on “Photos” in the left side bar of iTunes window.
4. Check the square box beside Sync Photos, then select the target folder or app in which you want to get your photos synced from.
5. Choose the option “Sync all photo and albums”, you also can choose the option “include Videos” to make the videos in your iPhone synced with iTunes.
The great feature of Live Photos enriches our lives in a simple way, sound and movements can be captured by the Live Photos so that the photos will become more memorable and valuable for the important moment in our life. This article teaches us how to turn off live photos you have already taken or permanently if you don’t need it. But you should remember to back up all your memorable live photos in case of losing them accidentally. Backing up your live photos would be a great solution to prevent any data loss if you want to find back some important live photos one day. Leawo iTransfer is highly recommended to back up any data on your iPhone, because it is easy-to-use and works in a safe and effective way.

